---
title: "How to Set Up Flask MySQL Connection: Explained With Code"
description: "Key Takeaways Method 1: Setting Up Flask MySQL Database Install & configure driver – Add flask_mysqldb and set host, user, password, DB in app.config.Open cursor – Get a cursor from mysql.connection, run queries, commit, then close.Handle routes – On form POST, read submitted fields, insert into"
canonical_url: https://hevodata.com/learn/flask-mysql/
published_at: 2023-04-28T13:09:00+05:30
updated_at: 2026-03-24T11:47:56+05:30
author: "Davor DSouza"
tags: ["ETL", "Flask MySQL", "MySQL", "Python Flask", "RDBMS"]
categories: ["Data Integration", "MySQL"]
word_count: 2533
content_type: post
---
# How to Set Up Flask MySQL Connection: Explained With Code
> Key Takeaways Method 1: Setting Up Flask MySQL Database Install & configure driver – Add flask_mysqldb and set host, user, password, DB in app.config.Open cursor – Get a cursor from mysql.connection, run queries, commit, then close.Handle routes – On form POST, read submitted fields, insert into
**Key Takeaways**
**[Method 1: Setting Up Flask MySQL Database](#m1)**
Install & configure driver – Add flask_mysqldb and set host, user, password, DB in app.config.
Open cursor – Get a cursor from mysql.connection, run queries, commit, then close.
Handle routes – On form POST, read submitted fields, insert into MySQL via cursor, commit.
Launch app – Run Flask and navigate to your form endpoint.
**[Method 2: Using PyMySQL to Integrate MySQL Database with Flask App](#m2)**
Install & configure ORM – Add PyMySQL and flask_sqlalchemy; set SQLALCHEMY_DATABASE_URI.
Define model – Create a class subclassing db.Model with your table’s columns.
Create schema – Call db.create_all() to generate tables.
CRUD operations – Use the model’s query interface and session commits for reads and writes.
Flask is a lightweight **web application framework** known for its simplicity and elegance. Unlike some other frameworks, Flask allows developers the freedom to choose the tools and libraries that best suit their requirements.
Additionally, Flask is well-suited for **single-page** web applications, utilizing side tabs to present different content sections seamlessly. Developers often use Flask with MySQL to create dynamic and **data-driven** websites.
This blog is tailored to anyone aspiring to create dynamic websites using the **Python Flask MySQL** combination. By the end of this article, you will have gained a moderate level of expertise in harnessing the power of Python and Flask MySQL connections.
**Simplify MySQL Data Analysis with Hevo’s No-code Data Pipeline**
[Hevo Data](https://hevodata.com/) is a No-code Data Pipeline that offers a fully managed no-code platform to set up data integration from **MySQL** and [150+ Data Sources](https://hevodata.com/integrations/pipeline/) (including** 60+ Free Data Sources**)and will let you directly load data to a Data Warehouse or the destination of your choice. Its fault-tolerant architecture makes sure that your data is **secure**and **consistent.** **Hevo** offers:
- Both **pre-load** and**post-load transformations**to ensure your data is always analysis ready.
- **User friendly interface** with drag-and-drop features.
- **End-to-End encryption** ensures your data is always safe.
- Support teams for **round the clock support.**
By incorporating Hevo, you can see why customers like [**Slice**](https://hevodata.com/success-stories/slice/) and [**Harmoney**](https://hevodata.com/success-stories/harmoney/) have upgraded to a **powerful data and analytics stack**!
## Setting Up Flask MySQL Database
Connecting **Flask with MySQL**is essential for creating dynamic and data-driven web applications.
Here are the **four steps** to get started with Flask MySQL Database Connection:
- [Flask MySQL Step 1: Connecting a Flask Application to a MySQL Database](#51)
- [Flask MySQL Step 2: Configuring the MySQL Connection Cursor](#52)
- [Flask MySQL Step 3: Programming a Flask Application](#53)
- [Flask MySQL Step 4: Putting the Code into Action](#54)
### Step 1: Connecting a Flask Application to a MySQL Database
Before attempting to connect **Flask to MySQL**, ensure the MySQL server is running and accessible to avoid any potential connection issues.
The following is the procedure we use to connect Flask MySQL
```
from flask import Flask,render_template, request
from flask_mysqldb import MySQL
app = Flask(__name__)
app.config['MYSQL_HOST'] = 'localhost'
app.config['MYSQL_USER'] = 'root'
app.config['MYSQL_PASSWORD'] = ''
app.config['MYSQL_DB'] = 'flask'
mysql = MySQL(app)
```
- **Imports**:
- `Flask` and `render_template`, `request`: Used to handle web requests and render HTML templates.
- `MySQL` from `flask_mysqldb`: Provides MySQL database connectivity for Flask.
- **Initialize Flask App**: `app = Flask(__name__)` creates the Flask application.
- **Configure MySQL Connection**:
- `app.config['MYSQL_HOST']`: Sets MySQL host to `'localhost'`.
- `app.config['MYSQL_USER']`: Specifies `'root'` as the MySQL username.
- `app.config['MYSQL_PASSWORD']`: Sets an empty string as the MySQL password.
- `app.config['MYSQL_DB']`: Defines the database to use (`'flask'` in this case).
- **Initialize MySQL**: `mysql = MySQL(app)` initializes the MySQL connection, making it available for use within Flask routes.
### Step 2: Configuring the MySQL Connection Cursor
We can't interact with **DB tables** with the setup described above. We'll need something called a **cursor** for that.
Cursor thus provides a means for Flask to **interact** with the database tables. It can scan the database for **data**, execute**SQL queries**, and delete **table records.**
The cursor is employed in the following manner:
```
mysql = MySQL(app)
#Creating a connection cursor
cursor = mysql.connection.cursor()
#Executing SQL Statements
cursor.execute(''' CREATE TABLE table_name(field1, field2...) ''')
cursor.execute(''' INSERT INTO table_name VALUES(v1,v2...) ''')
cursor.execute(''' DELETE FROM table_name WHERE condition ''')
#Saving the Actions performed on the DB
mysql.connection.commit()
#Closing the cursor
cursor.close()
```
- **Initialize MySQL Connection**: `mysql = MySQL(app)` creates a connection to the MySQL database.
- **Create Cursor**: `cursor = mysql.connection.cursor()` opens a cursor, allowing SQL commands to be executed.
- **Execute SQL Statements**:
- `CREATE TABLE`: Creates a new table with specified fields.
- `INSERT INTO`: Inserts values into a table.
- `DELETE FROM`: Deletes records that match the specified condition.
- **Commit Changes**: `mysql.connection.commit()` saves the changes made by the SQL statements.
- **Close Cursor**: `cursor.close()` closes the cursor to free up resources.
Because MySQL is not an**auto-commit DB,** we must manually commit, i.e. save the changes/actions performed by the **cursor execute** on the DB.
### Step 3: Programming a Flask application
Now we'll create a small Flask application that will store user-submitted data in the **MySQL DB Table**. Take a look at the following Application Code:
```
from flask import Flask,render_template, request
from flask_mysqldb import MySQL
app = Flask(__name__)
app.config['MYSQL_HOST'] = 'localhost'
app.config['MYSQL_USER'] = 'root'
app.config['MYSQL_PASSWORD'] = ''
app.config['MYSQL_DB'] = 'flask'
mysql = MySQL(app)
@app.route('/form')
def form():
return render_template('form.html')
@app.route('/login', methods = ['POST', 'GET'])
def login():
if request.method == 'GET':
return "Login via the login Form"
if request.method == 'POST':
name = request.form['name']
age = request.form['age']
cursor = mysql.connection.cursor()
cursor.execute(''' INSERT INTO info_table VALUES(%s,%s)''',(name,age))
mysql.connection.commit()
cursor.close()
return f"Done!!"
app.run(host='localhost', port=5000)
```
- **Initialize Flask App**: Creates a Flask application.
- **Configure MySQL**: Connects to a MySQL database (`flask`) with credentials.
- **Form Route**: Renders a `form.html` template at `/form`.
- **Login Route**:
- `GET`: Prompts for login via a form.
- `POST`: Captures `name` and `age` from the form, inserts them into `info_table`, and confirms the action.
- **Run App**: Starts the app on `localhost` at port `5000`.
When the user submits the data, the cursor inserts it into the MySQL DB.
Command to be executed Info table is the name of my table.
The form.html will be as follows:
```
```
- **Form Definition**:
- `action="/login"`: Submits the form data to the `/login` route.
- `method="POST"`: Uses the POST method to send data.
- **Input Fields**:
- **Name Input**:
- ``: Text input for the user’s name.
- **Age Input**:
- ``: Input for the user’s age (note: "integer" should typically be "number" for better browser support).
- **Submit Button**:
- ``: A button to submit the form.
### Step 4: Putting the Code into Action
- Now start the server and navigate to **"/form**"
- Enter the information and press the **Submit** button.
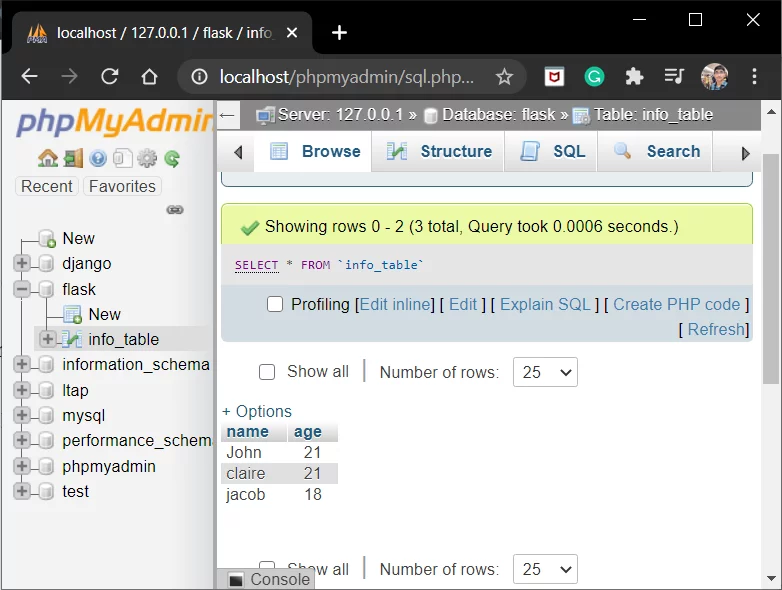
- Let's take a look at it in the phpMyAdmin web interface now.
*[Image Source](https://www.askpython.com/wp-content/uploads/2020/09/php.png.webp)*
This concludes the setting up of Python Flask MySQL database connection.
## Using PyMySQL to Integrate MySQL Database with Flask App
### Step 1: Install the PyMySQL package
The `PyMySQL` package will allow us to connect to and interact with MySQL databases from our Flask app. To install the `PyMySQL` package, we can use the following command:
```
pip install PyMySQL
```
### Step 2: Create a MySQL database
We will create a MySQL database named books_db using the PyMySQL library and the `**CREATE** **DATABASE**` statement. We will also check if the database exists on the MySQL server using the `**SHOW** **DATABASES**` statement. To do this, we can use the following Python script:
```
import pymysql
hostname = 'localhost'
user = 'root'
password = 'your_password'
db = pymysql.connections.Connection(
host=hostname,
user=user,
password=password
)
cursor = db.cursor()
cursor.execute("CREATE DATABASE IF NOT EXISTS books_db")
cursor.execute("SHOW DATABASES")
for databases in cursor:
print(databases)
# Closing the cursor and connection to the database
cursor.close()
db.close()
```
### Step 3: Configure the Flask app to connect to the MySQL database
We will configure the Flask app to connect to the MySQL database using the app.config dictionary and the `SQLALCHEMY_DATABASE_URI` key. We will also import the SQLAlchemy module and create an instance of the SQLAlchemy class with the Flask app as an argument. To do this, we can use the following Python code:
```
from flask import Flask
from flask_sqlalchemy import SQLAlchemy
app = Flask(__name__)
# Configuring the Flask app to connect to the MySQL database
app.config['SQLALCHEMY_DATABASE_URI'] = 'mysql+pymysql://root:your_password@localhost/books_db'
app.config['SQLALCHEMY_TRACK_MODIFICATIONS'] = False
# Creating an instance of the SQLAlchemy class
db = SQLAlchemy(app)
```
### Step 4: Define a model for the database table
We will define a model for the database table using the SQLAlchemy declarative base and the **db**.Model class. We will specify the table name, the columns, and their data types using the **db**.Column class. We will also define a constructor method and a **`__repr__`** method for the model. To do this, we can use the following Python code:
```
# Defining the Book model
class Book(db.Model):
# Specifying the table name
__tablename__ = 'books'
# Specifying the columns and their data types
id = db.Column(db.Integer, primary_key=True)
title = db.Column(db.String(100), nullable=False)
author = db.Column(db.String(50), nullable=False)
genre = db.Column(db.String(20), nullable=False)
# Defining the constructor method
def __init__(self, title, author, genre):
self.title = title
self.author = author
self.genre = genre
# Defining the __repr__ method
def __repr__(self):
return f''
```
### Step 5: Create the database table
We will create the database table using the `**db**.create_all()` method. This method will create all the tables defined by the models in the database. We will also check if the table exists on the MySQL server using the `**SHOW** **TABLES**` statement. To do this, we can use the following Python script:
```
from app import Book, db
# Creating the books table in the database
db.create_all()
# Checking if the table exists on the MySQL server
cursor = db.cursor()
cursor.execute("SHOW TABLES")
for tables in cursor:
print(tables)
# Closing the cursor
cursor.close()
```
## Setting Up MySQL Server
In this section, we will download and establish our MySQL server to be able to establish Python Flask and MySQL integration.
- [XAMPP Installation on a Server](#41)
- [Fire up Apache and MySQL](#42)
- [Installing the Flask MySQL library](#43)
### XAMPP Installation on a Server
- To use MySQL, we now need a software tool to handle**MySQL administration** over the web.
- You can use **phpMyAdmin**. You can also use other software if you are familiar with it.
- The **PHPMyAdmin** web interface is provided by the Xampp software. You can get XAMPP from the [official website.](https://www.apachefriends.org/download.html)
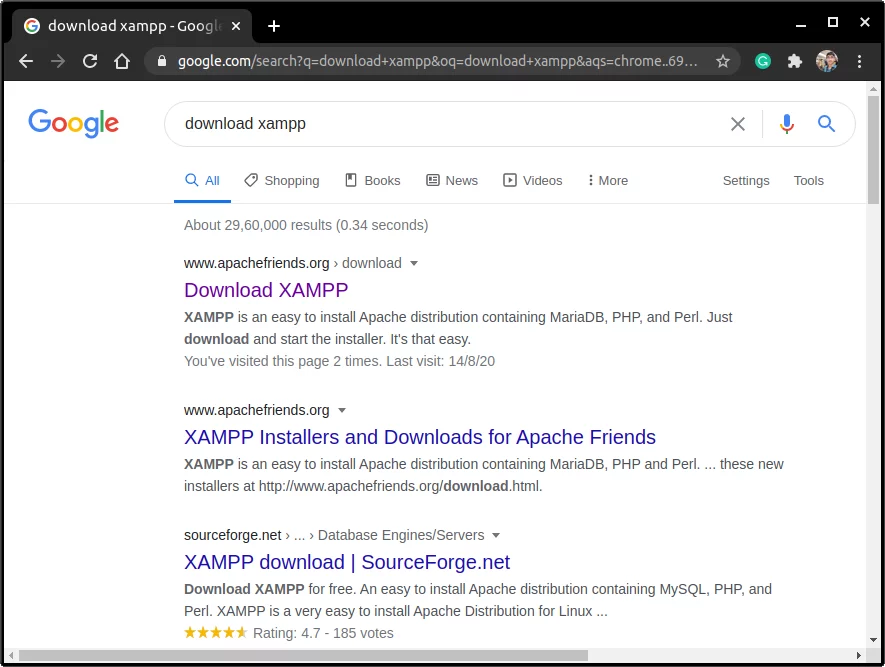
- Alternatively, you can go directly to Google and search for download Xampp. The first link alone will suffice!!
- Download the version that is appropriate for your**operating system**and **architecture**.
*[Image Source](https://www.askpython.com/wp-content/uploads/2020/08/xampp-1.png.webp)*
### Fire up Apache and MySQL
Start the following two processes once XAMPP has been installed and loaded:
- The **Apache Webserve**r is used to serve HTTP requests.
- **MySQL Server** – the database server

*[Image Source](https://www.askpython.com/wp-content/uploads/2020/08/xampp-2.png.webp)*
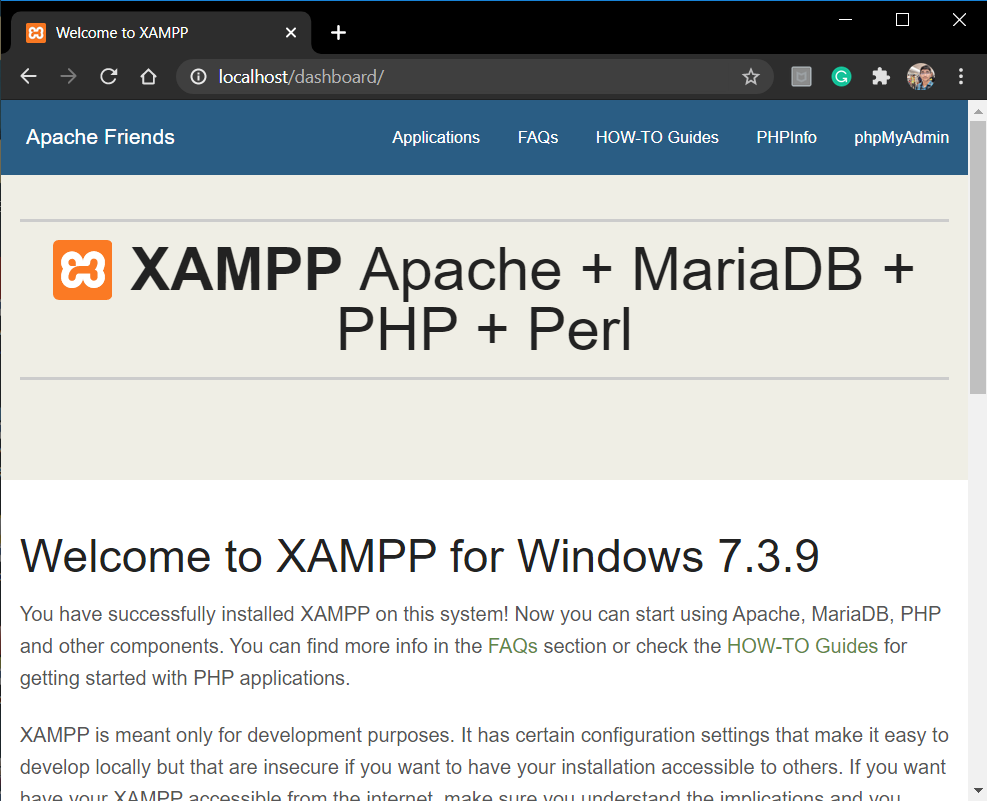
- Keep in mind that the default MySQL port is **3306**. Go to https://localhost in your browser now.
*[Image Source](https://www.askpython.com/wp-content/uploads/2020/08/xampp-host-webpage.png)*
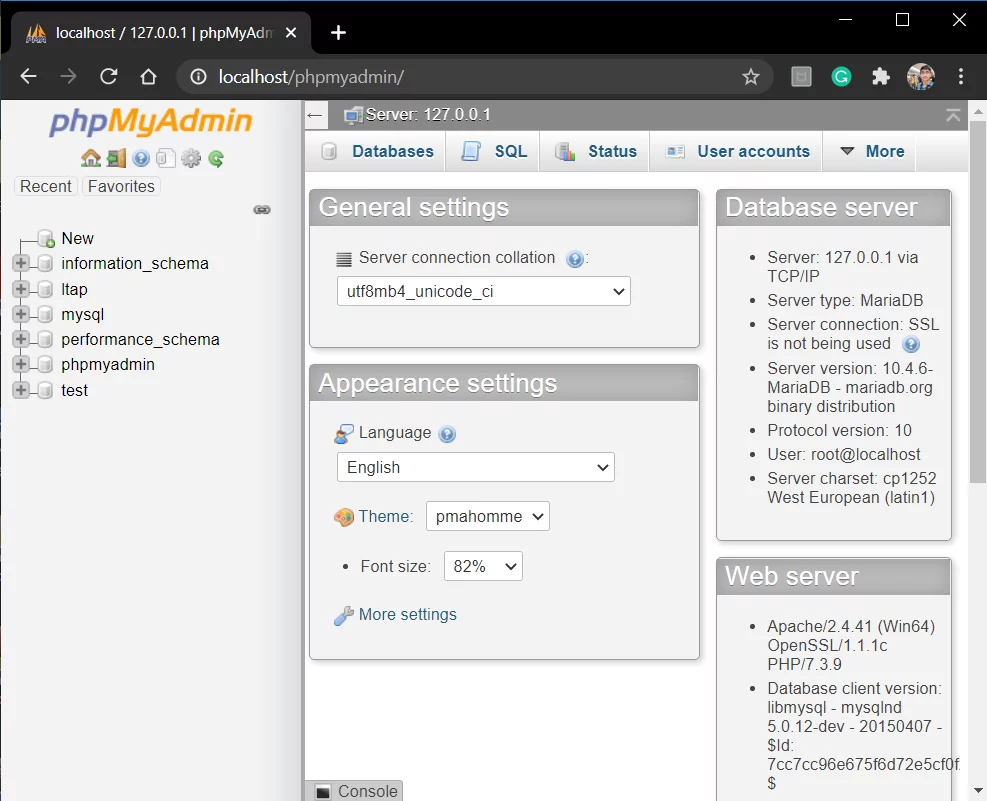
- This is the Xampp Host webpage. To access the PHP web interface, click on **phpMyAdmin** in the upper right corner.
*[Image Source](https://www.askpython.com/wp-content/uploads/2020/08/phpmyadmin-1.png.webp)*
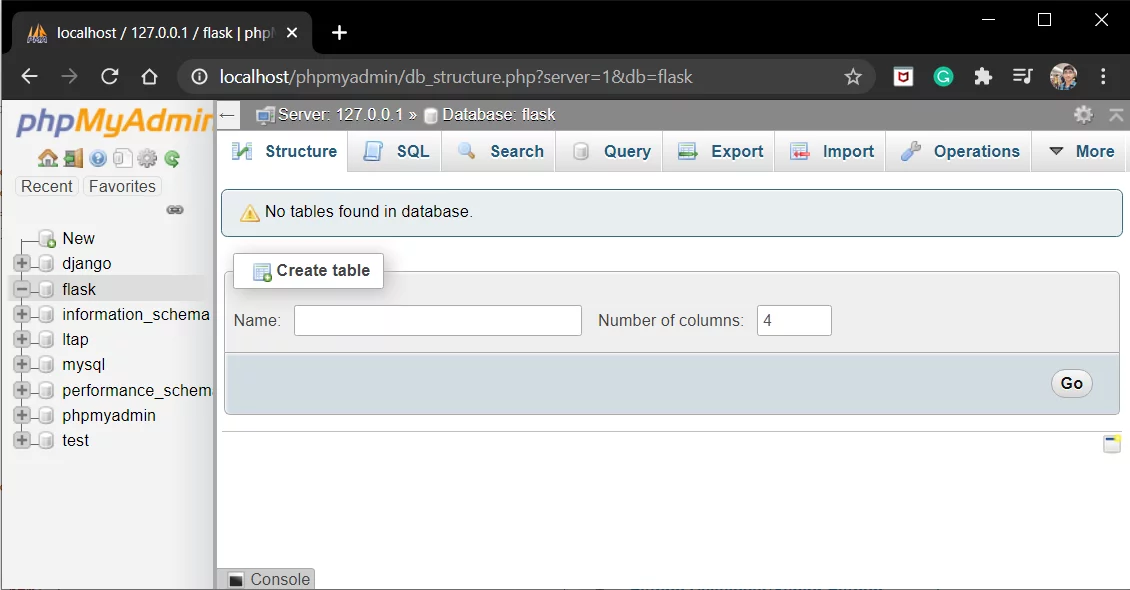
- Here, by clicking new in the **left column**, you can create a**new database**.
- Maintain a suitable **name** for the database.
*[Image Source](https://www.askpython.com/wp-content/uploads/2020/09/flask.png.webp)*
- Create a table in the database. Enter the table name in the space provided, as shown in the image, and press**Go.**
You can also take a look at how you can easily [Develop RESTful Flask APIs with Python](https://hevodata.com/learn/flask-api/) step-by-step.
### Installing the Flask MySQL library
When it comes to integrating a MySQL database into a Flask web application, the **Flask MySQLdb** connector is a great choice. To use this connector, you'll need to install the package using the following command:
```
pip install flask_mysqldb
```
**Usage**
Initialize the extension :
```
from flaskext.mysql import MySQL
mysql = MySQL()
mysql.init_app(app)
```
Obtain a cursor :
```
cursor = mysql.get_db().cursor()
```
This will give you access to all the tools you need to connect your Flask application to a MySQL database. With Flask MySQLdb, you can easily perform database operations and manipulate data using SQL queries - making it an essential tool for any Flask developer.
## Benefits of Flask MySQL Connection
### Seamless Integration
MySQL integrates easily with Flask using libraries like Flask-MySQLdb or SQLAlchemy, enabling smooth interaction between the application and database.
### **Scalability**
MySQL supports large-scale applications, making it a reliable choice for Flask projects that expect growth in users or data.
### **Flexibility in Data Handling**
With support for complex queries, relationships, and transactions, MySQL provides flexibility for diverse application requirements.
### **High Performance**
MySQL is optimized for read-heavy applications, ensuring quick data retrieval and efficient handling of requests.
### **Open Source and Cost-Effective**
Being open-source, MySQL is a budget-friendly choice, especially for startups and small projects using Flask.
### **Wide Community Support**
A large community ensures easy access to tutorials, troubleshooting, and plugins for both Flask and MySQL. If you’re unfamiliar with setting up a Flask-MySQL connection, hiring an expert can save you significant time and effort.
There are many [Flask developers for hire](https://mobilunity.com/tech/hire-flask-developers/) who can assist in configuring the database, handling migrations, and optimizing queries for better performance.
1.
## Use Cases of Flask MySQL Connection
### **Blogging Platforms**
MySQL with Flask is ideal for building blogs where data such as posts, comments, and users need to be stored and retrieved efficiently.
### **E-commerce Websites**
It’s a popular combination for e-commerce apps to manage products, orders, and user accounts in a secure and scalable way.
### **Content Management Systems (CMS)**
Using Flask and MySQL, you can create CMS solutions that handle dynamic content, user roles, and workflows.
### **Data-Driven Dashboards**
Flask applications that rely on real-time or aggregated data can leverage MySQL for quick and reliable access to structured datasets.
### **API Backends**
MySQL serves as a robust backend database for Flask APIs, providing endpoints for mobile apps or third-party integrations.
#### You can also learn more about:
- [Azure MySQL to BigQuery](https://hevodata.com/learn/how-to-migrate-from-azure-mysql-to-bigquery/)
- [Azure MySQL to Databricks](https://hevodata.com/learn/how-to-load-data-from-azure-mysql-to-databricks/)
- [GCP MySQL to Snowflake](https://hevodata.com/learn/how-to-migrate-gcp-mysql-to-snowflake/)
- [MySQL to Snowflake](https://hevodata.com/learn/how-to-migrate-data-from-mysql-to-snowflake/)
1.
## FAQ on MySQL Database With Flask
### 1. Can I use MySQL with Flask?
Yes, you can use MySQL with Flask by using libraries like Flask-MySQL, Flask-SQLAlchemy, or PyMySQL. These libraries help you connect Flask to MySQL and manage database operations.
### 2. **Can we use SQL with Flask?**
Yes, you can use SQL with Flask through ORM libraries like SQLAlchemy or by directly using database connectors like sqlite3, PyMySQL, or psycopg2 for PostgreSQL.
### 3. Does Flask support NoSQL?
Yes, Flask supports NoSQL databases like MongoDB through libraries like Flask-PyMongo, allowing you to integrate NoSQL databases into your Flask applications.
#### References:
- [Flask-MySQL — flask-mysql 1.4.0 documentation](https://flask-mysql.readthedocs.io/en/stable/)