Tableau is one of the most popular Business Intelligence tools that allow you to create Interactive Charts, Reports, and Dashboards for making data-driven decisions. With Tableau, you can seamlessly analyze and visualize datasets that are imported into the Tableau workspace by utilizing the rich set of Templates and Widgets.
Tableau not only allows you to perform Data Visualization on imported datasets, but it also allows you to integrate with various Third-Party applications via Tableau-supported connectors or drivers for retrieving data from external data sources. One such external application that supports Tableau integration is Amazon Athena, which serves as an interactive query engine to analyze big data.
In this article, you will learn about Tableau, Amazon Athena, and how to connect Tableau to Amazon Athena via Tableau Athena Connector (JDBC driver).
Table of Contents
Prerequisites
A fundamental understanding of data visualization.
What is Tableau?
Developed by Pat Hanrahan, Christian Chabot, and Chris Stolte in 2003, Tableau is a Visual Analytics Platform that enables you to perform Data Visualization for making data-driven decisions. In other words, Tableau allows you to create Interactive Dashboards, Graphs, Charts, and Reports using built-in Templates and Widgets, making it more straightforward for anyone to understand data trends and patterns over time.
In addition, you can also connect Tableau to external Data Sources and Third-Party Applications via drivers and connectors for gaining meaningful insights into a variety of external datasets. Tableau can pull data from any platform with the supported drivers and connectors or extract data from any Data Source, including Excel, PDF, Oracle, and Amazon Web Services.
What is Amazon Athena?
Launched by Amazon in 2016, Amazon Athena is a serverless interactive query service that allows you to easily analyze data present in Amazon’s web-based storage service, Amazon S3 (Simple Storage Service). In other words, you can seamlessly analyze and process data present in the Amazon S3 platform by executing simple SQL queries in Amazon Athena console.
Furthermore, Amazon Athena is a highly scalable and fault-tolerant service that enables you to run a colossal amount of queries in parallel across clusters, thereby achieving high speed and accuracy. Since Amazon Athena is a serverless query service, you do not need to set up the cluster or manage the infrastructure. Amazon Athena bills you only for the queries you run on the console, making it a cost-effective service.
Hevo Data is a No-code Data Pipeline that offers a fully managed solution to set up Data Integration for 150+ Data Sources (including 60+ Free sources) and will let you directly load data from sources like Tableau to a Data Warehouse or the Destination of your choice. It will automate your data flow in minutes without writing any line of code.
Let’s look at some of the salient features of Hevo:
- Fully Managed: It requires no management and maintenance as Hevo is a fully automated platform.
- Data Transformation: It provides a simple interface to perfect, modify, and enrich the data you want to transfer.
- Real-Time: Hevo offers real-time data migration. So, your data is always ready for analysis.
- Schema Management: Hevo can automatically detect the schema of the incoming data and map it to the destination schema.
Steps to Connect Tableau to AWS Athena using Tableau Athena Connector
Prerequisites
For connecting Tableau to AWS Athena, you have to satisfy certain prerequisites. You should readily have a pre-installed Tableau Desktop or an active account to work with Tableau services like Tableau Online, Tableau Server, and Tableau Reader. Since Amazon Athena allows you to query and analyze data in the Amazon S3 platform, you should have an active bucket in S3.
You should also have an access key ID and secret access key that permits you to query the Amazon S3 through the Athena console. As you will connect Amazon S3 to Tableau using the Athena JDBC driver, make sure you have installed the most recent version of 64-bit Java in your local machine. For establishing a proper connection between Amazon S3 and Tableau, you’ll need at least JDK 7.0 or Java 1.7.
Step 1: Download and Install Tableau Athena Driver
To establish a connection between Tableau and AWS Athena, you should download and install the appropriate Tableau Athena Connector (JDBC driver) in the form of a jar file. You should also make sure that the Tableau Athena Connector (JDBC driver) matches the JDK version installed in your local machine.
For downloading the Tableau Athena Connector (JDBC driver), you can visit the official website, where you can find various versions of Tableau Athena Connectors (JDBC drivers). Download the appropriate Tableau Athena Connector (JDBC driver) according to your JDK version. After downloading, move the downloaded jar files to the below-given file locations based on your operating system.
1. For Windows:  C:Program FilesTableauDrivers
2. For macOS: ~/Library/Tableau/Drivers location
3. For Linux: /opt/tableau/tableau_driver/jdbc
Step 2: Configuring and Setting up Athena
- Initially, you have to create a “student” table in CSV format that points to a student-db.csv file in the Amazon S3 bucket.
- After creating a student table, you have to create a view called “student view” on top of the student-db.csv table.
- You can refer to the GitHub repository, which has raw SQL queries for creating a student table and student view.
- After creating the student table and student view, you are all set to upload the files into Amazon S3 for querying using Athena.
- Now, open your Amazon S3 console and upload the student-db.csv file in the previously created S3 bucket.
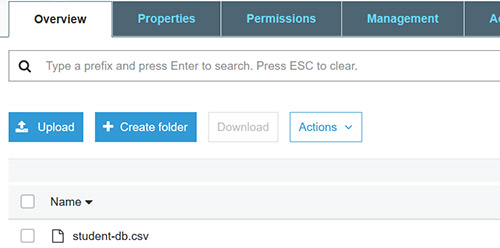
- The uploading process is very simple; all you have to do is click the “Upload” button, as shown in the image above.
- Now, you have to create your “studentdb” database in the Athena Console using the DDL statement given below.
CREATE DATABASE studentdb;- Then, you have to create a “student” table inside the “studentdb” database created in the previous step. For creating a new student table, execute the below given DDL statement.
CREATE EXTERNAL TABLE student(
  `school` string,
  `country` string,
  `sex` string,
  `age` string,
  `studytime` int,
  `failures` int,
  `preschool` string,
  `higher` string,
  `remotestudy` string,
  `health` string)
ROW FORMAT DELIMITED
  FIELDS TERMINATED BY ','
STORED AS INPUTFORMAT
'org.apache.hadoop.mapred.TextInputFormat'
OUTPUTFORMAT
'org.apache.hadoop.hive.ql.io.HiveIgnoreKeyTextOutputFormat'
LOCATION
  's3://<your_bucket_name>/'
TBLPROPERTIES (
  'has_encrypted_data'='false',
  'skip.header.line.count'='1',
'transient_lastDdlTime'='1595149168')- In the above query, you have to provide the name of your S3 bucket in the <your_bucket_name> field of the local parameter.
- After creating a student table, you have to create a view named “student_view.”
- If you create a new view from the previously created table, you can limit the number of fields or columns required to build dashboards in Tableau. For creating a view called “student_view,” execute the following command.
CREATE OR REPLACE VIEW student_view AS
SELECT
 "school",
 "country",
 "sex",
 "age",
 "health",
 "studytime",
 "failures"
FROM
Student- Now, you successfully created the student database, a table named “student” and a view called “student_view.” For checking whether the entities are created properly, you can execute some basic SQL queries on the Athena Console.
- To check whether the “student_view” is created correctly, execute the following command.
SELECT * FROM “studentdb”.”student_view” limit=10;- You will get the output, as shown below, which only displays the columns like school, country, age, and health that are mentioned inside the SQL view query. Now, you can confirm that the view is successfully created.
Step 3: Connecting Tableau to Athena
In this step, you will use a Tableau Athena Connector (JDBC driver) to connect Athena to Tableau. With the Tableau Athena Connector (JDBC driver), you can connect Tableau to Amazon S3 for visualizing data present within S3 buckets. After establishing a proper connection, you can easily visualize S3 data in the Tableau workspace with just a drag-and-drop simplicity.
- Initially, you have to open your Tableau Desktop and navigate to Connect > More.
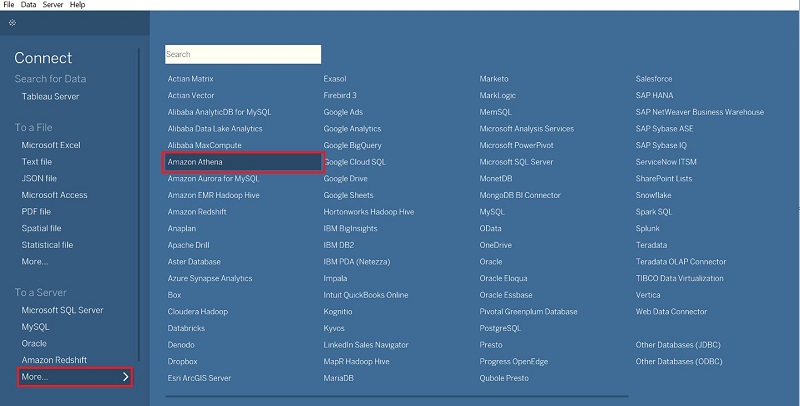
- You will get various options, as shown in the above image. From the displayed options, click on Amazon Athena.
- After choosing Amazon Athena, a new dialog box will pop up.
- In the dialogue box, you have to fill in the user information like Server and Access Key ID.
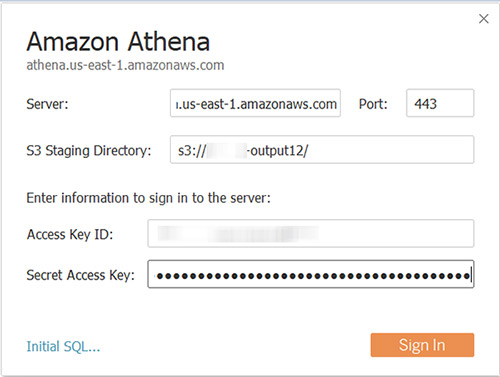
- Enter your response in the format of athena <region>.amazonaws.com, in which <region> represents your AWS availability zone.
- Then, enter the appropriate port number in the port field if required, or you can leave it as default.
- In the S3 Staging Directory field, enter the path to the Amazon S3 location where you want to store query results.
- For knowing your default query result location, go to Athena and open the Query Editor.
- In the Query Editor tab, click on Settings, where you can find “Query result location.”
- If the “Query result location” shows as “Not defined”, you have to click on the “Manage” button on the right-hand side.
- You are redirected to the Manage Settings dialogue box, where you can find the S3 URL for the query results.
- If in case the “Location of query result” is not filled in, you have to set up a new location. For setting up a new query result location, open your Amazon S3 and go to the Buckets menu and click on the “Copy S3 URL” under the Objects section. Now, your query result location URL is copied.
- Then, you have to paste the copied URL to the S3 Staging Directory field in the Amazon Athena dialogue box.
- In the next step, you have to fill the Access Key ID and Secret Access Key fields with the appropriate values associated with the AWS IAM.
- After filling in all the required fields in the Amazon Athena dialogue box, click on the “Sign in” button.
- Then, you will be taken to Tableau Desktop’s data source pane, where you can see the previously created “student view” and “student” tables. Being in a data pane, you can drag and drop the “student_view” table from the left side panel to the workspace on the right side.
- Now, you can visualize the “student_view” table using various graphs and widgets available in Tableau.
Step 4: Visualizing the data in Tableau
- In this step, you can visualize the newly connected S3 data in the Tableau workspace. Create a new worksheet named “country-wise” for visualizing the country field of the student_view table.
- For visualizing the country data, drag and drop Latitude and Longitude fields into the “Columns” and “Rows” segments on the left-hand side, respectively. Now, you will get a visualization based on the country column of the student_view table, as shown below.
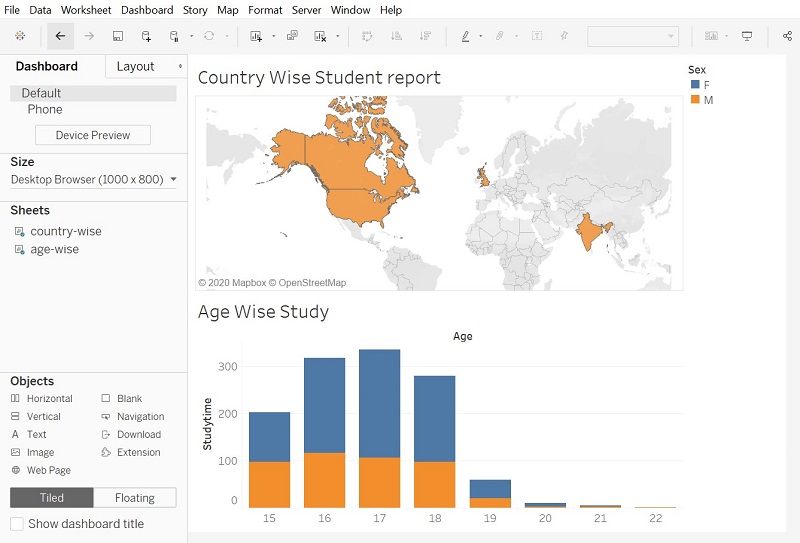
On following the above-given steps, you successfully established a connection between Tableau and AWS Athena.
Conclusion
In this article, you learned about Tableau, Amazon Athena, and how to connect Tableau to Amazon Athena. This article mainly focused on integrating Tableau and AWS Athena via a Tableau Athena Connector (JDBC driver), which needs proper setup and configuration. However, you can also use online data pipelines or data integration platforms and third-party connectors for connecting Tableau to AWS Athena. In case you want to export data from a source of your choice such as Tableau into your desired Database/destination then Hevo Data is the right choice for you!
Hevo Data, a No-code Data Pipeline provides you with a consistent and reliable solution to manage data transfer between a variety of sources like Tableau and a wide variety of Desired Destinations, with a few clicks. Hevo Data with its strong integration with 150+ sources (including 60+ free sources) allows you to not only export data from your desired data sources & load it to the destination of your choice, but also transform & enrich your data to make it analysis-ready so that you can focus on your key business needs and perform insightful analysis using BI tools.
Want to take Hevo for a spin? Sign Up for a 14-day free trial and experience the feature-rich Hevo suite first hand. You can also have a look at the unbeatable pricing that will help you choose the right plan for your business needs.
Share your experience of learning about the Tableau Athena Connector! Let us know in the comments section below!
FAQs
1. Can I connect Tableau to Athena?
Yes, Tableau provides a native connector for Amazon Athena. You’ll need the Amazon Athena ODBC driver to connect and query data stored in Amazon S3.
2. Can Tableau connect directly to an API?
Tableau doesn’t natively connect to APIs but can use Web Data Connectors or third-party tools to fetch API data in a compatible format.
3. How do I connect to a virtual connection in Tableau Desktop?
Sign in to Tableau Server/Cloud from Tableau Desktop, select the virtual connection in the data source list, and connect.


