


This article gives an overview of Microsoft Azure and REST APIs. You will learn about the key features that help Azure stand out in the market. Moreover, you will learn how you can call your Azure REST API using Postman and curl. At the end of the article, you explore some notable points to keep in mind while using Azure REST APIs. So, read along to unravel the world of Azure REST APIs.
Table of Contents
Prerequisites
To build the Azure REST APIs successfully, you need to meet the following requirements:
- An Azure Account with Azure Subscription.
- Basic knowledge of the REST APIs.
- Postman installed on your system.
- Azure CLI installed locally.
Introduction to Microsoft Azure

Microsoft Azure is a Cloud-based platform that can assist your company in overcoming business bottlenecks. Many products and Cloud services are offered on the Azure Cloud to assist you in bringing new solutions to life, solve today’s problems and shape the future. With the tools and frameworks of your choice, you can build, run, and manage apps across various Clouds or On-Premises.
Microsoft Azure has gained significant popularity in the market. It supports a wide range of industries, including E-Commerce, Finance, and many Fortune 500 organizations, and is also open source-compatible. This gives consumers the freedom to use whatever tools and technologies they want. Azure also provides 4 types of Cloud Computing services:
- Infrastructure as a Service (IaaS)
- Platform as a Service (PaaS)
- Software as a Service (SaaS)
- Serverless
Key Features of Microsoft Azure
The Microsoft Azure platform is designed to assist organizations in overcoming obstacles and achieving their objectives. Some of the key features of Microsoft Azure that help your businesses are:
- Flexible: Microsoft Azure allows your business to use whichever level of capability it needs. Furthermore, your organization may quickly deploy and update web apps to Microsoft Azure without downtime.
- Efficient Storage System: Microsoft Azure has more delivery points and data centers than competitor cloud services. As a result, Microsoft Azure can deliver content to your business environment more quickly and give a better user experience.
- Analytics Support: Data analysis and key insight support are built-in to Microsoft Azure. Businesses can use these capabilities to find new business leads, improve customer service, and make strategic decisions.
- Pay-as-you-go Pricing Model: Azure is billed on a pay-as-you-go basis, which means that subscribers receive a monthly fee that only includes the resources they have used. As a result, it is a viable option for a wide range of businesses of all sizes.
Hevo, a No-code Data Pipeline, helps load data from any data source, such as Databases, SaaS applications, Cloud Storage, SDK, and Streaming Services, and simplifies the ETL process. It supports 150+ Data Sources, including 60+ Free Sources. Hevo loads the data onto the desired Data Warehouse/destination, enriches it, and transforms it into an analysis-ready form without writing a single line of code.
Check out why Hevo is the Best:
- Secure: Hevo has a fault-tolerant architecture that ensures that the data is handled securely and consistently with zero data loss.
- Schema Management: Hevo takes away the tedious task of schema management & automatically detects the schema of incoming data and maps it to the destination schema.
- Minimal Learning: Hevo, with its simple and interactive UI, is extremely simple for new customers to work on and perform operations.
- Hevo Is Built To Scale: As the number of sources and your data volume grows, Hevo scales horizontally, handling millions of records per minute with very little latency.
- Incremental Data Load: Hevo allows the transfer of data that has been modified in real-time. This ensures efficient utilization of bandwidth on both ends.
- Live Support: The Hevo team is available round the clock to extend exceptional support to its customers through chat, email, and support calls.
- Live Monitoring: Hevo allows you to monitor the data flow and check where your data is at a particular time.
Introduction to REST APIs
REST APIs is an acronym for Representational State Transfer Application Programming Interface. A REST API is a data source’s frontend, allowing users to create, retrieve, update, and delete data items. An API is typically a portal to the rest of the world for developer teams.
In a typical 3-tier application, it stands between the User Interface (which allows end-users to access and alter data), and the Database (which stores the data).
A REST API is a set of protocols that govern how different apps communicate via HTTP. There are 4 basic methods, which are also referred to as CRUD operations:
- POST: Create a resource.
- GET: Read information from a resource.
- PUT: Update a resource.
- DELETE: Delete a resource.
These CRUD operations are used in an HTTP request to access and utilize the data.

The information flow is quick and efficient since these components are loosely connected. Also as the data formats aren’t pre-defined, it can be used for a wider range of purposes and is easier to create. As a result, REST APIs are a popular choice among web developers and have established themselves as the industry standard for web-based APIs.
Building APIs can be done in one of two ways:
- Code-First: In this approach, you produce an API definition documentation after coding the API directly from the requirements.
- Design-First: This method entails first defining an API and then implementing backend services based on the API design that has been agreed upon.
The approach you take will be determined by your business needs and use case. The Code-First approach to develop APIs is more traditional, although the prevalence of API definition formats has led to an increase in support for the Design-First approach. The Design-First approach lets your customers easily comprehend how to use your API if it is designed first, and makes sure that consistency is maintained across all APIs.
Components of an Azure REST API Request/Response
Typically an Azure REST APIs’ Request/Response pair can be categorized into 5 different components as listed below:
- Request URI
- HTTP Request Message Header
- HTTP Request Message Body
- HTTP Response Message Header
- HTTP Response Message Body
1) Request URI
A Request URI (Uniform Resource Identifier ) is present in the Request message header, however, you call it out independently as many frameworks and languages allow you to pass it separately from the Request message.
It consists of {URI-scheme} :// {URI-host} / {resource-path} ? {query-string}.
- URI-scheme identifies the protocol such as HTTP or HTTPS used to transmit the request.
- URI-host identifies the server’s domain name or IP address that hosts the REST service endpoint.
- Resource-path provides the path of resource collection.
- Query-string is an optional field that you may use to specify additional parameters like API version or resource selection criteria.
2) HTTP Request Message Header
The HTTP Request message header can contain 2 fields: a required HTTP method and an optional header field. The required HTTP method in the Azure REST API supports GET, HEAD, PUT, POST, and PATCH methods.
3) HTTP Request Message Body
This is an optional field. For example, POST Request has a body whereas GET has no message body. For POST or PUT operations, the Multipurpose Internet Mail Extensions (MIME) -encoding type for the body is passed as complex parameters and they also need to be mentioned in the Content-type Request header.
4) HTTP Response Message Header
The HTTP Response Message Header contains 2 fields, basically an HTTP status code field that specifies the error and success codes and optional additional header fields that are used to provide any additional information like a Content-type Response header.
5) HTTP Response Message Body
The HTTP Response Message Body fields are optional, as it depends on the method passed. For example, MIME-encoded response objects are returned in the HTTP response body, such as a response from a GET method that is returning data.
Steps to Call Azure REST API via Postman

Postman is an API platform that allows you to create and use APIs by improving collaboration and simplifying each phase of the API lifecycle. It is a graphical interface tool that allows you to call your Azure REST APIs. You can install Postman. Here, you will use Postman v8.0.5. So, follow the steps below to call Azure REST API using Postman.
- Step 1: Authenticate Azure REST API via a Bearer Token
- Step 2: Set Up Postman
- Step 3: Execute “Get Resource Groups” Request
- Step 4: Execute “Create Resource Group” Request
Step 1: Authenticate Azure REST API via a Bearer Token
The first step is to authenticate your Azure REST API via a Bearer Token using a Service Principal. A Service Principal is an Azure account that grants you access to Azure resources and allows you to perform actions on them. You will first create a Service Principal that will be used to fetch tokens to make Azure REST API requests. Follow the steps below to perform Azure REST API authentication:
- Go to Azure CLI and type the following command to create a Service Principal.
az ad sp create-for-rbac- Now store the output, an example is shown below. This will be used to set up your Postman.
{ "appId": "798256c4-bbdc-4f7a-a20a-",
"displayName": "azure-cli-2021-02-10-22-47-08",
"name": "http://azure-cli-2021-02-10-22-47-08",
"password": "", "tenant": "72f988bf-86f1-41af-91ab-" }
Step 2: Set Up Postman
In this step, you will configure and set up your Postman. To do so, follow the steps below:
- Run in Postman for Windows option as shown below

- Next, select the workspace you want to import your Azure REST API into.
- Now, click on the collection name and then select the Variables tab from the top of the window as shown below. You need to set the variables to get the token for each Azure REST API call.
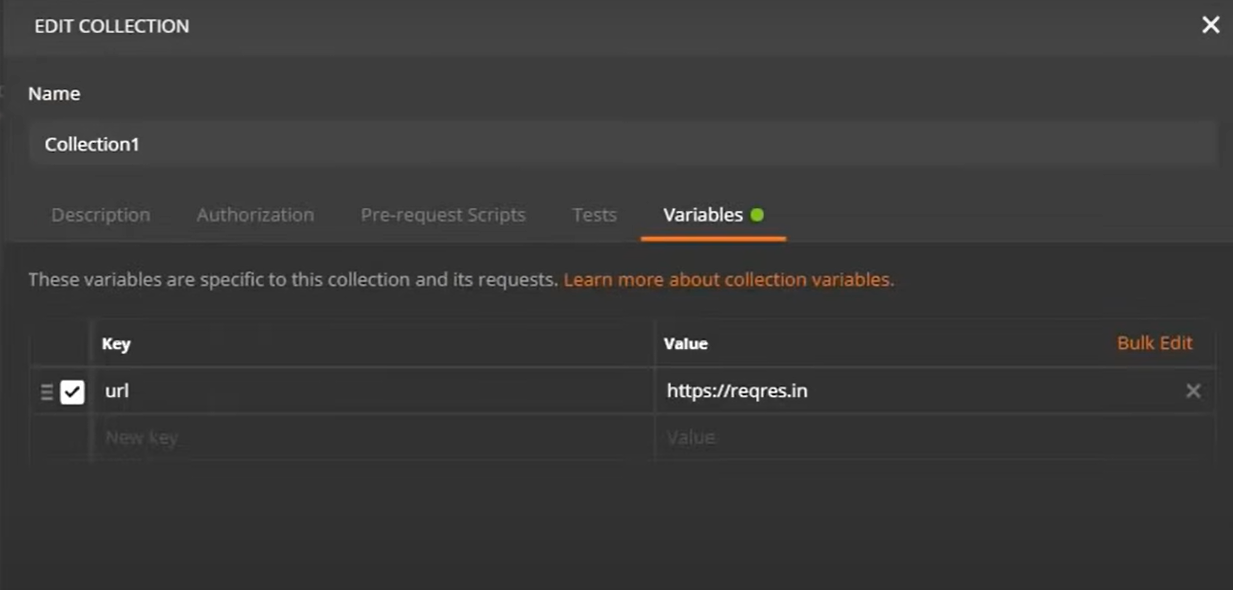
- Next, select all the variables as shown above. The variables selected are clientId, clientSecret, tenantId, subscriptionId, resource and bearerToken.
- After completing, click on Save to save collection as shown below.
Note: In the Authorization tab, select Bearer Token as the type, and in the Token field enter {{bearerToken}}. The authorization header will now be automatically generated when you send the request.
Step 3: Execute “Get Resource Groups” Request
In this step, you will execute your first request. Follow the steps below:
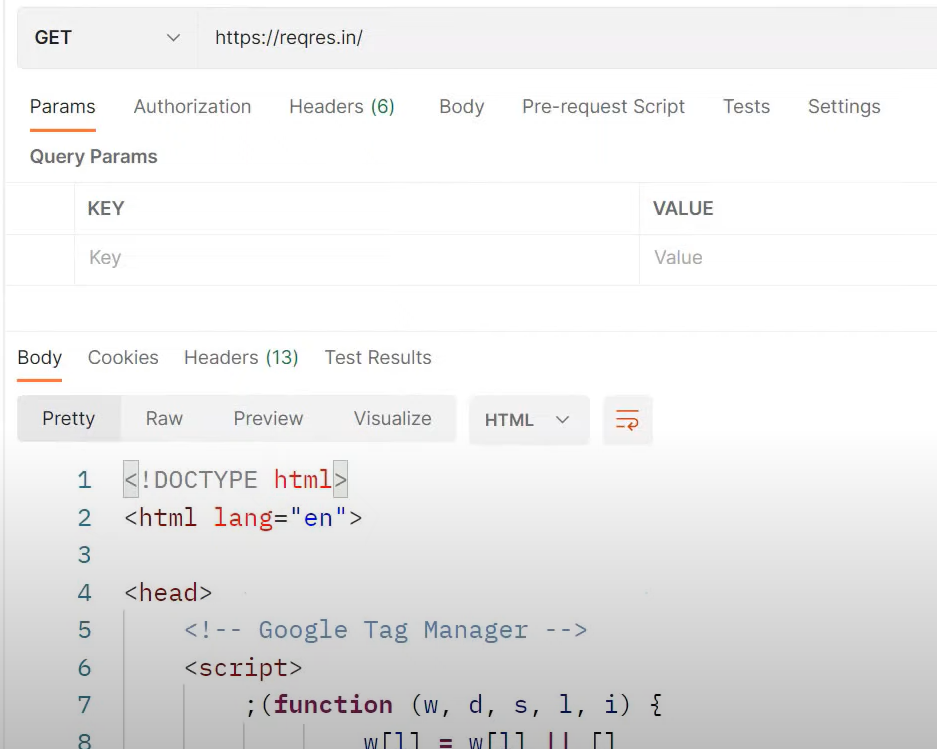
- Go to your Postman My Workspace and select the Azure REST collection created. Now, select the GET Get Resource Groups.
- Next, click on the GET request as shown below and click Send.

The output for the above GET request will be displayed in the response pane as shown below.
Step 4: Execute “Create Resource Group” Request
In this step, you will learn to create a resource group using the PUT command. Follow the steps below:
- Go to your Postman My Workspace and select the Azure REST collection created. Now, select the PUT Create Resource Group.
- Change the HTTP verb to PUT and add the resource group name to the URL as shown below.

- Next, click on the Body tab on the top of the window, choose the raw radio option and from the content-type dropdown select JSON. Next, type the following JSON body in the textbox.
{"location": "westus"}- After finishing the above steps, click on Save.
Steps to Call Azure REST API via curl

curl (short for client URL) is a command-line utility that allows developers to send and receive data from a server. curl allows you to communicate with a server by giving the location (in the form of a URL) and the data you wish to transmit.
Let’s learn how you can call an Azure REST API using curl. curl could be useful in unattended scripts, such as in DevOps automation scenarios. In the latest versions of AZ CLI, you can use the “rest” command to call your Azure REST API using just 1 command as shown below.
az rest -m get --header "Accept=application/json" -u ‘https://management.azure.com/subscriptions/{subscriptionId}/providers/Microsoft.Web/sites?api-version=2016-08-01'In the above command, the {subscriptionId} value will be replaced automatically by your active Subscription Id.
Notable Points to Keep in Mind for Azure REST APIs
In this section, let’s discuss some of the important points you need to keep in mind when working with Azure REST APIs. Some of these are:
- To prevent an application from submitting too many requests, the Resource Manager sets a limit on the number of read and write requests each hour. Requests are throttled if your application goes over certain limits. The number of requests left in your scope is included in the response header.
- In the Response body, several list operations return a property named nextLink. This property appears when the results are too large to be returned in a single response. When a list action returns more than 1,000 items, the response usually includes the nextLink property.
- The Azure REST APIs are built to be resilient and available at all times. The REST API’s control plane operations (requests made to management.azure.com) are distributed across regions and Availability Zones (as well as regions) in locations with multiple Availability Zones. They don’t rely on a single logical data center and are never taken down for maintenance.
Check out our blog on REST API to Azure for more insights.
Conclusion
This article provided a holistic view of Microsoft Azure REST APIs. You learned about the key features of Microsoft Azure and gained a basic understanding of REST APIs along with the components. Moreover, you understood the steps to call Azure REST APIs via Postman and curl. In addition, you learned some noteworthy points to keep in mind while using Azure REST APIs.
Moreover, extracting complex data from diverse data sources such as Databases, SaaS applications, Cloud Storage, SDK,s, and Streaming Services can be quite challenging and cumbersome. However, a simpler alternative like Hevo can save your day!
Hevo is a No-Code Data Pipeline that offers a faster way to move data from 150+ Data Sources including 60+ Free Sources, into your Data Warehouse to be visualized in a BI tool. Try a 14-day free trial and experience the feature-rich Hevo suite firsthand. Also, check out our unbeatable pricing to choose the best plan for your organization.
FAQs
1. Can I integrate Azure REST APIs with third-party applications?
Yes, Azure REST APIs can connect to third-party applications, sharing data and functionality across systems.
2. What authentication methods are required for Azure REST APIs?
Azure REST APIs uses OAuth2 for authentication; to make secure calls toward accessing resources, tokens are required.
3. What tools support working with Azure REST APIs?
Some popular tools available include Postman, curl, PowerShell, and Azure CLI. These tools support testing, management, and automation for API calls.
Share it with your connections.
-
 Share To LinkedIn
-
 Share To Facebook
-
 Share To X
-
 Copy Link


