Google Cloud (also known as Google Cloud Platform or GCP) is a provider of computing resources for developing, deploying, and operating applications on the Web. Although its cloud infrastructure does serve as the host for applications such as Google Workplace (formerly G Suite, and before that Google Apps), GCP is mainly a service for building and maintaining original applications, which may then be published via the Web from its hyper-scale data center facilities. Since Google Cloud has a great infrastructure to host website hosting WordPress Website on it provides utmost exposure to it.
WordPress is one of the most popular software on the planet with more than 70 million websites on the internet. It’s one of the best content management software and it’s evolving in every version update.
This article provides steps for Google Cloud WordPress Migration using two different methods.
Table of Contents
What is Google Cloud?
Google Cloud Platform is a suite of public cloud computing services that include data storage, data analytics, big data, machine learning, etc. It runs on the same infrastructure that Google uses internally for its end users. With the help of Google Cloud Platform, you can deploy and operate applications on the web.
Features of Google Cloud
- Computing and Hosting: It allows you to work in a serverless environment, use a managed application platform, leverage container technology, and build your own cloud-based infrastructure.
- Storage Services: It offers consistent, scalable, and secure data storage in Cloud Storage. You will have a fully managed NFS file server in Filestore. You can use Filestore data from applications that run on Compute engine VM instances or GKE clusters.
- Database Services: Google Cloud Platform offers a variety of SQL and NoSQL database services. You can use Cloud SQL, which can be either MySQL or PostgreSQL. For NoSQL, you can use Firestore or Cloud Bigtable.
- Networking Services: While your App Engine manages networking for you, GKE uses the Kubernetes model to provide a set of network services to you. All these services can load balance traffic across resources, create DNS records and connect your existing network to your Google network.
- Big Data Services: This service will help you to process and query the big data in your cloud to get fast and quick answers. With the help of BigQuery, data analysis becomes a cakewalk for you.
- Machine Learning Services: The AI platform will provide you with a variety of machine learning services. To access pre-trained models optimized for a specific application, you can use APIs. You can also build and train your own large-scale models.
Google Cloud offers these services at a reasonable price as it follows the pay-as-you-go policy.
Hevo simplifies data integration by seamlessly connecting various sources like Google Cloud and WordPress. With its user-friendly design and intuitive interface, you can set up a data pipeline in just minutes, enabling real-time data analysis effortlessly. Its features include:
- Connectors: Hevo supports 150+ integrations to SaaS platforms, files, Databases, analytics, and BI tools.
- Transformations: A simple Python-based drag-and-drop data transformation technique that allows you to transform your data for analysis.
- Schema Management: Hevo eliminates the tedious task of schema management. It automatically detects the schema of incoming data and maps it to the destination schema.
- 24/7 Live Support: The Hevo team is available 24/7 to provide exceptional support through chat, email, and support calls.
Try Hevo today to experience seamless data transformation and migration.
Get Started with Hevo for FreeWhat is WordPress?
WordPress is a free, open-source website creation platform. On a more technical level, WordPress is a content management system (CMS) written in PHP that uses a MySQL database. In non-geek-speaking terms, WordPress is the easiest and most powerful blogging and website builder today.
Features of WordPress
As a website building platform and CMS, WordPress boasts an impressive feature set. Here are just a few of the many features of WordPress.
- SEO – Search Engine Optimization (SEO) begins at a technical level and WordPress delivers an exceptional code base for SEO. SEO allows your website’s content to be found via common search engines such as Google or Bing.
- Speed – WordPress is a lean website framework that is constantly striving to remove code “bloat” that slows down the loading speed of a website.
- Mobile-friendly – Most WordPress themes are now mobile-friendly or responsive out-of-the-box.
- Media file library – WordPress includes a built-in media library where you can upload and embed media files such as images or videos into your pages or posts. You can even perform basic edits to your images within WordPress.
- Easy-to-use user interface – WordPress is very easy to use with no complicated settings. If you can use a WordPress processor, you can use WordPress. WordPress also has a focus on accessibility.
- Custom menus – WordPress makes it easy to create navigation menus with links to your pages or custom links.
- Built-in blog – Adding a blog to your website is as simple as publishing a post.
Google Cloud WordPress Migration
Google Cloud WordPress Migration can improve the exposure of the WordPress website that is to be hosted. Google Cloud WordPress Migration can be done in two methods, the first being a newer efficient method and the second being older but with higher support. You can choose anyone based on the requirement.
Google Cloud WordPress Migration Method 1:
Step 1: Configure WordPress
Google Cloud WordPress Migration Method 1 shows you how to deploy a WordPress website on Google Cloud using the efficiency configuration, which consists of an f1-micro instance and a 32GB HDD persistent disk, at an estimated cost of around $1 per month.
1. Deploy WordPress
- From the Google Cloud sidebar menu, navigate to Marketplace.
- From the Marketplace dashboard, type WordPress into the search field, then select WordPress Certified by Bitnami and Automattic.
- Click on the LAUNCH button to begin configuring your Google Cloud WordPress instance.
2. Customize Deployment
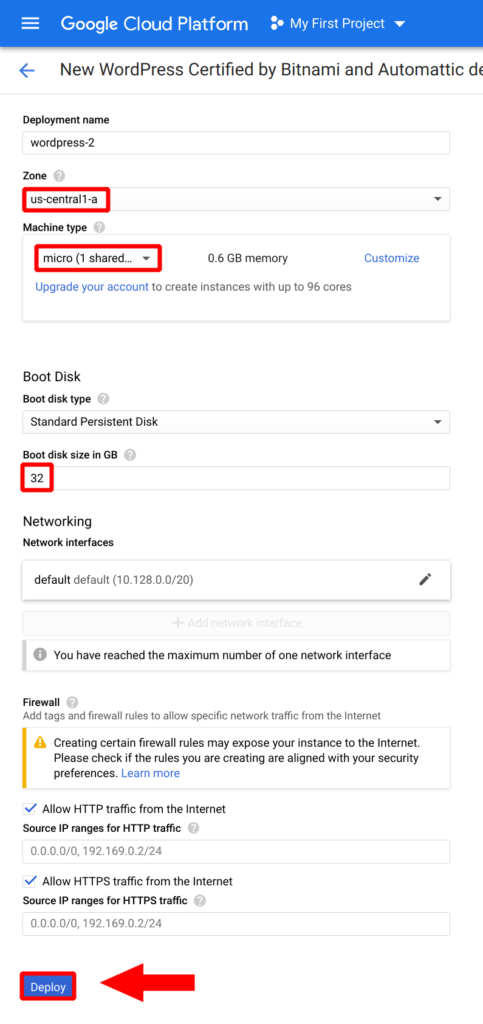
Modify your Google Cloud WordPress instance configuration according to the settings above, making sure to change the Zone to represent where most of your website’s visitors are located. You can also upgrade the Machine type and/or Boot disk size in GB accordingly. Finally, click on the Deploy button to deploy your Google Cloud WordPress instance.
Step 2: Configure Domain
Now that your Google Cloud WordPress instance has been deployed, you will configure a domain name for your new WordPress website. Although the tutorial uses Namecheap as the domain name provider, the configuration is universal and will work with any domain name provider.
3. Copy Instance IP Address
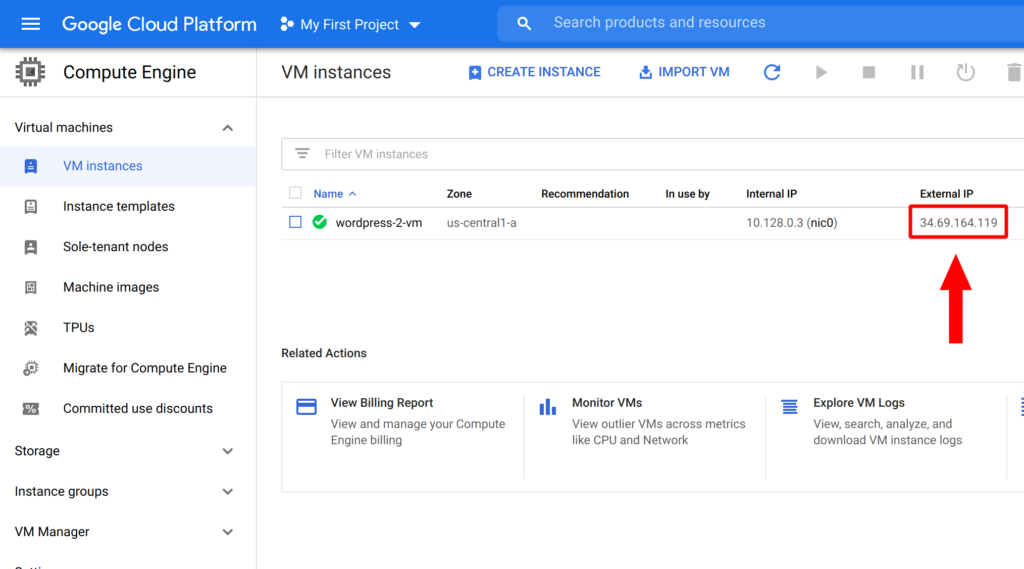
Navigate to your VM Instances dashboard and copy the IP address that has been assigned to your Google Cloud WordPress instance.
4. Enable DNS Settings
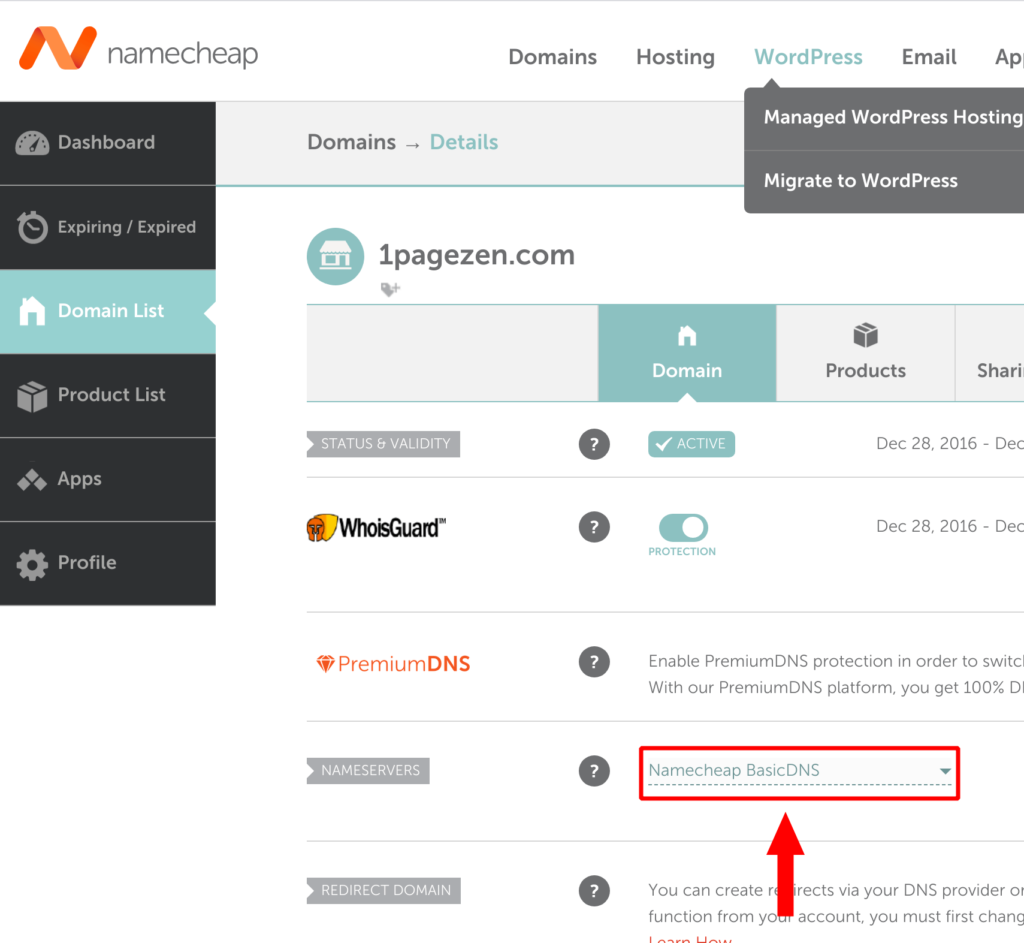
From your web browser, navigate to your domain name provider (we recommend Namecheap). Navigate to the settings page for your domain, and select Namecheap BasicDNS from the NAMESERVERS row.
5. Create DNS Record
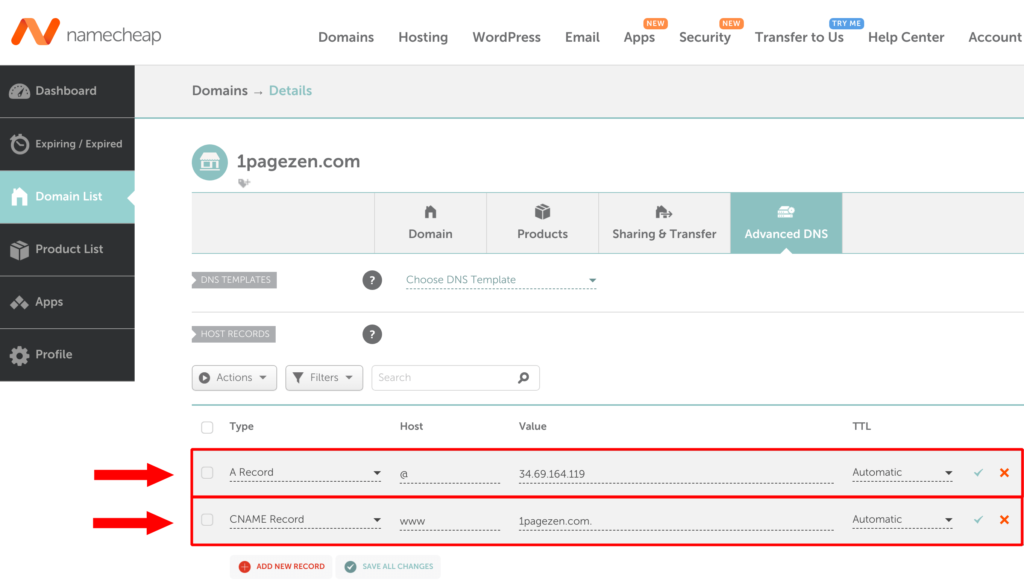
Next, click on the Advanced DNS tab at the top-right of your domain name dashboard. Then, in the HOST RECORDS row, create a new A record as shown in the image, however, remember to replace the IP address in the image with the IP address of your instance (which you copied in a previous step). Next, create a CNAME record as shown, but remember to replace Hevodata.com with your own domain name.
Step 3: Configure SSL
Now that your website’s domain name has been configured, you will learn how to enable SSL for your domain name. To do this, you will connect to your Google Cloud WordPress instance via the SSH terminal, then execute a script that will automate the process of configuring SSL for your website.
6. Connect Google Cloud WordPress Instance
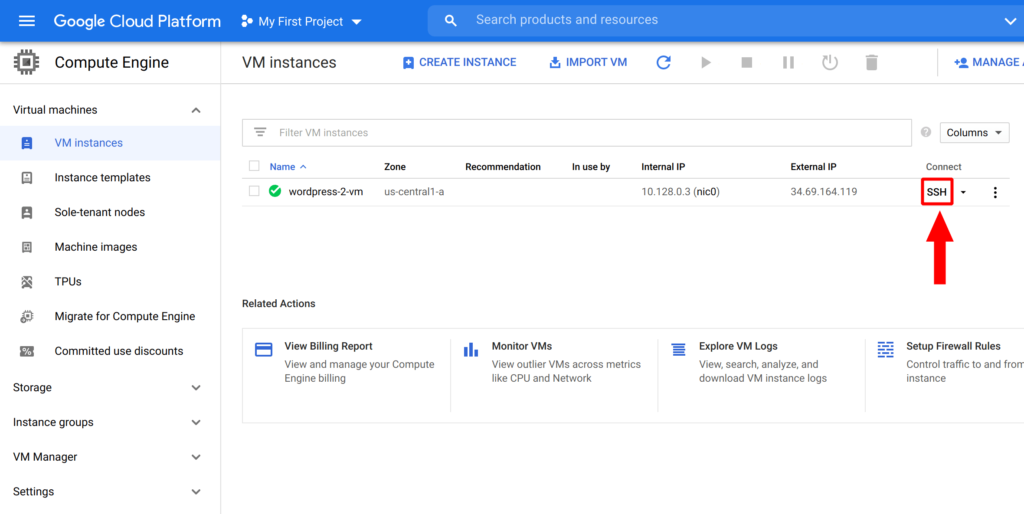
Return to your VM Instances dashboard, and click on the SSH button in order to connect to your Google Cloud WordPress instance.
7. Execute SSL Script
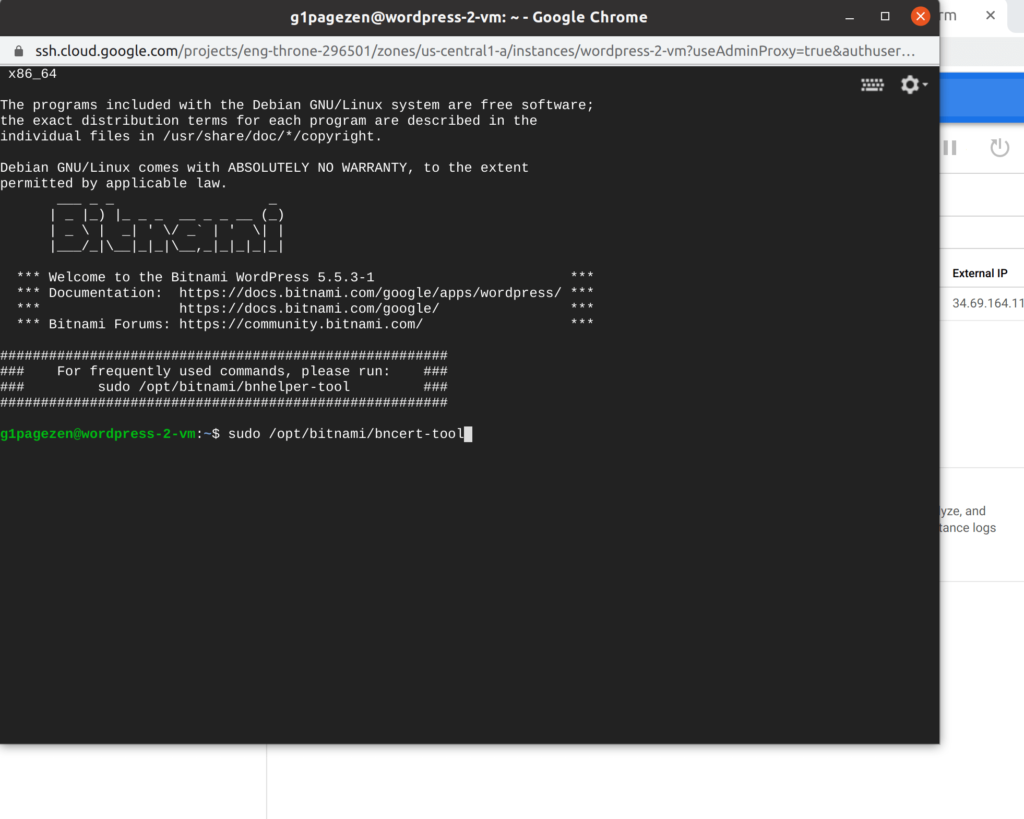
Now that you’ve clicked the SSH button, a new terminal window will open displaying the connection to your WordPress Instance. Copy the command in the box below, and paste it into the terminal window, then press Enter.
sudo /opt/bitnami/bncert-toolAfter you’ve pressed Enter the script will prompt you with a series of questions, which you will answer by entering either y (for yes), or n (for no). We recommend answering each question in the following way, remembering to replace each bolded instance of HevoData with your own domain name or email:
Domain list []: Hevodata.com www.Hevodata.com
Enable HTTP to HTTPS redirection [Y/n]: y
Enable non-www to www redirection [Y/n]: n
Enable www to non-www redirection [y/N]: y
Do you agree to these changes? [Y/n]: y
E-mail address []: 1pagezen@gmail.com
Do you agree to the Let's Encrypt Subscriber Agreement? [Y/n]: y
8. Log in to WordPress
- From the Google Cloud sidebar menu, navigate to Marketplace.
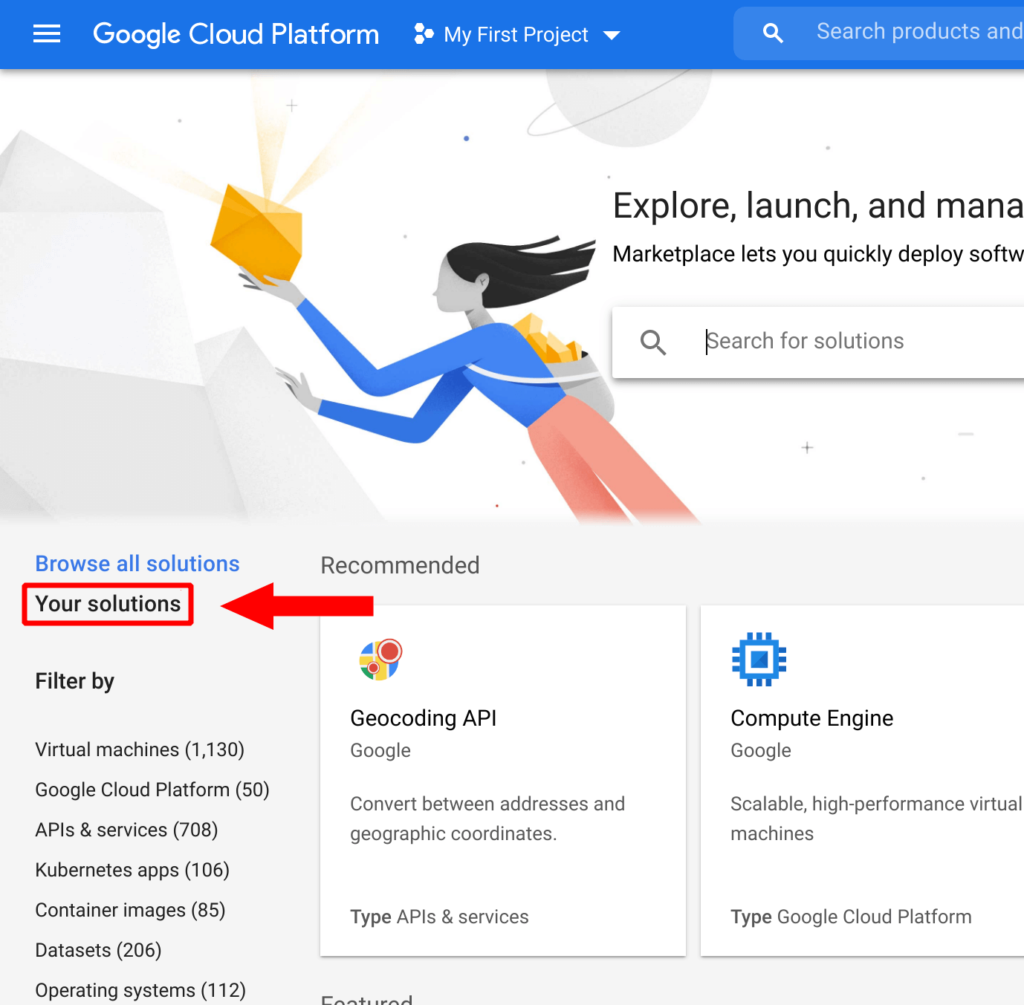
- From the Marketplace dashboard, click on Your solutions.
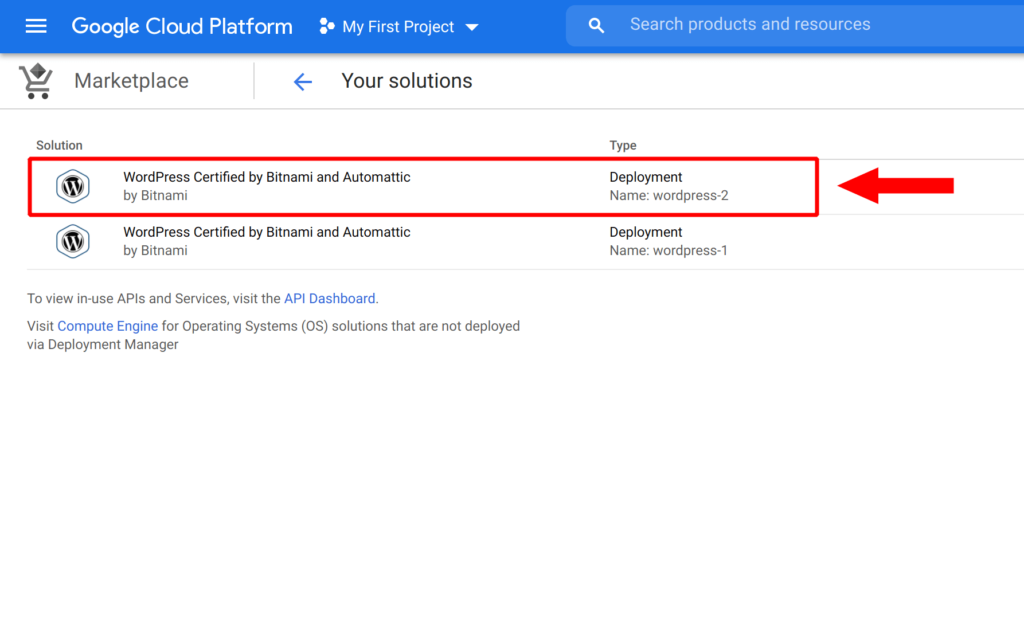
- Select your recent deployment from the list and select Google Cloud WordPress Migration.
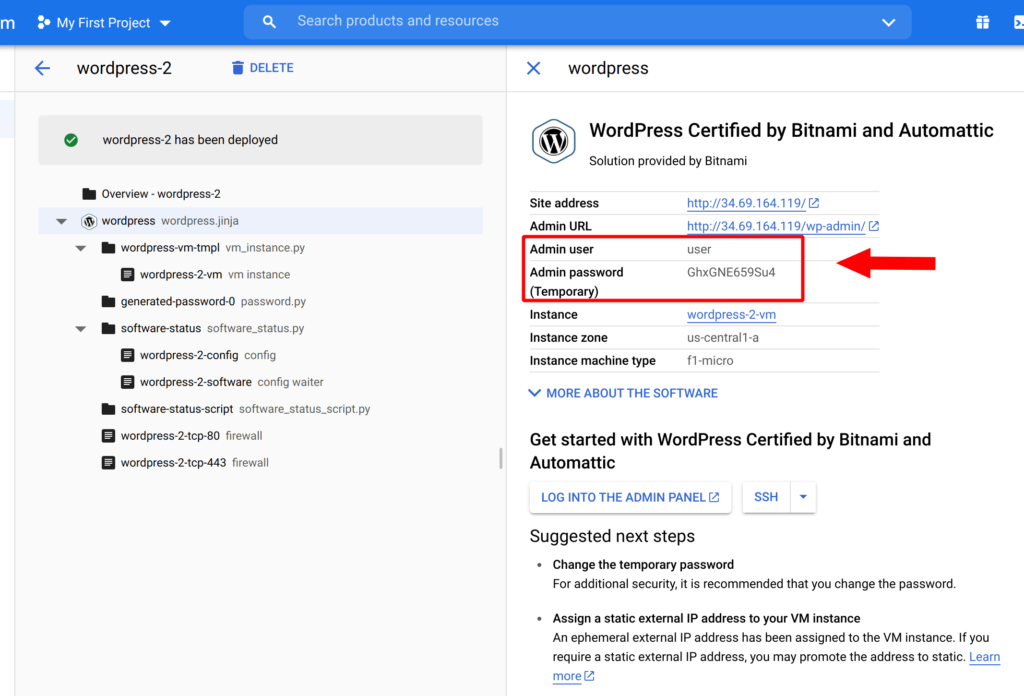
- Next, copy both the Admin user and Admin password (Temporary) from the list. You will use these credentials to log in to your WordPress website in the next step.
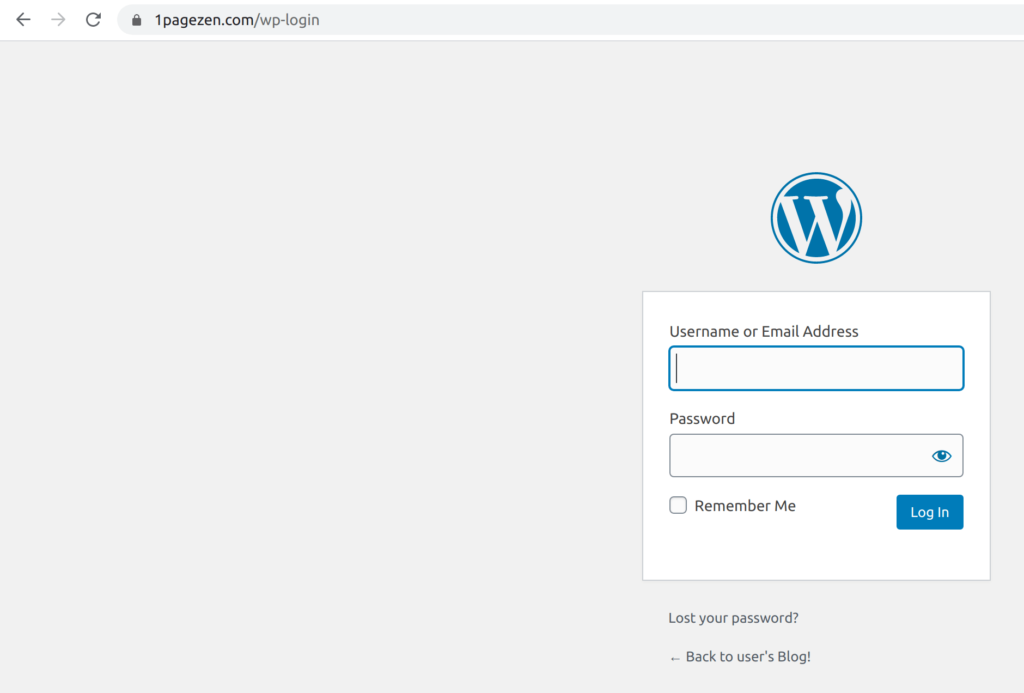
- Visit your WordPress login page, and use the username and password that you copied from the last step to log in to your website.
Google Cloud WordPress Migration Method 2:
Steps for Google Cloud WordPress Migration
- Edit your DNS records and reduce the TTL time.
- Set up Google Cloud for WordPress.
- Create new DNS records in Cloud DNS.
- Serve a back soon message.
- Backup and Import your whole website.
- Import your website to Google Cloud.
- Switch DNS records.
- Enjoy.
1. Edit your DNS records
Edit your DNS records and reduce the TTL time to 330 seconds. This means that most users were routed to the new server quickly.
However, if your DNS TTL is higher, we would recommend lowering it a few days prior to performing the migration. Normally, DNS propagation takes around 24 – 48 hrs. This method will ensure DNS changes propagate more quickly to your users.
2. Set up Google Cloud for WordPress
You can set up Google Cloud WordPress with Apache webserver or Nginx web server. You can also choose Operating systems from Ubuntu, Debian, CentOS, and more.
- Install LEMP in Compute Engine.
- Set up Server Blocks for your WordPress files.
- Set up Cloud SQL and connect with your Instance.
Now you must have a directory structure like the one below.
Replace yourdomainname.com with your original domain name.
home
 -- yourdomainname.com
 ---- logs
 ---- public
The public directory is the root directory for your website.
3. Create new DNS records in Cloud DNS
Now you need to create a new DNS record with the A record pointing to your VM’s IP address.
Go ahead and Set Up Cloud DNS for your domain.
You can also set up DNSSEC to secure your domain name from DNS cache poisoning.
4. show a Back Soon Message
This step is necessary to stop the live site from modifying the database while Google Cloud WordPress Migration. So, we’re going to show a ‘Back Soon’ page for some time.
The simplest way to do this is to upload an index.html file to your webroot and make it serve instead of index.php
5. Backup your whole website
Now, you can take a backup of your website and database. Once you have your backup you can upload the files to Google Cloud Instance.
Next, you need to make some changes to your database file to remove all MyISAM engines. Cloud SQL does not support the MyISAM engine so you need to remove this or replace it with the InnoDB engine.
Then you can upload your database file in your Cloud Storage bucket and import it into Cloud SQL.
6. Switch DNS records
Once everything is in place you can update the DNS records with the records provided by Google Cloud.
Modifying your DNS records will start routing traffic to your new server. However, keep in mind that DNS queries are cached, so anyone who has visited your site recently will likely still be routed to the old server and see the ‘Back Soon’ page. Once the user’s machine re-queries for the domain’s DNS entries they should be forwarded to the new server.
7. Advanced Set-Up
If you wonder about handling huge traffic, you can set up Load balancing on Google Cloud and dynamically scale your VM instance during high traffic and scale down during low traffic.
Conclusion
This Article is a comprehensive guide on Google Cloud and WordPress. It also provided two methods that can be used for Google Cloud WordPress Migration. While Google Cloud WordPress Migration is insightful, setting up the proper environment can be hectic. To make things easier, Hevo comes into the picture.
`Hevo Data is a no-code data pipeline with 150+ pre-built integrations. Hevo can help you Integrate your data from numerous sources like Google Cloud and WordPress and load them into a destination to Analyze real-time data with a BI tool such as Tableau. It will make your life easier and data migration hassle-free. Sign up for Hevo’s 14-day free trial and experience seamless data migration.`
Frequently Asked Questions
1. Does WordPress use PostgreSQL?
No, WordPress does not natively support PostgreSQL.
2. Is WordPress using PostgreSQL or MySQL?
WordPress uses MySQL (or its fork, MariaDB) as its default database management system.
3. Which db is best for WordPress?
For WordPress, MySQL and MariaDB are the best choices due to native support, compatibility, and community support. PostgreSQL is not natively supported and would require custom solutions if used.


