Key Takeaways
Transferring JSON data to Amazon Redshift for analytics and data warehousing requires specialized approaches to handle JSON’s nested structure and Redshift’s columnar format.
Below are three primary approaches for this migration:
Method 1: Using Hevo Data
Hevo provides intelligent JSON parsing with automated schema mapping and real-time synchronization, automatically handling nested JSON structures without manual configuration.
Method 2: Using Copy Command
This method involves uploading JSON files to S3, creating JSONPath mapping files, then using Redshift’s native COPY command for direct data loading with manual schema alignment.
Method 3: AWS Glue
This approach uses AWS Glue crawlers to discover JSON schema in S3 and ETL jobs to transform and load data into Redshift through serverless processing.
You can make use of the advanced storage and query capabilities of Redshift for JSON to Redshift replication.
You can easily load data from JSON to Redshift via Amazon S3 or directly using third-party Data Integration tools. Redshift also provides you with in-built SQL commands to carry out the data loading process.
The question is, which method suits your use case out of all these methods? We have got you covered in this blog using three different methods.
Simplify data loading with Hevo’s easy-to-use interface and a simple two step click setup.
Why Choose Hevo?
- Automated Data Pipelines: Effortlessly manage and automate data flows from JSON to Redshift.
- No-Code Interface: Eliminate the need for technical expertise with Hevo’s intuitive platform.
- Real-Time Sync: Ensure your data in Redshift is always up-to-date with real-time updates.
Rated as 4.4 on G2, Hevo stands out as a reliable and cost-effective platform with more 150+ pre built connector library.
Get Started with Hevo for FreeTable of Contents
Methods of Loading Data from JSON to Redshift
Let’s explore each option to load data from JSON to Redshift in detail.
Method 1: Load JSON to Redshift in Minutes using Hevo Data
- Hevo Data is a No-code Data Pipeline solution that can help you move data from 150+ data sources like FTP/SFTP & Amazon S3 to your Data Warehouse like Amazon Redshift, or BI tools in a completely hassle-free & automated manner.
- To load JSON-formatted Source data to your desired Destination, Hevo allows you to select the JSON Data parsing strategy for the nested fields, objects, and arrays so that these are read correctly.
- For instance, to load data from JSON to Redshift, a default parsing strategy of replicating JSON fields to JSON columns is applied. To know more, you can check out the Hevo Documentation for Parsing Nested JSON Fields in Events.
Take a look at some of the salient features of Hevo:
- Exceptional Security: A Fault-tolerant Architecture that ensures Zero Data Loss.
- Data Transformation: It provides a simple interface to perfect, modify, and enrich the data you want to transfer.
- Auto Schema Mapping: Hevo takes away the tedious task of schema management & automatically detects the format of incoming data and replicates it to the destination schema. You can also choose between Full & Incremental Mappings to suit your Data Replication requirements.
- Incremental Data Load: Hevo allows the transfer of data that has been modified in real-time. This ensures efficient utilization of bandwidth on both end.
To effortlessly load data from JSON to Resdhift using Hevo, follow the simple steps given below:
- Step 1: Connect Hevo Data with your system by setting FTP/SFTP as a source. You can provide a unique name to your Pipeline along with information such as Port Number, Username, Password, etc. Hevo currently supports CSV, JSON, and XML formats. You can specify the file format as JSON for your use case.

- Step 2: For completing the process to load data from JSON to Redshift, you can start by providing your Redshift Data Warehouse credentials such as your authorized Username and Password, along with information about your Host IP Address and Port Number value. You will also need to provide a name for your database and a unique name for this destination.

Discover the benefits of connecting SFTP/FTP to Redshift for improved data handling. Our comprehensive guide offers an easy setup and enhanced performance.


Method 2: Load JSON to Redshift Using Copy Command
- Step 1: Create and Upload JSON File to S3
- Step 2: Create JSONPath File
- Step 3: Load the Data into Redshift
Step 1: Create and Upload JSON File to S3
To get started with the Redshift JSON extraction process, let’s see how you will create and upload the JSON files to S3.
- Step 1a: Create a sample JSON file named employee.json and add a few sample records of the employee as below.
{“emp_id” : 1, “emp_name” : “Sam”, “emp_dept” : “HR”}
{“emp_id” : 2, “emp_name” : “Jib”, “emp_dept” : “Tech”}
{“emp_id” : 3, “emp_name” : “Nick”, “emp_dept” : “IT”}
{“emp_id” : 4, “emp_name” : “Joseph”, “emp_dept” : “Tech”}- Step 1b: Upload the file to AWS S3 using AWS CLI.
Syntax - aws s3 cp <source file> <target S3 path>

Example - aws s3 cp employee.json s3://test-bucket/json/
Step 2: Create JSONPath File
JSONPath is an expression that specifies the path to a single element in a JSON hierarchical data structure. Amazon Redshift doesn’t support any JSONPath features, such as wildcard characters or filter expressions, and only expects the complete JSONPath of that element to parse it correctly. As a result, Amazon Redshift can’t parse complex, multi-level data structures.
- Create the JSONPath file for the above JSON. Copy the below content and save it in a file as – employee_jsonpath.json.
{

"jsonpaths": [

"$.emp_id",

"$emp_name",

"$emp_dept"
]
}- Use AWS CLI to upload the file into S3.
Syntax - aws s3 cp <source file> <target S3 path>

Example - aws s3 cp employee_jsonpath.json s3://test-bucket/jsonpaths/
Step 3: Load the Data into Redshift
Let’s see what are the steps to load data into Redshift.
- First, you have to create table DDL in the Redshift, which will hold the schema information of the JSON.
CREATE TABLE employee(emp_id INT, emp_name STRING, emp_dept STRING, primary key(emp_id))- Load the data from the AWS S3 to Redshift using the Redshift Copy command.
copy employees

from 's3://test_bucket/json/employee.json’

credentials 'aws_iam_role=arn:aws:iam::xxxxx:role/Redshift'

region 'eu-west-3'

json 's3://test_bucket/jsonpath/employee_jsonpath.json';- You will get a successful message when the above command finishes execution.
- Use the below command to check the loaded data.
select * from employeeVoila! You have successfully loaded the data from JSON to Redshift using the COPY command.
When using COPY with JSON format data here are the different options:
- ‘auto’ – COPY can load fields from a JSON file automatically, facilitating quick and efficient data import processes for businesses and academics.
- ‘auto ignorecase’ – The COPY function facilitates the automatic loading of fields from a JSON file while disregarding the case of the field names. This feature enables seamless data transfer and integration for efficient processing.
- s3://jsonpaths_file – JSONPaths file is a text file that contains a single JSON object named “jsonpaths” with an array of JSONPath expressions.If the name is any string other than “jsonpaths”,
For examples showing how to load data using ‘auto’, ‘auto ignorecase’, or a JSONPaths file, and using JSON objects or arrays, see Copy from JSON examples.
How to Prevent Loss of Numeric Precision?
While using the COPY command, you may observe that loading numbers from a JSON-formatted data file into a column defined as a numeric data type can reduce accuracy. Some floating point values are not accurately represented in computer systems. As a result, the data copied from the JSON file may not be rounded as expected. For better accuracy, you can opt for any of the following :
- You can denote a number as a string by enclosing the value in double quotes.
- Employ ROUNDEC to round numbers rather than truncating them.
- You can start using CSV, delimiters, or fixed-width text files instead of JSON or Avro files.
Common errors
If the format of the text or JSONPaths table is incorrect, you may receive one of these errors.
- Error 1: This Error Message suggests checking the stl_load_errors table for more information.
ERROR: Load into table 'paphos' failed. Check 'stl_load_errors' system table for details.
- Error 2: This error indicates a mismatch between the number of elements in the JSONPath file and the number of columns in the database table. Please modify the JSONPath file to match the number of columns in the table.
ERROR: Number of jsonpaths and the number of columns should match. JSONPath size: 5, Number of columns in table or column list: 13 Detail: ----------------------------------------------- error: Number of jsonpaths and the number of columns should match. JSONPath size: 5, Number of columns in table or column list: 13 code: 8001 context: query: 273 location: s3_utility.cpp:780 process: padbmaster [pid=20575] -----------------------------------------------
- Error 3: If you put your JSON data into an array instead of the JSONP format, it may exceed the size limit and result in an error.
String length exceeds DDL length
Limitations
- Limited JSONPath Support: The Redshift COPY function doesn’t recognize advanced JSONPath elements (e.g., wildcards, filter expressions), which can make targeting specific data within complex JSON structures difficult.
- Handles Only Top-Level JSON: Initially, COPY processes only top-level JSON elements. If your data has nested structures, you’ll need additional JSON-SQL functions provided by Redshift to extract deeper information.
- Case Sensitivity: COPY commands are case-sensitive, but Redshift table schemas are not. Ensure careful capitalization for proper data mapping.
- Complexity Restrictions: Parsing complex, deeply nested JSON or arrays of JSON files is not directly supported by Redshift.
- Post-Load Parsing: After loading initial JSON data, Redshift provides JSON-SQL functions for working with nested elements.
- Schema Alignment: To directly load JSON into Redshift, your JSON structure and target table schema must have an exact match. Extensive preparation might be required to achieve this.
- String-Based Storage: JSON fields in Redshift must use string data types (CHAR or VARCHAR). CHAR has a limit of 4096 bytes, VARCHAR has a limit of 65535 bytes. Exceeding these limits will cause errors.
PRO TIP: Completely Automate Your Amazon Redshift Data Pipelines
Method 3: Load JSON to Redshift using AWS Glue
Pre-requisites
- Understanding and working knowledge of AWS S3, Glue, and Redshift.
- Active AWS account, with full access roles for S3, Glue, and Redshift.
1. Create a JSON Crawler
For starting the JSON to Redshift data loading process, let’s first go through the steps to create a JSON crawler:
- Step 1: Log in to the AWS account, and select AWS Glue from the service drop-down.
- Step 2: First, you need to define a Classifier, so that each JSON record will load into a single row in Redshift. Otherwise, Redshift will load the entire JSON as a single record, and it isn’t beneficial for the analysis.
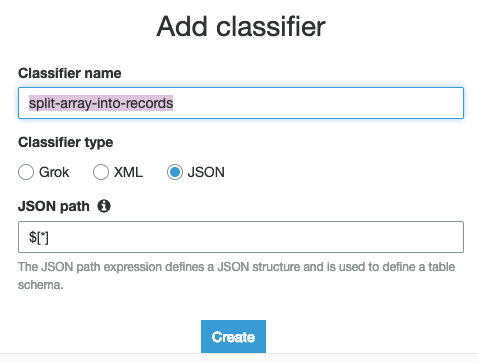
- Step 3: To create a Classifier, on the left menu of the Glue page, select Crawlers > Classifiers, and then click on Add Classifier

- Step 4: Provide the classifier name, and select the Classifier type as JSON and provide JSONPath as $[*].
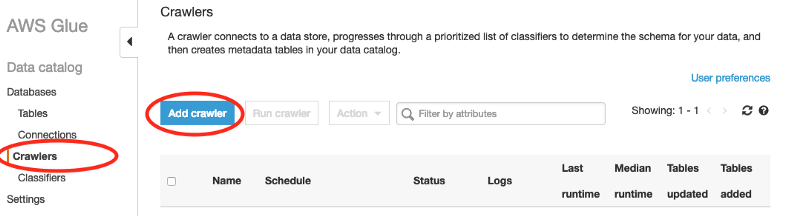
- Step 5: Once you add the classifier, click on the Crawler and then Add Crawler to fetch JSON files from S3.
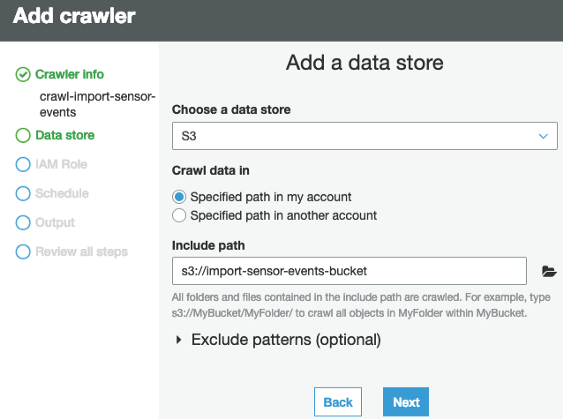
- Step 6: Set the Crawler name, and select the above created Custom Classifier.

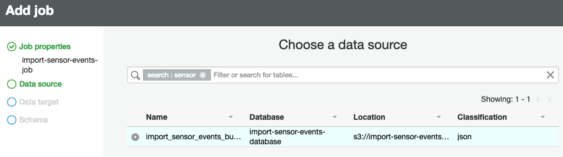
- Step 7: Choose the data source as S3, and provide the location to S3 where files are located.
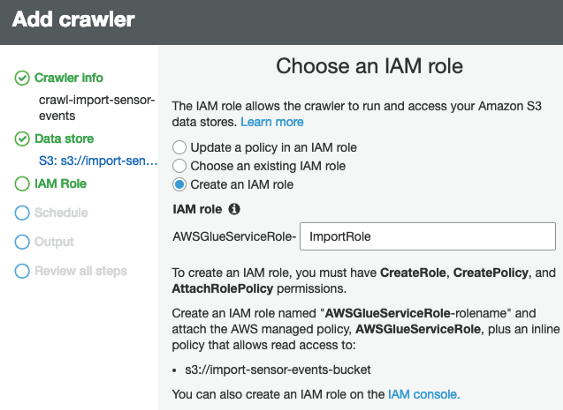
- Step 8: Select the appropriate IAM role to allow Glue to access S3 and Redshift.
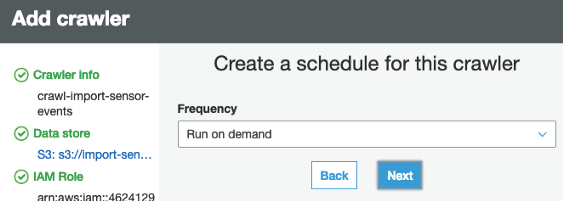
- Step 9: Once you specify all the required roles, now you need to select the Schedule for the crawler to run. Select “Run on Demand” option.
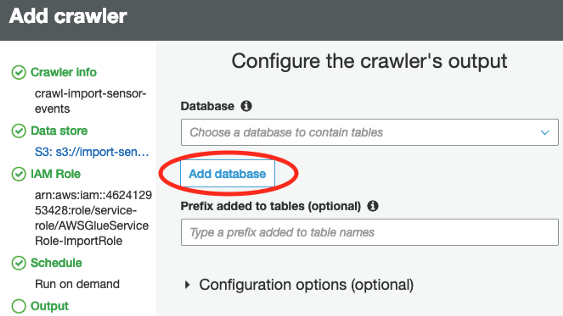
- Step 10: Next, you have to select the output for the Crawler, select Add Database, and then specify the name of the database. Click Finish.
2. Create Glue Job
Now that you have created Crawler, that will crawl S3 files and load it into a DB; you now need to create a Glue job that will execute this Crawler to load the JSON file, parse it and then load into Redshift. Follow the below steps to create Glue Job.
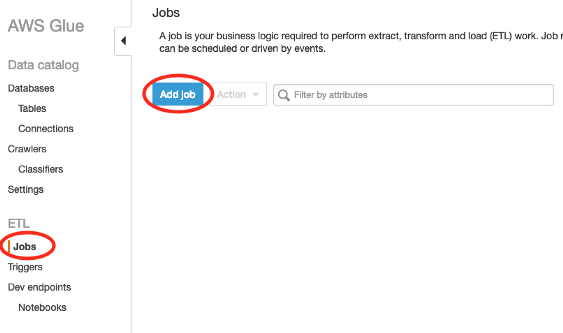
- Step 1: From the left pane, under the ETL section, select Jobs and then click on Add Job.
- Step 2: Specify the name of the Job, and select the appropriate AWS Role, and click Next by keeping everything else as default.
- Step 3: Now, in the input data source, select the table name that contains the crawled JSON schema.
- Step 4: For the target location, choose JDBC as the Data Store and click on Add connection.

- Step 5: In the Add new connection dialog box, select Amazon Redshift as the connection type and mention all the required database credentials.

- Step 6: Check the source to target Mapping.

- Step 7: Click on Next, then Save and then click on Run Job.

- Step 8: Once the job completes, navigate to services and select Amazon Redshift.
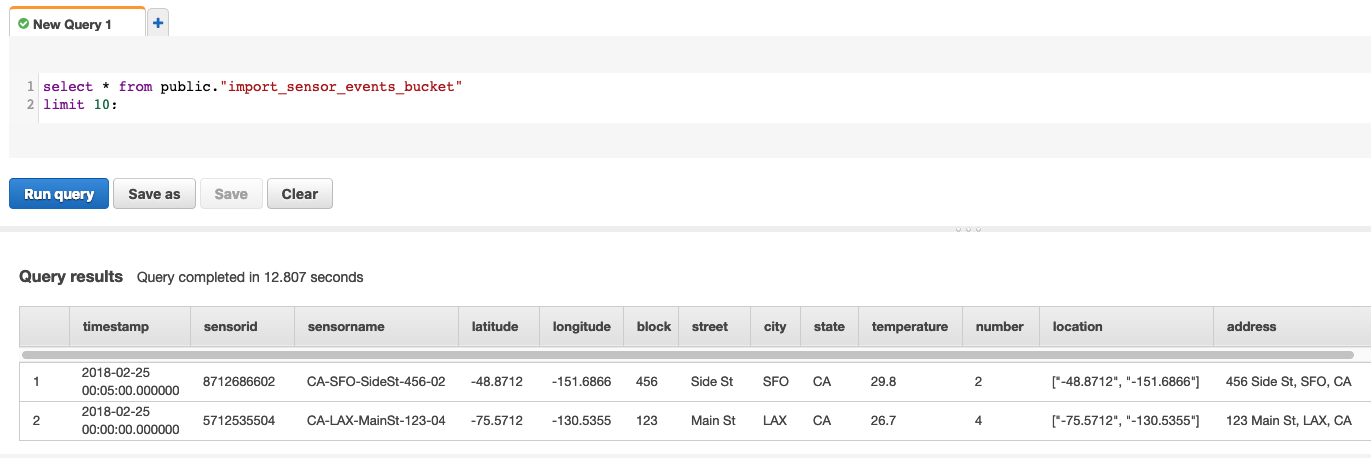
- Step 9: On the Redshift, run the query to check the data has been successfully loaded from JSON to Redshift.
Before we wrap up, let’s cover some basics.
What is JSON Data?
The JSON data structure is a key-value pair, and it usually contains a set of JSON objects and arrays.
A JSON object is an unordered collection of key-value pairs that begins and ends with braces. The key values are enclosed in separate quotes and separated by a colon. Commas separate the pairs from each other.
A JSON array is a collection of JSON Objects, which is separated by commas and the JSON array begins and ends with brackets.
JSON objects and arrays may contain nested structures to have a hierarchical data structure. Below is the sample JSON Object that contains the nested array and objects.
{
"menuitem": [
      {"value": "New", "onclick": "CreateNewDoc()"},
      {"value": "Open", "onclick": "OpenDoc()"},
      {"value": "Close", "onclick": "CloseDoc()"}
    ]  }
What is Redshift?
AWS Redshift is a cloud-based data warehouse provided by Amazon as a part of Amazon Web Services. It is a fully managed and cost-effective data warehouse solution.
AWS Redshift is designed to store petabytes of data and can perform real-time analysis to generate insights.
Conclusion
In this article, you went through a detailed step-by-step approach on how you can load data from JSON to Redshift.
However, the above-mentioned ways need some programming language and understanding of tools.
If you’re looking for an all-in-one solution, that will not only help you transfer data but also transform it into an analysis-ready form, then Hevo Data is the right choice for you!
FAQ on Load Data from JSON to Redshift
How do I load data from JSON to Redshift?
You can load data from JSON to Redshift using three methods:
Method 1: Load JSON to Redshift in Minutes using Hevo Data
Method 2: Load JSON to Redshift using the ‘Copy’ Command
Method 3: Load JSON to Redshift using AWS Glue
How do I transfer data to Redshift?
You can load data into Redshift by issuing a COPY command, using AWS Data Pipeline, AWS Glue, third-party ETL tools, or using Redshift’s JDBC/ODBC drivers.
How to send JSON data to Firebase?
Send data in JSON form using the Firebase REST API or SDKs. For example, in JavaScript, use firebase. database().ref('path').set(jsonData).
Is JSON valid in Redshift?
Yes, redshift supports JSON files.
Can I store JSON in Redshift?
You can store JSON in Redshift using the ‘super’ data type.

Share it with your connections.
-
 Share To X
-
 Share To LinkedIn
-
 Share To Facebook
-
 Copy Link