If you are working on a non-trivial project, chances are you will add new features and functionalities over time, and your domain model will evolve along with it.
For example, you might need to add/update a field or document within a collection in your database across all environments; doing so manually is a tedious and error-prone process, and keeping track of your changes is difficult. Database migration tools such as Mongock can assist you in automating the preceding process.
In this blog, you’ll get to learn about Mongock, its architecture, and how to get started with Spring Data Migration for MongoDB.
Table of Contents
What is Mongock?
Mongock is a Java-based migration tool for distributed environments that focuses on managing changes for your favorite NoSQL databases.
It was initially designed for MongoDB data migrations, but the product is evolving to provide a broader suite of database compatibility, as well as transactional execution features for use cases that require state management in distributed systems.
With Hevo Data, you can easily integrate MongoDB with a wide range of destinations. While we support MongoDB as sources, our platform ensures seamless data migration to the destination of your choice. Simplify your data management and enjoy effortless integrations.
Check out what makes Hevo amazing:
- It has a highly interactive UI, which is easy to use.
- It streamlines your data integration task and allows you to scale horizontally.
- The Hevo team is available around the clock to provide exceptional support to you.
With its automated data handling and no-code interface, Hevo makes building efficient pipelines effortless.
Get Started with Hevo for FreeKey Features of Mongock
Here are some features of Mongock:
- Code-Based Approach: You can reate migration scripts in Java to allow database changes to be shipped alongside application code.
- Java, Spring, and Spring Boot Compatibility: It is Compatible with all Frameworks.
- Support for NoSQL Databases: Mongock’s primary goal is to support the most widely used NoSQL databases.
- Distributed Environment: It uses a locking mechanism that allows multiple instances of an Application to run concurrently while ensuring one-write-only.
- Open-source Community: Open, without a license, and supported by a community of enthusiasts.
- Management Operations: Mongock provides a plethora of Operations for dealing with database changes. Migrations, Rollbacks, Undo, List History, Audit, and so on are examples of these.
- CLI Is Included: Mongock includes a Command Line Interface for better management of Datastore Operations.
Mongock Architecture

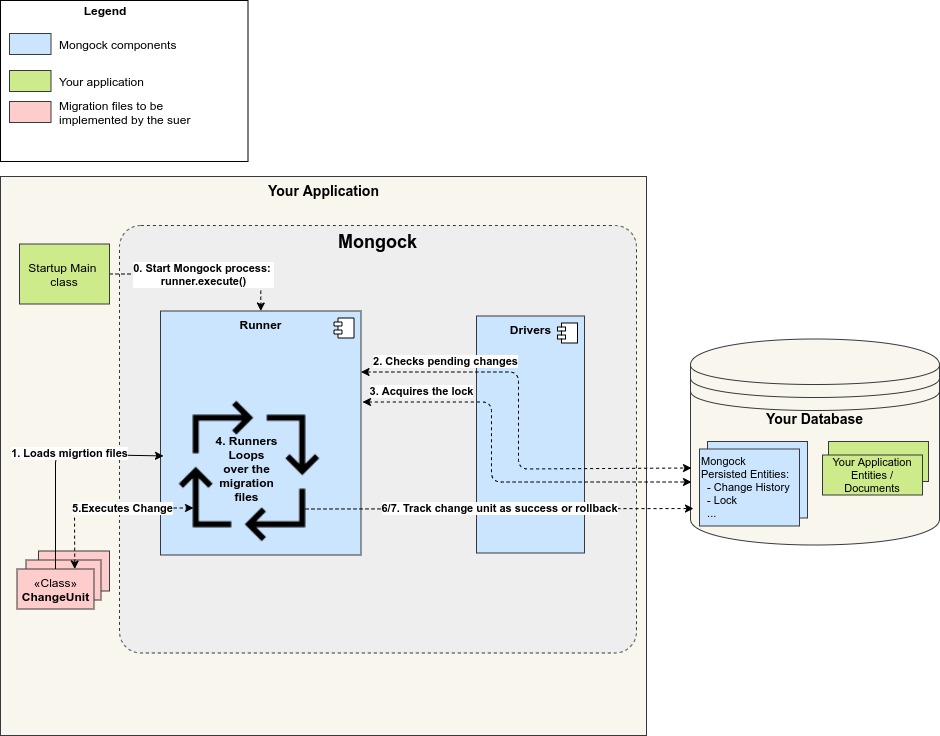
The main elements of this architecture are:
- Migration
- Driver
- Runner
Migration
A migration entails tracking transactional changes and operations in your database. Mongock employs the ChangeUnit concept, which is a single migration file. During startup, a migration can execute multiple ChangeUnits.
A ChangeUnit is materialized as a Java class because Mongock promotes a code-first approach to migrations. Using the @ChangeUnit annotation, you can implement your migration unit, which will be stored in the Mongock state records.
Driver
Everything that must be saved is given to the driver. The runner uses it to persist, check the migration history, and work with the distributed lock.
Mongock categorizes drivers into driver families, which are further subdivided into databases. Then, within a driver family, multiple drivers for different connection libraries and versions may be provided.
In the case of MongoDB, for example:
mongodb-driver-sync » org.mongodb
mongo-java-driver » org.mongodb
data.org.springframework » spring-data-mongodb(v3.x)
spring-data-mongodb » org.springframework.data (v2.x)
The architecture is designed in such a way that any driver can be combined with any runner. For example, with the standalone runner, you could use a driver for springdata (no framework).
Runner
The component dealing with process logic, configuration, dependencies, framework, and any environmental aspect is the runner. It is the glue that holds everything together and the decision-maker. It runs the process with the migration, driver, and framework.
Mongock has a runner for each framework (standalone, Springboot, Micronaut…) and can be combined with any driver.
Process
In short, the migration process executes all pending migration changes in order.
It is designed to either complete the migration successfully or fail. And the next time it is executed, it will pick up where the migration left off (the failed ChangeUnit).
To ensure consistency between the code and the data, the process is normally placed in the application startup, ensuring that the application is deployed only after the migration has been completed.
- The migration files are loaded by the runner (changeUnits).
- The runner determines whether there is a pending change to execute.
- The runner obtains the distributed lock via the driver.
- The runner iteratively loops through the migration files (changeUnits).
- Executes the following ChangeUnit.
- If the ChangeUnit is successfully executed, Mongock adds a new entry to the Mongock change history with the state SUCCESS and repeats step 5.
- If the ChangeUnit fails, the change is rolled back by the runner. The rollback is performed natively if the driver supports transactions and transactions are enabled. When the driver does not support transactions or when transactions are disabled, the @RollbackExecution method is invoked. In both cases, the ChangeUnit failed, but in the latter case, an entry in the changelog indicates that a change has been rolled back.
- It is considered successful if the runner completed the entire migration with no errors. It unlocks the lock and completes the migration.
- If, on the other hand, any ChangeUnit fails, the runner terminates the migration and throws an exception. When it is run again, it will resume from the failed ChangeUnit (included).
Why use Mongock?
Mongock enables developers to execute safer database changes by giving them ownership and control over migrations during the application deployment process, as the code and the data changes are made together.
You can also take a look at the Top MongoDB Migration Tools to explore other ways to migrate your data.
Prerequisites
- 3.x Spring Boot
- Maven 3.9.x
- JAVA 17 or JAVA 21
- Mongo 6.0.x
Mongock for Spring Data Migration for MongoDB
Here are the simple steps to get started with Spring Data Migration:
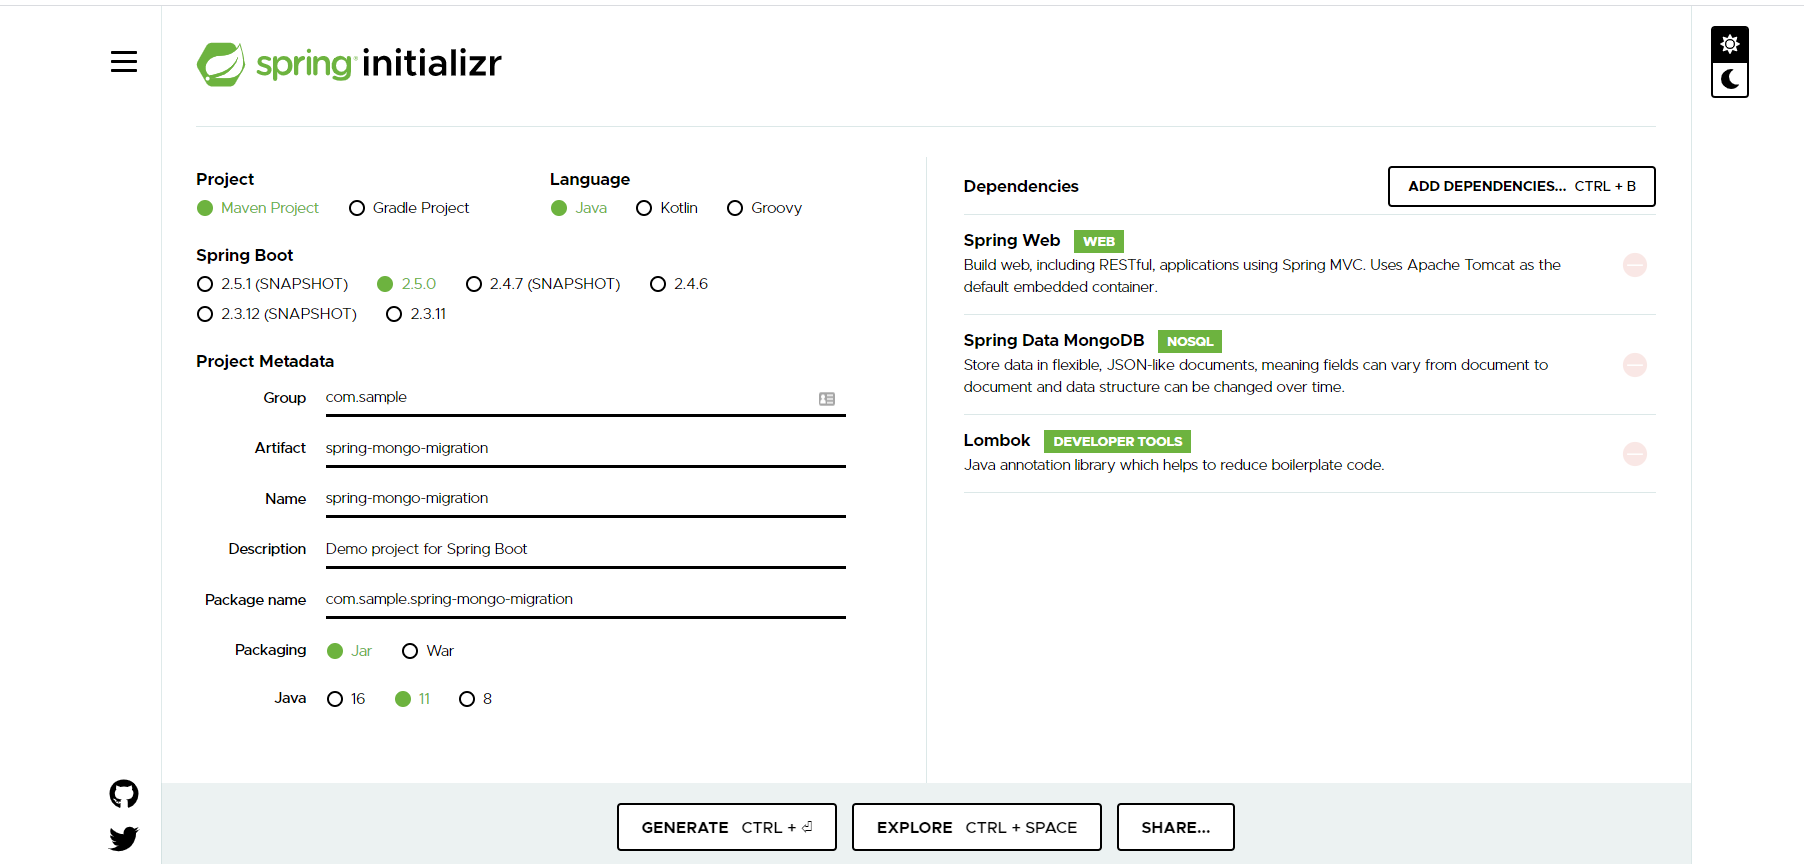
To begin, we will create a simple Spring Boot project from start.spring.io with the following dependencies: Web, MongoDB, and Lombok.

Import the most recent version of the Mongock bom file into your pom file.
<dependencyManagement>
    <dependencies>
        <dependency>
            <groupId>com.github.cloudyrock.mongock</groupId>
            <artifactId>mongock-bom</artifactId>
            <version>4.3.8</version>
            <type>pom</type>
            <scope>import</scope>
        </dependency>
    </dependencies>
</dependencyManagement>- Add a runner dependency
<dependency>
    <groupId>com.github.cloudyrock.mongock</groupId>
    <artifactId>mongock-spring-v5</artifactId>
</dependency>- Add a driver dependency
<dependency>
    <groupId>com.github.cloudyrock.mongock</groupId>
    <artifactId>mongodb-springdata-v3-driver</artifactId>
</dependency>
Step 1: Initiate Mongock
Once you’ve imported all of the required dependencies, there are two ways to activate it in the project. When using the Spring framework, the annotation approach is usually the simplest and most convenient option.
However, you may not always use Spring or require more control over your Mongo bean. You should take the traditional builder approach in this case.
Let’s make the java class in charge of the migration -DatabaseChangeLog.java.
package com.programming.techie.mongo.config;

import com.github.cloudyrock.mongock.ChangeLog;
import com.github.cloudyrock.mongock.ChangeSet;
import com.programming.techie.mongo.model.Expense;
import com.programming.techie.mongo.model.ExpenseCategory;
import com.programming.techie.mongo.repository.ExpenseRepository;

import java.math.BigDecimal;
import java.util.ArrayList;
import java.util.List;

import static com.programming.techie.mongo.model.ExpenseCategory.*;

@ChangeLog
public class DatabaseChangeLog {

    @ChangeSet(order = "001", id = "seedDatabase", author = "Sai")
    public void seedDatabase(ExpenseRepository expenseRepository) {
        List<Expense> expenseList = new ArrayList<>();
        expenseList.add(createNewExpense("Movie Tickets", ENTERTAINMENT, BigDecimal.valueOf(40)));
        expenseList.add(createNewExpense("Dinner", RESTAURANT, BigDecimal.valueOf(60)));
        expenseList.add(createNewExpense("Netflix", ENTERTAINMENT, BigDecimal.valueOf(10)));
        expenseList.add(createNewExpense("Gym", MISC, BigDecimal.valueOf(20)));
        expenseList.add(createNewExpense("Internet", UTILITIES, BigDecimal.valueOf(30)));

        expenseRepository.insert(expenseList);
    }

    private Expense createNewExpense(String expenseName, ExpenseCategory expenseCategory, BigDecimal amount) {
        Expense expense = new Expense();
        expense.setExpenseName(expenseName);
        expense.setExpenseAmount(amount);
        expense.setExpenseCategory(expenseCategory);
        return expense;
    }
}
The class is annotated with the @ChangeLog annotation, indicating that it is a class that should run when applying migrations.
- seedDatabase() is annotated with the @ChangeSet annotation.
- The order property of the @ChangeSet determines the order in which the migration should be applied to the database schema.
- id to be able to identify a ChangeSet uniquely
- author to be able to set the author who created this Changeset’s name.
Step 2: Use ChangeLogs and ChangeSets
To the main class, add the @EnableMongock annotation.
Include the path to your changeLog package in your property file (application.yml). Because it’s an array, you can add more than one.
To the main class, add the @EnableMongock annotation.

Include the path to your changeLog package in your property file (application.yml). Because it’s an array, you can add more than one.

Migration classes are ChangeLogs. They contain ChangeSets, which are the migration methods themselves.
You’ll need the following to run the migration:
- @ChangeLog should be used to annotate the changeLog classes.
- @ChangeSet should be used to annotate the changeSet methods.
Let’s run the application and see if it can successfully seed the MongoDB with our test data.

We can see from the logs that have successfully applied the ChangeSet to MongoDB. Let us test this by querying the database.
use expense-tracker;
db.getCollection("expense").find({});
Output:
{
    "_id" : ObjectId("5ff6303090b13917dfb170b7"),
    "name" : "Movie Tickets",
    "category" : "ENTERTAINMENT",
    "amount" : "40",
    "_class" : "com.programming.techie.mongo.model.Expense"
}
{
    "_id" : ObjectId("5ff6303090b13917dfb170b8"),
    "name" : "Dinner",
    "category" : "RESTAURANT",
    "amount" : "60",
    "_class" : "com.programming.techie.mongo.model.Expense"
}
{
    "_id" : ObjectId("5ff6303090b13917dfb170b9"),
    "name" : "Netflix",
    "category" : "ENTERTAINMENT",
    "amount" : "10",
    "_class" : "com.programming.techie.mongo.model.Expense"
}
{
    "_id" : ObjectId("5ff6303090b13917dfb170ba"),
    "name" : "Gym",
    "category" : "MISC",
    "amount" : "20",
    "_class" : "com.programming.techie.mongo.model.Expense"
}
{
    "_id" : ObjectId("5ff6303090b13917dfb170bb"),
    "name" : "Internet",
    "category" : "UTILITIES",
    "amount" : "30",
    "_class" : "com.programming.techie.mongo.model.Expense"
}
How does Mongock handle Database Migrations?
It keeps track of the ChangeLog by storing them in the mongockChangeLog collection; once a ChangeSet is applied, it marks it as EXECUTED to prevent the migration from being executed again.
use expense-tracker;
db.getCollection("mongockChangeLog").find({});
Output:
{
    "_id" : ObjectId("5ff6303090b13917dfb170bc"),
    "executionId" : "2021-01-06T22:48:32.481939600-722",
    "changeId" : "seedDatabase",
    "author" : "Sai",
    "timestamp" : ISODate("2021-01-06T21:48:32.520+0000"),
    "state" : "EXECUTED",
    "changeLogClass" : "com.programming.techie.mongo.config.DatabaseChangeLog",
    "changeSetMethod" : "seedDatabase",
    "executionMillis" : NumberLong(36),
    "_class" : "io.changock.driver.api.entry.ChangeEntry"
}
Conclusion
This blog has introduced you to Mongock, its architecture, and the key features of the platform, along with that a simple two-step procedure to get started with Spring Data Migration for MongoDB.
An Automated Data Pipeline can help in solving the issue and this is where Hevo comes into the picture.
Sign up for a 14-day free trial and simplify your data integration process. Check out the pricing details to understand which plan fulfills all your business needs.
1. What is Mongock used for?
Mongock is a Java-based database migration tool designed for MongoDB. It helps developers manage database schema changes in an automated, version-controlled, and reliable manner, ensuring consistency across environments.
2. How do you disable Mongock?
To disable Mongock, you can set its property mongock.enabled=false in the application configuration file (e.g., application.properties or application.yml) when using Spring Boot.
3. How to do migration in MongoDB?
Database migrations in MongoDB using Mongock involve defining changesets in Java classes annotated with @ChangeLog and @ChangeSet. Mongock executes these changesets to apply schema or data transformations during application startup.


