


 Key Takeaways
AWS Glue and AWS Lambda are built for fundamentally different workloads. While AWS Glue is designed for large-scale ETL and data integration, AWS Lambda focuses on executing lightweight, event-driven functions with minimal latency.
Use AWS Glue when:
- You’re building complex ETL pipelines
- You need to process large datasets at scale
- Data transformation, cataloging, and scheduling are required
Use AWS Lambda when:
- You need real-time, event-triggered execution
- Tasks are short-lived and stateless
- You’re building microservices or lightweight automation
What makes Hevo a better choice:
- Simplifies ETL with a no-code interface
- Handles real-time data pipelines without manual setup
- Reduces dependency on deep AWS expertise and infrastructure tuning
Note: Glue handles data-heavy workflows, Lambda powers event-driven execution, and Hevo offers a simpler, no-code alternative for faster pipeline setup.
Choosing between AWS Glue and Lambda isn’t just a technical decision; it impacts how your data pipelines run, how quickly your system responds, and how much complexity your team manages. Understanding these distinctions is key. Not only does it save teams from overengineering features, it also helps organisations cut down redundant costs.
In this guide, we break down differences, and ideal use cases of AWS Glue and Lambda, and how a no-code alternative like Hevo fits in.
To know more about Hevo and how it impacts modern data teams, read our guide or book a demo now!
Table of Contents
AWS Glue vs AWS Lambda: Core Comparison
AWS Glue (a serverless data integration or ETL service) and AWS Lambda (a serverless compute service) play an integral role in the AWS ecosystem. While Glue builds scalable ETL pipelines, Lambda executes lightweight, event-driven tasks. However, that’s not all of it. The tools differ significantly in terms of use cases, purpose, and architecture and have challenges of their own.
Here’s a quick snapshot of how Glue differs from Lambda
| Feature | AWS Glue | AWS Lambda |
| Service Type | Serverless ETL service | Serverless compute service |
| Primary Use Case | Data integration and ETL pipelines | Event-driven application logic |
| Execution Model | Runs ETL jobs (batch/streaming) | Runs functions triggered by events |
| Scaling | Auto-scales for large data workloads | Auto-scales per request |
| Execution Time Limit | Supports long-running jobs | Max 15 minutes per execution |
| Programming Languages | Python (PySpark), Scala | Python, Node.js, Java, Go, Ruby |
| Pricing Model | Based on DPUs (compute resources used) | Based on requests and execution time |
| Startup Time | Slower (job startup latency) | Fast (low-latency execution) |
What is AWS Glue
AWS Glue is a fully managed Data Integration service that helps its users prepare, discover, catalog, clean, and transform data from various sources. It supports connection to more than 70 data sources so that various teams can discover and manage data in a centralized data catalog. Cataloged data can be easily accessed with tools like Amazon Athena, Amazon EMR, Amazon Redshift, etc.
Components of AWS Glue
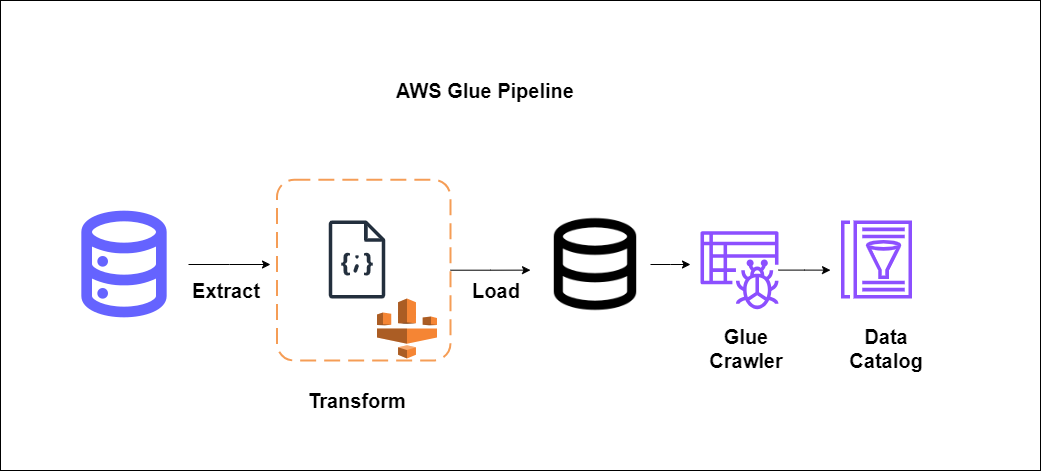
AWS Glue ships with many features that can be accessed under different components. Here, we discuss various components of AWS Glue.
- Data catalog: The Data catalog holds the schema and metadata of the data.
- Amazon Glue Crawlers: Crawlers register/create metadata for data from the source and register it in the data catalog.
- Job: AWS Glue Jobs carry out processing for ETL tasks. Python or Scala is used to write business logic for these jobs.
- Trigger: Glue Jobs can be scheduled based on time, or triggers can be set up based on events.
- Development endpoint: Allows developers to use their preferred integrated development environment (IDE) to develop, test, and debug their ETL code.
Looking for a simpler, no-code alternative to AWS Glue and AWS Lambda? Hevo offers an automated ETL platform that streamlines data integration without the complexity. Experience seamless data pipelines with Hevo—no coding required.
Why choose Hevo?
- In-flight Transformations: Use Python script or drag-and-drop interface to perform transformations on the go.
- Historical Data Sync: Fetch all your historic data for free.
- Flexible Replication: Choose and replicate either the entire database or specific columns as per your need.
Key Features of AWS Glue
- Data Catalog: Search across all your data sources by cataloging in AWS.
- Manage schema access: Users can implement fine-grained access control to databases and tables.
- Job Scheduling: Automates the running of ETL jobs based on time or events.
- Serverless streaming ingestion: Users can create serverless ingestion pipelines and prepare their streaming data on the go.
- Clean data with Machine learning: With the Find matches feature of AWS Glue, users can clean and prepare data for their analysis needs. This feature deduplicates data based on values in fields.
- Detecting sensitive data: AWS Glue sensitive data detections lets you identify and process crucial data on the fly.
- Monitor jobs: AWS Glue provides various automated monitoring tools like AWS Cloudwatch logs, Apache Spark UI access for spark-based applications, AWS Glue Job run insights, and Cloudtrail to help users with full control of their jobs.
- ETL Workflows: Users can define workflows on their jobs, triggers, and crawlers to serve their ETL needs.
Advantages of Using AWS Glue
- Support for a Wide Range of Data Sources: AWS Glue provides seamless integration with various AWS services. It directly supports data stored in Amazon Relational Database Service (RDS), Amazon S3, Amazon Redshift, and Amazon Aurora and with various common database engines via ODBC and JDBC connectors, thus providing hassle-free integration with these services.
- Automated Data Discovery: Glue automatically catalogs and discovers data. By setting up crawlers, It can automatically crawl data sources, identify data formats, and register metadata with the catalog. It can also automatically generate code to run transformation, reducing the effort needed to build, maintain, and run ETL jobs.
- Scalability: Scales automatically based on workload.
- Cost-Effective: Since AWS Glue is serverless, users only need to pay for the resources used during ETL jobs.
- Ease of Use: AWS Glue is easy to use. Its console provides a user-friendly interface to create and set up jobs and crawlers. With advanced filtering capability, one can find required tables from the catalog easily.
Limitations of Using AWS Glue
- Learning Curve: While it is easy to use, users may require time to learn and understand its capabilities.
- Spark Dependency: AWS Glue jobs run on the Apache Spark engine. This means that engineers writing ETL code should also know spark well. Additionally, code can be written in Scala or Python so engineers must also be well versed with these languages.
- Limited to the AWS ecosystem: While Glue is great for working with other AWS services, it lacks integrations with products outside the AWS ecosystem, thus limiting choices in using open-source frameworks.
- Limited control over Spark configuration: While AWS Glue manages the Apache Spark cluster used for processing, it limits the user’s access to control and optimizes Spark configuration fully for special use cases.
- Cost: AWS Glue is a serverless service. Though it is cost-effective in the sense that users only pay for what they use, users also need to be well-versed in monitoring usage and choosing the right resources to minimize costs. For example, using reserved instances for their regular needs can help them save costs.
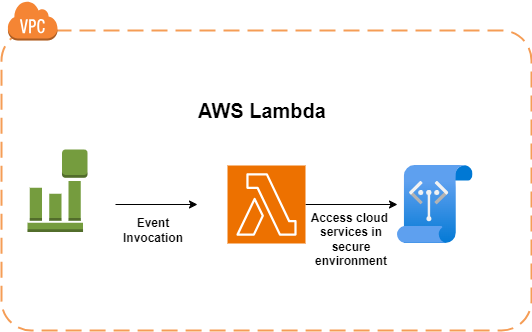
What is AWS Lambda
AWS Lambda is a serverless computing service that executes code known as lambda functions in response to events. It automatically scales resources, letting users run code on high-availability compute infrastructure without worrying about the administration of managing servers. When using Lambda, users are only responsible for their code in one of the supported language runtimes. AWS Lambda manages the compute fleet, capacity, monitoring, and logging for your functions.
Components of AWS Lambda
- Lambda Function: Lambda functions are where users ship their actual code to perform tasks in the language runtimes supported by Lambda.
- Configuration: In the Configuration section, users can specify any dependency layers they need to attach, any permissions required by the function to execute, Environment variables, Security configurations, and many more. It controls how functions will be executed.
- Event Source: Since Lambda functions execute in response to events, event sources can be configured to trigger functions in response to some events triggered by AWS services or a third-party service. However, setting up event sources is not mandatory.
Key Features of Lambda
- Layers: Dependencies and packages needed by your code can be shipped together as layers to reduce the size of deployment bundles and deploy your code quickly.
- Container Images: Users can also create container images with their base image or an AWS-provided base image and deploy them on lambda. This empowers them to reuse these images with their own set of containerization tools for variable workloads.
- Environment Variables: Environment variables can run configurable code, allowing you to reuse code for different use cases.
- Concurrency control: AWS Lambda gives its users full control over scaling policies and the responsiveness of their production applications.
- Code Signing: Code signing enables customers to allow approved developers to alter and publish code to lambda functions.
- Private Networking: Lambda’s can be created and deployed in the same private network as a database and internal services referenced in lambda code.
- File System Access: Amazon EFS can be mounted to lambda functions to access and modify shared resources safely and at high concurrency.
Advantages of Using Lambda
- Cost Efficiency: AWS Lambda is a serverless service. Hence, users only pay for the compute time their function executes.
- No Server Management: AWS Lambda is responsible for the availability, provisioning, and maintenance of servers, eliminating the need to manage them.
- Scalability: AWS Lambda automatically scales based on workload.
- Quick Deployment: AWS Lambda supports shipping libraries as layers, reducing the size of deployment code and enabling rapid deployment.
- Integration: AWS lambda easily integrates with various AWS services. Lambda functions can be integrated with pre-trained machine learning (ML) models to classify images, perform NLP processing, and many more.
- Resiliency: Code in AWS Lambda is more resilient under load and suboptimal conditions. Lambda’s statelessness ensures that it does not affect other functionalities.
- Modular Design: AWS Lambda can be used to build scalable architecture. It encourages microservices and modular functions as an architectural design pattern.
Here’s what an advanced user has to say about its on G2:

Limitations of Using Lambda
- Execution Timeout: AWS Lambda has a limitation of a maximum execution time of 15 minutes, making it a bad choice for large data processing workloads.
- Cold Starts: Since Lambda works on containerization, first executions can experience latency.
- Resource Limits: AWS Lambda has limitations in memory and computing resources that can be used for execution.
- Complexity in Debugging and Monitoring: Since AWS Lambda encourages microservices and modular architecture, it might lead to complex applications with numerous functions. Due to the distributed nature of the architecture, debugging, tracing, and monitoring can be challenging.
- Vendor Lock-In: AWS Lambda functions are tightly coupled with AWS Services and infrastructure. Hence creating Vendor LockIn.
- No Control Over Environment: For ease of execution and reduction in cost, users have less control over the environment. They might want to look for some other services for extra OS configuration needs.

Factors to Consider when Choosing between AWS Glue and Lambda
Functionality
- AWS Glue is Designed for data integration tasks, such as cleaning, transforming, and moving data between different data stores. It also serves data cataloging needs for an organization looking for Digital Transformation. It can be used where the customer has a use case for data migration or data preparation for analytics needs.
- AWS Lambda is good for use cases that require running short-lived, stateless functions. For example, Lambda functions can be used for Real-time file processing, data transformation on the fly, lightweight API backends, and task automation.
Execution Model
- AWS Glue runs on the Apache Spark environment. It is ideal for processing large datasets in batches. For example, it can be used to aggregate data on a daily or weekly basis for analytics KPIs.
- AWS Lambda can run short-lived tasks concurrently in response time, making them ideal for real-time processing use cases. For example, AWS Lambda can be used to ingest real-time IOT data.
Data Volume
- AWS Glue is designed to handle large datasets with high throughput with the help of the Apache Spark engine. Hence it is ideal for scenarios where large data sets need to be processed.
- AWS Lambda is charged based on the number of requests and execution time. Since AWS Lambda has execution time and resource limits, It is ideal for small datasets like ingesting real-time IOT data into the database.
Cost
- AWS Glue is charged based on DPUs (Data Processing Units) and the duration of your job. There are separate charges for crawler runtime and data catalog storage
- AWS Lambda charges based on the number of requests and the compute time required. Additional costs may apply for data transfer and storage when integrated with other AWS services.
Complexity
- With developer developer-friendly User interface and automation features, it is easy to set up for ETL tasks in AWS Glue. It requires minimal management for handling AWS infrastructure.
- AWS Lambda is easy to deploy without caring for the underlying infrastructure. It integrates seamlessly with AWS Services like S3, Dynamodb, and many more to serve your event processing needs.
Scalability
- AWS Glue scales automatically based on the workload. It is designed to handle large datasets. It also has built-in optimization for data processing tasks.
- AWS Lambda can scale up to handle multiple incoming events but may require fine-tuning to avoid throttling. It is best suited for tasks that can be completed within a few seconds to minutes.
Use AWS Glue When You Need…
An ETL workflow can make or break your workflow, and hence, one must have the right knowledge about when to use which tool. Here’s when to use AWS Glue:
- Complex ETL workflows: For teams processing complex Extract, Transform, and Load (ETL) operations, AWS Glue serves as the right choice. AWS Glue supports built-in data cleansing, transformations, and cataloging features, which makes it ideal for large-scale data pipelines.
- Data integration with multiple sources: One of the key aspects of AWS Glue that differentiates it from others is its ability to seamlessly integrate with various data sources. For instance, AWS Glue supports data sources such as S3, RDS, RedShift, and external databases. These databases can be combined to create a data catalog, while built-in connectors streamline this process.
Use AWS Glue When You Need…
In contrast to AWS Glue, AWS Lambda finds a spot in projects that need real-time processing abilities. Here are two such cases where AWS Lambda plays a distinct role:
- Event-driven data processing: For applications that need triggered data processing tasks based on an event like file upload or data changes, AWS Lambda serves as the right choice. Lambda allows developers to execute code responding to these events with minimal latency, making it suitable for real-time data processing.
- Simple or short-lived tasks: AWS Lambda is perfectly designed for lightweight processing tasks. The tool performs simple data transformation tasks or operations that can be completed within a few seconds. On top of it, it uses a pay-per-use pricing model that makes it cost-efficient.
Leveraging Hevo for No-Code ETL
While AWS Glue and AWS Lambda are powerful tools for data processing and ETL tasks, they have limitations that can be addressed using Hevo. Hevo is a cloud-based no-code data movement platform. Here is how Hevo can help you write no-code ETL”
- Ease of Use: AWS Glue and Lambda can be complex to configure and require knowledge of AWS services, IAM roles, and other AWS-specific configurations. Hevo provides a no-code, drag-and-drop interface that makes it easy for users of all technical levels to create and manage ETL pipelines.
- Time Savings: With options of many pre-built connectors and transformations, Hevo helps reduce the development and maintenance cycle.
- Scalability: AWS Glue and Lambda require careful resource management and tuning to optimize performance and cost, which can be challenging. Hevo automatically manages resources and scales with your data needs, eliminating the need for manual tuning and optimization.
- Real-time data processing: Hevo ensures consistent performance without cold start latency, making it suitable for both batch and real-time data processing. Support for real-time data integration ensures that data is always current and ready for analysis.
- SaaS offering on AWS Marketplace: Hevo is available on AWS Marketplace with a SaaS offering for customers who want to use their AWS accounts for infra needs. Hevo provides hassle-free integration with AWS while following data security and compliance with industry standards.
Conclusion
In this article, we discussed the capabilities, purpose, advantages, and limitations of AWS Glue vs AWS Lambda. Where AWS Glue is ideal for ETL processes and data preparation, AWS Lambda serves best for event-driven applications and microservices. Both of them come with their own set of powerful features and limitations for different use cases.
Find alternative tools to AWS Glue that provide different strengths in data processing, scalability, and pricing. Learn more at exploring AWS Glue alternatives.
Hevo can help address their limitations by providing a no-code, user-friendly interface that simplifies the ETL process. With Hevo, users can easily set up and manage data pipelines without deep technical expertise, reducing development cycles and focusing on fetching maximum business value.
Schedule a customized demo to see Hevo in action!
Frequently Asked Questions
1. What is the difference between Lambda and glue AWS?
AWS Lambda is a serverless compute service that runs code in response to events, while AWS Glue is a managed data integration service designed for data discovery, cataloging, and ETL needs
2. When should I use AWS Glue?
Use AWS Glue for ETL processes, data preparation, and when you must catalog and transform large datasets.
3. What is AWS Glue good for?
AWS Glue is good for automating the ETL process, discovering and cataloging metadata, and preparing data for analytics.
4. When not to use AWS Glue?
AWS Glue is good for batch processing needs. While it can be used to perform near real-time processing, it should be avoided for real-time data processing, low-latency applications, or complex transformations that require extensive custom coding.
5. When should I use AWS Lambda?
AWS Lambda should be used when you need to execute your code in a scalable, event-driven fashion.
6. Can I use AWS Glue and Lambda together?
Yes, AWS Lambda and Glue can be used together. Both services can be integrated to fulfill data processing needs.


Share it with your connections.
-
 Share To X
-
 Share To LinkedIn
-
 Share To Facebook
-
 Copy Link


