


With Traditional ETL no longer being able to meet the demands of the future, businesses across the world have moved on to the paradigm of real-time streaming ETL, which works in a distributed manner and allow transforming and enriching data in real-time and at a large scale. Setting up such robust ETL pipelines that bring in data from a diverse set of sources can be done using Kafka with ease. Organisations use Kafka for a variety of applications such as building ETL pipelines, data synchronisation, real-time streaming and much more.
This article aims to provide you with a step-by-step guide to help you set up Kafka ETL using various methods. Through this article, you will get a deep understanding of the tools and techniques being used & thus, it will help you hone your skills further. It will help you build a customised ETL pipeline for your organisation.
Table of Contents
What is Kafka?

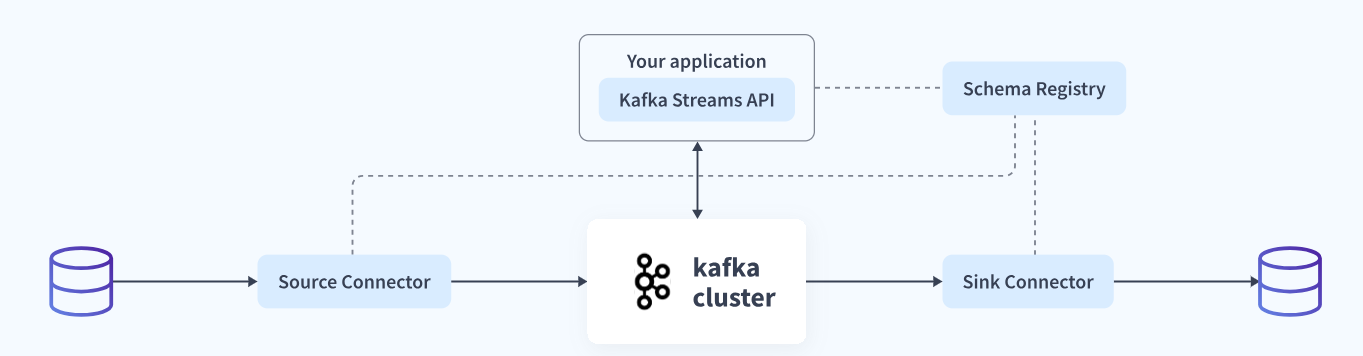
Apache Kafka is a popular real-time data streaming software that allows users to store, read, and analyze streaming data using its open-source framework. Being open-source, it is available free of cost to users. Leveraging its distributed nature, users can achieve high throughput, minimal latency, high computation power, etc. and handle large volumes of data with ease.
Written in Scala, Kafka supports bringing in data from a large variety of sources and stores them in the form of “topics” by processing the information stream. It uses two functions, namely “Producers”, which act as an interface between data source and topics, and “Consumers”, which allow users to read and transfer the data stored in Kafka. You can also read our article about kafka schema registry.
Key features of Kafka:
- Scalability: Kafka has exceptional scalability and can be scaled easily without downtime.
- Data Transformation: Kafka offers KStream and KSQL (in case of Confluent Kafka) for on the fly data transformation.
- Fault-Tolerant: Kafka uses brokers to replicate data and persists the data to make it a fault-tolerant system.
- Security: Kafka can be combined with various security measures like Kerberos to stream data securely.
- Performance: Kafka is distributed, partitioned, and has very high throughput for publishing and subscribing to messages.
For further information on Kafka, you can check the official website here.
What is ETL?
ETL stands for Extract, Transform, and Load and refers to the process of integrating data from a variety of sources, transforming it into an analysis-ready form, and loading it into the desired destination, usually a data warehouse.
- Method 1: Using Kafka Stream APIs to Set Up Kafka ETL
With the help of various stream processors provided by Stream APIs, users can perform various operations to enrich the data they’ve loaded into Kafka using the connect framework and provide ready-to-use data in real-time. - Method 2: Using Hevo Data to Set Up Kafka ETL
Hevo Data an Automated Data Pipeline, a No-code Data Pipeline can set up the ETL process to transfer data from Kafka to the Data Warehouses, Databases or any other destination of your choice in a hassle-free manner. Hevo’s end-to-end Data Management service automates the process of not only loading data from Kafka but also transforming and enriching it into an analysis-ready form.
Get Started with Hevo for Free - Method 3: Using Kafka Connect to Set Up Kafka ETL
Using the JDBC connector to import data and HDFS connector to export data from Kafka, Kafka Connect lets users copy their data from a source of their choice to a destination with minimal latency.
Prerequisites
- Working knowledge of Kafka.
- A general idea of ETL.
- A general idea of APIs.
- A general idea of Java/Scala.
Methods to Set Up Kafka ETL
There are multiple ways in which you can set up Kafka ETL:
Method 1: Using Kafka Stream APIs to Set Up Kafka ETL
This can be implemented using the following steps:
Step 1: Loading Data into Kafka
To start the export process, you first need to have a Kafka source connector, that will help you bring in data from a variety of data sources. Click here and choose your desired Kafka source connector from a large variety of available connectors such as Kafka Connect Elasticsearch, Kafka Connect Couchbase, etc.
Once you’ve selected your desired connector, you now need to make use of JDBC connector to load data into Kafka in the form of key-value pair messages.

To do this, you will need to make use of Single Message Transforms (SMTs) and use the following configuration for your Kafka topics:

Open the source connector properties file for your JDBC connector known as source-quickstart-sqlite.properties and append the following lines of code, that will help transform the fetched data by making use of the Single Message Transform functions namely, ValueToKey and Extract Field. This ensures that the data is converted into the correct format before it’s stored as Kafka topics.
# Add the `id` field as the key using Simple Message Transformations
transforms=InsertKey, ExtractId

# `ValueToKey`: push an object of one of the column fields (`id`) into the key
transforms.InsertKey.type=org.apache.kafka.connect.transforms.ValueToKey
transforms.InsertKey.fields=id

# `ExtractField`: convert key from an object to a plain field
transforms.ExtractId.type=org.apache.kafka.connect.transforms.ExtractField$Key
transforms.ExtractId.field=id
Once you’ve modified the configurations to bring in data as key-value pairs, you need to set your key & value converter to the string and Avro format respectively. You can do this by adding the following lines of code to the JDBC source connector properties files:
# key converter: String (just a bare field)
key.converter=org.apache.kafka.connect.storage.StringConverter
key.converter.schemas.enable=false

# value converter: schema’d Avro with pointer to Schema Registry
value.converter=io.confluent.connect.avro.AvroConverter
value.converter.schemas.enable=true
value.converter.schema.registry.url=http://schemaregistry1:8081
Kafka Connect will now automatically fetch data from your desired data source such as SQLite3 once the source data changes. It will then store it in the form of key-value pairs in the Kafka topic you’ve created. You can now access data in the as a KSream object directly from your application, with each row, now stored as an Avro record.
# Lookup the schema of the message value for the topic “retail-locations”
$ curl -X GET http://schemaregistry1:8081/subjects/retail-locations-value/versions/1 | jq
{
  "subject": "retail-locations-value",
  "version": 1,
  "id": 2,
  "schema": "{"type":"record","name":"locations","fields":[{"name":"id","type":["null","long"],"default":null},{"name":"name","type":["null","string"],"default":null},{"name":"sale","type":["null","long"],"default":null}],"connect.name":"locations"}"
}
Step 2: Using Kafka Stream APIs to Transform Data
Once you’ve successfully loaded your data into Kafka as a topic, you can now use a variety of applications to access this data and use the schema registry to deserialize the Avro Record. Transform your data for Kafka ETL as follows:
Using Kafka Topics to create Kafka Streams
To create Kafka Stream Objects, you need to convert the byte records of your Kafka topic into a Java object. To do this, create a schema file for your Avro records called “location.avsc”, that will help outline the data structure that matches the clients’ expectations, having three records id, name and sale (example).

Once you’ve created the Avro schema file, you now need a Java class that matches the schema and helps deserialise the Avro records. You can directly import the Java class(ex: Location) using the maven plug-in avro-maven-plugin, found in the pom.xml file. You can import the class using the following lines of code:
import io.confluent.examples.connectandstreams.avro.Location;Configure your streams so that the correct serialization/deserialization class is used. To do this, use the following lines of code:
#Define the Serdes for the key
streamsConfiguration.put(StreamsConfig.KEY_SERDE_CLASS_CONFIG, Serdes.String().getClass().getName());

#Define the Serdes for the value
streamsConfiguration.put(StreamsConfig.VALUE_SERDE_CLASS_CONFIG, GenericAvroSerde.class);

#Point to the Schema Registry
streamsConfiguration.put(AbstractKafkaAvroSerDeConfig.SCHEMA_REGISTRY_URL_CONFIG, http://schemaregistry1:8081);
Once you’ve made all the configurations correctly, create the KStream object using the following line of code:
#Build a KStream<String, GenericRecord> from the Kafka topic
KStream<String, GenericRecord> locationsGeneric = builder.stream(“retail-locations”);

#Build a KStream<Long, Location> from locationsGeneric
KStream<Long, Location> locationsStream = locationsGeneric.map((k, v) -> new KeyValue<Long, Location>(Long.parseLong(k), new Location ((Long) v.get("id"), (String) v.get("name").toString(), (Long) v.get("sale")) ));
This is how you can create KStream objects to set up streaming Kafka ETL.
Using Kafka Stream Processing Operations to transform the data
Once you’ve created your KStream object (locationsStream), you can now start transforming your data stream, containing key-value pair-based messages.

The Kafka Stream APIs provide various streams processors, which take data records as the input, going one at a time, perform numerous transformations on them and then produces single or multiple outputs. Kafka stream processors can be either stateless and hence transform a particular message at a time or be stateful and perform aggregation operations on various data messages.
Some of the common transformations you can perform using Kafka Stream APIs are as follows:
Sum Values for a Key: This makes use of the reduce method to sum the values of messages that are grouped based on a key. You can do this by using the following command to find the sum of all sales for a given key:
KStream<Long,Long> salesAgg =sales.groupByKey(Serdes.Long(), Serdes.Long()).reduce((aggValue, newValue) -> aggValue + newValue, SALES_STORE).toStream();
Mapping Data Stream to Key-Value pair: You can use the map method and convert a KStream<Long, Location> to KStream<Long, Long> using the following line of code:
KStream<Long,Long> sales = locationsStream.map((k, v) -> new KeyValue<Long, Long>(k, v.getSale()));
This is how you can transform your data using the Kafka Stream APIs stream processors.
Step 3: Loading Data into your desired destination such as S3
Once you’ve transformed & enriched your data, you can now transfer it to a destination of your choice such as S3 using a Kafka sink connector. You can also run multiple sink connectors in parallel and load the same data into various locations. To do this, use a KStream object to write out the information of a particular topic using the following line of code:
#Write KStream to a topic
salesAgg.to(Serdes.Long(), Serdes.Long(), OUTPUT_TOPIC);
The Kafka sink connector will now transfer your data to the destination, using the downstream system. For example, if you want to load the data into your S3 bucket, you will need to provide your Kafka topic name, S3 region and bucket to configure the sink connector:
$ bin/connect-standalone connect-standalone.properties s3-sink-connector.propertiesThis is how you can set up streaming Kafka ETL using the Stream APIs.
Limitation of Using Kafka Stream APIs
- Setting up streaming ETL can be a challenging task and requires having a strong knowledge of Java. To make the process easier, here are a few tips to overcome some common ETL challenges.
Method 2: Using Hevo Data to Set Up Kafka ETL
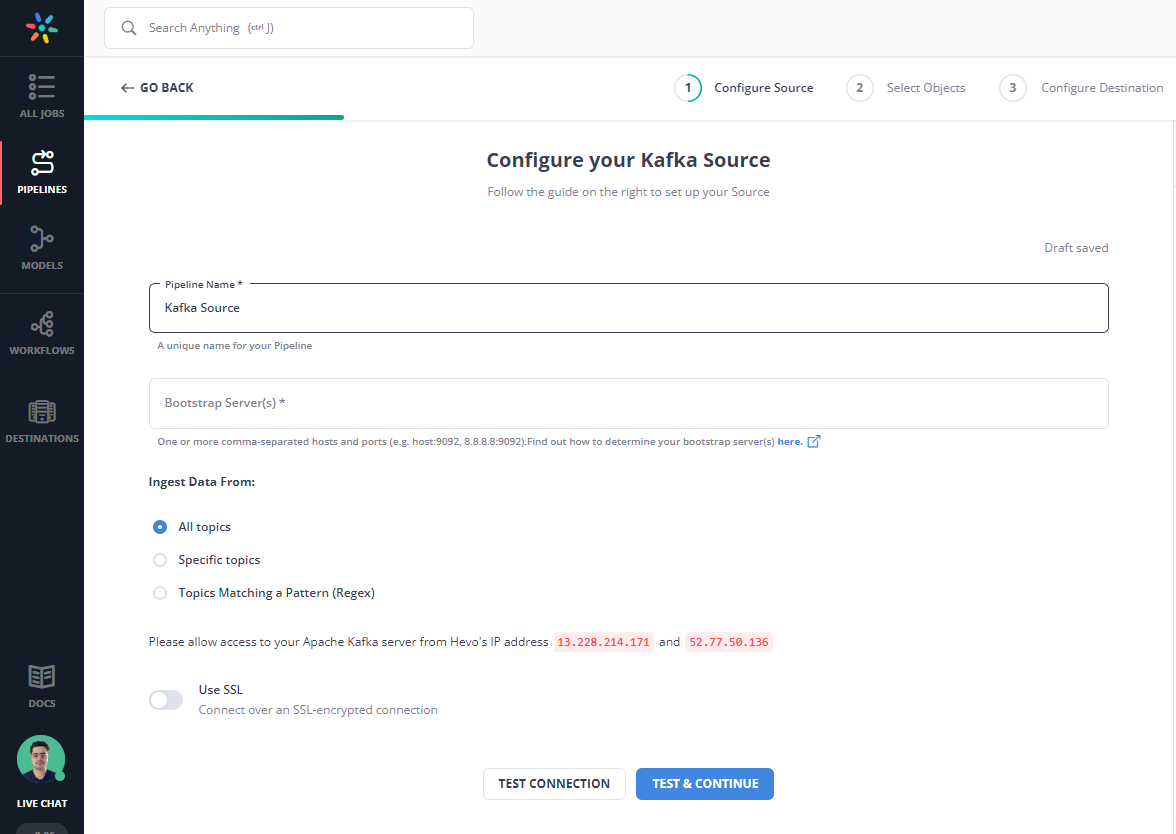
Step 1: Configure Kafka as a Source
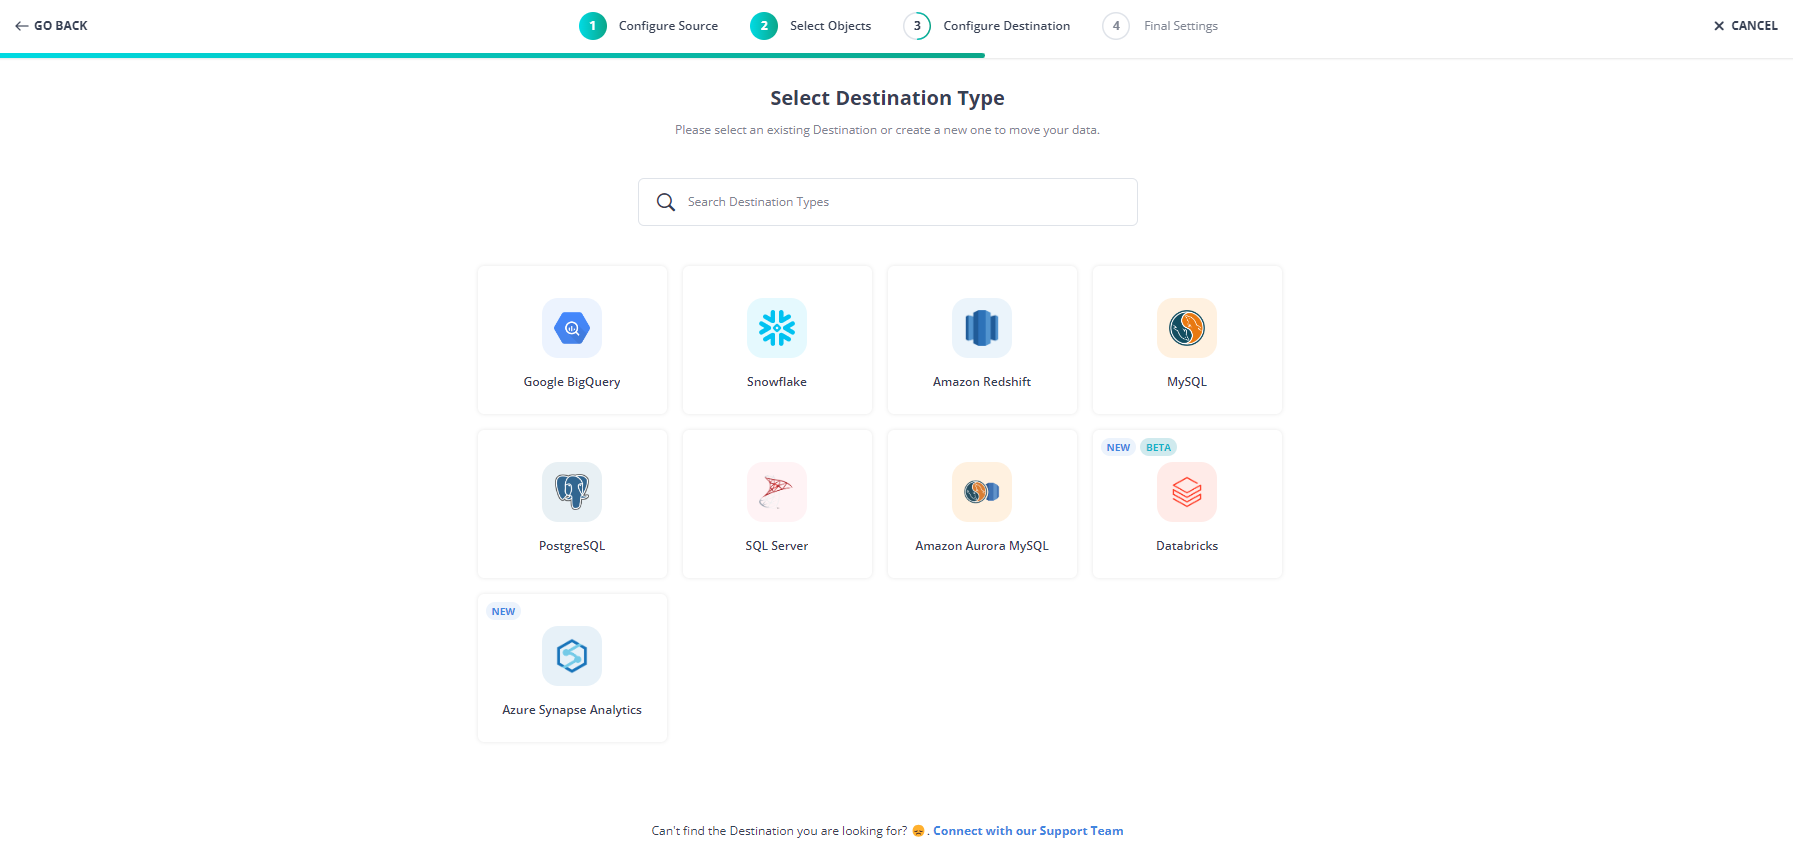
Step 2: Configure your Destination Settings
After configuring Kafka as your source, select the objects you want to ingest, and in the next step, select your Destination. Fill in the required details and click on Save & Continue.
With these simple steps, you have successfully created your pipeline from Kafka to your desired destination.
Method 3: Using Kafka Connect to Set up Kafka ETL
You can build an ETL pipeline with Kafka Connect using the following steps:
Step 1: Preparing data at your desired data source such as MySQL
To begin setting up Kafka ETL, you first need to prepare the data you want to transfer using the Kafka ETL pipeline. For example, if you’re using MySQL as your data source, you can create a table, “customers” and add data to it using the “Insert Into” command:
$ mysql -u root --password="mypassword"
mysql> CREATE DATABASE demodata;
mysql> USE demodata;
mysql> CREATE TABLE customers (
->   id serial NOT NULL PRIMARY KEY,
->   name varchar(100),
->   email varchar(200),
->   department varchar(200),
->   modified timestamp default CURRENT_TIMESTAMP NOT NULL,
->   INDEX `modified_index` (`modified`)
-> );
mysql> INSERT INTO customers (name, email, department) VALUES ('aleesha', 'aleesha@abc.com', 'engineering');
mysql> INSERT INTO customers (name, email, department) VALUES ('bharat', 'bharat@abc.com', 'sales');
mysql> exit;
Once you’ve prepared your data, you now need to start the services required for Kafka Connect and the HDFS cluster using the following command:
$ ./start.shThis is how you can prepare your data source for setting up Kafka ETL.
Step 2: Ingesting Data into Kafka using Kafka Connect
To ingest data from your desired source, such as MySQL, Kafka makes use of the JDBC connector to bring in the data from the data source and the HDFS connector to load data from Kafka. Kafka ensures that the data remains in Kafka, allowing users to transfer the data to multiple destinations in parallel, such as Elasticsearch.
To start the process, enable Kafka Connect with both connectors, using the following command:
$ connect-standalone /mnt/etc/connect-avro-standalone.properties
    /mnt/etc/mysql.properties /mnt/etc/hdfs.properties &
The properties, mysql.properties and hdfs.properties, are responsible for controlling how the JDBC and HDFS connectors work, respectively. To know more about them, click on the links given below:
Once you’ve enabled Kafka Connect, the JDBC connector will create a new topic called test_jdbc_name. The HDFS connector will now start reading the data from this topic and will transfer it to HDFS, by storing the data in the directory, topics/test_jdbc_customers/. It will also create a new external table in Hive, known as test_jdbc_customers.
You can now use Hive to retrieve the data stored in HDFS, using the following command:

Step 3: Setting up Change Data Capture for your Data Source
With the JDBC connector in place, you can set up the change data capture by configuring the following fields:
- incrementing.column.name: This field represents the column that will increment.
- timestamp.column.name: This field represents the timestamp column that the JDBC driver will refer to while performing the update.
- Mode: This field represents the mode of change data capture.
The best mode of carrying out change data capture is by using a combination of the timestamp column and incrementing column, as each tuple, containing the timestamp & incrementing (id & timestamp) columns, can be easily identified and updated. Even if the updates happen partially, they can be completed at a later stage.
Once you’ve set up change data capture, whenever the data at your source gets modified, the JDBC connector will automatically apply the same changes to your destination. For example, if you modify the customers’ table in MySQL using the following command:
mysql>UPDATE users SET email = 'aleesha@def.com', modified = CURRENT_TIMESTAMP WHERE name='aleesha';
mysql>UPDATE users SET email = 'bharat@ghi.com', modified = CURRENT_TIMESTAMP WHERE name='bharat';
The JDBC connector will immediately identify the updates and will copy them to Kafka, from where they are then applied to the destination. You can now use a select statement to retrieve the data stored in the customers’ table and see if it was updated or not:

This is how you can set up Kafka ETL and transfer data from a source database such as MySQL to a data warehouse or any other destination.
Step 4: Configuring Schema Migration for HDFS Connector
The HDFS connector allows users to configure the schema they want to use for loading the data into a destination of their choice, with the help of the “schema.compatibility” parameter. You can set this to “None”, “Backward”, “Forward” or “Full” as per your requirement.
When the schema configuration is “Backward”, the HDFS connector keeps track of the most recent schema and only when a record with a larger schema comes, it automatically takes up the new schema and maps all data records to the new schema. Even when a user inserts a new record with the old schema, it automatically maps it to the new schema and then loads the data into Hive.
To implement this, remove the name column from the customers’ table using the following command:

Once the schema change comes into place, Kafka Connect will use the Avro converter to register this schema in the schema registry, and the HDFS connector will automatically refer to the migration mode and make the update before loading the data.

This is how you can configure schema migration for the HDFS connector.

Limitations of using Kafka Connect
- Deploying custom plugins using Kafka Connect can be challenging, especially for a beginner.
- It requires having an in-depth knowledge of Java /Scala.
- It can be tough to distinguish between commercial and open-source features.
Conclusion
This article introduces you to the various methods that can be used to set up Kafka ETL. It also provides in-depth knowledge about the concepts behind every step to help you understand and implement them efficiently. These methods, however, can be challenging as they require a deep understanding of Java programming language and other backend tools. This is where Hevo saves the day! To learn more, you can schedule a personalized demo with us.
FAQ on Kafka ETL
Is Kafka an ETL tool?
Kafka is not a traditional ETL tool. It is primarily a distributed event streaming platform for real-time data ingestion and processing. However, it can be integrated into ETL pipelines to handle the “Extract” and “Load” phases, while “Transform” can be handled by other tools or custom code.
Can Kafka do data transformation?
Kafka, through Kafka Streams or Kafka Connect with transformations, can handle lightweight data transformations, such as filtering or mapping data. However, complex transformations typically require additional tools like Kafka Streams, ksqlDB, or integration with processing frameworks like Apache Spark.
What is the difference between Kafka and Spark for ETL?
Kafka is mainly used for real-time data streaming and ingestion, focusing on transporting and processing streams of events. On the other hand, Spark is a full-fledged data processing framework that supports batch and real-time data processing with more advanced transformation and analytics capabilities.


