


Snowflake and Metabase are two of the most popular companies that offer data management and analysis solutions. Snowflake is a data warehousing solution based in the cloud that lets you easily store and analyze large amounts of data using SQL queries. It is one of the world’s most commonly used data warehousing solutions, primarily because of how convenient it is and the range of business intelligence tools that it puts at your disposal.
However, while it’s fairly comprehensive, data analysts generally want a bit more. That’s where Metabase comes in. Metabase is a simple, conveniently designed open-source business intelligence solution that makes it easy for businesses to combine and analyze data from a myriad of data sources or destinations. It also offers unparalleled data visualization options, allowing you to showcase your data in a convenient way that others can understand. More importantly, Metabase doesn’t use SQL, so you don’t need to learn a programming language before you can get started with it.
This article will explain the steps that you can use to set up your Snowflake Metabase integration easily. Metabase lets you easily share live dashboards or automate reports with other members of your team. You can easily load data from Snowflake into Metabase and analyze it. It’s a fantastic platform that offers official support for major database platforms like BigQuery and Snowflake. Read along to learn more about Snowflake Metabase integration.
Table of Contents
What Is Snowflake?
Snowflake is a relational data warehouse that works on an SQL-based cloud structure. It provides users with a database-as-a-service (DBaaS) platform. Moreover, Snowflake can add the required flexibility and agility to your business and help it meet the changing market requirements. This platform can store limitless amounts of both structured and semi-structured data in one place and allows you to bring in consolidated data from different types of data sources. Furthermore, this data warehouse is highly scalable and allows your business to increase its production without having to purchase additional resources.
What Is Metabase?

Metabase is an advanced data analytics tool that can extract key insights from your data. A major advantage of using this tool is that you don’t have to write a single piece of code or SQL query to get detailed results. You can simply use the given filters and browse through the data to generate summaries and reports. Moreover, it empowers you to create charts and tables seamlessly and develop a meaningful data visualization.
When the data is more complex and ordinary charts and tables are not sufficient to generate the required level of insights, you can also turn to queries and modify the data in an easy-to-understand form. The Metabase SQL interface also plays a key role in understanding complex data insights. Furthermore, you can set up Metabase to alert all users in case the incoming data goes out of control.
A Snowflake-native app to monitor Fivetran costs

Streamline your data transfer to Snowflake using Hevo’s intuitive no-code platform, ensuring fast and reliable data integration. It offers a range of industry-leading features such as:
- 150+ pre-built connectors for seamless migration
- Fault-tolerant architecture to ensure no data is ever lost
- Drag-and-drop transformation capabilities
- Round-the-clock support and extensive documentation
Hevo Data is also Snowflake Ready Technology validated, ensuring seamless compatibility with Snowflake.
Sign up here for a 14-Day Free Trial!Setting up Snowflake Metabase Integration
If you want to load data from Snowflake into Metabase, the first step is to connect the database with Metabase. To make matters easier, Metabase offers a variety of connection options primarily depending on the database you plan to connect with. You can easily set up your Snowflake Metabase Integration using the following steps:
- Step 1: Secure SSL Connection
- Step 2: Select Metabase Sync Frequency
- Step 3: Add a Snowflake Database to Metabase
- Step 4: Scan for Field Values
- Step 5 (Optional): Deleting a Snowflake Database
Step 1: Secure SSL Connection
You can primarily set up the Snowflake Metabase connection using a Secure Sockets Layer. If that doesn’t work, it tries to connect without SSL. Snowflake does support SSL since it only allows HTTPS connection. You can also switch the encryption on or off in Snowflake, though by default, all Snowflake connections use SSL.
Once Metabase connects to your database with SSL, it’ll automatically make this the default setting. However, if you do not want to connect with SSL turned on, you can always close it.
Step 2: Select Metabase Sync Frequency
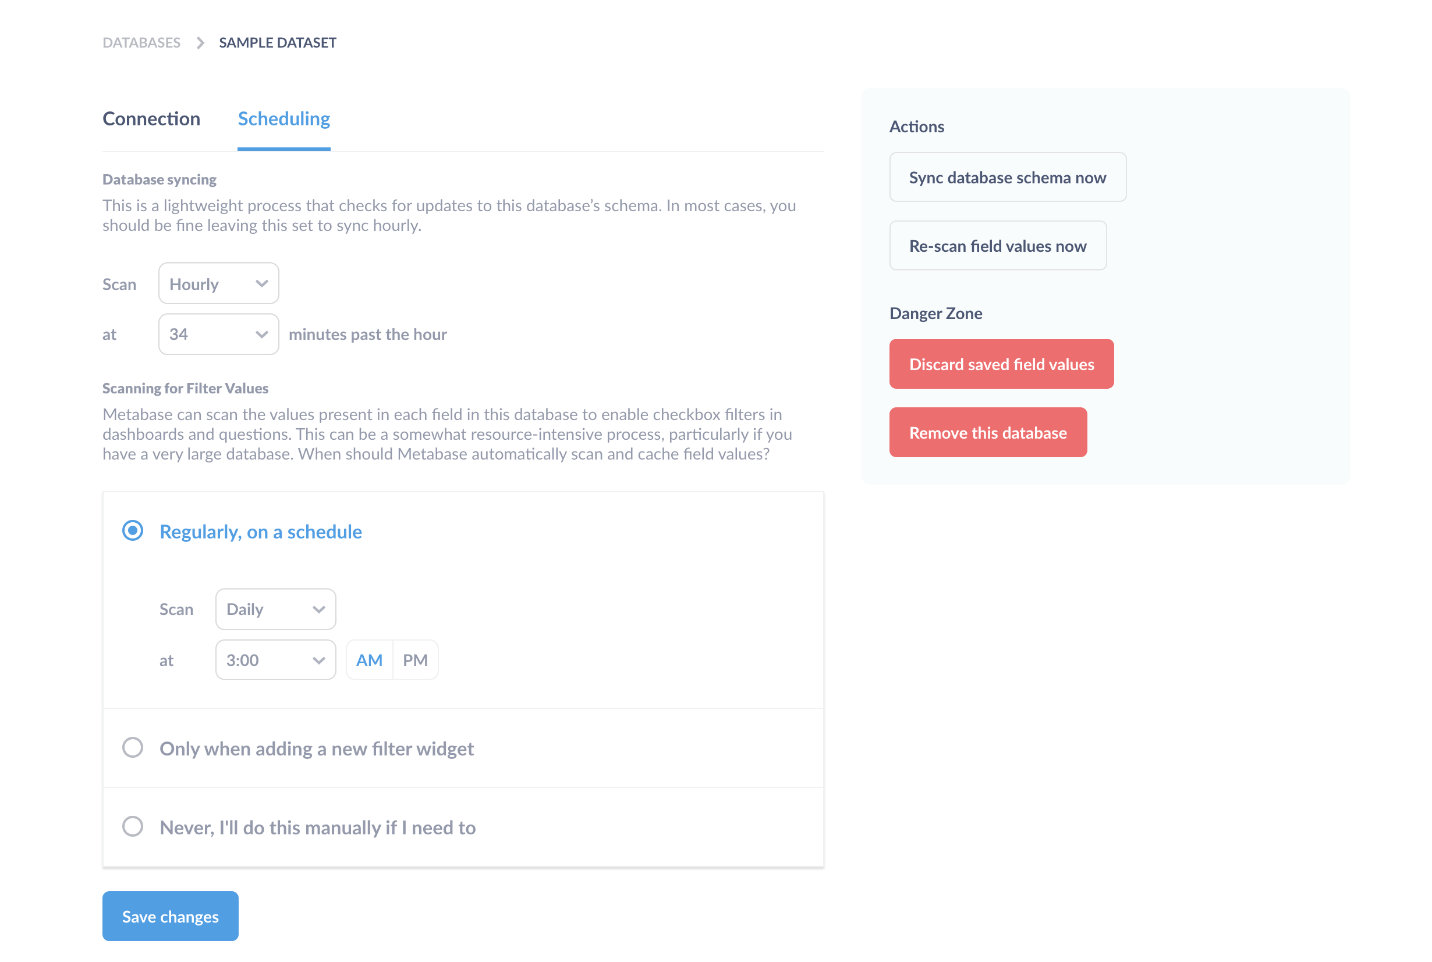
Metabase has a default function where it regularly runs a lightweight sync each hour to pull the latest data and sync any changes. At least once a day, Metabase also runs a more intensive scan to update all field values. If you are connecting a bigger database from Snowflake, you can choose a separate option that allows you to sync and scan using Metabase whenever you want.
Once you activate that option, you can select the frequency of these field value scans. Once you enable this and save your changes, you will notice that a new tab appears at the top, “Scheduling.” On clicking it, you can easily decide on the frequency with which Metabase scans and syncs your database. Here’s how it looks:


Step 3: Add a Snowflake Database to Metabase
To start with this, you need to first create an account with Metabase. Then, head to the “settings”, and select “Add a Database.”You will have to add a project ID and required information from Snowflake and then generate an “Auth Code“. Once you have that, you can easily connect your database to Metabase.
But, while it’s fairly straightforward, there are a few important things that you need to keep in mind. Here’s what to know when connecting Snowflake to Metabase:
- The Account field should be filled in using your alphanumeric account ID, as well as the region where your Snowflake cluster is based. For example, if you are working on Snowflake with AWS, you’ll need to indent the suffix
.awsat the end. However, this is not a requirement in certain regions, so it’s best to check the official documentation from Snowflake regarding account identifiers. - You do not have to fill both the “Schema” and the “Role” fields. If you specify a role, it’ll override the default role assigned to a user within the database. For example, if you have assigned a database user the
REPORTERrole, but the user also has access to the role ofREPORTERPRODUCT, adding this in the Role field will simply turn the default role toREPORTERPRODUCTinstead ofREPORTER. - It’s important to remember that all other fields have to be entered in “upper case” exclusively, apart from the password of course.
Step 4: Scan for Field Values
Once your Snowflake Metabase integration is in place, you must know how to scan for field values. When you first set up the Snowflake Metabase connection, Metabase automatically reviews the metadata in the columns in all your tables and assigns them a type on its own. It samples some of the data to look for “URLs, Encoded Strings, or JSON values.” You can also manually edit the data anytime you want in Metabase by just clicking the “Data Model” tab in the “Admin Panel.”
Metabase automatically performs a more comprehensive sampling once a day of all the values in each field and captures any unique values to let you create filters that natively work in your dashboard. However, this could cause larger databases to slow down, so if you want, you can always choose when to scan and cache the field values in Metabase automatically.
Step 5 (Optional): Deleting a Snowflake Database
Deleting a database is irreversible in Metabase. You should know that all dashboard cards and saved questions will be deleted. To do this, go to “Remove this database” in the detail screen. However, deleting a database is only possible for admin-level roles.
There’s also an option to “Discard saved field values” if you want to flush out all the cached field values from your database.
That’s it! You can now try out the process of setting up a Snowflake Metabase connection by yourself.
Is There a Way to Make Snowflake Metabase Data Load Quicker?
One of the most common problems that many users face when they set up their Snowflake Metabase Integration is that their databases tend to load slower when it’s connected to the platform. That can affect operations and hinder insights, so it’s important to know how you can improve loading times. Here are some recommended methods to make the Snowflake Metabase Data Load Quicker:
1) Reduce Your Data Requirements
One of the first questions that you should ask is whether you actually require all of the data for the query you’re about to send. And, do you really need all of that data, all the time? Do you want a frequent sync between Metabase and Snowflake?
One of the best ways to reduce your Snowflake Metabase data loading time is to reduce the amount of data that you query using Metabase. For instance, setting a simple filter on your dashboard can reduce the amount of data that’s pulled by Metabase. This is all the more important for data that relates to previous times.
For instance, do you really require all the data from the past quarter, every single day? One of the best things that you can do to reduce loading times is to go through your data requirements and review them. Find out whether you need all of the datasets that you’re working with or if you can reduce some to focus on your analysis. This can help reduce loading times by a significant margin.
2) Cache Your Answers
Metabase also allows you to cache query results, which means that it’ll store answers to important, repeated questions. If you have a dashboard that everyone uses when they start looking at data, you can easily cache it so that it runs ahead of time. That way, all of the queries or questions in that dashboard will simply use the saved results for all subsequent results.
The Snowflake Metabase data loading times will drop down to a few seconds at most. To do this, just head to “Settings’ in the “Admin Panel.” You can also decide the minimum query duration that you want to cache, and specify the Cache Time-to-live. Metabase also has a wide array of auditing tools that you can use to figure out when most people run different questions and then build a script using the API to run those questions sequentially.
Conclusion
Integrating Snowflake with Metabase empowers organizations to harness their data effectively, enabling dynamic visualizations and insightful analytics. This seamless connection allows users to create custom dashboards, facilitating data-driven decision-making across departments.
By leveraging Hevo Data’s capabilities, businesses can streamline their ETL processes, ensuring data is always up-to-date and accurate for reporting. Embracing this integration not only enhances data accessibility but also fosters a culture of analytical thinking, driving growth and innovation.
Want to take Hevo for a spin?Want to take Hevo for a spin? Explore Hevo’s 14-day free trial and experience the feature-rich Hevo suite firsthand. You can also have a look at our unbeatable pricing that will help you choose the right plan for your business needs!
Frequently Asked Questions
1. Can Metabase connect to Snowflake?
Yes, Metabase can connect to Snowflake. You can set up a connection in Metabase to query and visualize data stored in Snowflake.
2. What is the difference between Metabase and Snowflake?
Metabase is an open-source business intelligence tool used for creating dashboards, reports, and visualizations from various data sources.
Snowflake is a cloud-based data warehousing platform designed for scalable data storage, processing, and analytics. It’s primarily used for storing and querying large volumes of data.
3. How much does Metabase Snowflake cost?
The cost of using Metabase with Snowflake depends on several factors:
Metabase Cost: Metabase offers a free open-source version, but the enterprise version with additional features is paid.
Snowflake Cost: Snowflake pricing is based on the amount of data storage and compute resources used. The integration itself doesn’t have a specific cost but is part of your overall Snowflake usage fees.
Share it with your connections.
-
 Share To LinkedIn
-
 Share To Facebook
-
 Share To X
-
 Copy Link


