Data Storage is a critical component for every Snowflake Database. Snowflake can access data saved in other Cloud Storage Systems as well as store data locally. Regardless of whether the data is stored internally or externally, a Stage is a location where it is saved. The process of uploading files into one of these Stages, on the other hand, is known as Staging.
In this article, you’ll look at the different sorts of Snowflake Stages, as well as how to set up, manage and use them.
Table of Contents
What is Snowflake?

Snowflake is the world’s first Cloud Data Warehouse solution, based on the infrastructure of the customer’s choice of Cloud Provider (AWS, Azure, or GCP). Snowflake SQL adheres to the ANSI standard and offers conventional analytics and windowing features. There are some variances in Snowflake’s syntax, but there are also some similarities.
The integrated development environment (IDE) for Snowflake is entirely Web-based. Go to XXXXXXXX.us-east-1.snowflakecomputing.com. After logging in, you’ll be sent to the main Online GUI, which also functions as an IDE, where you can start interacting with your data assets. For convenience, each query tab in the Snowflake interface is referred to as a “Worksheet.” Similar to the tab history feature, these “Worksheets” are automatically kept and can be accessed at any time.
Access and control your data with ease using the Snowflake UI. Discover its features at Snowflake Interface.
What are Snowflake Stages?
The Storage of Data is an important aspect of any Snowflake Database which is associated with Snowflake Stages. Snowflake can both Store Data locally and access data stored in other Cloud Storage Systems. The location where Data is saved is known as a Stage, regardless of whether the data is stored internally or externally. On the other hand, Staging is the process of uploading files into one of these Stages.
Key Features of Snowflake Stages
Snowflake stages are crucial for transferring data in and out of Snowflake and managing data operations. Here are the main aspects:
- Purpose: Stages enable smooth data movement and help manage data transfer tasks within Snowflake.
- Features: They offer built-in encryption to protect data from unauthorized access and allow creating temporary tables for staging data before loading it into the main table.
- Optimizations: Internal stages allow automatic compression and parallel loading for improved data handling efficiency.
- Security: Like other Snowflake objects, stages follow the same security and access rules, with the ability to grant or revoke access privileges based on roles.
What are the Types of Snowflake Stages?
As you got to know in the previous sections Snowflake’s Data can be stored internally or externally, based on this, the Snowflakes Stages are broadly categorized into two types:
1) Internal Stages
In Internal Stages of Snowflake Stages basically, the data is stored internally. There are 3 types of Internal Stages:
- Each user’s Personal Storage Area is called the User Stage. These Stages are personal to the user, which means no one else can see them. By default, each user is assigned a User Stage, which cannot be changed or removed.
- Within a Table Object, Table Stages are Storage locations. This is useful when only a few files need to be imported into a certain table, and these Stages will get the job done the quickest. They are, however, limited to that one table, and other tables cannot access the files.
- Within a Snowflake Database/Schema, Internal Named Stages are Storage Location Objects. Since they are Database Objects, they are subject to the same Security Permissions as other Database Objects. Unlike User and Table Stages, these Stages are not created automatically. They do, however, offer more versatility when it comes to importing files into different Tables and/or allowing Multiple Users to access the same Stage.
2) External Stages
External Snowflake Stages are Storage websites in another Cloud Storage Location that is not part of the Snowflake Environment. This might be Amazon S3 Storage or Microsoft Azure Storage, giving you more options for web hosting and ELT solutions before you access the data in Snowflake. The disadvantage of these Stages is that the Storage website may be in a different area than your Snowflake Environment, thus slowing down data loading times.
Build Your Single Source of Truth with Snowflake in Minutes:
How to Set up Snowflake Stages using the UI?
Within Demo DB Database, you will need to establish a Stage. To begin, you need to open the database in Snowflake and go to the navigation menu and select Stages. This page contains a list of all stages found in the database. This list is empty since you haven’t made any yet:

To begin designing a stage, select Create. The initial decision is whether to use an Internal Named Stage (managed by Snowflake) or an External Named Stage (stored in Amazon S3 or Microsoft Azure).
The Internal Named Stage controlled by Snowflake is the simplest of these alternatives. The only prerequisites if this option is selected are a Stage Name, the schema to which it will belong, and any remarks. Keep in mind that all object names must follow Snowflake’s object naming conventions:
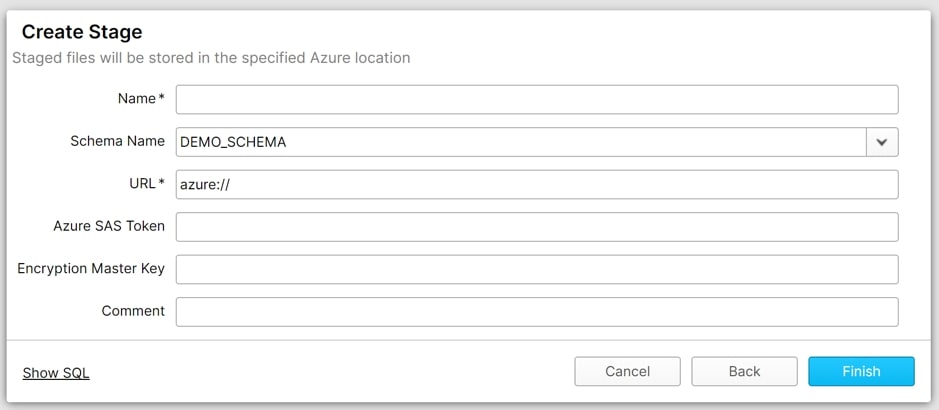
As a connection to another storage environment is formed, External Stages request more information. You’ll need to specify the stage’s location, as well as any Authentication Credentials, in addition to a Name, Schema, and Comment.
How to Set up and Use Internal Snowflake Stages?
1) User Stage in Snowflake
A) Use Case
By default, each user in Snowflake has a Stage assigned to them for Storing Files. It’s possible that the files are loaded or unloaded files. If only a single user needs to access your files but it needs to be duplicated into many tables, then User Stage is a good choice.
B) Uploading a File to the User Stage
Step A: To upload files to the User Stage Area, use the SnowSQL command below.
vithal#COMPUTE_WH@TEST_DB.PUBLIC>put file://D:Snowflakesample_file.csv @~/staged;
Step B: The file will be uploaded to the user stage, which you may check using the LIST command.
vithal#COMPUTE_WH@TEST_DB.PUBLIC>list @~/staged;C) Identifying the User Stage
- “@~” is used to refer to the User Stages. For example, to list the files in a User Stage use LIST @~.
- You have the option of giving the User Stage, a Name. For instance, in the previous example, @/staged.
D) Limitations
The following are the User Stage’s constraints in Snowflake.
- User Stages, Unlike Named Stages, cannot be changed or removed.
- Setting file format parameters is not possible in User Stages. Instead, use the COPY command to specify the file format.
It’s worth noting that the Use Stage isn’t a Database Object. It’s an unspoken step that comes with being a Snowflake User.
2) Table Stage in Snowflake
A) Use Case
Snowflake assigns a Stage to each Table by default for Storing Files. If your files need to be available to several people and simply need to be transferred into a single Table, the Table Stage is a good choice. The Stage Name for your table is the same as your Table Name.
Note: If you need to load a file into many Tables, this method is not acceptable.
B) Uploading a File to Table Stage
Step A: To upload files to the Table Stage area, use the SnowSQL command below.
vithal#COMPUTE_WH@TEST_DB.PUBLIC>put file://D:Snowflakesample_file.csv @%test;Step B: You can also select the Subfolder where you want to upload files within the Table Stage.
vithal#COMPUTE_WH@TEST_DB.PUBLIC>put file://D:Snowflakesample_file.csv @%test/sample_csv/;Step C: The file will be uploaded to the User Stage, which you may check using the LIST command.
vithal#COMPUTE_WH@TEST_DB.PUBLIC>list @%test;C) Identifying the Table Stage
- “@%tableName” is used to refer to the Table phases.
- For example, to list the files in a Table Stage that is allocated to the test Table, LIST @%testto is used.
D) Limitations
The following are the limits of Snowflake’s Table Stage.
- The table phases are named after the table. For example, @%test is a stage in the table test.
- The steps of the table cannot be changed or removed.
- Setting file format parameters is not possible in Table Phases. Instead, use the COPY command to specify the file format.
- The Table Stage is not a Database Entity to be aware of. It’s an unspoken Stage connected to the table.
3) Named Stage in Snowflake
A) Use Case
Internal Stages are Database Objects that can be substituted for the User and Table Stages. To load the Tables, Internal Named Stages are recommended.
Numerous users can access the Internal Named Stages, which can be utilized to Load Multiple Tables. The file format can also be specified. Consider the following example to establish an Internal Stage.
create or replace stage my_csv_stage
  file_format = (type = 'CSV' field_delimiter = '|' skip_header = 1);
B) Uploading a File to Named Stage
Step A: To Upload Files to the Internal Named Stage area, use the SnowSQL command given below.
vithal#COMPUTE_WH@TEST_DB.PUBLIC>put file://D:Snowflakesample_file.csv @my_csv_stage;Step B: The file will be saved to an Internal Named Stage, which you can check with the LIST command.
vithal#COMPUTE_WH@TEST_DB.PUBLIC>LIST @my_csv_stage;C) Identifying the Named Stage
- @stage_name is used to refer to the Table phases.
- For example, to list the files in my_csv_stage, use LIST @my_csv_stage.
D) Limitations
- If you’re planning to stage data files that will only be loaded by you or into a Single Table, you should use either your User Stage or Table Stage where you’ll be loading your data.
How to use the Copy Command with User & Table Snowflake Stages?
In the COPY command, you can specify several stages such as User, Table, or Named Stage. For example, To utilize a different stage, use any of the following commands.
User Stage Command:
COPY INTO test FROM @~/staged;Table Stage Command:
COPY INTO test FROM @public.%test;Named Stage Command:
COPY INTO test FROM @stage_path;A Snowflake-native app to monitor Fivetran costs.
How to Set up and Use External Snowflake Stages?
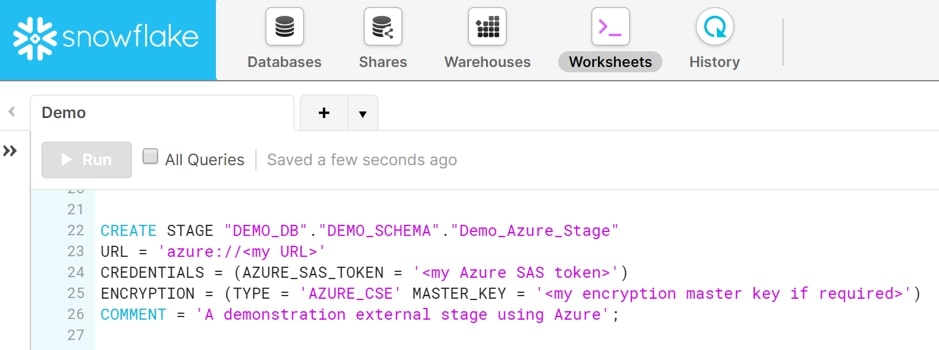
You can construct Stages using SQL Code in the same way that you can create Databases, Schemas, and indeed all Objects and User Interface Commands in Snowflake. It’s worth noting that one of Snowflake’s best features is that every activity in the User Interface can also be performed using SQL Code, which Snowflake explains when you select the Show SQL option. External Stages to Amazon S3 and Microsoft Azure Storage can be created.
1) Amazon S3
For storing the data in Amazon S3, a location needs to be fixed.
STORAGE_ALLOWED_LOCATIONS = ('s3://bucket/path/', 's3://bucket/path/')- <bucket> is the name of the S3 bucket where your data files are stored (e.g. mybucket).
- <path> is an optional case-sensitive path that restricts access to a collection of files in the Cloud Storage location (i.e. files with names that begin with a common string). Depending on the Cloud Storage Service, paths are referred to as Prefixes or Folders.
2) Microsoft Azure
Similar to Amazon S3 Storage, Locations are needed to be fixed in Microsoft Azure as well.
STORAGE_ALLOWED_LOCATIONS = STORAGE_ALLOWED_LOCATIONS = ('azure://account.blob.core.windows.net/container/path/', 'azure://account.blob.core.windows.net/container/path/')- The Azure storage account’s name is <account> (e.g. myaccount). For all supported types of Azure blob Storage Accounts, including Data Lake Storage Gen2, use the blob.core.windows.net endpoint.
- The name of an Azure Blob Storage container that contains your data files is <container> (e.g. mycontainer).
- <path> is an optional case-sensitive path that restricts access to a collection of files in the Cloud storage location (i.e. files with names that begin with a common string). Depending on the Cloud Storage Service, paths are referred to as prefixes or folders.
3) Google Cloud Storage
Create an external stage using a protected/private GCS bucket called load with a folder path called files. Secure access to the GCS bucket is offered through the myint storage integration:
create stage my_ext_stage
  url='gcs://load/files/'
  storage_integration = myint;
Next, generate a stage called mystage with a directory table within the active schema for the user session. The cloud storage URL consists of the path files. The stage references a storage integration called my_storage_int:
create stage mystage
  url='gcs://load/files/'
  storage_integration = my_custom_storage_int
  directory = (
    enable = true
    auto_refresh = true
    notification_integration = 'MY_CUSTOM_NOTIFICATION_INT'
  );
Use Case for Internal Stage
You can use internal Snowflake Stages to load source files from the local system into multiple tables in Snowflake and then process the data. This allows the processed data to be procured in the target table.
You can then unload the data into a file within the local system. Since this is a single target table, you can either use named Snowflake stages or table Snowflake stages to unload the data from a table.
Use Case for External Stage
To load files from Amazon S3 into a Snowflake table, you can use External Snowflake stages. All you need to do is create an Amazon S3 bucket, upload files on S3, and use S3 Keys to generate external Snowflake stages for the same.
Format Type Options
TYPE = CSV
When talking about COMPRESSION = AUTO | BZ2 | GZIP | ZSTD | BROTLI | DEFLATE | NONE | RAW_DEFLATE:
This type is primarily used for data unloading and loading. When loading data, this helps specify the current compression algorithm for the data file. Snowflake leverages this option to identify how an already compressed data file was compressed so that the compressed data in the file can be extracted for loading.
When unloading data, this data type will help compress the data using the specified compression algorithm.
TYPE = JSON
When talking about DATE_FORMAT = ‘ <string> ‘ | AUTO, you can use this data type for data loading purposes only. This allows you to define the format of date string values within the data files. If a value is not mentioned or is deemed AUTO, the value for the DATE_INPUT_FORMAT parameter is leveraged.
This file format can be applied to the following actions only:
- Loading JSON data into separate columns by mentioning a query in the COPY statement (i.e. copy transformation).
- Loading JSON data into separate columns by leveraging the MATCH_BY_COLUMN_NAME copy option.
TYPE = AVRO
You can only use TRIM_SPACE = TRUE | FALSE for data loading purposes. This is defined as a boolean expression that identifies whether to remove trailing and leading white space from strings. For instance, if your external database software encloses fields in quotes, but it inserts a leading space as well allowing Snowflake to read the leading space.
TYPE = ORC
You can only use NULL_IF = ( '<em>string1</em>' [ , '<em>string2</em>' , ... ] ) for data loading purposes. This expression is a string that can be used to convert to and from SQL NULL. Snowflake replaces these strings within the data load source with SQL NULL. To mention more than one string, you need to enclose the list of strings in parentheses and use commas to separate each value.
TYPE = PARQUET
You can only use COMPRESSION = AUTO | LZO | SNAPPY | NONE for data unloading and data loading purposes. When loading the data, you need to specify the current compression algorithm for the columns in Parquet files. When unloading data, you can compress the data files using the specified compression algorithm.
TYPE = XML
You can only useIGNORE_UTF8_ERRORS = TRUE | FALSE for data loading purposes only. This boolean expression specifies whether UTF-8 encoding errors produce error conditions. If you set it to TRUE, any invalid UTF-8 sequences can be silently replaced with the Unicode character U+FFFD.
Examples
Internal Stages
- Create an internal stage with the default file format type (CSV):
- All the default copy options are utilized, except for ON_ERROR. If a COPY INTO <table> command that references this stage deals with a data error on any of the records, it skips the file.
- All the corresponding default CSV file format options are used.
create stage my_int_stage
  copy_options = (on_error='skip_file');
Similar to the previous example, you can mention the server-side encryption for the stage as follows:
create stage my_int_stage
  encryption = (type = 'SNOWFLAKE_SSE')
  copy_options = (on_error='skip_file');
Generate a temporary internal stage with all the same properties as the previous example, except the copy option to skip files on error:
create temporary stage my_temp_int_stage;Next, you can develop a temporary internal stage that references a file format my_csv_format (generated using CREATE FILE FORMAT):
create temporary stage my_int_stage
  file_format = my_csv_format;
When you reference the stage in a COPY INTO <table> statement, the file format options get automatically. You can then create an internal stage that includes a directory table. The stage references a file format named myformat as follows:
create stage mystage
  directory = (enable = true)
  file_format = myformat;
External Stages
Here’s an example that describes how you can set an external stage in your Microsoft Azure environment. First, you need to create an external stage using a protected/private Azure container called load with a folder path named files. Secure access to the container will be offered through the myint storage integration:
create stage my_ext_stage
  url='azure://myaccount.blob.core.windows.net/load/files/'
  storage_integration = myint;
You can then create an external stage using an Azure storage account called myaccount and a container called mycontainer with a folder path called files along with client-side encryption enabled. The stage references a file format called my_csv_format.
create stage mystage
  url='azure://myaccount.blob.core.windows.net/mycontainer/files/'
  credentials=(azure_sas_token='?sv=2016-05-31&ss=b&srt=sco&sp=rwdl&se=2018-06-27T10:05:50Z&st=2017-06-27T02:05:50Z&spr=https,http&sig=bgqQwoXwxzuD2GJfagRg7VOS8hzNr3QLT7rhS8OFRLQ%3D')
  encryption=(type='AZURE_CSE' master_key = 'kPxX0jzYfIamtnJEUTHwq80Au6NbSgPH5r4BDDwOaO8=')
  file_format = my_csv_format;
Next, generate a stage with a directory table in the active schema for the user session. The cloud storage URL consists of the path files. The stage references a storage integration called my_storage_int:
create stage mystage
  url='azure://myaccount.blob.core.windows.net/load/files/'
  storage_integration = my_storage_int
  directory = (
    enable = true
    auto_refresh = true
    notification_integration = 'MY_NOTIFICATION_INT'
  );
Best Practices for Snowflake Stages
The following are some best practices for working with Snowflake Stages:
- If you need to load a file into Numerous Tables, the User Stage is the way to go.
- If you only need to load into one Table, use the Table Stage.
- Numerous Users can access the Internal Named Stages, which can be utilized to Load Multiple Tables. If you want to share files with different users and load them into Multiple Tables, the Internal Named Stage is the way to go.
- For huge files, it is always recommended to use an External Named Stage.
Conclusion
This article has exposed you to the various Snowflake Stages to help you improve your overall decision-making and experience when trying to make the most out of your data. In case you want to export data from a source of your choice into your desired Database/destination like Snowflake, then Hevo Data is the right choice for you!
Explore the Snowflake UI for seamless data operations, from queries to performance monitoring. Learn more at Snowflake Interface.
FAQ on Types of Snowflake Stages
What are Snowflake stages?
In Snowflake, stages are intermediate storage locations used for loading data into and unloading data from Snowflake tables.
What is S3 stage in Snowflake?
An S3 stage in Snowflake refers to an external stage that uses Amazon S3 (Simple Storage Service) as the storage location.
How to see all stages in Snowflake?
To see all stages in Snowflake, you can query the INFORMATION_SCHEMA views or use specific Snowflake commands
Which is the command to list the staged files in Snowflake?
The command to list all the staged files in Snowflake is LS@;
How to get DDL for stages in Snowflake?
You can use the DESC command to get the Data Definition Language (DDL) for stages in Snowflake.


