


Cloud computing has had a major impact on the advancement of data science and as such, most companies have moved their data and core applications to the cloud but a lot of this data is still stored on-premises and behind a firewall. Getting access to these data housed on-prem and linking them up with the data on the cloud becomes a challenge hence, the need to come up with an application to bridge the divide between these data houses.
Tableau Bridge a Windows-based program that is installed on the same network as your on-premises data is used to form a linkage with Tableau online site beyond the firewall thereby communicating with it to retrieve information, handle schedule extract refreshes, or live queries of your published data on the cloud. In this article, you will learn about working with Tableau Bridge.
Table of Contents
What is Tableau Bridge?

Tableau Bridge is a very flexible program in which you can connect to your published data sources by querying the local data and securely sending them across to Tableau Online. This keeps your data updated and refreshed.
Tableau Bridge is used to keep your data up to date by connecting to data Tableau Online can not reach directly because of restrictions of data being stored in a private network within a secured firewall. Data on a private network includes on-premises data and virtual cloud data.
Tableau Bridge functions as the channel through which access is gotten to the private network data such as Excel files and SQL Server data from Tableau Online. Correspondence is done through an outbound encrypted connection between your on-premises data and your Tableau Online site.
Tableau Bridge is accessible by any authorized user of Tableau Online but it is most efficient for site admins and data source owners within an establishment as Bridge can be used to manage clients, publish and manage data sources, and facilitate live and extract connections.
Struggling to migrate your data from various sources? Hevo makes it a breeze with its user-friendly, no-code platform. Here’s how we simplify the process:
- Seamlessly pull data from over 150+ other sources with ease.
- Utilize drag-and-drop and custom Python script features to transform your data.
- Efficiently migrate data to a data warehouse, ensuring it’s ready for insightful analysis in Tableau.
Experience the simplicity of data integration with Hevo and see how Hevo helped fuel ThoughtSpot’s drive for accurate analytics and unified data.
Get Started with Hevo for FreeWhat is Tableau Online?
Tableau Online is a cloud-based, fully-hosted SaaS that allows users to perform self-service data analytics from any device, at any time. It can create advanced visualizations that take data from a variety of database sources and turn it into usable results. Users can easily discover insights and share them with others by creating and exploring interactive dashboards, giving all members of an organization the ability to make data-driven decisions.
A minimum of one creator membership is required for each deployment, which includes the desktop version, prep builder, and an online creator license. With a minimum of five explorers or 100 viewers, users can purchase additional licenses for explorers and viewers. Subscriptions are billed annually and charged per user per month. There are also enterprise pricing options available, as well as volume discounts where appropriate. A data management add-on is also available from the vendor, which helps with data preparation and governance.
Steps to Install Tableau Bridge
As stated in the opening paragraph, Tableau Bridge is software that is installed on a machine in a network and is used in conjunction with Tableau Online which is a cloud service.
Before installing Bridge, you need to have the following requirements – Windows operating system, End User License Agreement (EULA) to authorize users of Bridge, Tableau Online, network access to make outbound connections through the internet to Tableau Online, addresses and ports (80 and 443 are commonly used ports), and database drivers to help Bridge connect with databases through Tableau connectors.
To install Tableau Bridge, carry out the following steps:
- From the Product Downloads and Release Notes page on the Tableau website, download the installer.
- Run the installer by selecting Run.
- Accept the license agreement when prompted, to continue the installation.
- You may decide to customize the installation as this is optional by clicking Customize. The following changes can be made based on your needs:
- Install location: You can specify a different location other than the default location to install the client.
- Create a desktop shortcut: Click the checkbox if you want to create a desktop shortcut for Bridge.
- Create a Start menu shortcut: A shortcut for Bridge can be added to the Start menu by selecting the check box.
- Enable error reporting: To enable error reporting in situations where Bridge closes unexpectedly as a result of encountered problems, check the box as this will generate crash dump files and logs to be sent to Tableau.
- Install database drivers: Check the box to automatically install the default database drivers Oracle (OCI), Microsoft SQL Server, and PostgreSQL.
- Click Install.
Steps to Connect to Tableau Bridge
Bridge connects with data stored in on-premises locations for new updates and changes are facilitated through live or extract connections.
Extract connections use Bridge to perform scheduled refreshes for data sources that can connect to supported data connectors. The supported data for extract connections are grouped into the following categories:
- Relational data
- Files
- Cloud data and ODBC data like Amazon Redshift, Teradata, and Snowflake.
- Web Data Connectors (WDC)
Live connections also use Bridge to connect to data sources found in on-premise locations. It does this using live queries on data sources with live connections.
Some supported connectors found on Tableau Bridge for both extract connections and live connections include Excel, Text file, Hadoop Hive, HortonWorks, MariaDB, SnowFlake, Amazon Redshift, Microsoft SQL Server, MySQL, PostgreSQL, Azure SQL Data Warehouse, Google Cloud SQL, and lots more. For a further listing of supported connectors and to differentiate between Extract and Live connections, see here.
To connect to your data sources, you would be required to launch Bridge as the client is needed for connectivity between Tableau Online and Tableau Bridge and this is done through the steps listed below:
- Select Server on the main menu.
- Click on Start Tableau Bridge Client.

- Sign in to your Online site with Tableau Bridge.

When the client is running, it is accessible from the Windows system tray of the machine where it is installed. The client is made up of the following Client name, Connection status, Site, Settings menu, Data sources, Pooling status, Legacy options, and Client mode which indicates if the client is running as a windows application or service.

As shown in the figure above, there are two types of Client mode Application and Service, and both function differently. The mode to be chosen is dependent on the Windows user account it is running under, the Tableau Online site settings in which registration was made, and your general data update needs.
In application mode, it runs as a Windows application allowing for live queries and scheduled refreshes of data sources when the dedicated user is logged on to Windows but discontinues whenever the user logs off while the Service mode which runs as a Windows service constantly updates even when the user logs off but the Windows user account must be a member of the local Administrators group to run the client in service mode.

Steps to Publish a Bridge Data Source With Live Connections
You can choose to publish your data source on Tableau, as it supports live connections to data sources that connect to on-premises data. Bridge uses the function called live queries to do this by querying the database directly and returns the results of the query for use in the data source.
The steps below describe how to set up live connections.
- In Tableau Desktop, Select Server.
- Click on Publish Data Source.
If you had not logged in to Tableau Online, you will be prompted to.
- Fill out the options found on the Publish Data Source to Tableau Online dialog box.
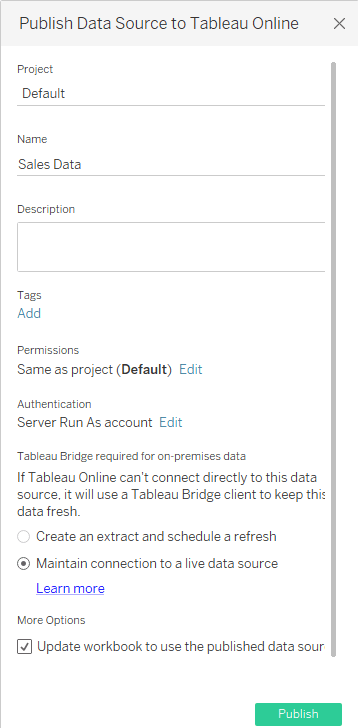
- Project: The name of the project you want to publish.
- Name: The name of the data source.
- Add Description and Tags if necessary.
- Setup custom Permissions for the data source if needed.
- Authentication: Can be used to select Embedded password or Server Run As account depending on the data source selected when Edit is clicked on.
- Maintain connection to a live data source should be checked to have a continuous live connection.
- Click on Publish which will bring up a browser window to Tableau Online.
- Click Done to complete publishing.
Steps to Set up Bridge Refresh Schedule
Setting up a schedule is mostly done when publishing your data and it can be programmed on the same dialog box but is dependent on the data source is connected to or how the data source is configured. To achieve this, follow steps 1 – 4 stated above in Publishing a Bridge Data Source With Live Connections then proceed to the following steps:
- In the Publishing Complete dialog box, Click on Schedule Extract Refresh button.

- In the dialog box, set a schedule for refresh by filling out the options.

- Refresh Type: Select the type you want from Full or Incremental Refresh. Full Refresh is the default.
- Refresh Frequency: This is used to set up the frequency in which the refresh would be done, it can be done Hourly, Daily, Weekly, and Monthly.
- At: Used to set the time for a refresh.
- On: To select the days of the week for a refresh.
- Click on the Create button.


Steps to Add or Update an Existing Schedule
You can always add a schedule to a published data or update your scheduling whenever it is needed. To add or update, do the following:
- Sign in to Tableau Online and go to your data source.
- On the data source page, click on Extract Refreshes.
- Either add or update a schedule. To set up a new schedule, click on New Extract Refresh button then configure your refresh schedule. To update an existing schedule, check the box next to schedule, click on Action menu then select Change Frequency to enable you to reconfigure the refresh schedule.
- Click on Create.
For more information about setting up Tableau Bridge Refresh schedule, adding and updating an existing schedule, and other schedules, visit their official site.
Conclusion
This article talked about Tableau Bridge and how it is used to connect on-premise data to Online data sources. It acts as a go-between to make sure that you have access to relevant information where and whenever needed despite restrictions placed on the private network.
It was further described how data can be linked by publishing it live or having to fix an extraction schedule for your data. It is best practice to create different Tableau Bridges for Live and Scheduled Extract so as to avoid jam but this can be difficult for one who is not a seasoned administrator with a particular skill set but using an effective tool other than Bridge that can do all of this in a simplified manner is highly recommended.
Hevo is a No-code Data Pipeline and has awesome 150+ pre-built integrations that you can choose from. Hevo can help you integrate your data from numerous sources and load them into a destination to analyze real-time data with a BI tool such as Tableau. It will make your life easier and data migration hassle-free. It is user-friendly, reliable, and secure. Check out the pricing details here. Try Hevo by signing up for a 14-day free trial and see the difference!
Frequently Asked Questions
1. What is a Tableau bridge?
Tableau Bridge is a tool that enables secure data connections between Tableau Cloud and on-premises data sources for live or scheduled extracts.
2. Is Tableau Bridge free?
Yes, Tableau Bridge is included with Tableau Cloud at no additional cost.
3. Where do you install Tableau Bridge?
Install Tableau Bridge on a machine within your on-premises network to securely connect to local data sources.
Share it with your connections.
-
 Share To LinkedIn
-
 Share To Facebook
-
 Share To X
-
 Copy Link


