


 Key Takeaways
To help you choose the right approach, here’s a breakdown of three effective methods to integrate your MongoDB data into BigQuery:
- There are multiple ways to move data from MongoDB to BigQuery, ranging from fully managed pipelines to streaming-based and GCP approaches.
- Fully managed, automated pipelines: No-code platforms that handle MongoDB extraction, schema normalization, incremental syncs, and monitoring with minimal operational effort.
- Kafka-based CDC streaming pipelines: Engineering-led, near real-time integrations using MongoDB Change Streams and Kafka, best suited for teams with an existing event-streaming stack.
- GCP-native batch or CDC pipelines: Custom Dataflow pipelines for large-scale or specialized workloads, offering transformation flexibility but requiring significant setup and maintenance.
Moving data from MongoDB to BigQuery allows teams to run fast, SQL-based analytics on large, semi-structured datasets.
While MongoDB is well-suited for flexible, document-based storage and application workloads, it is not designed for complex analytical queries, joins, or large-scale reporting. BigQuery fills this gap by providing a fully managed, columnar data warehouse built for high-performance analytics.
In the sections that follow, we’ll break down three practical methods to migrate data from MongoDB to BigQuery, explaining when to use each approach and how to turn your operational data into analytics-ready insights.
To help you understand how a MongoDB to BigQuery integration works in practice, the short video below walks through the end-to-end data flow and what the pipeline looks like once data lands in BigQuery.
Table of Contents
Understanding MongoDB to BigQuery Integration
Before diving deeper, it helps to understand how MongoDB and BigQuery differ and why teams commonly integrate the two. MongoDB is optimized for operational workloads and flexible data storage, while BigQuery is designed for large-scale analytics and SQL-based querying.
Connecting MongoDB to BigQuery bridges this gap, allowing teams to analyze application data efficiently without impacting production systems.
What Is MongoDB?
MongoDB is a popular NoSQL, document-oriented database designed for flexibility and high-velocity application workloads. It stores data in JSON-like documents, making it well suited for rapidly evolving schemas, nested data structures, and real-time transactional use cases. MongoDB is commonly used for application backends, event storage, and operational systems where fast reads and writes are critical.
While this document model enables agility, it also makes complex analytical queries—such as joins, aggregations across large datasets, and historical trend analysis—more challenging at scale.
What Is BigQuery?
Google BigQuery is a fully managed, serverless data warehouse built for large-scale analytics. It uses a columnar storage format and supports ANSI SQL, allowing teams to run complex queries across massive datasets with minimal infrastructure management. BigQuery is optimized for analytical workloads, including reporting, business intelligence, and advanced data analysis.
By integrating MongoDB with BigQuery, teams can move operational, semi-structured data into an analytics-first environment where it can be queried efficiently, combined with data from other sources, and used to drive business insights.
3 Methods to Migrate Data From MongoDB to BigQuery
Moving data from MongoDB to BigQuery involves bridging a NoSQL document-based storage with a columnar analytics database. Each integration method handles differences in data structure, replication frequency, and transformation capabilities.
Here, we discuss three methods to migrate data from MongoDB to BigQuery:
- Hevo (fully managed pipelines): Automated end-to-end. Handles extraction, incremental updates, schema changes, retries, and monitoring with minimal manual effort after setup.
- Confluent Kafka connectors (manual): Largely manual and engineering-driven. Requires setting up and operating Kafka, configuring source and sink connectors, managing schemas, monitoring lag, and handling failures.
- Google Cloud Dataflow (Semi-automated): Execution and scaling are managed by GCP, but pipeline configuration, transformations, and ongoing tuning still require engineering effort.
Method 1: Moving data from MongoDB to BigQuery using Hevo
Hevo Data connects to MongoDB using native drivers or Change Streams and writes to BigQuery via the streaming API or batch loads. It maps MongoDB’s semi-structured documents to BigQuery’s schema by flattening nested fields.
Here’s how you can set it up:
Prerequisites:
Before setting up the pipeline, ensure the following are in place:
MongoDB requirements
- A running MongoDB instance (Atlas or self-managed)
- Network access configured to allow Hevo’s IPs
- A database user with read access to the required collections
Refer to the MongoDB source integration documentation for supported deployment types and authentication options
BigQuery requirements
- An active Google Cloud project with billing enabled
- A BigQuery dataset where MongoDB data will be loaded
- A service account with:
- BigQuery Data Editor
- BigQuery Job User
Detailed setup steps are covered in the BigQuery destination guide.
Step 1: Connect MongoDB as the source
- Log in to your Hevo account.
- From the dashboard, select Create Pipeline.
- Choose MongoDB as the source.
- Enter the required connection details:
- MongoDB host and port
- Authentication database
- Username and password
- 5. Test the connection to validate network access and credentials.
- Select the collections you want to replicate.

Hevo establishes a persistent connection and tracks changes using incremental replication or Change Streams, depending on your MongoDB setup.
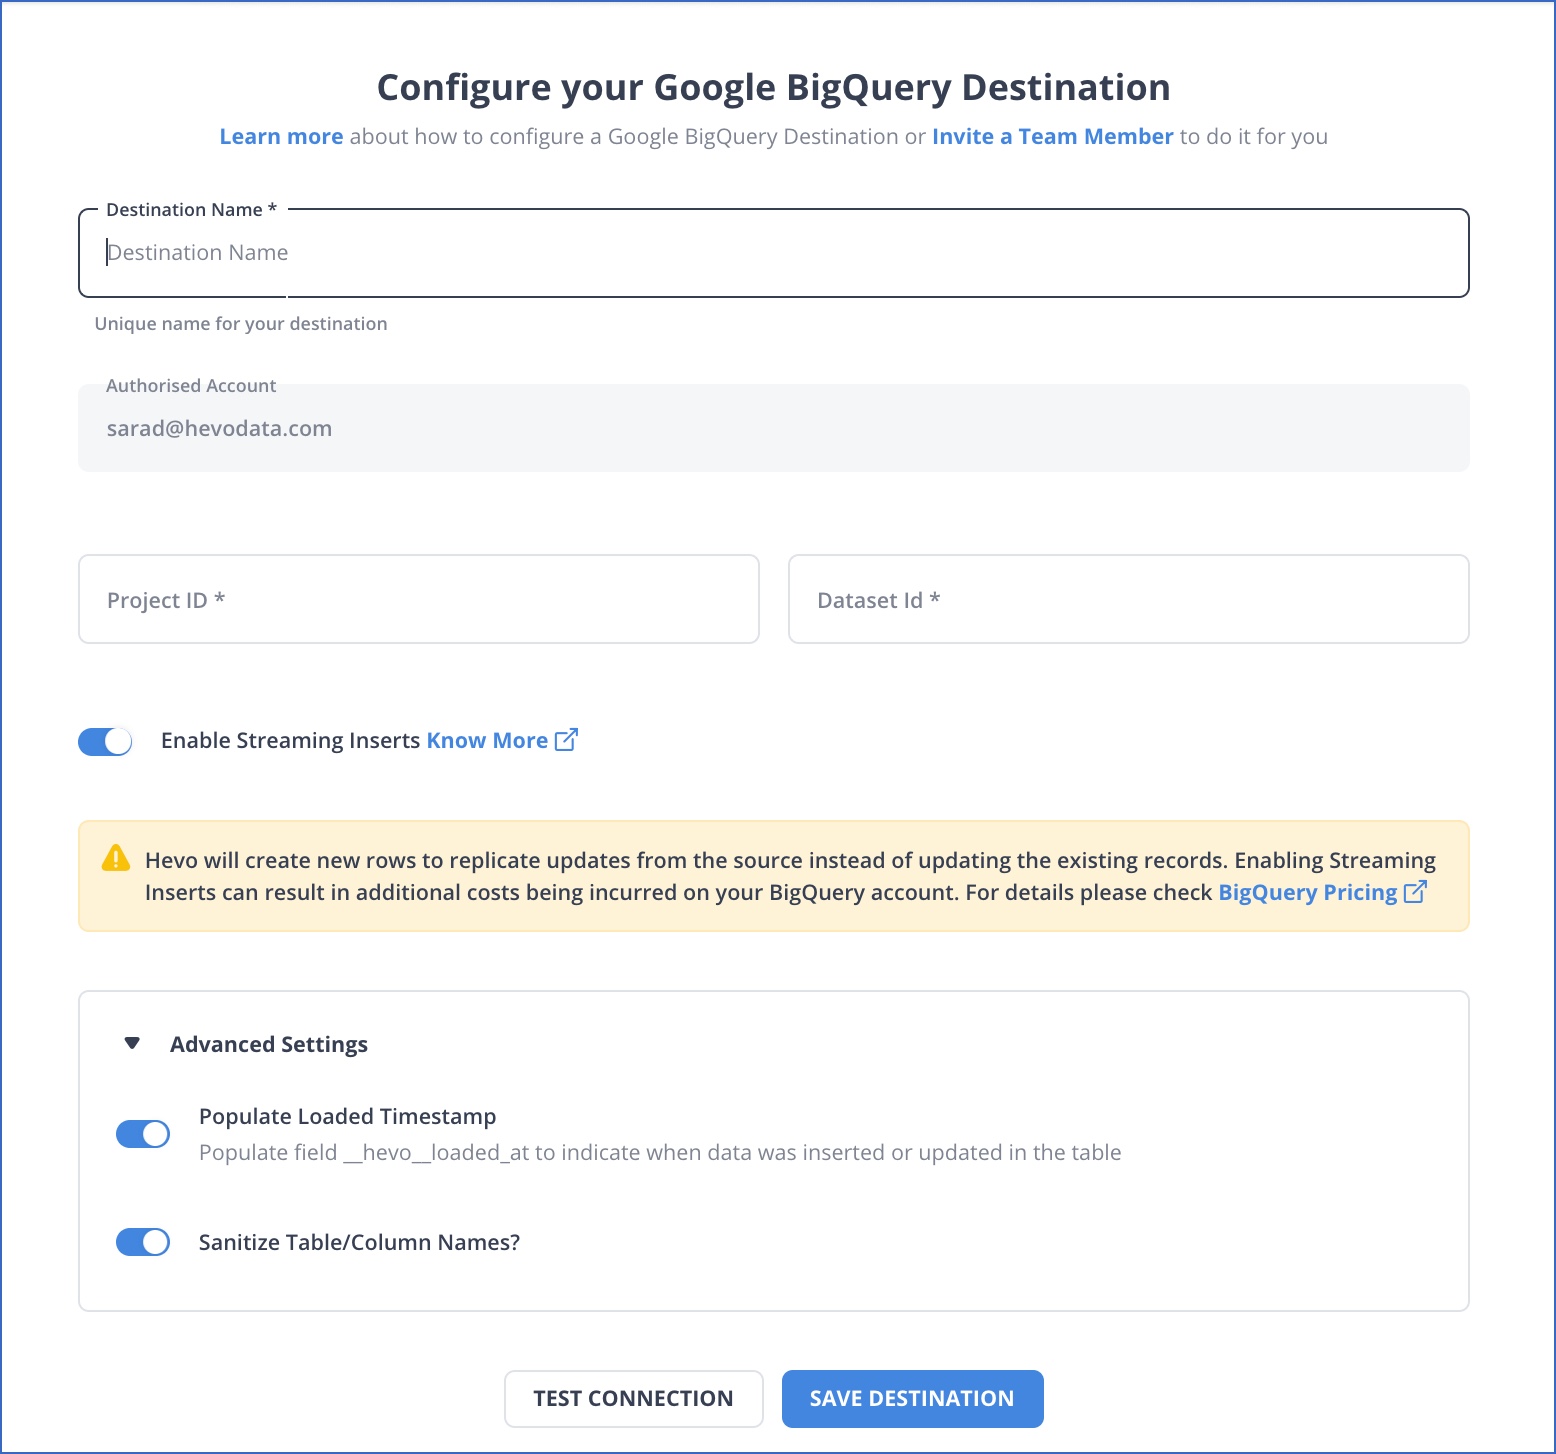
Step 2: Configure BigQuery as the destination
- Select Google BigQuery as the destination.
- Provide:
- Project ID
- Dataset ID
- Authentication method (OAuth or service account)
- Test the destination connection and save the configuration.
Hevo automatically creates tables, maps MongoDB fields to BigQuery-compatible schemas, and applies naming sanitization where required.
Step 3: Confirm the data pipeline and enable final settings
Before activating the pipeline, you can configure:
- Table name prefixes for easier identification
- Loaded timestamp columns for ingestion tracking
- Schema handling behavior for nested fields and arrays
Once enabled, the pipeline starts syncing data automatically and continues to replicate changes based on the configured schedule or CDC mode.


Simplify data pipelines with Hevo. Book a 1:1 demo today!
Get your free trial right away!
Why Teams Use Hevo for MongoDB to BigQuery
This method is typically chosen when teams need:
- Fast setup without writing or maintaining code
- Automatic handling of nested MongoDB documents
- Incremental or near real-time updates
- Built-in monitoring, retries, and failure recovery
Hevo removes the need to manage extraction jobs, transformation scripts, and BigQuery load logic manually, allowing teams to focus on analytics instead of pipeline maintenance.


Method 2: Integrating MongoDB with BigQuery via Confluent Connectors
Integrating MongoDB with BigQuery via Confluent Connectors leverages Kafka as a streaming intermediary, allowing near real-time replication of data. This approach handles nested documents and offers a reliable pipeline for analytics.
Here’s how it works:
Step 1: Set Up MongoDB Atlas
The workflow:
- Create a MongoDB Atlas cluster running.
- Load sample data into a database and collection to test the pipeline.
- Whitelist the IP addresses of your Kafka Connect cluster in the Network Access settings.
Obtain the connection string for your MongoDB Atlas cluster, which will be used in the connector configuration.
Step 2: Set Up Kafka Connect Cluster
The workflow:
- Set up a Kafka cluster in Confluent Cloud or on-premises.
- Enable Kafka Connect to manage connector configurations and schema evolution.
- Install the MongoDB Source and BigQuery Sink connectors using Confluent Hub Client.
Step 3: Deploy MongoDB Source Connector
Create a JSON configuration file with the following content:
{<br> "name": "mongo-source-connector",<br> "config": {<br> "connector.class": "com.mongodb.kafka.connect.MongoSourceConnector",<br> "connection.uri": "mongodb+srv://:@/",<br> "database": "sample_mflix",<br> "collection": "movies",<br> "output.format.value": "json",<br> "topic.prefix": "mongo."<br>}
- connector.class: Specifies the connector implementation.
- connection.uri: MongoDB Atlas connection string with credentials.
- database & collection: MongoDB database and collection to monitor.
- output.format.value: Defines the format of the output messages (JSON in this case).
- topic.prefix: Prefix for Kafka topics created by the connector.
Now, use the Kafka Connect REST API to deploy the connector:
curl -X POST -H "Content-Type: application/json" \<br> --data @mongo-source-connector.json \<br> http://:8083/connectors
- Replace <connect-host> with your Kafka Connect host address.
Step 4: Create BigQuery Dataset
The workflow:
- Navigate to BigQuery in the GCP Console.
- Create a new dataset where the data will be stored. Note: Ensure the dataset’s location matches the region of your Kafka Connect cluster.
- Create a service account in GCP with roles: BigQuery Data Editor, BigQuery Job User.
- Download the JSON key file for authentication.
Step 5: Deploy BigQuery Sink Connector
Create a JSON configuration file (bigquery-sink-connector.json):
{<br> "name": "bigquery-sink-connector",<br> "config": {<br> "connector.class": "com.wepay.kafka.connect.bigquery.BigQuerySinkConnector",<br> "topics": "mongo.sample_mflix.movies",<br> "project": "",<br> "datasets": "default=",<br> "autoCreateTables": "true",<br> "keyfile": ""<br> }<br>}
- connector.class: Specifies the connector implementation.
- topics: Kafka topic to consume data from.
- project: GCP project ID where BigQuery resides.
- datasets: Mapping of Kafka topic to BigQuery dataset.
- autoCreateTables: Automate table creation in BigQuery.
- keyfile: Path to the service account JSON key for authentication.
Use the Kafka Connect REST API to deploy the connector:
curl -X POST -H "Content-Type: application/json" \<br> --data @bigquery-sink-connector.json \<br> http://:8083/connectors
- Replace <connect-host> with your Kafka Connect host address.
Step 6: Test the Pipeline
The workflow:
- Add test documents to the collection monitored by the MongoDB Source Connector.
- Check if the changes are captured by the source connector.
- Confirm that the inserted documents are ingested correctly in the corresponding BigQuery table.
Method 3: Google Cloud Dataflow to Move MongoDB Data to BigQuery
Google Cloud Dataflow provides both batch and streaming pipelines for integrating MongoDB with BigQuery. This method is ideal for large-scale migrations, scheduled batch transfers, or real-time streaming using MongoDB Change Streams.
Here’s how it works:
Step 1: Set up MongoDB
The workflow:
- Ensure your Atlas or replica set instance is running.
- Identify the database and collections you want to migrate.
- Whitelist the Dataflow IP ranges for network access.
Dataflow requires access to MongoDB to read the documents, and streaming requires a replica set to capture changes.
Step 2: Set up BigQuery
Dataflow writes to BigQuery via the streaming API (real-time) or batch load jobs:
- Create a BigQuery dataset to store the migrated data.
- GCP service account with roles: BigQuery Data Editor and BigQuery Job User.
- Choose table names and creation mode.
Step 3: Choose the Dataflow template
Build a Dataflow pipeline using the platform’s UI:

- In the “Dataflow template” box, select:
- “MongoDB to BigQuery (CDC)” for streaming template.
- “MongoDB to BigQuery” for batch template.
- Other required details include:
- Job name: Unique identifier for pipeline.
- Regional endpoint: GCP region where the job runs.
Step 4: Configure pipeline parameters
Provide MongoDB and BigQuery connection details:

- MongoDB connection URL
- Mongo database
- Mongo collection
- BigQuery destination table
- User option
Choose how you want to encrypt your data:
A. Google-managed encryption key
- Google automatically manages encryption keys.
- No configuration required.
B. Customer-managed encryption key (CMEK)
- You control the encryption key.
- Requires configuring key access and permissions.
Step 5: Run & monitor the pipeline
The workflow:
- Launch the Dataflow job in GCP Console or via gcloud CLI.
- Use Dataflow monitoring tools to check job status.
- Ensure successful ingestion, handle errors, and validate data.
MongoDB to BigQuery: Benefits & Use Cases
- Scalability and Speed: With BigQuery’s serverless, highly scalable architecture, you can manage and analyze large datasets more efficiently, without worrying about infrastructure limitations.
- Enhanced Analytics: BigQuery provides powerful, real-time analytics capabilities that can handle large-scale data with ease, enabling deeper insights and faster decision-making than MongoDB alone.
- Seamless Integration: BigQuery integrates smoothly with Google’s data ecosystem, allowing you to connect with other tools like Google Data Studio, Google Sheets, and Looker for more advanced data visualization and reporting.
Struggling with custom scripts to sync MongoDB and BigQuery? Hevo simplifies the process with a fully managed, no-code data pipeline that gets your data where it needs to be fast and reliably.
With Hevo:
- Connect MongoDB to BigQuery in just a few clicks.
- Handle semi-structured data effortlessly with built-in transformations.
- Automate schema mapping and keep your data analysis-ready.
Trusted by 2000+ data professionals at companies like Postman and ThoughtSpot. Rated 4.4/5 on G2. Try Hevo and make your MongoDB to BigQuery migration seamless!
Get Started with Hevo for FreeConclusion
Migrating data from MongoDB to BigQuery enables faster analytics and more flexible querying, but the approach you choose should match your operational capacity. Managed pipelines are often preferred when teams want quick setup, built-in schema handling for nested documents, and minimal ongoing maintenance. Streaming and native cloud options make sense for specialized, infrastructure-heavy use cases, but they also introduce additional complexity.
For teams that want dependable, near real-time data in BigQuery without maintaining custom code or infrastructure, a fully managed, no-code pipeline like Hevo provides a simpler and more scalable long-term solution. Sign up for a 14-day free trial with Hevo Data to streamline your migration process and leverage multiple connectors, such as MongoDB and BigQuery, for real-time analysis!
FAQ on MongoDB To BigQuery
1. What is the difference between BigQuery and MongoDB?
BigQuery is a fully managed data warehouse for large-scale data analytics using SQL. MongoDB is a NoSQL database optimized for storing unstructured data with high flexibility and scalability.
2. How do I transfer data to BigQuery?
Use tools like Google Cloud Dataflow, BigQuery Data Transfer Service, or third-party ETL tools like Hevo Data for a hassle-free process.
3. Is BigQuery SQL or NoSQL?
BigQuery is an SQL database designed to run fast, complex analytical queries on large datasets.
4. What is the difference between MongoDB and Oracle DB?
MongoDB is a NoSQL database optimized for unstructured data and flexibility. Oracle DB is a relational database (RDBMS) designed for structured data, complex transactions, and strong consistency.
Share it with your connections.
-
 Share To LinkedIn
-
 Share To Facebook
-
 Share To X
-
 Copy Link


