


AfterShip is a third-party shipment tracking service that interfaces with e-commerce platforms to retrieve and update the real-time status of your ordered items from various shipping carriers. For medium to large-sized companies that send thousands of orders daily, this platform offers an alternative to the manual process of tracking shipments.
With AfterShip, you can manage logistics with an interactive dashboard that provides insights into shipping and post-purchase performance while tracking your delivery, package acceptance, and courier performance. However, by connecting it to a Cloud Data Warehouse such as Snowflake, you can do complex analytics on enormous volumes of tracking and shipping data obtained from numerous e-commerce platforms.
This article will give you an overview of AfterShip and Snowflake before delving into the methods for AfterShip Snowflake integration. Read along to understand better the step-by-step procedure to connect AfterShip to Snowflake.
Table of Contents
Prerequisites
We recommend you have a fundamental understanding of Data Integration to get the most from this article.
What is AfterShip?

AfterShip is a web-based tool that keeps your customers updated on the status of their purchases from an online business. Companies can use the platform’s automated features to help with order processing, marketing, sales, and delivery. The platform connects global e-commerce infrastructure, enabling users worldwide to streamline their business operations pertaining to their order status.
After you create an AfterShip account and link it with your e-commerce or internet business, it automatically imports all of your store’s tracking numbers. The platform’s interface also allows for the manual entry of tracking numbers. It imports client data, phone numbers, email addresses, and your e-commerce company’s tracking numbers.
Every time a customer’s tracking number changes, regular email alerts are sent to them. With this, consumers can keep track of everything they own and constantly contact their suppliers in case of delays or missing items.
Key Features of AfterShip
- Branded Monitoring: With a branded tracking page, customers can check the status of their parcels directly on the website where they made their purchase, negating the need to visit a courier’s website. Using AfterShip, store owners can create personalized monitoring pages and boost sales through personalization. On AfterShip’s custom tracking website, you will find end-to-end tracking, reroute delivery choices, multilingual tracking, and more.
- Integrations: Various e-commerce platforms, such as Shopify, WooCommerce, BigCommerce, Etsy, and others, can be integrated with AfterShip. Aftership also offers 7 API Integrations (e.g., Postmen API, Commerce API, Tracking API) to help businesses streamline their e-commerce tracking processes using its shipment tracking data.
Method 1: Connecting AfterShip to Snowflake Using Hevo
Hevo Data is an Automated Data Pipeline platform that provides a hassle-free solution to replicate data from Aftership (Free Source Connector with Hevo) to Snowflake within minutes in an easy-to-use no-code interface. Hevo is fully managed and completely automates not only loading data from 150+ Data Sources such as AfterShip but also enriching the data and transforming it into an analysis-ready form without having to write a single line of code.
Method 2: Connecting AfterShip to Snowflake Using Manual Method
To replicate data from AfterShip to Snowflake, you must first extract data from AfterShip in CSV format. Then you need to load that CSV file into your Snowflake Data Warehouse manually. Implementing this method may take a long time and could be pretty cumbersome.
Get Started with Hevo for FreeWhat is Snowflake?

Snowflake is a fully managed Cloud-based Data Warehouse made available to customers as Software-as-a-Service (SaaS). Snowflake uses the ANSI SQL protocol, which supports structured and semi-structured data formats, including JSON, Parquet, and XML. With pricing based on per-second resource utilization, it is highly flexible and scalable in terms of user base and processing power.
Snowflake has a shared disk design that enables all of the platform’s compute nodes to access a single data repository for persistent data. Additionally, Snowflake runs queries on MPP compute clusters, which leverage shared-nothing architecture to store a portion of the entire dataset locally on each cluster node, aiding in performance management.
In Snowflake, several computing clusters are combined to create Virtual Warehouses. Many Virtual Warehouses could be created to access the same storage layer without needing multiple copies of the data in each Warehouse. These Virtual Warehouses can be scaled up and down with minimal downtime and storage burden.
Key Features of Snowflake
- Zero Cloning: In a typical RDBMS system, the table and its contents are duplicated when you copy a table from one database to another. This duplicating of the data increases the amount of storage required. With Snowflake’s zero-copy feature, you can quickly clone any table or database without creating duplicates.
- Caching Results: The Snowflake design features caching at multiple levels to speed up your searches and decrease expenses. For instance, Snowflake stores the results for 24 hours when a query is done. Therefore, provided the underlying data hasn’t changed, the results are already accessible and ready to be delivered if the same query is executed again by the same user or another account user.
Methods to Connect AfterShip to Snowflake
In this section, you will learn about the two methods for AfterShip Snowflake integration:
Method 1: Connecting AfterShip to Snowflake Using Hevo

The following are the steps to connect AfterShip to Snowflake using Hevo Data:
Step 1: Configuring AfterShip as a Source
To configure AfterShip as the Source in your Pipeline, perform these steps:
- In the Asset Palette, choose PIPELINES.
- In the Pipelines List View, click + CREATE.
- Select AfterShip on the Select Source Type page.
- In the Configure your AfterShip Source page, provide the following information:
- Pipeline Name: A unique name for the pipeline that should not be longer than 255 characters.
- API Key: The API key is retrieved from your AfterShip account.

- Click on TEST & CONTINUE.
- Continue by configuring the Data Ingestion and setting up the Destination.
Step 2: Configure Snowflake as a Destination
- In the Asset Palette, choose DESTINATIONS.
- In the Destinations List View, click + CREATE.
- Select Snowflake as the Destination type on the Add Destination page.
- In the Configure your Snowflake Warehouse page, enter the following information:
- Destination Name: Give your Destination a distinctive name.
- Snowflake Account URL: This is the account URL you obtained.
- Database User: The Hevo user you set up. In the Snowflake Database, this user has a non-administrative role.
- Database Password: The Database user’s password.
- Database Name: The Database name into which the data will be loaded.
- Database Schema: The name of the schema in the Destination Database into which data will be loaded.
- Warehouse: The Snowflake Warehouse is connected with your Database, where SQL queries and DML operations are executed.
- Populate Loaded Timestamp: Enabling this option adds the identifier __hevo_loaded_at the column to the Destination Database, indicating the time when the Event was loaded to the Destination.
- Sanitize Table/Column Names: Enable this option to sanitize the names of your tables and columns. Hevo uses underscores to replace any non-alphanumeric characters and spaces in a table or column name. When you use Auto Mapping to map a Source Event Type to a table in Snowflake, or when you try to build a table manually using the Hevo UI, names are sanitized.
- Create Transient Tables: Select this option to enable the creation of transient tables. Transient tables have the same properties as permanent tables, except for the fail-safe duration. If you lose the table, Snowflake can restore it for up to seven days because of the fail-safe function. Transient tables allow you to save additional backup storage expenses and are appropriate if your data does not require the same level of data protection and recovery as permanent tables or if it can be recreated outside of Snowflake.
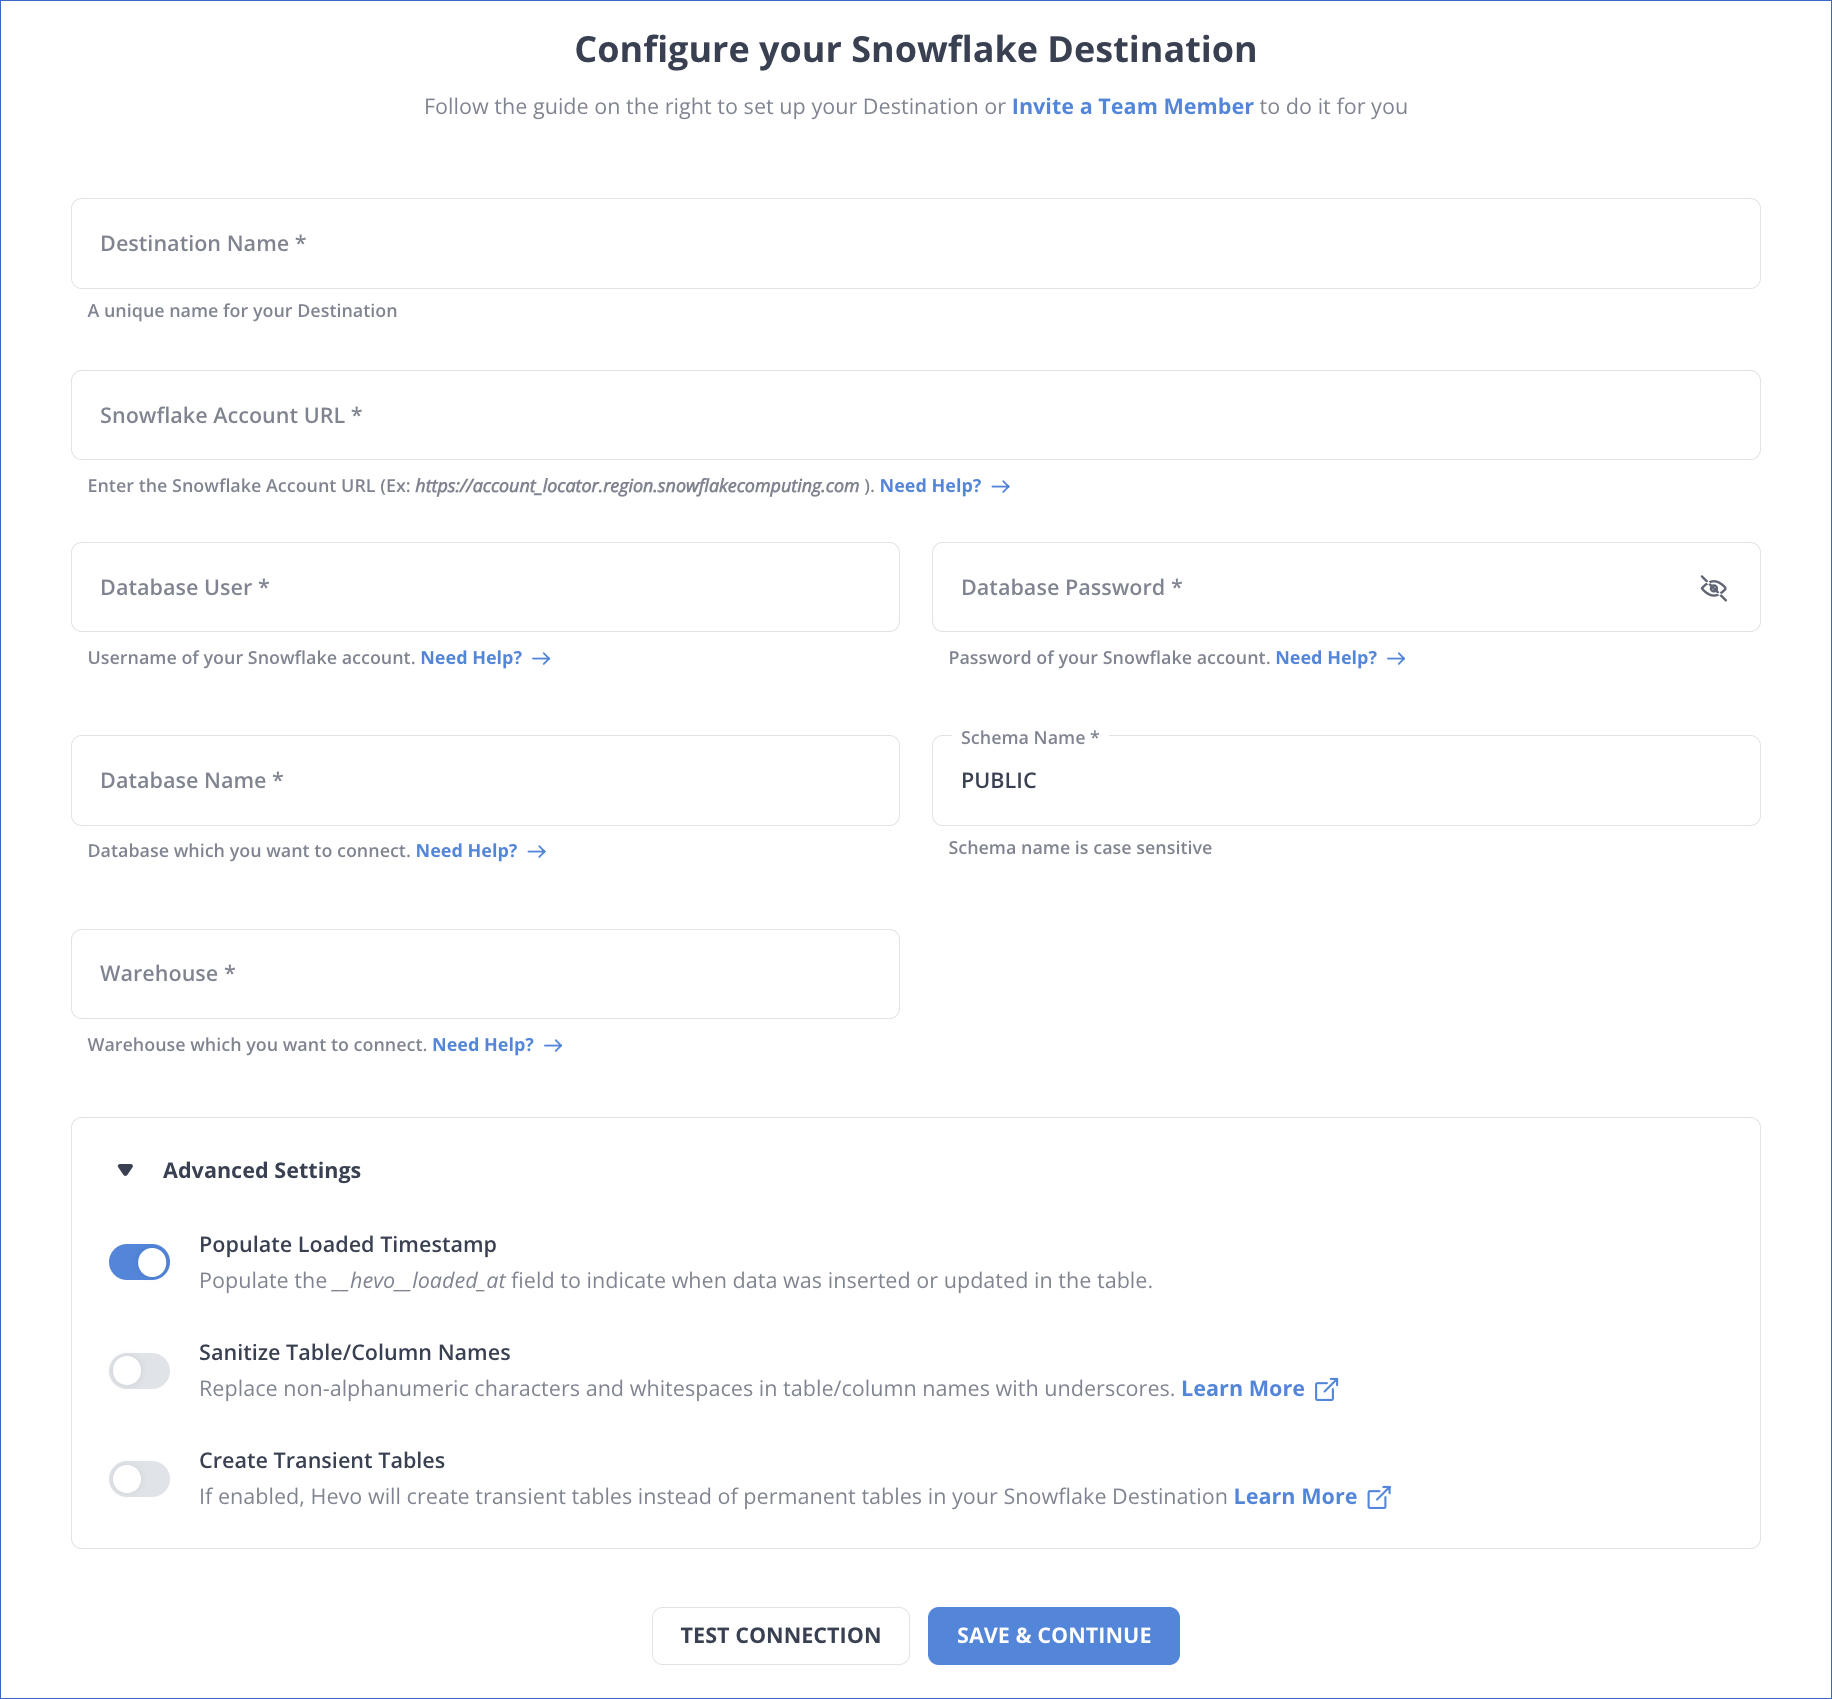
- Click SAVE & CONTINUE.
- Click TEST CONNECTION.
Why Consider Hevo
- Fully Managed: Hevo requires no management and maintenance as it is a fully automated platform.
- Data Transformation: Hevo provides a simple interface to perfect, modify, and enrich the data you want to transfer.
- Faster Insight Generation: Hevo offers near real-time Data Replication so that you can access real-time insight generation and quicker decision making.
- Schema Management: Hevo can automatically detect the schema of the incoming data and map it to the destination schema.
- Scalable Infrastructure: Hevo has in-built Integrations for 150+ Data Sources (with 60+ Free Sources) that can help you scale your data infrastructure as required.
- Live Support: Hevo team is available round the clock to extend exceptional support to its customers through chat, email, and support calls.
Method 2: Connecting AfterShip to Snowflake Using Manual Method
In this method, you must extract data from AfterShip in CSV format. Then you need to load that CSV file into your Snowflake Data Warehouse.
- Step 1: Download the CSV File
- Step 2: Preferred Warehouse Selection
- Step 3: Loading Files
- Step 4: Selecting a File Format
- Step 5: Setting Up Load Options
Step 1: Download the CSV File
- Open the Shipments page in your AfterShip account and then set up filters (if required).
- You need to export the shipments. The registered email address will receive the CSV file.
- Open the file in Google Sheets before importing it into Snowflake.
- Select File in the top left corner.
- Click Download As, then Comma-Separated Values (.csv).
- The data will then be downloaded to your local computer and exported to CSV.
- Now, to load your data in Snowflake, follow the below steps:
- Click on Data and then select Databases on the Snowflake Web homepage.
- Click on the link to the specific database to view the content.
- Click on the Tables tab by either ‘choosing a row’ and loading it or ‘choosing the table name’ and loading it.

The wizard for loading data will appear. It will populate the data into the table you requested for.
Step 2: Preferred Warehouse Selection
- Select a warehouse from the drop-down option as Snowflake.
- Click on Next.
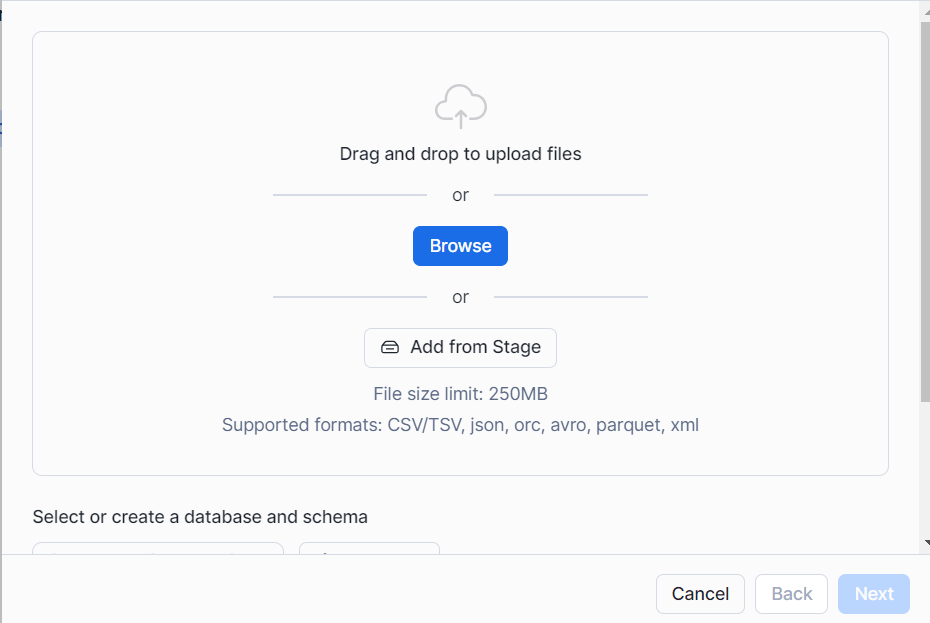
Step 3: Loading Files
- Click Load files from your computer, then choose Select Files.
- Click the Open button after choosing one or more local data files.
- Press the Next key when you’re finished.
Step 4: Selecting a File Format
- For a pre-existing file format:
- Choose a preexisting file format.
- Click Next.
- To create a New File Format:
- A drop-down list will appear; click the plus (+) sign.
- According to the format of your data files, fill in the fields on the screen.
- Select Finish.
- Select the newly named file format you want from the drop-down menu.
- Click Next.
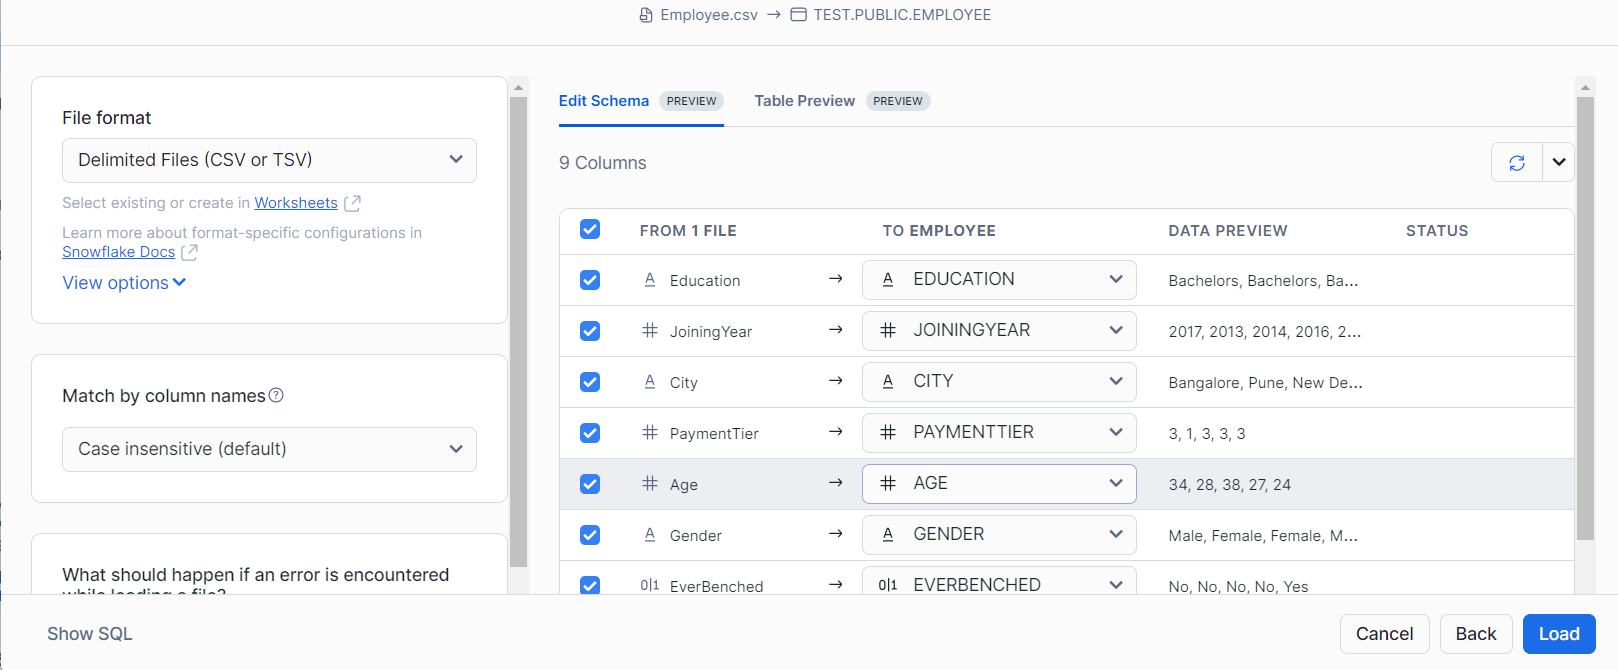
Step 5: Setting Up Load Options
- You need to specify how Snowflake should act if the data files include anomalies.
- Select Load from the menu. Snowflake uses the warehouse of your choice to import data into the table of your choice.
- Click OK once you’ve finished. The wizard for loading data ends.

Limitations of Connecting AfterShip to Snowflake Using Manual Method
When you use the CSV file export method, you will need to update your older data on Snowflake when you generate additional data on Aftership. This covers the newest records and modifications to existing records that have been updated on Aftership for any reason. Though you can repeatedly update the Snowflake Data Warehouse with newly available data, it will be a tedious process. You will also need to check Aftership for new data frequently.
The detection and elimination of any duplicate records from your Snowflake database is another concern that needs your attention. Duplicate records can get added to your database due to Aftership’s lack of a way to discover new and modified entries or mistakes.
Therefore, it’s better to choose a fault-tolerant, fast and secure ETL solution like Hevo Data to replicate your data from AfterShip to Snowflake in as easy as 2 steps. With Hevo, you can be worry-free of duplication issues, and have complete flexibility to define your own load schedule.
Recommended
Conclusion
This article gives you an overview of AfterShip and Snowflake, along with their features. It also describes the two methods to connect AfterShip to Snowflake. Manual Data Replication from AfterShip to Snowflake would need a substantial amount of time and resources, making the process time-consuming and exhausting procedure. However, a Data Integration solution like Hevo allows you to replicate data quickly and efficiently.
Hevo Data is a No-code Data Pipeline that can transport real-time data from 150+ Data Sources such as AfterShip (including 60+ free sources) to a Data Warehouse such as Snowflake, BI Tool, or any other destination of your choice. It is a robust, completely automated, and secure solution that does not require any code!
You can perform On-demand Transformations on the data using Hevo Models and Workflows and prepare it for analysis suitable for your BI tool.
Want to take Hevo for a ride? Try Hevo’s free 14-day trial to streamline your Data Integration process. You may examine the pricing information to see which plan best suits your company’s needs.
You can contribute your knowledge of connecting AfterShip to Snowflake in the comments section below.
Frequently Asked Questions
1. Can Snowflake replace ETL?
Snowflake simplifies ETL processes by allowing ELT (Extract, Load, Transform), where data is loaded first and transformed within Snowflake. However, it doesn’t entirely replace ETL tools, which offer advanced automation and orchestration capabilities. Tools like Hevo Data complement Snowflake by streamlining the ETL/ELT process.
2. Is Snowflake a good option?
Yes, Snowflake is a good option for scalable, cloud-based data warehousing. It offers high performance, flexibility, cost-efficiency, and seamless integration with various tools.
3. What is AfterShip API?
AfterShip API is a tool that allows developers to integrate shipment tracking and notifications into their applications.
Share it with your connections.
-
 Share To LinkedIn
-
 Share To Facebook
-
 Share To X
-
 Copy Link


