WordPress is the simplest, most popular way to create your own website or blog. WordPress is an open-source content management system licensed under GPLv2, which means that anyone can use or modify the WordPress software for free. A content management system is basically a tool that makes it easy to manage important aspects of your website – like content – without needing to know anything about programming. Airtable WordPress Integration improves the functionality of WordPress.
Airtable takes the best aspects of spreadsheets and databases and puts them together. Airtable can store information in a spreadsheet that’s visually appealing and easy-to-use, but it’s also powerful enough to act as a database that businesses can use for customer-relationship management (CRM), task management, project planning, and tracking inventory.
This article provides 2 methods that can be used for Airtable WordPress Integration.
Table of Contents
What is Airtable?

Airtable is an incredibly flexible system that combines the functionality of a spreadsheet with the power of a database. An end result is a highly-customizable tool. Use Cases of Airtable are
- Project management
- Customer relationships management
- Content calendars
- Client booking
Airtable can be used to organize information and then display it in a variety of ways, from a simple spreadsheet-style layout to calendars, Kanban boards, and gallery views.
The best part is that Airtable takes the hassle out of creating these tools. Getting advanced functionality out of a spreadsheet can be quite complex, but Airtable is designed to be simple and easy to use.
Basic Components of Airtable
Airtable is a combination of spreadsheets and databases; it’s the best of both worlds. Airtable makes it easier to interact with your data, while at the same time enabling programmatic management of your data. A few components of that Airtable consists is given below.
- Bases are collections of Tables. Airtable has existing templates like Content Calendar, Project Tracker, Event planning, and more.
- Workspace is a collection of Bases in Airtable. If bases are folders that hold Excel files, a workspace would be the hard drive that holds those folders.
- Tables are where your data is stored. They are similar to spreadsheets. Tables have columns, rows, and fields (which we’ll get to in a minute).
- Views are a powerful Airtable feature that allows you to configure how you view the data in a table.
Seamlessly migrate your WordPress data, from posts and comments to user information, with Hevo. Automate the process, centralize your data, and unlock valuable insights to drive smarter content strategies and website performance decisions. With Hevo, you can:
- Effortlessly extract data from WordPress and other 150+ connectors.
- Tailor your data to the destination’s needs with features like drag-and-drop and custom Python scripts.
- Achieve lightning-fast data loading, making your data analysis ready.
Don’t just take our word for it—listen to customers, such as Thoughtspot, Postman, and many more, to see why we’re rated 4.3/5 on G2.
Get Started with Hevo for Free
What is WordPress?
WordPress is a free, open-source website creation platform. On a more technical level, WordPress is a content management system (CMS) written in PHP that uses a MySQL database. In non-geek speak, WordPress is the easiest and most powerful blogging and website builder in existence today.
Features of WordPress
As a website building platform and CMS, WordPress boasts an impressive feature set. Here are just a few of the many features of WordPress.
- SEO – Search Engine Optimization (SEO) begins at a technical level and WordPress delivers an exceptional code base for SEO. SEO allows your website’s content to be found via common search engines such as Google or Bing. Check out these free WordPress SEO training videos to learn more.
- Speed – WordPress is a lean website framework that is constantly striving to remove code “bloat” that slows down the loading speed of a website.
- Mobile-friendly – Most WordPress themes are now mobile-friendly or responsive out-of-the-box.
- Media file library – WordPress includes a built-in media library where you can upload and embed media files such as images or videos into your pages or posts. You can even perform basic edits to your images within WordPress.
- Easy-to-use user interface – WordPress is very easy to use with no complicated settings. If you can use a WordPress processor, you can use WordPress. WordPress also has a focus on accessibility.
- Custom menus – WordPress makes it easy to create navigation menus with links to your pages or custom links.
- Built-in blog – Adding a blog to your website is as simple as publishing a post.
How to Set Up Airtable WordPress Integration?
There are a lot of ways you could Integrate the Airtable WordPress sites, but the most common use is to collect and manage data about your visitors. That information can come from either user surveys or signup forms.
Method 1: Using Zapier for Airtable WordPress Integration
To get Airtable set up on your WordPress site for Airtable WordPress Connection, you’ll need a forms plugin that can integrate with a service like Zapier, which connects Airtable WordPress together. The Gravity Forms plugin is a popular choice.
Then you’ll just create your form and use Zapier to send the data to Airtable. Let’s walk through how the process works.
Step 1: Create a Contact Form
We’ll use Gravity Forms for our demonstration since it’s such a popular and easy-to-use tool. First, you’ll need to purchase and download the plugin. Then head to your WordPress dashboard and navigate to Plugins > Add New.
Click on Upload Plugin, and choose the Gravity Forms file you just downloaded. Don’t forget to activate it once it’s installed!
Next, you need to create your form. We’ll use a basic contact form as our example. Navigate to Forms > New Form in the sidebar, then give it a name and click on Create Form.
Next, select the field options you want from the list on the right:

When you’re done, click on Update to save your form. Next, open up the page in the WordPress editor and add a new Forms block:
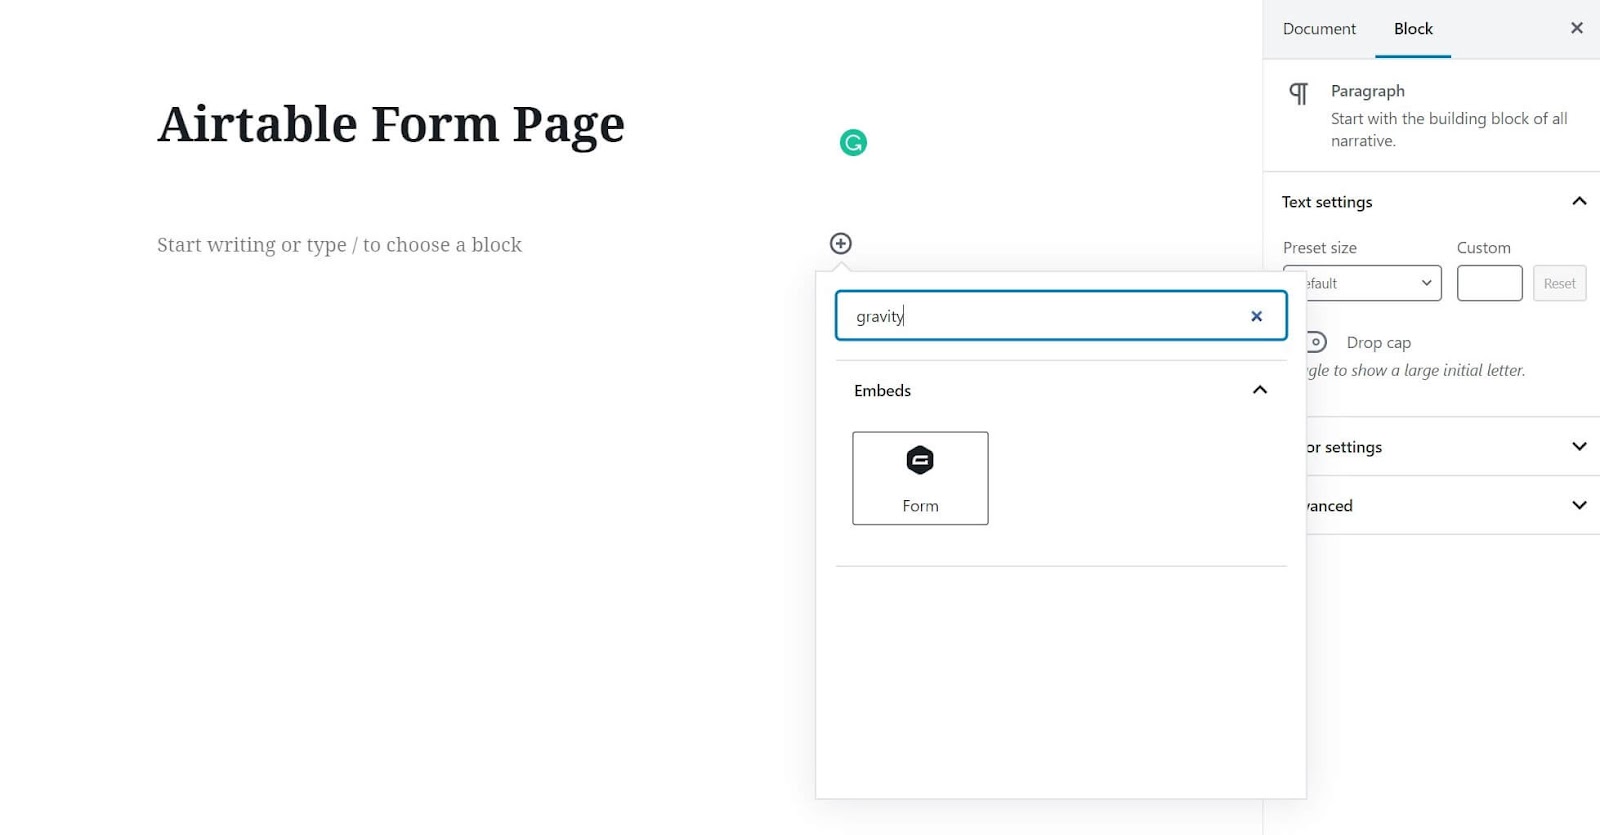
Select your newly-created form from the drop-down list and you’ll be all set. Make sure to update the page as well.
Step 2: Activate the Zapier Add-on for Gravity Forms
With your form created, the next step is to connect Zapier to the form and your Airtable account. The first thing to do is make sure that Zapier integration is turned on for Gravity Forms.
To do that, navigate to Forms > Add-ons. Scroll all the way down until you see the Zapier add-on (they’re in alphabetical order):
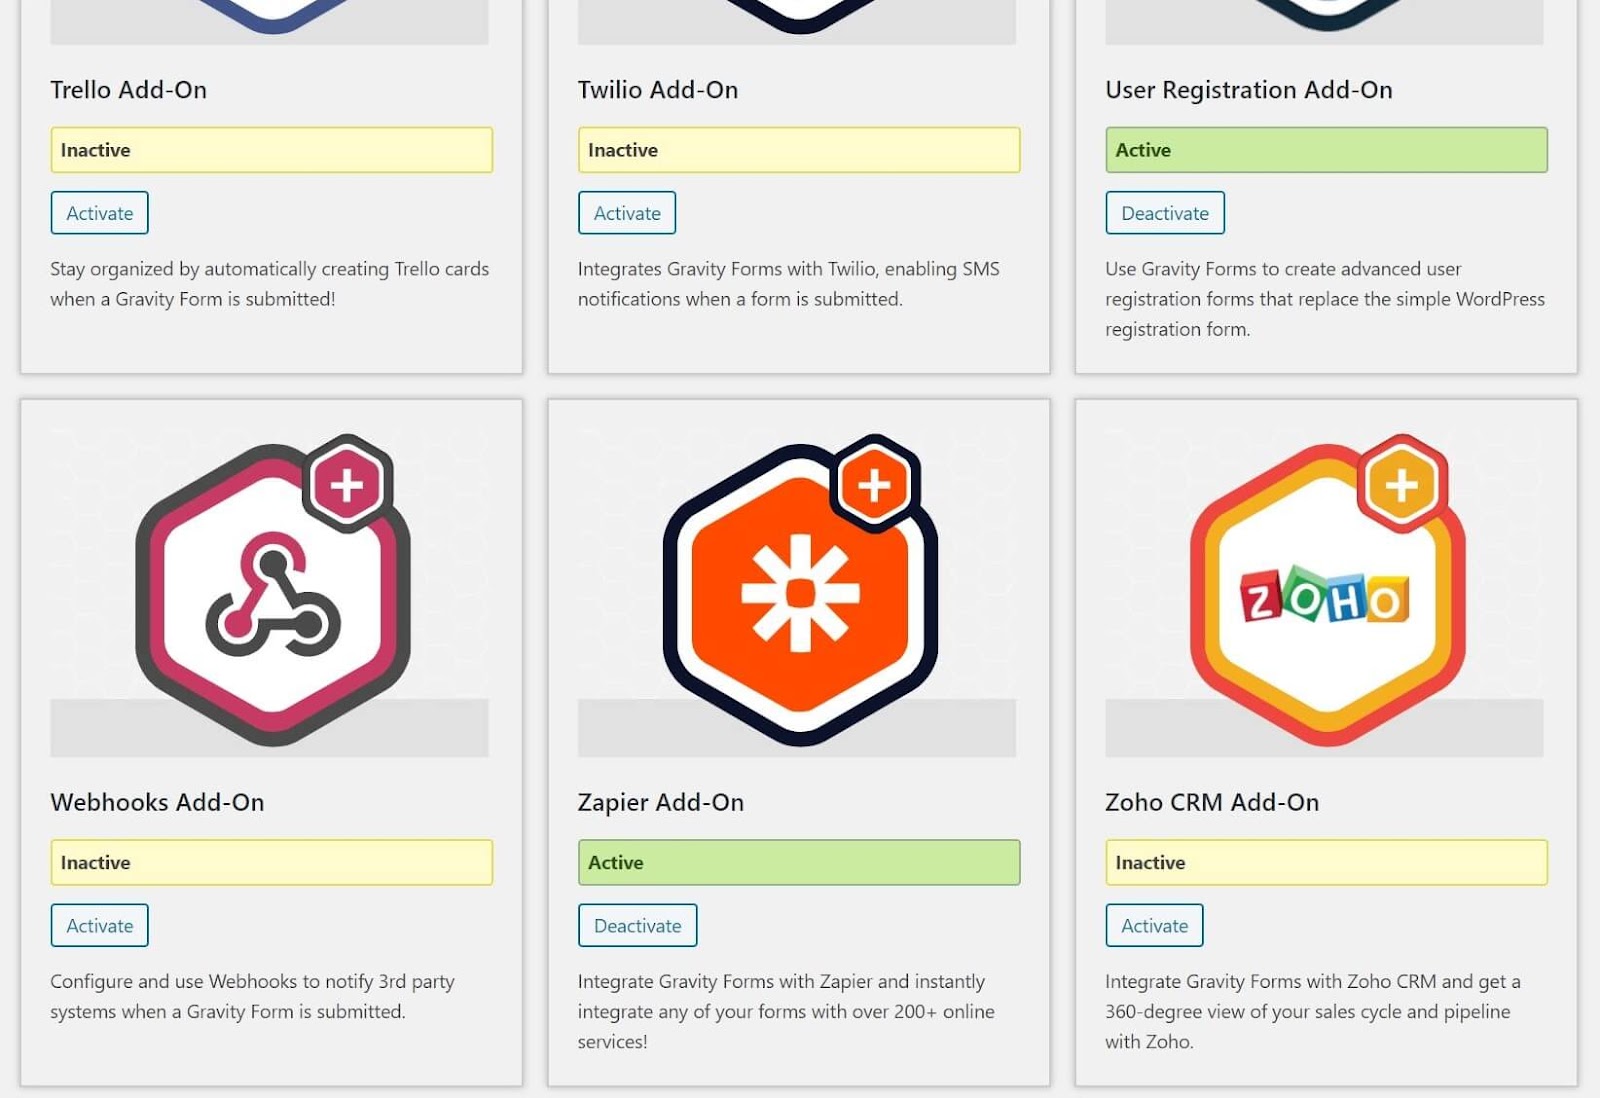
If it’s not active, click on Activate.
Step 3: Get Your Airtable API Key
Next, you’ll need to set up an Airtable account. There’s a free trier as well as several premium options, so feel free to choose the plan that fits your needs.
Then, head to your Airtable account page and click on the Generate API key button:

Copy and paste that key somewhere safe, as you’ll need it shortly.
Step 4: Create a Zapier ‘Zap’ to Connect Airtable and Gravity Forms
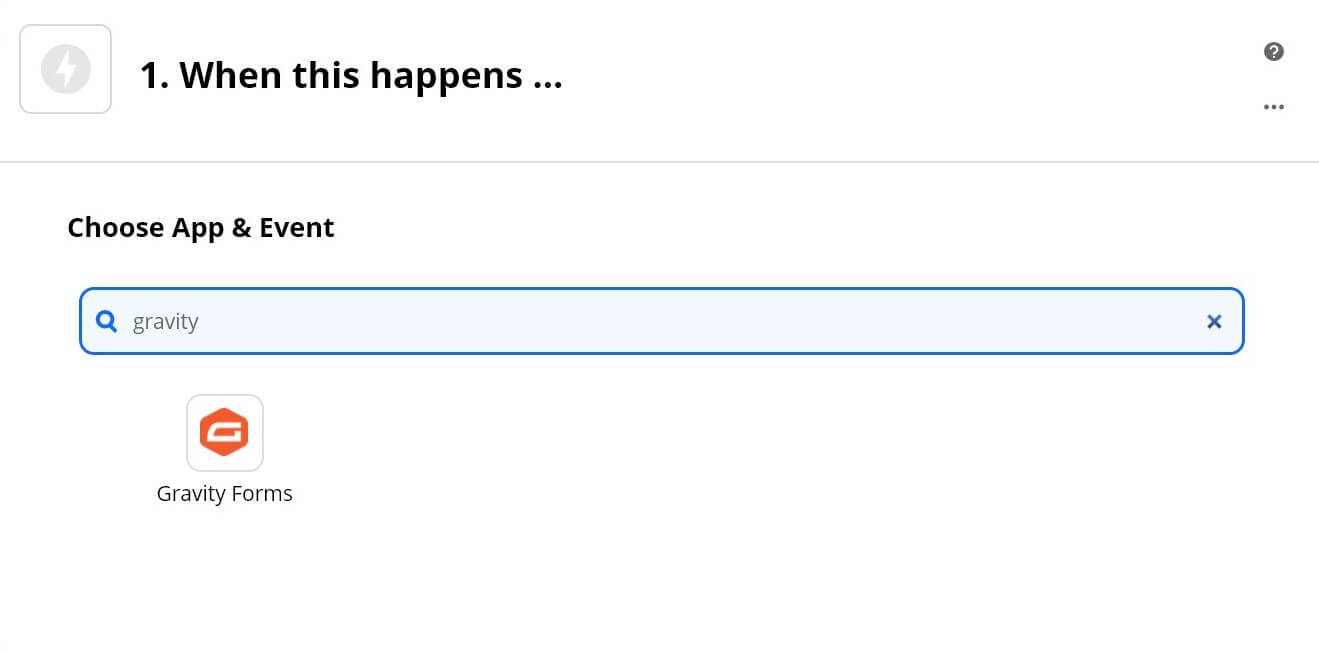
At this point, you’ll want to create a Zapier account if you don’t have one already. Then you can head to your account settings page and select Make a Zap. In the first section, type in “gravity” to pull up Gravity Forms:
Select the Zap and click on Continue. You’ll be given a URL that you need to paste into your Gravity Forms form from Step 1.
So head back to your Airtable WordPress dashboard, select Forms from the sidebar, and find your new form. Hover over it and click on Settings, then select Zapier from the list:
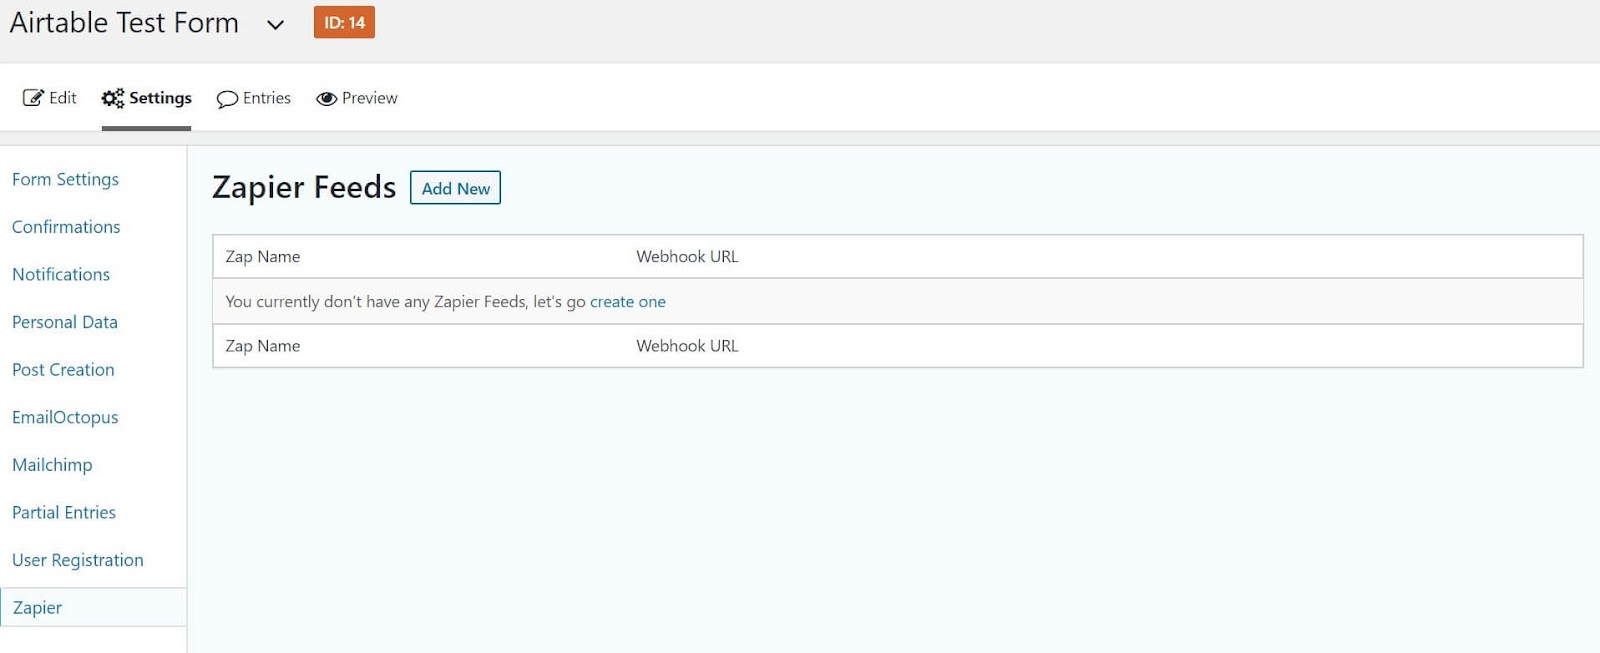
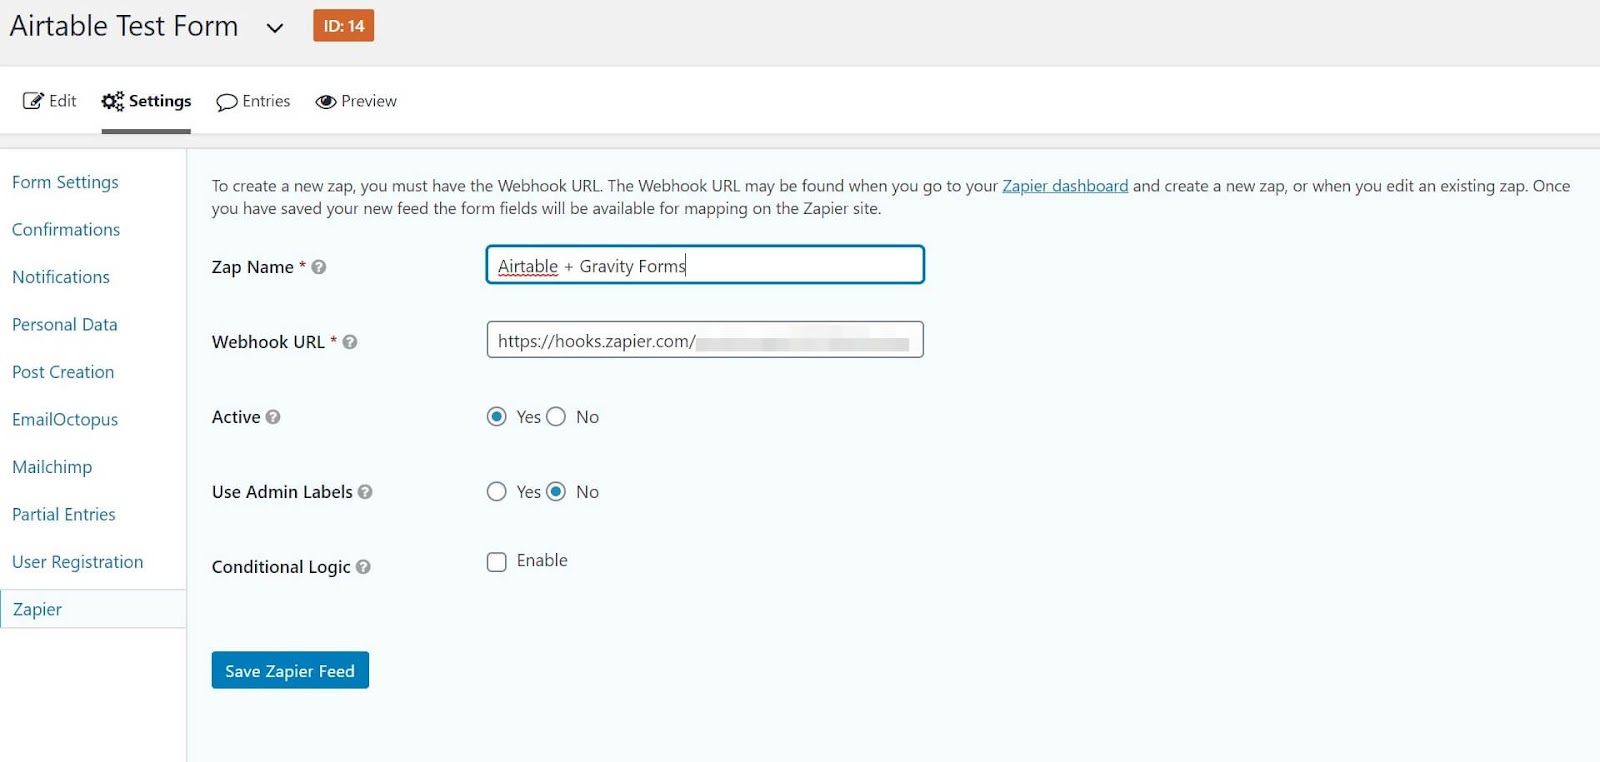
Next, click on Add New. Enter the name of your Zap and paste in the URL you were given. Make sure the Active toggle is set to “On” as well. Then select Save Zapier Feed:
At this point, you can head back to the Zapier Zap settings. Click on Continue and follow the prompts, and the app will test your connection. If the test passes, you can move on to adding Airtable to the Zap.
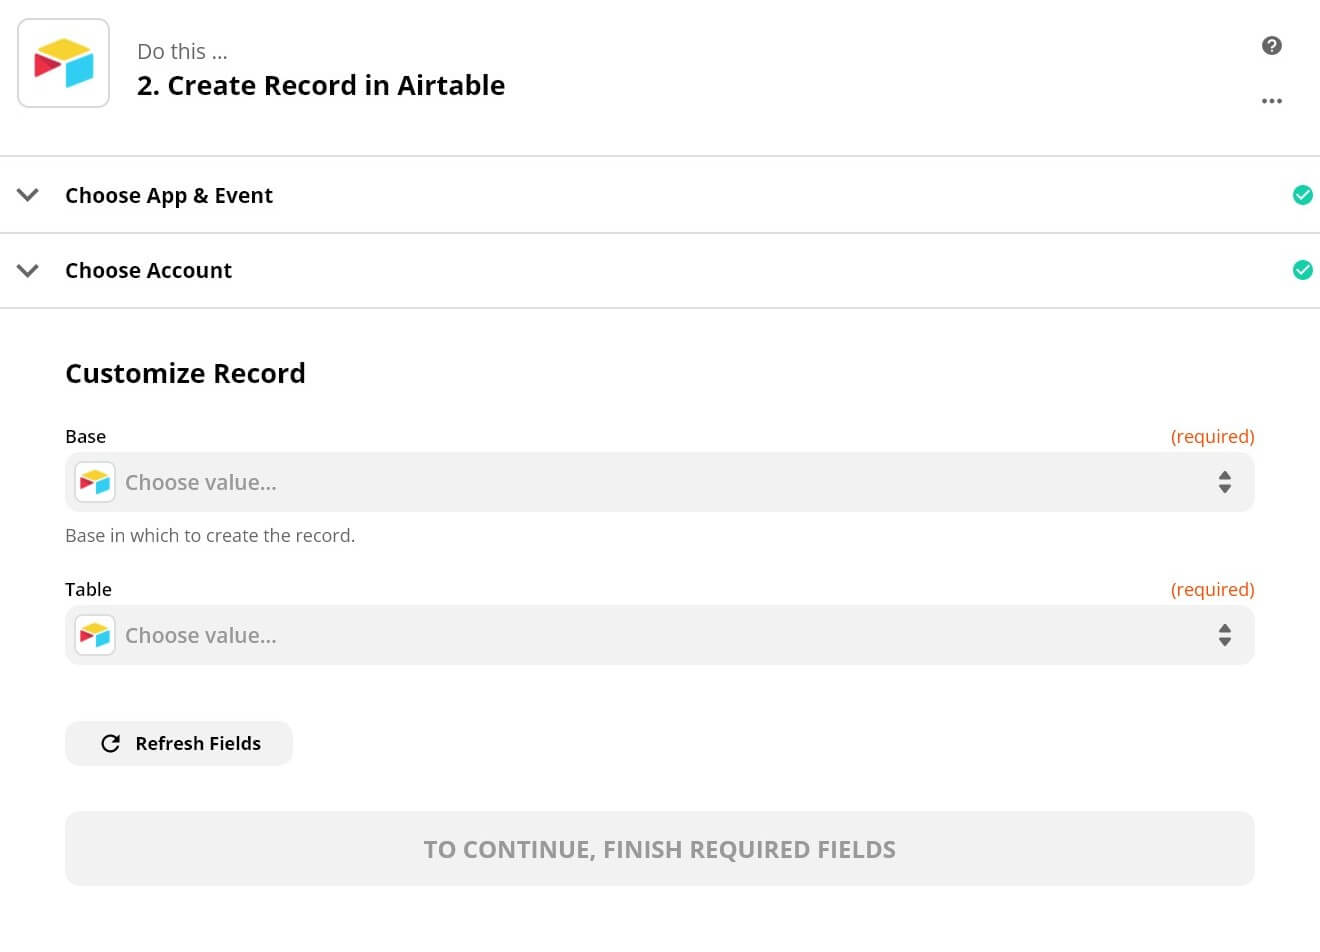
In the Do this… section, type in “Airtable” and select it from the list. Then choose Create Record from the three options:

Click on Continue, and hit Sign in to Airtable. There, you’ll paste the API key you copied earlier. When you’re done, select Continue again.
Next, you’ll need to choose the ‘Base’ and ‘Table’ you want the form data to go to in Airtable. For this example, we’ll choose “Sales CRM” and “Contacts”:
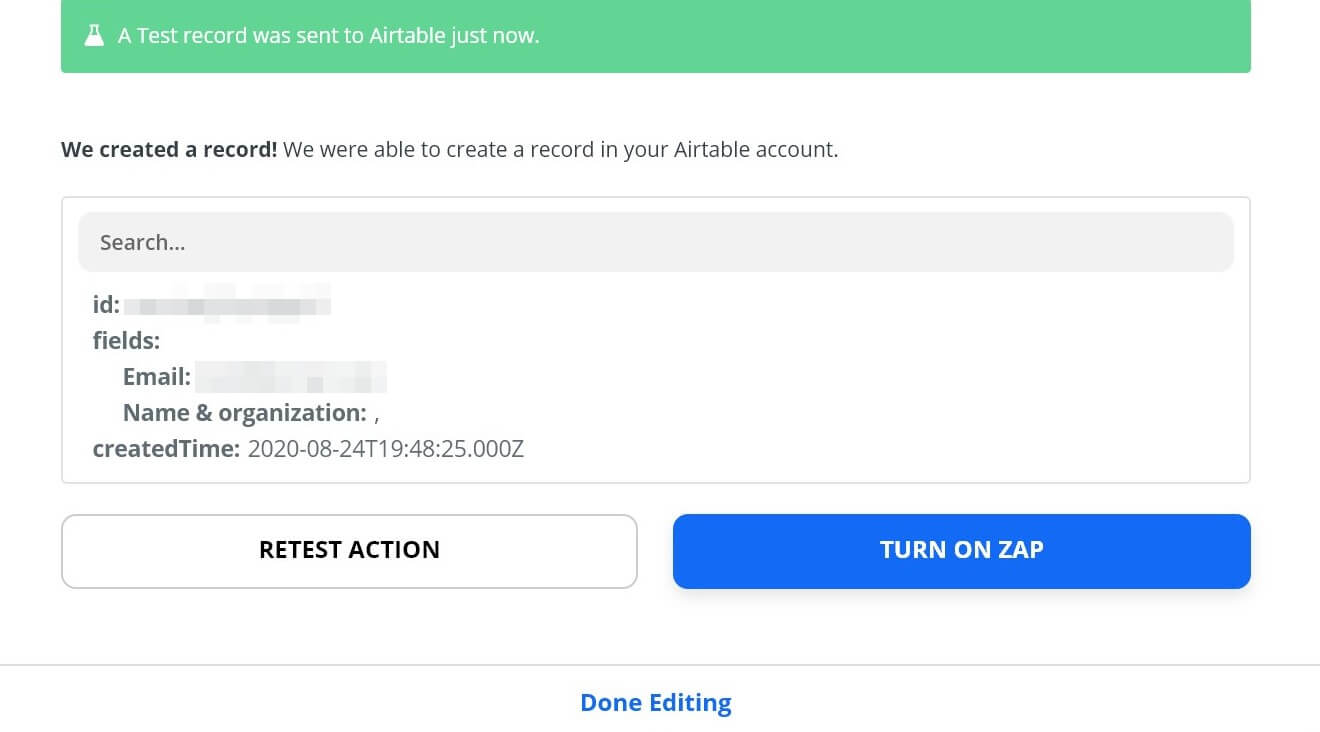
Next, you need to test the Airtable WordPress integration. Click on the fields that correspond to your form and enter some test data. Then select Test and Continue.
If the test is successful, you’ll finally have the option to activate your Zap. Click Turn on Zap:
That’s it! Now your Gravity Forms form is connected to Airtable via Zapier. This enables an Airtable WordPress connection. Any data entered in the form will be sent to your Airtable account.
Step 5: Test Your Form
Before taking your form live, it’s a good idea to test it yourself to make sure everything works as expected. Head to the page where your form is located, enter some test data, and then check your Airtable account to make sure the information shows up where you need it.
With that, you’re all set. You now have a simple contact form that will send any data entered to Airtable WordPress, which you can then use however you like.


Method 2: Using Integromat to Set Up Airtable WordPress
In order to make the whole Airtable WordPress Integration work, we need three elements: Airtable, Integromat, and a WordPress website. You can use Airtable and Integromat free plans to set it up.
Airtable database
We’re going to start from Airtable, where we’re going to create a database for Airtable WordPress Integration and a table that we will call Pages.
This is how this table is going to look like.

Pages table in Airtable.
The structure of the table Pages should look like this:
- Name (Single line text, Primary field)
- Content (Long text with rich formatting)
- WordPress ID (Number, Integer)
- Modified Time (Last modified time for all editable fields)
Modified Time field is required by Integromat to trigger the Integromat scenario once the record has changed.
We’re going to have the content of our pages in the Airtable table Pages in the Content field and we are going to be changing the content here and this content will change on our Airtable WordPress website.
For our About page the Name value will be About. Content it’s going to be just the current content for this page on our website.
Now we need to check what’s the page ID of this page in WordPress and also update it in the WordPress ID column so Integromat knows which page to update.
So this is the structure of our Airtable database ready.
We could create other pages in Airtable but for the moment we are only going to use the About page as an example and for testing purposes.
The Integromat scenario
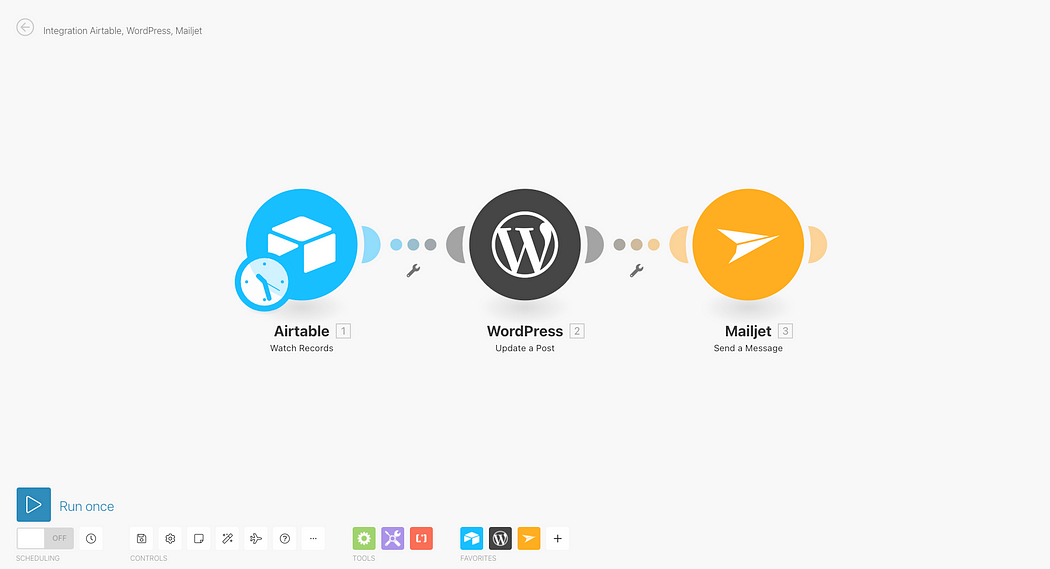
Airtable WordPress and Mailjet Integromat scenario
So, in Integromat, we need to create a new scenario and add Airtable with Watch Records action as the first module.
If you don’t have a connection with Airtable already created, you must add and authorize the Integromat with your Airtable. Click Add in the module window in the Connection section and follow the steps.
Now you need to choose the Airtable WordPress Integration database, and then the table is Pages.
The trigger field is Modified Time, Label is Name and the limit for records is 10. We will track the modifications from now on so any record that has been modified in Airtable, Integromat will use and process using the scenario we are currently building.
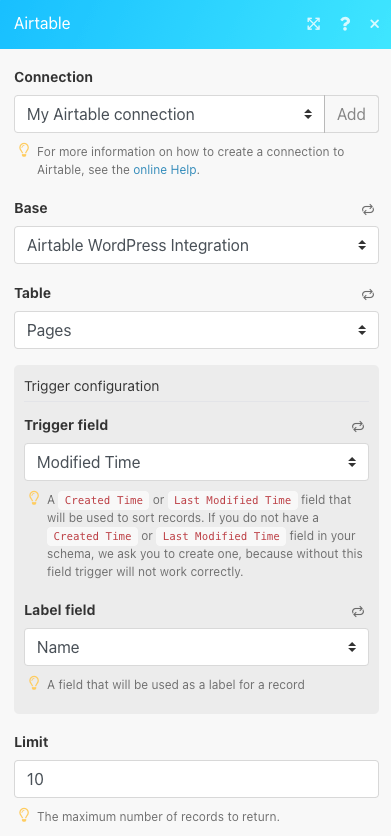
Airtable module configuration in Integromat
We’re going to add another module now, which is WordPress, and we’re going to choose the Update the Post action because we will be updating the page on our WordPress website.
I already have a connection configured here with my Airtable WordPress website, but if you don’t, you need to install the Integromat Connector plugin on your WordPress website.

It will generate a unique key for you.
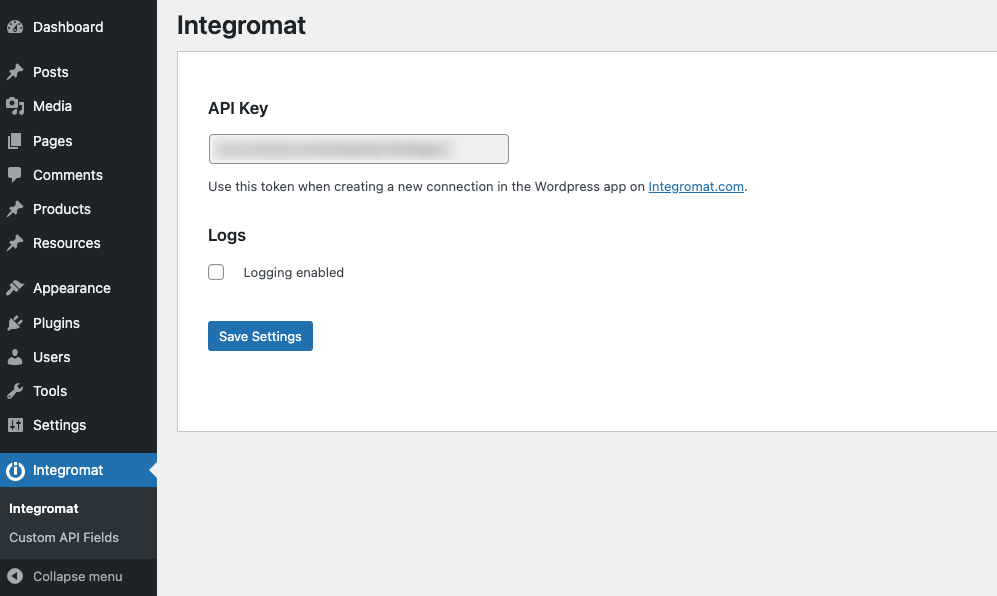
And then click Add in the WordPress module detail window in Integromat and add your Integromat key to the connection.
Now we need to choose the type of content we are going to be updating and in this case, it is Pages. The Post ID is going to be our WordPress ID from Airtable.
We’re going to be updating content in our Airtable Content field.
Then we click OK.

Airtable WordPress module configuration in Integromat
And then, as an option, you can also send an email at the end of that process once the page has been updated to notify us once the update has been completed.
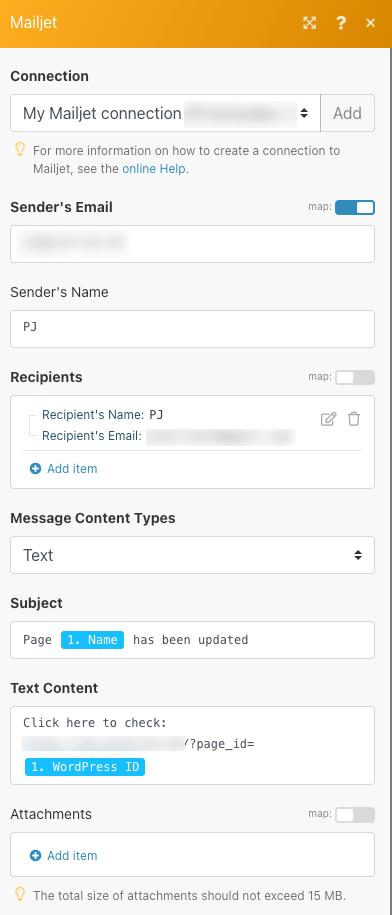
I usually use the Mailjet module in Integromat to send emails and I will choose the Send a Message action.
And then we’re going to send a Text email message with the URL to the updated page. Now you can save it by clicking OK.
Scheduling the scenario
If we were running this scenario in production we would schedule this scenario to run at regular intervals. For example once a day or a few times a day.
Before you schedule the scenario to run at regular intervals you can just test it by clicking Run once.
Testing the scenario
Let’s try to modify some content of our About page in Airtable and in order to update this information in WordPress, we just need to run the Integromat scenario and then check our Airtable WordPress website.
You can also follow the same steps for other pages on your Airtable WordPress website for example the Contact page.
You just need to add the Contact page in Airtable and the current content and the WordPress ID.
You don’t need to make any changes to the Integromat scenario. It will work the same regardless of how many pages you add to the Airtable spreadsheet.
And then you manage all of these content pages in Airtable instead of the WordPress admin panel.
Also as you can see I received an email that the page About has been updated.
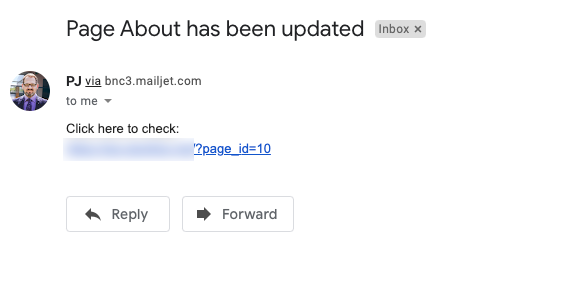
The confirmation email from the Mailjet module in Integromat
And then I can click on that link and check if the content of the page has been updated correctly.


Conclusion
This Article gave a comprehensive guide on Airtable and WordPress. It also provided two methods that can be used for Airtable WordPress Integration.
While Airtable WordPress Integration is insightful, it is a hectic task to Set Up the proper environment. To make things easier, Hevo comes into the picture. Hevo Data is a No-code Data Pipeline and has awesome 100+ pre-built Integrations that you can choose from.
Hevo can help you Integrate your data from numerous sources like Airtable WordPress and load them into a destination to Analyze real-time data with a BI tool such as Tableau. It will make your life easier and data migration hassle-free. It is user-friendly, reliable, and secure. Sign up for a 14-day free trial and see the difference!
Frequently Asked Questions
1. Does Airtable work with WordPress?
Yes, Airtable can integrate with WordPress through third-party plugins, APIs, or using tools like Zapier for data synchronization.
2. How do I embed an Airtable form in WordPress?
To embed an Airtable form in WordPress, use the “Embed” option in Airtable, copy the embed code, and paste it into your WordPress page or post using the HTML block.
3. What is the best table plugin for WordPress?
Popular table plugins for WordPress include TablePress, wpDataTables, and Ninja Tables, offering easy-to-use interfaces for creating and managing tables.
Share it with your connections.
-
 Share To LinkedIn
-
 Share To Facebook
-
 Share To X
-
 Copy Link