


 Key Takeaways
Exporting data from Azure SQL to SQL Server is easy. Choose between a simple no-code approach or a native toolkit depending on your needs:
Method 1: Using Hevo
Configure your Azure SQL Database as the source in Hevo.
Add SQL Server as the destination and supply your server credentials.
Method 2: Using Azure Native Tools
Install the Data Migration Assistant and run an assessment project against your Azure SQL Database.
Address any compatibility issues the assessment flags.
Set up the Azure Database Migration Service in your Azure subscription.
Provision DMS with a virtual network that can access both source and target.
Create a migration project in DMS, select schema and data, and start the migration.
Azure SQL Database is a Relational Database service that is always up to date and designed for modern Cloud applications. It is part of the Azure SQL family. Most Database Management functions, such as upgrading, patching, backups, and monitoring, can be performed without the intervention of a person.
Azure SQL is a Cloud-based service modeled like SQL Server, allowing you to seamlessly migrate applications while maintaining familiar tools, languages, and resources.
In this article, you will learn how to connect Azure SQL to SQL Server Migration in detailed steps.
Table of Contents
How does Migration work?
Azure SQL is a Cloud-based service developed along the lines of SQL Server, so you can easily move applications and keep using the tools, languages, and resources you’re familiar with.
You can migrate SQL Server databases that are run on:
- SQL Server on-premises.
- SQL Server on Azure Virtual Machines.
- Amazon Web Services (AWS) Elastic Compute Cloud (EC2).
- AWS Relational Database Service (RDS).
- Compute Engine in Google Cloud Platform (GCP).
- Cloud SQL for SQL Server in GCP.
Azure provides three options to implement SQL Server in Azure:
- IaaS on Azure—install and operate the database on Azure virtual machines (VMs).
- PaaS on Azure—relocate your on-prem database to Azure SQL Database.
- IaaS and PaaS—employ Azure SQL Database managed instances to gain both IaaS and PaaS traits.
Azure delivers free, automated tools that can help you migrate your on-premises SQL Server databases to Azure, regardless of your selected deployment model.
Azure SQL to SQL Server Migration: Options and Tools
There are several ways to connect to an Azure SQL database. Below is a list of IDEs that have the functionality to connect to the Azure SQL database.
- SQL server management studio
- Visual Studio
- Azure data studio
- Azure portal
- through PowerShell
- using IP address
SQL Server Migration Tools
Let’s review the tools to help you migrate SQL Server to Azure.
1) Azure Migrate
This service is a unified migration platform that plays the role of a centralized hub capable of evaluating and migrating On-premises Servers, Infrastructure, Applications, and Data to Azure. It can be found within the Azure portal when searching for Azure Migrate.
This tool can be beneficial if you have any on-premises servers. It will enable you to complete the discovery of your data center and check dependencies between servers and applications.
Azure Migrate can spot any type of migration blockers during the evaluation phase, offers recommendations for Azure SQL deployments, and provides monthly cost estimates and recommendations for target sizing.
For the actual migration step, you could use the tools for server migration or database migration. The tool is easy to use as the required instruments can be added from the hub based on your needs.
2) Data Migration Assistant
The Data Migration Assistant (DMA) is a desktop tool to help you complete single-database SQL Server migrations to Azure SQL Database.
This tool suggests performance and reliability revisions for your target environment. It enables you to migrate your schema, data, and uncontained objects from your source server to your target server.
DMA catches compatibility issues affecting database functionality and logically moves data between objects in your target and source databases.
The Data Migration Assistant can be installed on an on-prem server or a local machine with connectivity to the source databases. The latest version of the tool can be downloaded from the Microsoft Download Center.
3) Azure Database Migration Service (DMS)
The Azure Database Migration Service supplies fully managed assistance to migrate on-premises databases or data warehouses to the managed Azure SQL Database platform. DMS allows you to migrate data, objects, and schema efficiently.
It conducts a pre-migration assessment to spot any issues that may preclude migration. It also enables you to pinpoint those features that may be unsupported or negatively affected.
When utilizing DMS, you must select a preferred Azure virtual network for provisioning. This is essential to guarantee connectivity to the source SQL Server databases.
Hevo Data is a no-code, real-time ELT platform that cost-effectively automates data pipelines according to your preferences. With Hevo Data’s 150+ readily available connectors, you can easily export data from different sources, load it to destinations, and transform it for detailed analysis.
Some of the key features of Hevo Data are given below:
- Data Transformation: Analyst-friendly data transformation approaches allow you to analyze data efficiently. To clean, prepare, and transform data before importing it to the desired destination, you can write a Python-based transformation script or utilize Drag-and-Drop transformation blocks.
- Incremental Data Load: Hevo Data can transfer data in real time, maximizing bandwidth use on both ends of the data pipeline.
- Auto Schema Mapping: Hevo’s Auto Mapping feature eliminates manual schema management. It recognizes and replicates the incoming data format to the desired destination schema. You can choose either full or incremental mappings based on your data replication needs.
- Transparent Pricing: Hevo offers transparent pricing with no hidden fees, allowing you to budget effectively while scaling your data integration needs.
- Reliability at Scale: With Hevo, you get a world-class fault-tolerant architecture that scales with zero data loss and low latency.
Try Hevo today to seamlessly migrate data from Azure SQL to SQL Server!
Get Started with Hevo for FreeAzure SQL to SQL Server Migration Database
Here are the steps you’ll need to make to move your Azure SQL to SQL Server Migration:
Method 1: Azure SQL to SQL Server Migration using Data Migration Assistant
Prerequisites
Below are the prerequisites needed to complete the Azure SQL to SQL Server Migration:
- Download and install SQL Server the 2016 version or a later one.
- Ensure that the TCP/IP protocol has been enabled, as this feature is disabled by default during SQL Server Express installation.
- Restore the database to the SQL Server instance.
- Create a database in Azure SQL Database.
- A Microsoft Azure Virtual Network for Azure Database Migration Service has been created using the Azure Resource Manager deployment model. It offers site-to-site connectivity to your on-premises source servers through ExpressRoute or VPN.
Step 1: Pre-Migration
Ensure that the database can support the source environment. During the pre-migration stage, you should also assess migration feasibility, uncover resources, and determine and remediate potential impediments to migration.
Step 2: Discovery
The next step in the migration process is the discovery phase. During this phase, you will have to scan your network for all SQL Server instances and other appropriate features.
The Azure Migrate can be used to evaluate the migration suitability of each on-premises server and calculate their running expenses in Azure.
Step 3: Assessment
Reckon the compatibility of your on-premises SQL Server databases with Azure SQL Database. Starting with version 4.1, the Data Migration Assistant can supply suggestions for Azure target and the SKU that can sustain your workloads.
Here are the steps to perform the assessment:
- Step A: Open the Data Migration Assistant (DMA)
- Step B: Select File
- Step C: In the Data Migration Assistant, click the New (+) icon, and choose the Assessment project type.
- Step D: Set the name of your project; under Source, select SQL Server, and under Target, pick Azure SQL Database.
- Step E: Choose the target server SQL Server version. This is the SQL Server version that you’ll be evaluating.
During an assessment, you have the possibility of choosing one or both of the following assessment report types:
- Check database compatibility
- Check feature parity
Both report types are selected by default.
- Step F: Determine the source server instances, and provide the connection credentials.
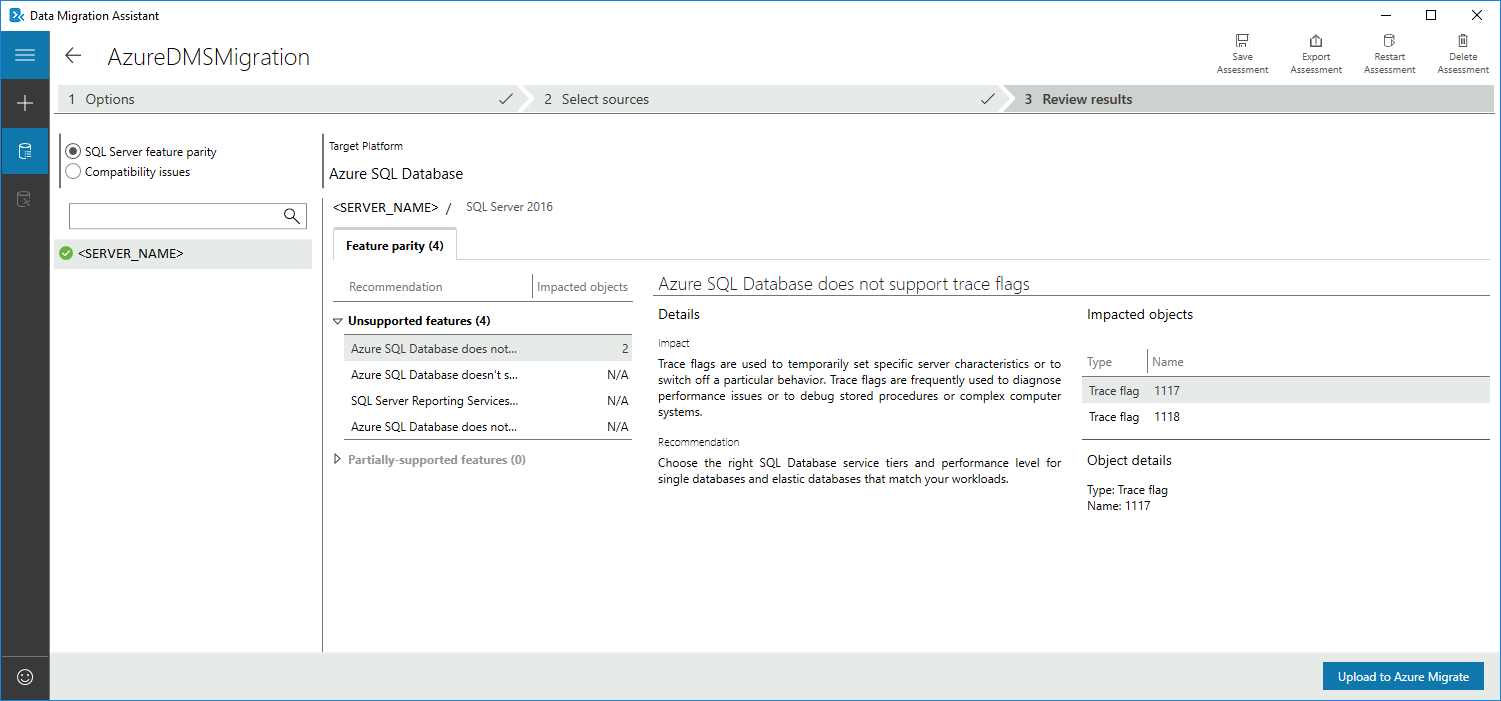
- Step G: Start Assessment; once the assessment is concluded, you can access the results under the Review results tab.
- Step H: Determine which compatibility issues you will fix.

The reports generated by the assessment can also be exported to a shareable file, such as CSV. The exported file can be viewed in Excel, or other tools, to acquire specific details on issues and recommendations.
Once the assessment is done, the results will be displayed as shown in the below image:
Step 4: Azure SQL to SQL Server Migration
Once the pre-migration stage is finalized, you can begin moving your data by employing the chosen migration strategy with Data Migration Assistant.
Here are the steps to be followed for Azure SQL to SQL Server Migration Database:
- Step A: Open a new project and under Type, choose the Migration option
- Step B: Specify a project name. Determine the source and target as SQL Server and Azure SQL Database, respectively.
- Step C: Next, select the schema and data as the scope of migration and click on the Create button.
- Step D: In the Data Migration Assistant, specify the source connection details for your SQL Server (e.g., server name, credentials) as well as the details of the target server (e.g., the source server name, target database, and credentials)
- Step E: Establish and deploy schema objects to the target database.
- Step F: Choose Start data migration and start observing the migration progress.
Step 5: Post-Migration
After completing the migration stage, you have the option of conducting post-migration tasks to ensure that things are working adequately.
Step 6: Remediation of applications
Once the data has been moved to your target environment, check if the apps that used to be connected to your original database can relate to and utilize the target database. Occasionally you might need to make changes to your applications.
Step 7: Testing
Conduct tests to validate your source and target database and to evaluate their performance. This can be done by setting up a set of validation queries. Put together a testing environment (an isolated copy of the databases that need to be tested), run both validation and performance tests, and examine the results.
Method 2: Azure SQL to SQL Server Migration using Hevo
Hevo Data, a No-code Data Pipeline, helps you directly transfer data from Data Warehouses and Databases like Azure SQL and 150+ other data sources, Data Warehouses, or a destination of your choice such as SQL Server in a completely hassle-free & automated manner.
Hevo is fully managed and completely automates the process of loading data from your desired source, enriching it, and transforming it into an analysis-ready form without having to write a single line of code.
It provides a consistent and reliable solution for managing data in real time and always having analysis-ready data in your desired destination. It supports moving data from Azure SQL DB to SQL Server and SQL Server to Azure, so you get a comprehensive solution. It is just a two-step process.
Step 1: Configure Azure MySQL DB as a Source

Step 2: Configure SQL Server as Destination

That’s it, literally! You have connected Azure SQL to SQL Server in just 2 steps. These were just the inputs required from your end. Now, Hevo will take care of everything. It will automatically replicate new and updated data from Azure SQL to SQL Server.

You can also read more about:
Conclusion
You have concluded the Azure SQL to SQL Server Migration by employing the import approach and the Data Migration Assistant tool. You can also assess and make recommendations to plan correctly and take action before the actual migration.
If you want to export data from a source of your choice, such as Azure SQL, into your desired Database/destination, such as SQL Server, then Hevo Data is the right choice for you! Sign up for Hevo’s 14-day free trial and experience seamless data migration.
FAQ on Azure SQL to SQL Server
How do I transfer data from Azure to SQL Server?
To transfer data from Azure to SQL Server, use Azure Data Factory to create a data pipeline that extracts data from Azure sources (e.g., Azure Blob Storage, Azure SQL Database), then load it into SQL Server using its data ingestion capabilities or SQL Server Integration Services (SSIS).
Is Azure SQL compatible with SQL Server?
Yes, Azure SQL Database is compatible with SQL Server in terms of SQL syntax and T-SQL language features. It supports most SQL Server functionalities.
How do I backup my Azure SQL Database to a local machine?
To backup Azure SQL Database to a local machine, use SQL Server Management Studio (SSMS) to connect to Azure SQL Database, then use the Export Data-tier Application Wizard to export the database as a .bacpac file to your local machine.
What are the limitations of Azure SQL?
Some limitations of Azure SQL Database include limited access to certain system procedures, database compatibility levels, and feature sets compared to on-premises SQL Server versions.

Share it with your connections.
-
 Share To X
-
 Share To LinkedIn
-
 Share To Facebook
-
 Copy Link


