


Braintree is one of the most popular payment gateway payment systems for mobile and web transactions. It provides advanced features like chargebacks and fraud detection to secure online payment processing.
With options to accept bank transfers and ACH with a reduced transaction fee for recurring donations, Braintree is a leading candidate for processing payments for nonprofits. Since vast payment data is on these online platforms, you can draw insights by connecting Braintree to Snowflake.
Snowflake supports multi-cloud infrastructure environments and enables quick and efficient data analysis by running its queries on multiple compute clusters.
This article discusses the two integration methods you can use for Braintree to Snowflake migration.
Table of Contents
Prerequisites
- Basic understanding of cloud computing
Methods to Connect Braintree to Snowflake
Integrating Braintree data with Snowflake opens doors for in-depth analysis in a no-shared architecture of virtual warehouses. You can carry out multiple computations simultaneously without compromising on resources and efficiency.
- Method 1: Connect Braintree to Snowflake using Hevo
- Method 2: Manually Connect Braintree to Snowflake
Method 1: Connect Braintree to Snowflake using Hevo
Hevo supports the Sandbox and Production environments for Braintree and uses the Braintree Server Integrations to replicate your Braintree account data to Snowflake. Hevo is a fully-managed, Automated No-code Data Pipeline that can load data from 150+ Sources(including 40+ free sources).
Configure Braintree as the Source
To set up Braintree as a source in Braintree to Snowflake Integration, follow the steps:
- Step 1: Click PIPELINES in the Asset Palette.
- Step 2: Next, click +CREATE in the Pipelines List View for Braintree to Snowflake Integration.
- Step 3: Then, on the Select Source Type page, select Braintree Payments to connect Braintree to Snowflake.
- Step 4: In the Configure your Braintree Payments Source page, mention the following:
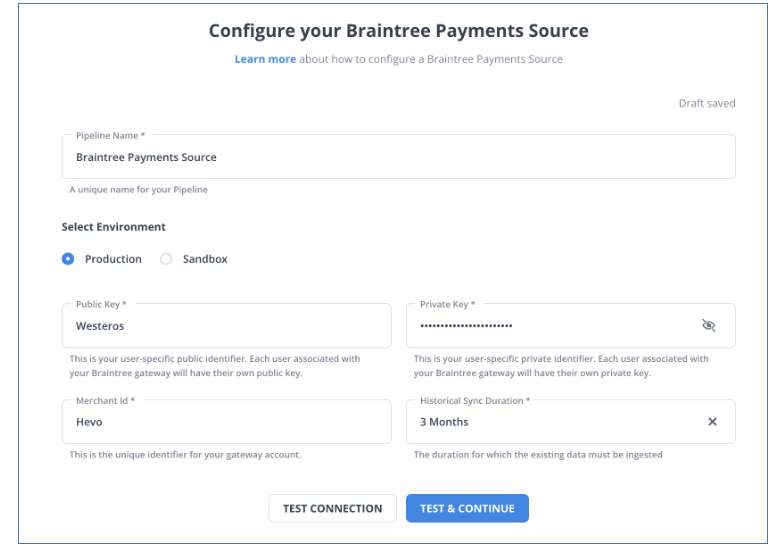
- Public Key: The public key that you got from your Braintree Payments account. You can refer to the section Obtaining the Public, Private API Keys, and Merchant ID for steps to obtain the public key for your environment.
- Pipeline Name: A unique name for your pipeline, not exceeding 255 characters.
- Private Key: It refers to the private key that you obtained from your Braintree Payments account. You can refer to the section Obtaining the Public, Private API Keys, and Merchant ID for steps to obtain the private key for your environment.
- Merchant ID: This is the ID for your merchant account. You can refer to the section Obtaining the Public, Private API Keys, and Merchant ID for steps to obtain the Merchant ID.
- Historical Sync Duration: The duration for which the existing data in the source needs to be ingested. The default value is 3 months.
- Step 5: Click TEST & CONTINUE to connect Braintree to Snowflake.
- Step 6: Proceed to configure the data ingestion and configure the destination.
Configure Snowflake as a Destination
To set up Snowflake as a destination in Hevo in Braintree to Snowflake Connection, follow these steps:
- Step 1: In the Asset Palette, select DESTINATIONS.
- Step 2: In the Destinations List View, click + CREATE.
- Step 3: Select Snowflake from the Add Destination page in Braintree to Snowflake Connector.
- Step 4: Set the following parameters on the Configure your Snowflake Destination page:
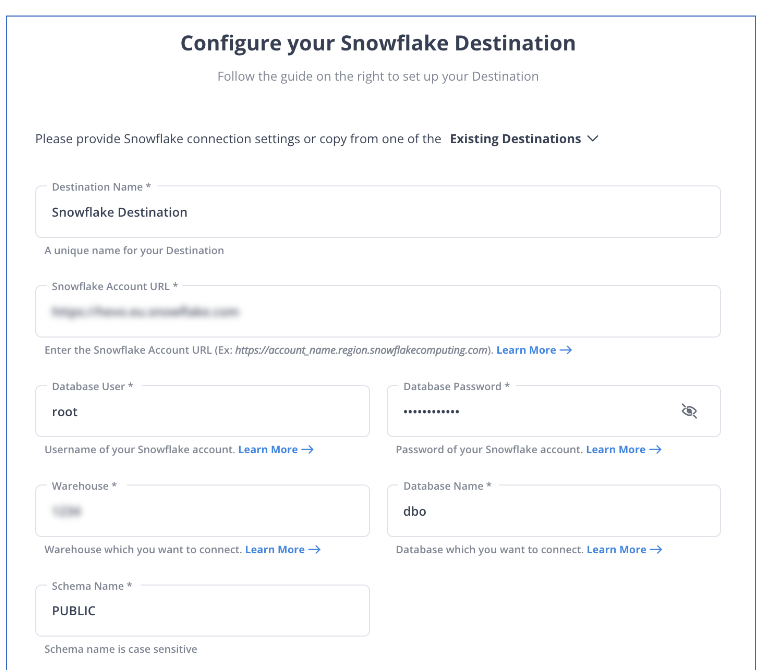
- Destination Name: Give your destination a unique name.
- Database Cluster Identifier: The IP address or DNS of the Snowflake host is used as the database cluster identifier.
- Database Port: The port on which your Snowflake server listens for connections is the database port. 5439 is the default value.
- Database User: In the Snowflake database, a user with a non-administrative position.
- Database Password: The user’s password.
- Database Name: The name of the destination database into which the data will be loaded.
- Database Schema: The Destination database schema’s name. The default setting is public.
- Step 5: To test connectivity with the Snowflake warehouse, click Test Connection for Braintree to Snowflake Connection.
- Step 6: When the test is complete, select SAVE DESTINATION to complete Braintree to Snowflake Integration.
Check out Hevo’s no-code data pipeline that allows you to migrate data to any destination with just a few clicks.
Take our 14-day free trial to experience a better way to manage data pipelines.
Get started for Free with Hevo!Method 2: Manually Connect Braintree to Snowflake
To manually connect Braintree to Snowflake, follow the steps:
Exporting Braintree Data
There are two main ways to search for required information in the Control Panel: Basic Search (with limited parameters) and Advanced Search Options (robust search with filters).
- Basic Search data: To obtain generic data like customer details (names, emails), payment methods, and transaction details, use the search bar at the top right corner to fetch data.
- Advanced Search data: Advanced search allows you to fetch detailed information about Transactions, Verifications, Vault, and Subscriptions.
To fetch Transaction Data in Braintree to Snowflake Connector, follow these steps:
- Step 1: Log into the Control Panel.
- Step 2: Click on Transactions.
- Step 3: Scroll down to the Transaction Search section.
- Step 4: Filter your desired parameters and click on Search.
To fetch Card Verifications data in Braintree to Snowflake Migration, follow these steps:
- Step 1: Log into the Control Panel.
- Step 2: Click on Vault.
- Step 3: Click the Verifications tab.
- Step 4: Filter your desired parameters and click on Search.
To fetch Vault data regarding specific customer records in Braintree to Snowflake Integration, follow these steps:
- Step 1: Log into the Control Panel.
- Step 2: Click on Vault.
- Step 3: Move to the Customer Search section.
- Step 4: Filter your desired parameters and click on Search.
To download these search results, follow these steps:
- Step 1: To retrieve the details of multiple variables at once, click the Download button at the top of the search results page.
- Step 2: You will receive the file in a CSV format.
After downloading a report, you can view your download history in the Downloads section of the Control Panel.
Loading Data in Snowflake
To load data into Snowflake in Braintree to Snowflake Migration, follow the steps:
- Step 1: Click on ‘Data’ > Databases (on Snowflake homepage).
- Step 2: To view the content in Braintree to Snowflake Integration, click on the database link.
- Step 3: Create a table by either ‘choosing a row’ to load it or ‘choosing the table name.’
- Step 4: Once you select an option, the loading wizard appears and populates the data into the table in Braintree to Snowflake Connection.
- Step 5: Select Preferred Warehouse
- Using the drop-down menu, select the warehouse from where Snowflake saves data.
- Proceed by clicking on Next.
- Step 6: Loading Files
- Click on Load files from your computer > Select Files.
- Once you choose one or more data files, click ‘Open’.
- Press the ‘Next’ key once you are done.
- Step 7: Selecting a File Format
- If the file format already exists:
- Choose the preexisting format.
- Click Next.
- For a new File Format:
- Click the plus (+) sign from the drop-down list.
- Fill in the fields that appear on your screen based on the format of your data files.
- Click on Finish.
- Select the new file format you want from the drop-down menu.
- Click Next.
- If the file format already exists:
- Step 8: Setting Up Load Options
- Specify an action by Snowflake in case the data files have anomalies.
- From the menu, select Load. Snowflake will use the warehouse of your choice to import data in your chosen table.
- Click OK once you are done. The loading wizard completes the loading data in Braintree to Snowflake Connection.
With this, you have succesfully connected Braintree to Snowflake.
Limitations of Connecting Braintree to Snowflake Manually
Here are some limitations of connecting Braintree to Snowflake manually:
- Limited Scalability: As transaction volumes grow, manually managing data flows can become cumbersome and inefficient, making it hard to scale operations effectively.
- Time-Consuming Process: Manual integration can require significant time and technical expertise to set up data connections and transformations.
- Error-Prone: Manual processes increase the risk of human errors during data extraction, transformation, and loading, which can lead to data inconsistencies.
What is Braintree?
Braintree is an online payment gateway owned and operated by PayPal since 2013. However, it features additional payment methods, some of which are not supported by Paypal. It is an excellent option for businesses seeking a merchant account with a no-cost PayPal integration. Braintree offers web technology solutions to enterprises for their mobile and web payments. It is a full-stack platform that does not necessitate traditional models of sourcing payment gateways. Braintree services cover international payments, reduced nonprofit transaction rates, affordable rates for ACH deposits, and credit card data portability. An existing merchant can obtain customer information and credit card data upon request in a PCI-compliant manner.
If you are interested in availing of Braintree services, it offers a “sandbox” version that lets you try the software without creating a merchant account. To use Braintree services, you can later sign up with an official ID, address proof, bank statements, and IRS SS4 letter.
Key Features of Braintree
Braintree offers a robust set of features via its building blocks that allow merchants to create their own payments infrastructure and help you identify opportunities to expand your business. Some of these core features include:
- Reduced Friction at Checkout: Braintree’s checkout feature is designed to be seamless and safe in both subscriptions: ready-made UI and tailor-made. Users can checkout with just a few clicks without any hassle. It reduces cart abandonment and encourages recurring transactions via the platform.
- Determinable Interface: Braintree offers its Drop-in-UI for a seamless checkout experience. The company also allows you to create a more customized experience via Custom UI. You can tailor your checkout flow to provide a flexible and ownable payment gateway that is still compliant with PCI SAQ A.
- Advanced Fraud Protection: Braintree offers both standard and advanced levels of protection against fraud. Their payment system helps identify and act to potential threats. Braintree utilizes its data-driven authentication with ‘3D Secure 2’, a new and robust customer authentication solution.
- Consistent Advantages: Braintree’s advantages are consistent for all customers regardless of their chosen features. The global enterprise provides robust reports, white-glove support (merchant support, sales, and account management), and business suggestions.
What is Snowflake?
Snowflake is a cloud data warehouse enabling users to manage and store their big data. The platform offers a highly reliable structure to support multi-cloud infrastructure environments. Snowflake uses the ANSI SQL protocol that supports structured and semi-structured data formats.
Snowflake’s shared hard disk design enables its compute nodes to access independent data repositories. Its queries run on MPP compute clusters, which leverage shared-nothing architecture to prevent concurrency issues. These virtual warehouses can access the same storage layer without multiple copies of data in each warehouse. Snowflake is very efficient in providing independent clusters for scalable computations.
Forecast your Snowflake costs accurately – use our pricing calculator for free!
Key Features of Snowflake
- Caching Results: Snowflake design can feature caching at multiple levels to speed up your work. Snowflake keeps a record of your query for up to 24 hours. So, the results are already accessible if the same query is to be executed again by the same user or another, given that the underlying data hasn’t changed. This feature makes it significantly useful for analytical work.
- Cloud-agnostic Solution: Snowflake is cloud-agnostic; it is available on all three platforms: Google Cloud Platform, Microsoft Azure, and Amazon Web Services. As a result, you can have similar deployment options and end-user experience while leveraging Snowflake into your cloud architecture.
- Near-Zero Administration: Snowflake does not need any hardware or software installation. It is a warehouse service for managing data without IT assistance or database administrators (DBA). In addition, Snowflake’s multi-cluster architecture prevents concurrency issues faced in other traditional warehouses. It separates workloads via its compute clusters (virtual warehouses).
- Security: Snowflake offers a wide array of security features. It allows you to manage network policies by listing IP addresses to restrict account access. It supports two-factor authentication and SSO support through federated authentication. All data is automatically encrypted via AES 256 strong encryption, even during transit.
Why Connect Braintree to Snowflake?
Here are some key points for why connecting Braintree to Snowflake is beneficial:
- Comprehensive Data Analysis: Centralize payment data with other business metrics for detailed analysis and reporting.
- Enhanced Business Insights: Analyze transaction trends and customer behavior to optimize revenue strategies and improve customer experience.
- Streamlined Data Management: Automate data ingestion and transformation processes for efficient data handling and reduced operational overhead.
Integrating Braintree with Snowflake allows businesses to leverage advanced analytics for informed decision-making.
Conclusion
This article discusses two online solutions: Braintree, a web payment gateway that provides user-friendly interfaces for businesses to receive payments online, and Snowflake, a cloud data warehouse. The focus is amplified to manually connect these two solutions to load Braintree data in Snowflake compute clusters and draw in-depth analytical insights. Snowflake can enhance your data analysis by providing secure and controlled data access throughout the enterprise. However, you need to fetch Braintree data using third-party ETL tools and store it into Snowflake, as manually integrating would only bring several data quality issues.
However, as a Developer, extracting complex data from a diverse set of data sources like Databases, CRMs, Project management Tools, Streaming Services, and Marketing Platforms to your Database can seem to be quite challenging. If you are from non-technical background or are new in the game of data warehouse and analytics, Hevo Data can help!
Hevo Data will automate your data transfer process, hence allowing you to focus on other aspects of your business like Analytics, Customer Management, etc. Hevo provides a wide range of sources – 150+ Data Sources (including 40+ Free Sources) – that connect with over 15+ Destinations. It will provide you with a seamless experience and make your work life much easier.
FAQ
Best ETL Tool for Snowflake?
Some of the top ETL tools for Snowflake include Hevo, Apache NiFi, and Informatica. These tools offer strong integration capabilities, performance optimization, and support for Snowflake’s architecture. The choice often depends on specific business needs and data complexity.
Is Snowflake an ETL or ELT Tool?
Snowflake is primarily an ELT (Extract, Load, Transform) tool, allowing data to be loaded in its raw form before transforming it. This approach leverages Snowflake’s processing power for efficient data transformation after loading. This distinction enables more flexibility and scalability in data processing.
How to Move Data from SAP to Snowflake?
To move data from SAP to Snowflake, you can use tools like Talend, Informatica, or Apache NiFi for extraction and loading. Alternatively, you can utilize Snowflake’s data loading features combined with SAP connectors. The process typically involves extracting data from SAP, transforming it as needed, and then loading it into Snowflake using SQL commands or batch jobs.

Share it with your connections.
-
 Share To X
-
 Share To LinkedIn
-
 Share To Facebook
-
 Copy Link


