

Building and managing effective data pipelines is becoming more important due to the growing demand for data-based technologies. Therefore, orchestration tools like Apache Airflow have become popular among data engineers who manage pipelines.
Airflow allows you to create and manage workflows programmatically. Connecting Airflow to a robust database like MySQL further enhances its capabilities. Moreover, external packages like MySQL hooks and operators streamline database operations in Airflow.
In this guide, you’ll see everything step-by-step, from installing Airflow to establishing Airflow MySQL connection and how to use hooks and operators to interact with DAGs using MySQL. Let’s dive in.
Table of Contents
What is Apache Airflow?

Apache Airflow is an open-source tool for running complex data pipelines in production. It provides users with an interface for creating and managing data pipelines.
Airflow ensures the pipeline processes are executed in order and has the required resources to execute them. It uses Python to create workflows represented as directed acyclic graphs (DAGs) with directions showing the execution order of associated tasks.
Hevo is an advanced data integration platform designed to simplify MySQL data migration with minimal configuration. It features pre-built connectors, real-time processing, and an intuitive interface, making it accessible for users of all technical levels. Hevo offers you:
- Simplified Setup: Hevo offers a quick, minimal-configuration setup for MySQL data pipelines.
- Pre-built Connectors: Hevo’s pre-built MySQL connectors streamline data integration.
- Real-Time Processing: Hevo supports real-time data processing for up-to-date information.
What is MySQL?

MySQL is an open-source relational database management system for managing data stored in a database. A structured query language allows you to create, delete, retrieve, or update database information.
MySQL stores data in tables. For example, if you have Facebook data, MySQL organizes it into tables for user accounts, posts, comments, groups, and more. It then links these tables by defining relationships between them.
MySQL’s key advantage is its large, active community to get help or resources. Additionally, it has a rigid schema, making it one of the fastest databases available.
Why Use MySQL with Airflow?
Airflow’s primary focus is to execute workflows in order and allocate required resources. If you have metadata information about workflows stored in a database, the scheduler can query it and find the sequence of execution. With this metadata, the Airflow scheduler also tracks the execution state, logs, failures, and resource consumption. That’s why Airflow stores metadata information about DAGs, their status, logs, and associated tasks in a database.
But why is MySQL the database for Airflow?
Airflow itself recommends using PostgreSQL or MySQL for metadata databases in production. SQLite is only preferred for dev or testing purposes. SQLite is a local database with no server, while MySQL can run on a production server.
Not just for metadata, MySQL can also manage data that Airflow’s DAG workflows use. MySQL is designed for multi-user accessibility, where multiple components of an Airflow DAG can interact with a MySQL database simultaneously. Fine-tuning performance and compatibility often involves working with MySQL setting variables to optimize how Airflow interacts with the database, especially under high loads. You can also optimize your MySQL databases with MySQLTuner for smoother
How to Set Up MySQL with Apache Airflow?
Apache Airflow internally uses SQLite as its default database. It stores metadata information about DAGs, execution states, and other internal operations. We’ll show how you can configure MySQL as the default metadatabase for Apache Airflow.
For this, you should need MySQL and Airflow installed on your machine.
Step 1: Install MySQL:
We’ll show the steps to install MySQL using homebrew. You can also install it from the official website.
Step 1. 1: Open the terminal on your machine.
Step 1. 2: Run the following command if you haven’t installed homebrew before.
/bin/bash -c "$(curl -fsSL https://raw.githubusercontent.com/Homebrew/install/HEAD/install.sh)"Step 1. 3: Once Homebrew is installed, use the below command in the terminal to install MySQL using Homebrew.
brew install mysqlStep 1. 4: MySQL is now installed. Run the following command to start the MySQL server
brew services start mysqlNow run the mysql_secure_installation command to set up the password. Remember these login credentials to access MySQL later.
Step 2: Install Apache Airflow:
Step 2. 1: Open the terminal.
Step 2. 2: Create a Python virtual environment for Airflow by executing:
python3 -m venv airflow_venvStep 2. 3: Activate the virtual environment.
source airflow_venv/bin/activateStep 2. 4: Install Apache Airflow using the following command. You should configure the below command based on your Python version. For example, if you have Python 3.7, use ‘constraints-3.7.txt’ at the end of the command.
pip install "apache-airflow[mysql]==2.6.3" --constraint "https://raw.githubusercontent.com/apache/airflow/constraints-2.6.3/constraints-3.9.txt"If the Airflow is successfully installed, the command airflow version should output the Airflow’s version.
Step 3: Connect Airflow and MySQL
Run the following command in the terminal to start the MySQL server.
mysql -u root -pEnter the MySQL password you’ve set initially.
Step 3. 1: Create a MySQL database user.
The next step is to create a MySQL database user for Airflow and grant it all the permissions and privileges. For this, run the following commands in sequence.
Replace airflow_user with your desired username and ‘password’ with a secure password.
CREATE USER 'airflow_user'@'localhost' IDENTIFIED BY 'password'; Replace ‘airflow_user’ with the username you used in the above command.
GRANT ALL PRIVILEGES ON airflow_db.* TO 'airflow_user'@'localhost';
FLUSH PRIVILEGES;
Step 3. 2: Configure the Airflow Config File
Once the Mysql database is created, configure the Airflow config file to use the new MySQL user and database. Follow these commands for this:
Step 1: Open a new terminal window.
Step 2: Activate the Airflow virtual environment.
source airflow_venv/bin/activate
Step 3: Run the below command to edit the config file.
nano ~/airflow/airflow.cfgAdd the following line under [core] section as shown in the image
sql_alchemy_conn = mysql+mysqlconnector://airflow_user:password@localhost/airflow_dbReplace the password with the original password you’ve set while creating a MySQL user.
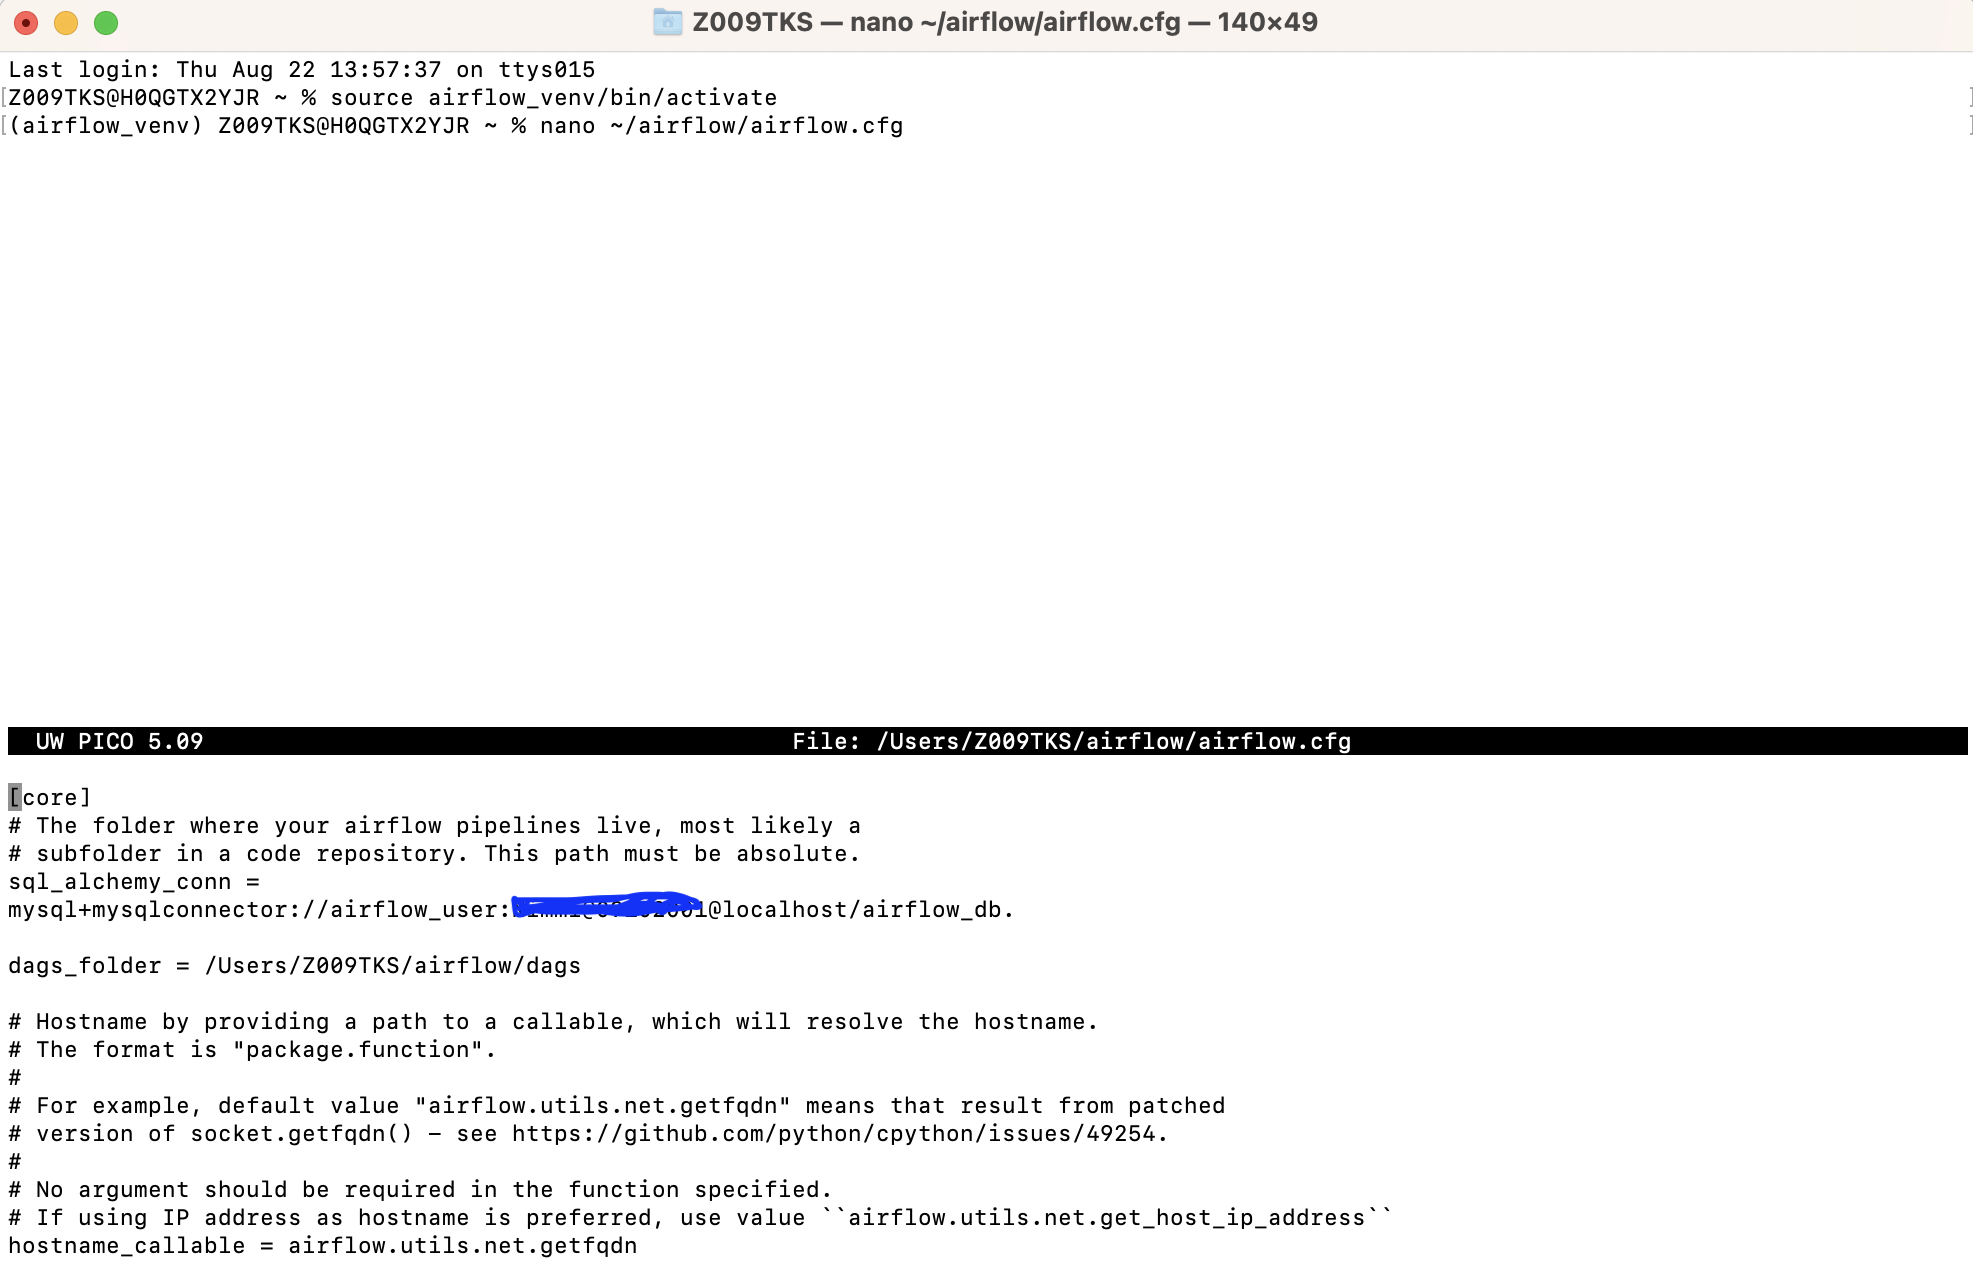
Press ‘ctrl+0’ to save the changes and hit ‘Enter.’ Now press ‘ctrl+x’ to exit.
The connection is created. Now, you must create Airflow login credentials to access its web interface.
Step 3. 3: Create Airflow Login Credentials
You’ll use this username and password while entering the Airflow web interface in the future.
Step 1: Open the terminal.
Step 2: Activate the Airflow virtual environment.
source airflow_venv/bin/activateStep 3: Run the following command, as shown in the following image.
airflow users create \
  --username admin \
  --firstname Admin \
  --lastname User \
  --role Admin \
  --email admin@example.com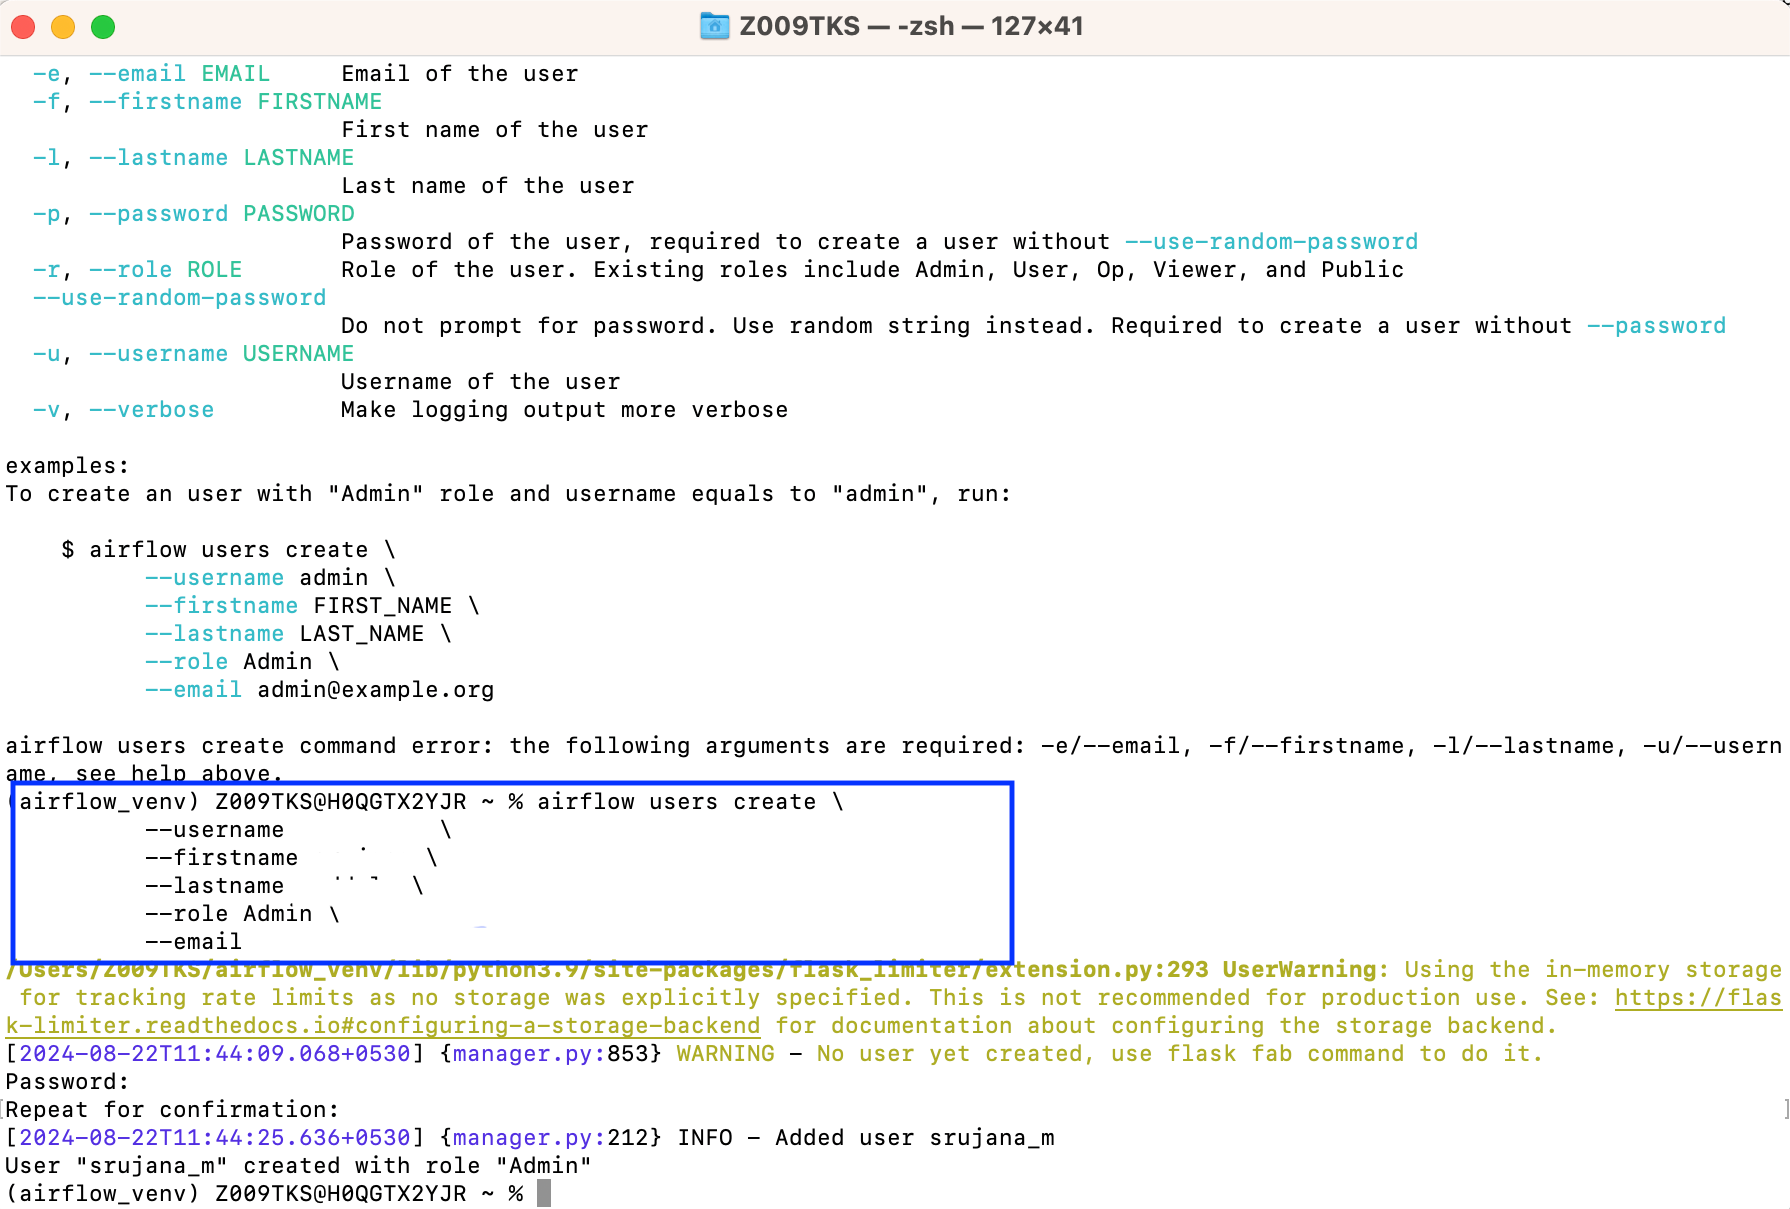
Step 3. 4: Start the Airflow Webserver
Initialize the Airflow db and start the webserver to see if everything is running.
Step 1: Open the terminal
Step 2: Activate the virtual environment.
source airflow_venv/bin/activateStep 3: Run the command airflow db init
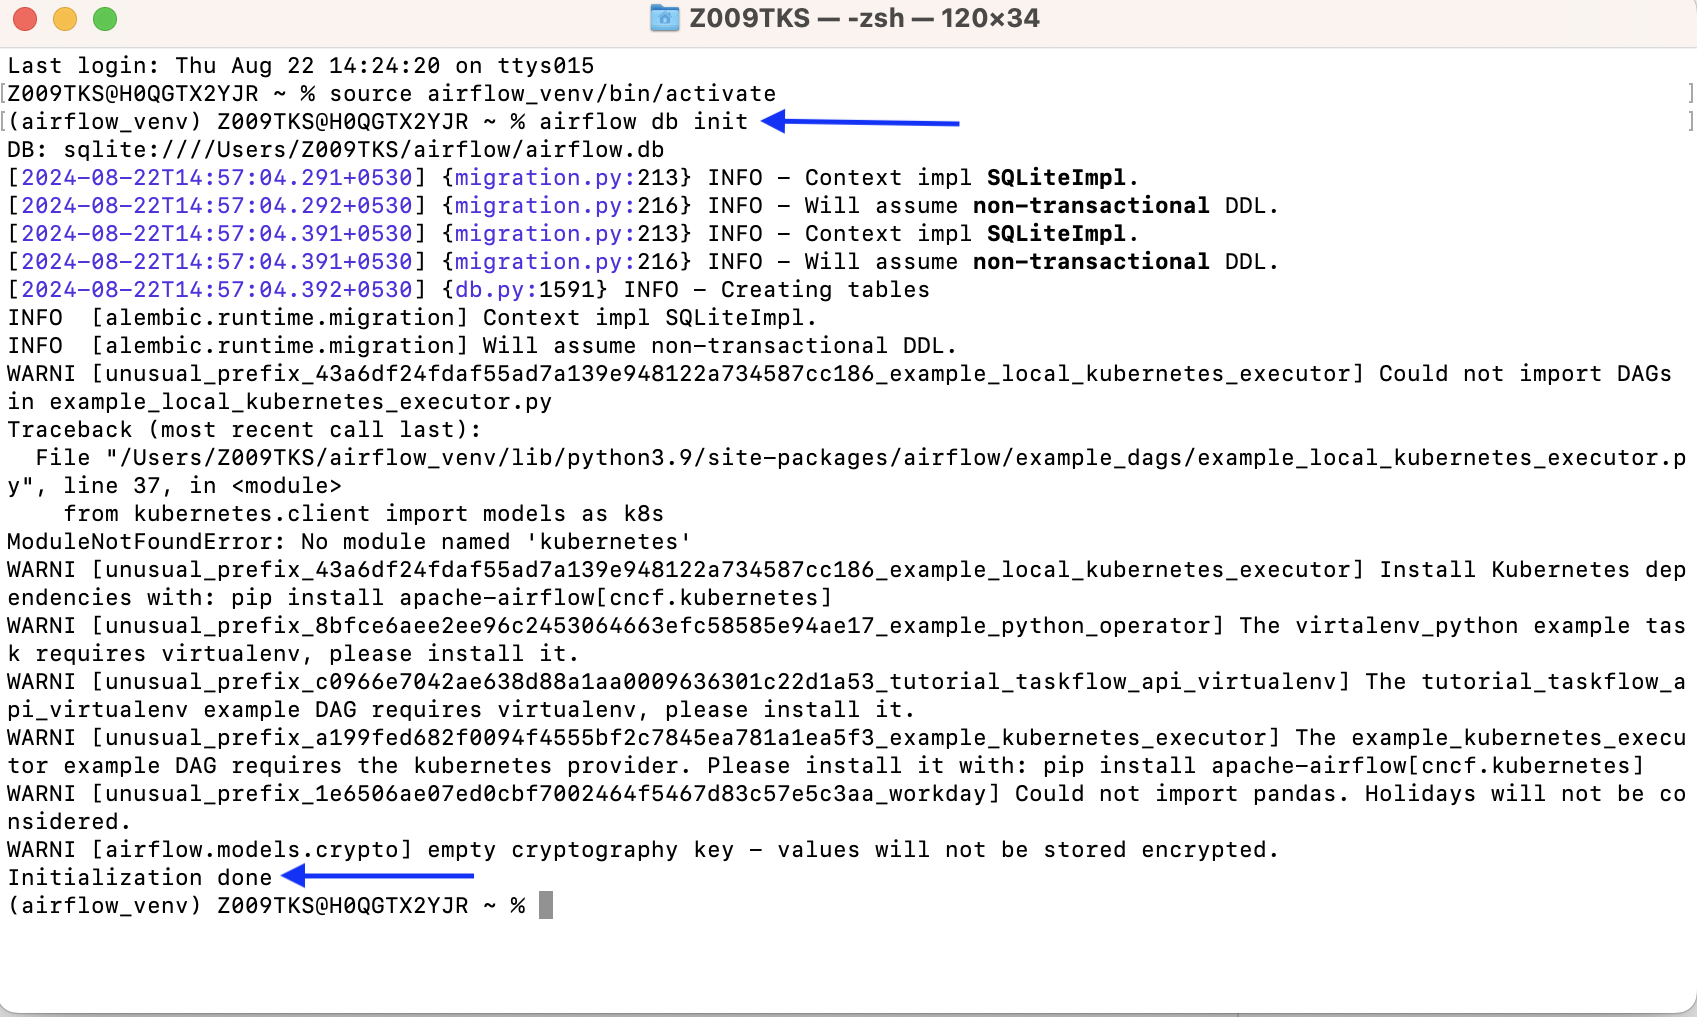
Once you get the initialization done message in the above image, run the command airflow webserver –port 8080 to start the Airflow webserver.
Now open the link http://localhost:8080 in your browser to access the web interface of Airflow. Use the login credentials you’ve created for Airflow UI and enter the web interface.
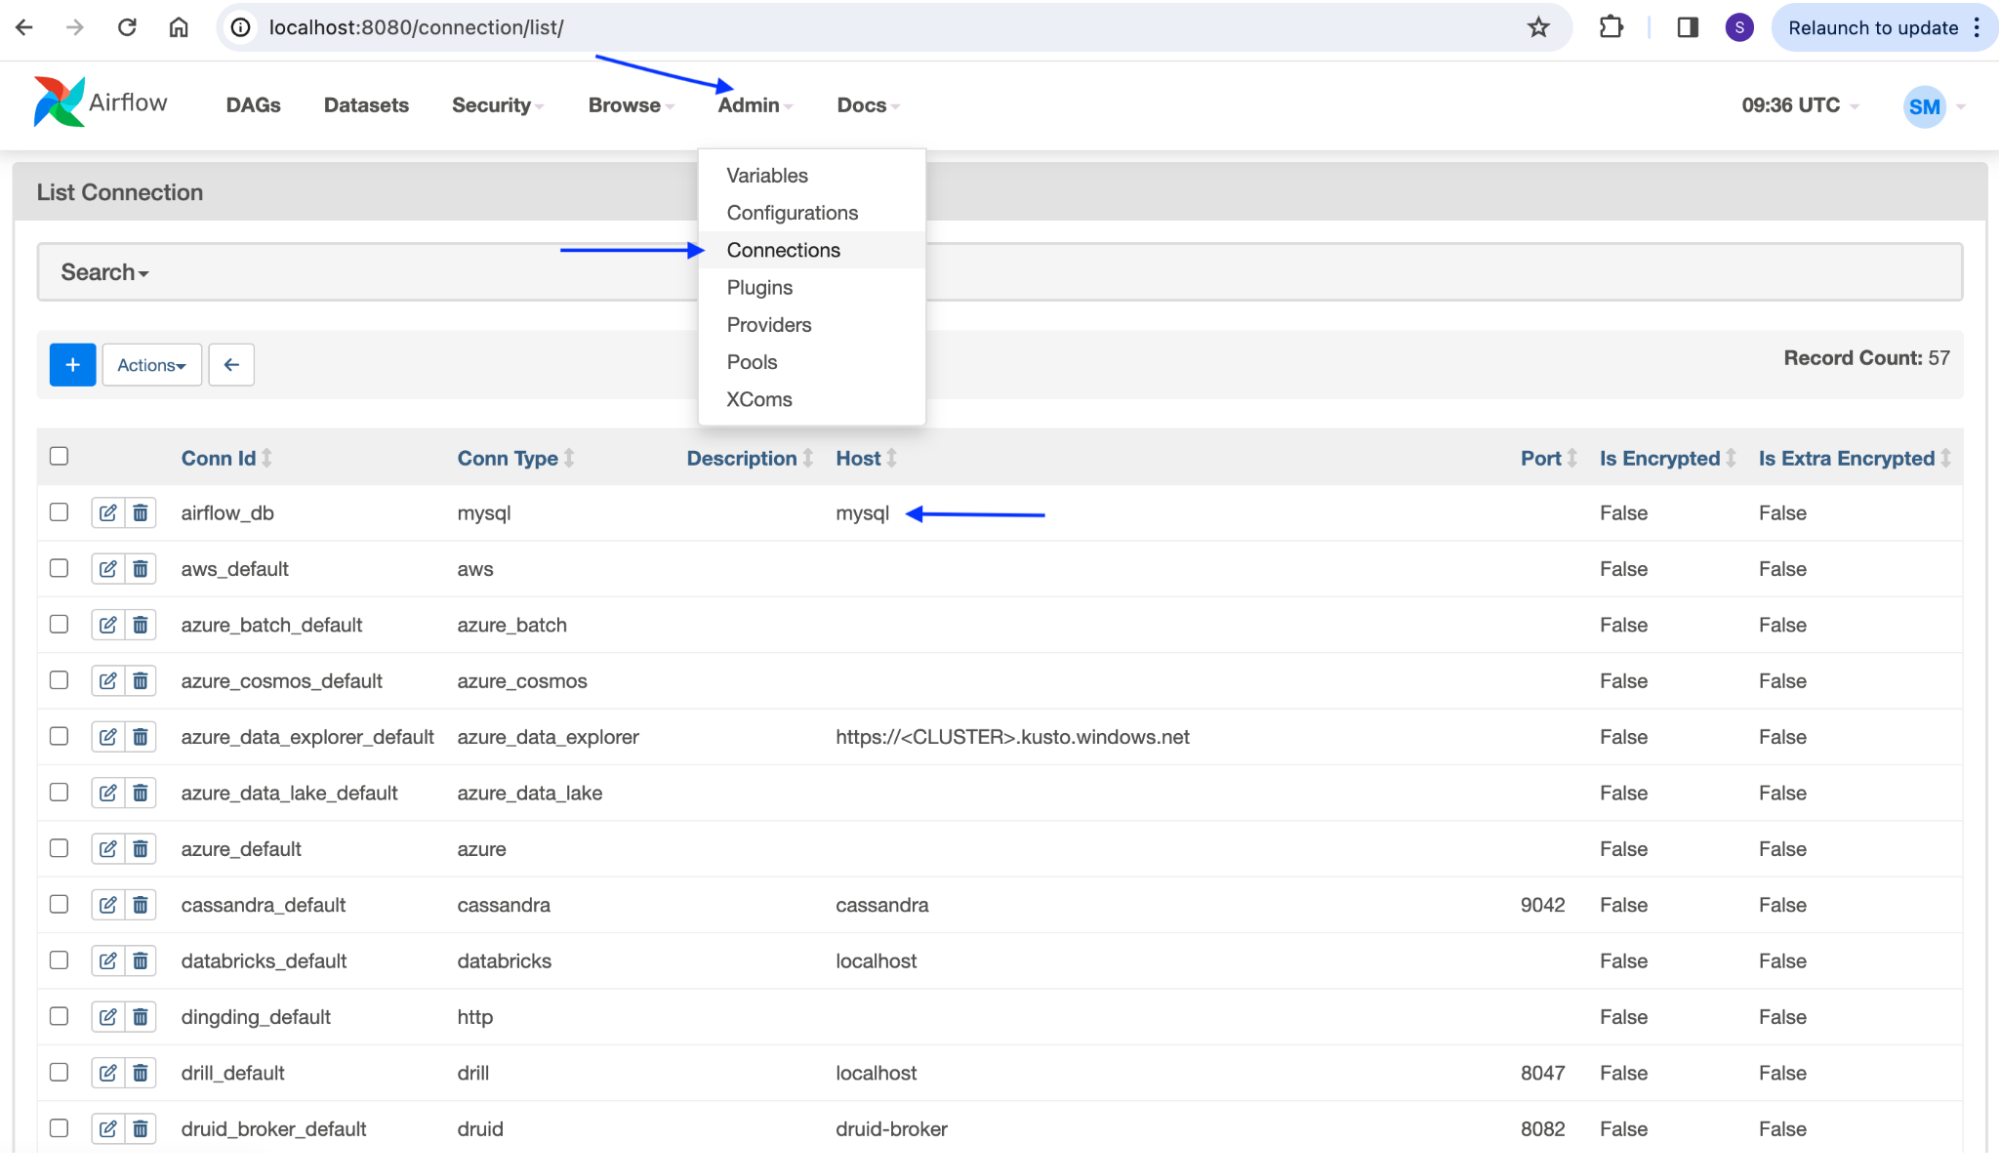
To ensure your database uses MySQL, Go to ‘Admin’ on the menu bar, select ‘Connections’ from the drop-down menu, and check the host for your database. The database ‘airflow_db’ is connected to MySQL, as marked in the picture below.
What Are MySQL Providers in Airflow and How Do They Work?
Apache Airflow functionalities can be extended with additional packages known as providers. Providers include hooks, operators, and sensors that foster communication with external systems and databases. The MySQL provider is one such package, allowing you to use MySQL hooks, connections, and related operators in your Airflow DAGs.
MySQL hooks: Hooks are the interfaces that manage Airflow connections to external platforms or databases. They are used to connect Airflow and MySQL, execute SQL commands, retrieve data from MySQL, and more. Use mysqldump to back up your MySQL databases before integrating with Airflow.
MySQL operators: Operators can build tasks of an Airflow DAG. They can perform operations like executing SQL queries within DAG, transferring data, manipulating data, etc.,
We’ve discussed how to make MySQL the default metadata database for Airflow. We’ll now use the provider package to connect MySQL with Airflow. This integration allows Airflow DAGs to interact with MySQL databases, whether to read or write data.
How to Set Up MySQL Connections in Airflow
We’ve already shown you how to install and set up Airflow with MySQL on your device. Now, we’ll discuss setting up a new MySQL connection with Airflow using both the web interface and command line interface methods.
Method 1: Creating a MySQL Connection Using the Airflow User Interface
If you’ve successfully set up the Airflow from the step-by-step guide in the previous section, you can easily access the Airflow web server at http://localhost:8080.
Step 1: Open http://localhost:8080 in your web browser.
Step 2: Go to the ‘Admin’ tab on the top menu bar.
Step 3: Select ‘Connections’ from the drop-down menu.
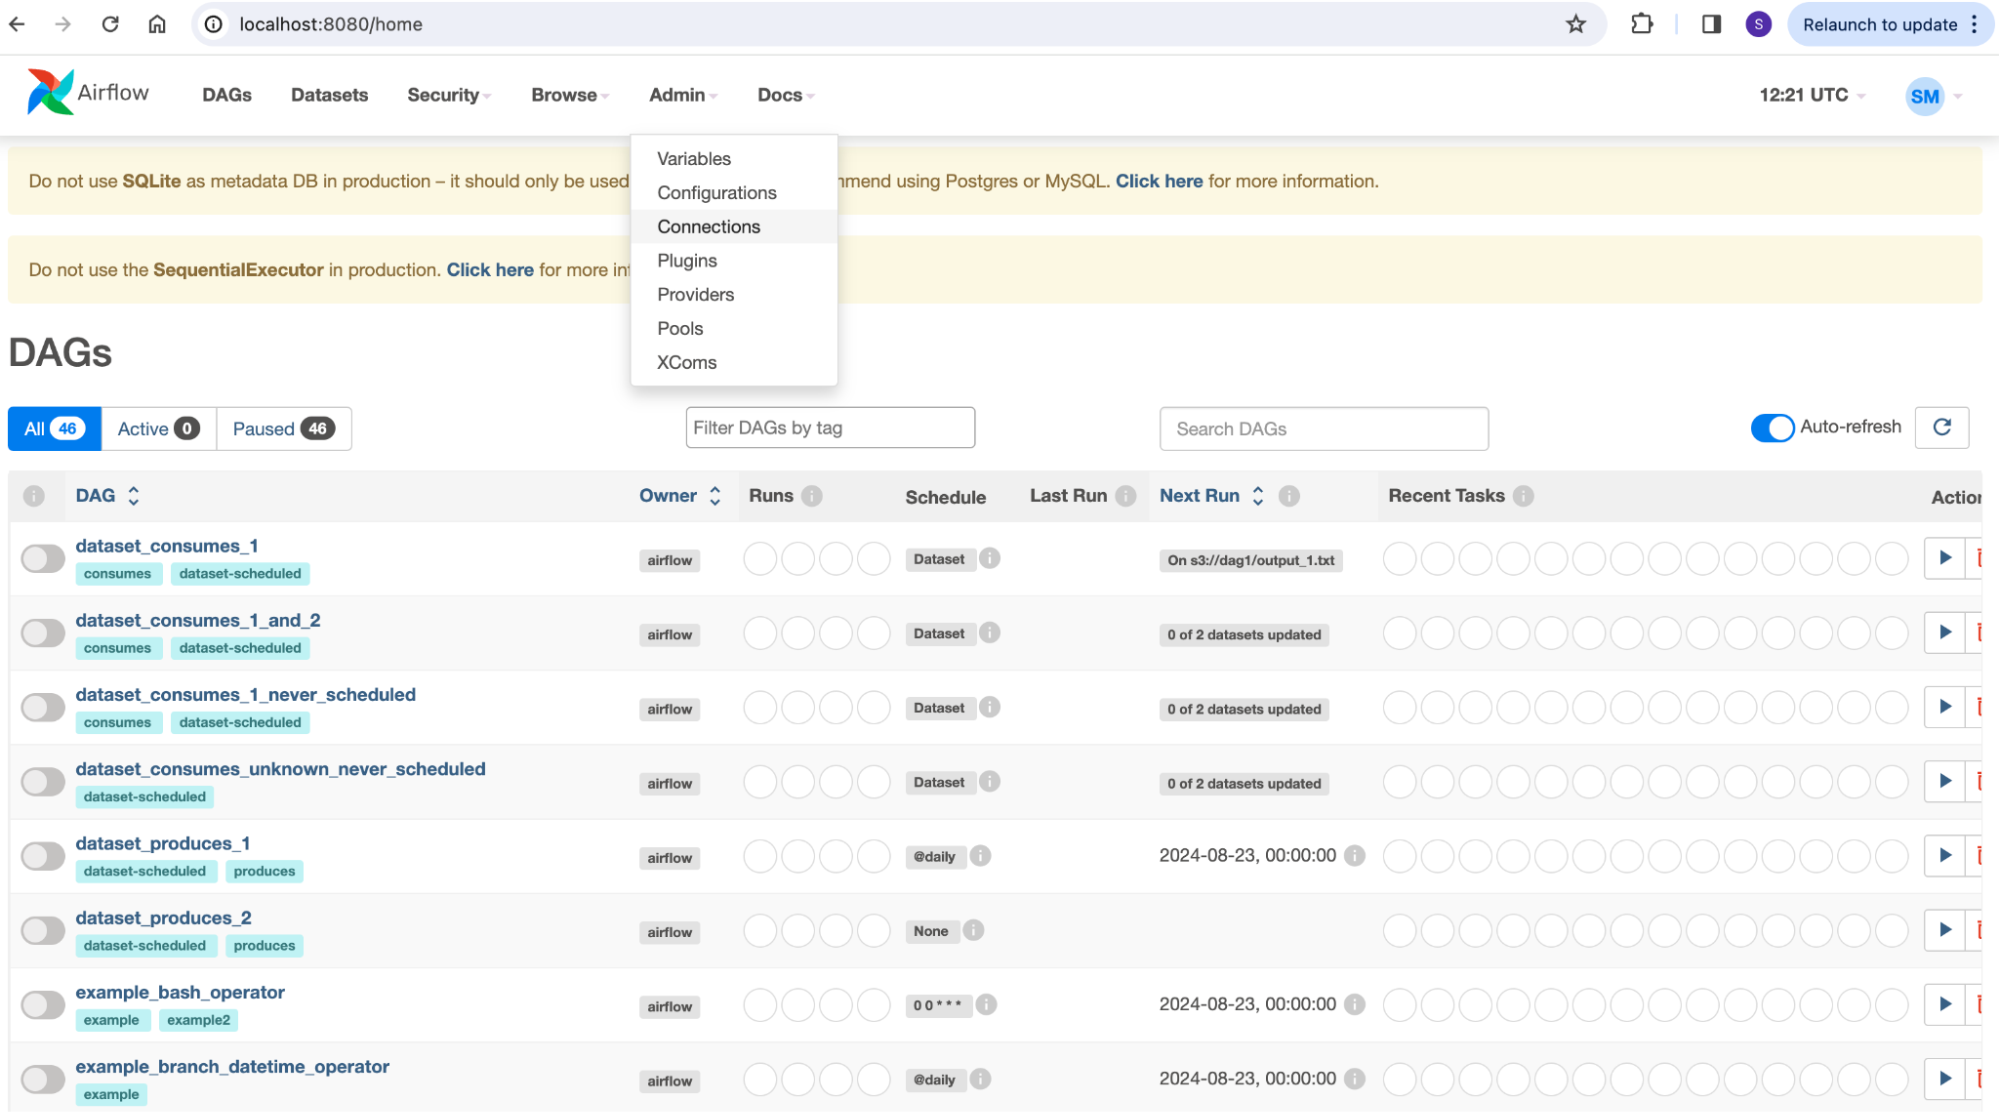
Step 4: Click the ‘+’ button and fill in the connection ID, type, host, and other details. In the connection type, select ‘MySQL’ to establish a MySQL connection.
Step 5: Click Save.
Method 2: Using the Command Line Interface to Set Up Airflow and MySQL Connections
Step 1: Open the terminal and run the following command to activate the virtual environment you’ve created previously.
source airflow_venv/bin/activateStep 2: Replace your username and password with your MySQL login credentials in the following command. Also, configure the database_name and run the command as shown in the image below.
airflow connections add 'mysql_default' \
    --conn-type 'mysql' \
    --conn-host 'localhost' \
    --conn-login 'username' \
    --conn-password 'password' \
    --conn-schema 'database_name' \
    --conn-port '3306'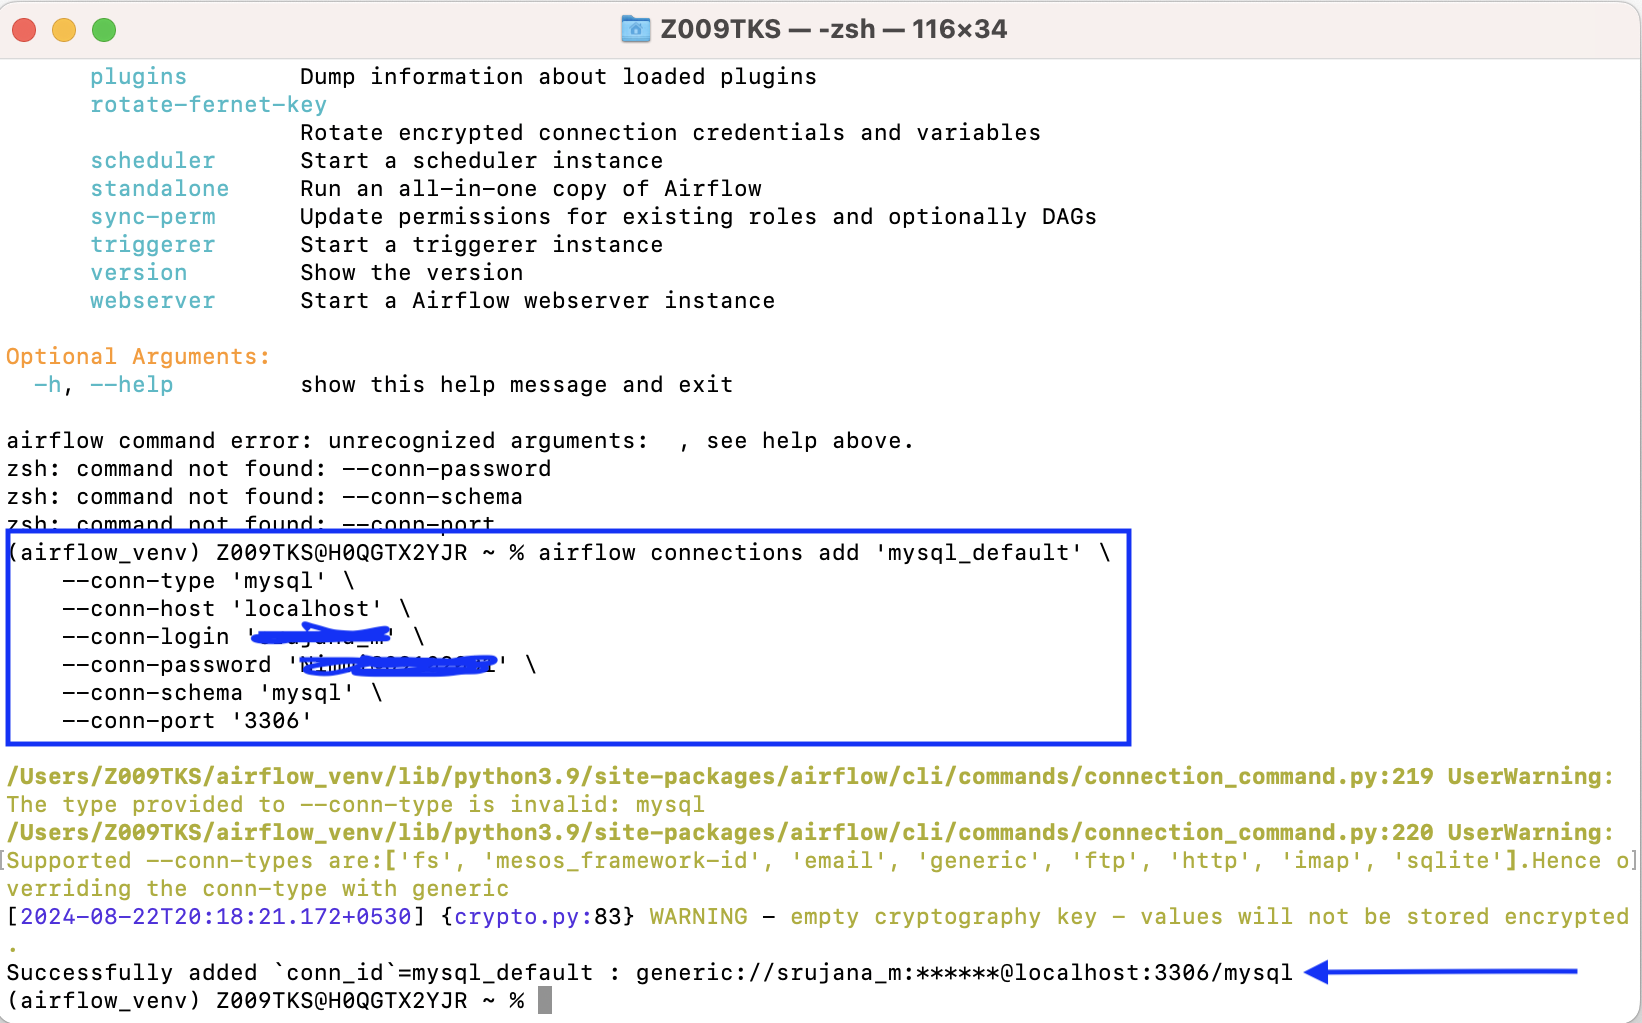
To ensure the connection is set up successfully, run the above command and see if the ‘mysql_default’ connection appears in the list.
airflow connections listHow to Interact with MySQL in Airflow?
The provider package hooks and operators are powerful tools for interacting with MySQL databases. They enable MySQL and Airflow connections, SQL command execution, and data transfers.
MySQL Hooks in Airflow
Step 1: Open the terminal and activate the virtual environment where Airflow is located.
source airflow_venv/bin/activateStep 2: Execute cd ~/airflow/dags to access dags. If not present, create the directory using:
mkdir -p ~/airflow/dagsStep 3: Run the command to enter the created dag directory: cd ~/airflow/dags
Step 5: Once you are in the dags directory, execute the following command to create a Python file.
nano create_table_using_hook.py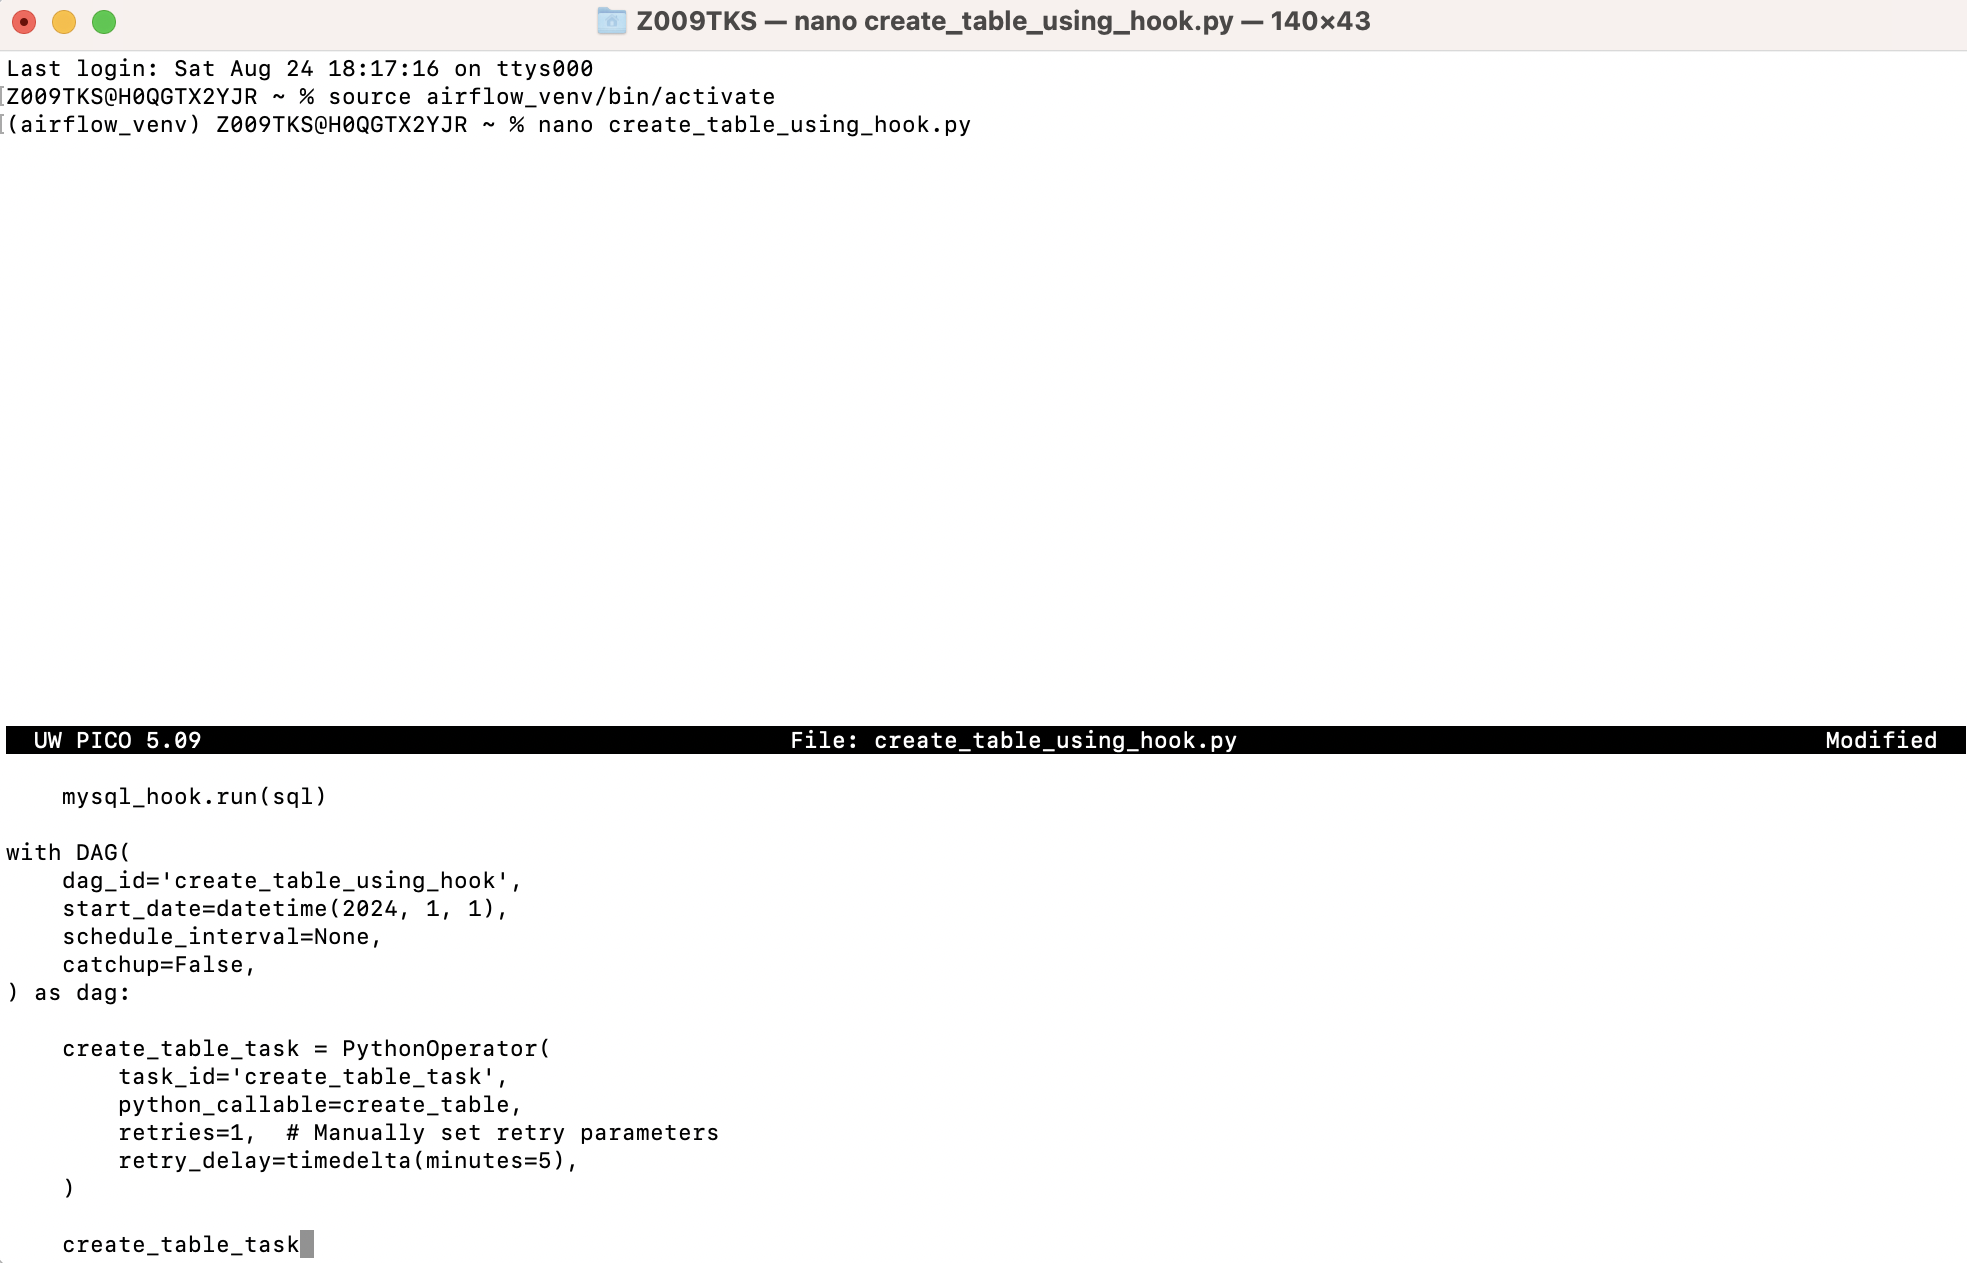
The following code creates a table using the MySQL hook. Copy and paste the code into the command line interface, as shown in the above image.
from airflow import DAG
from airflow.providers.mysql.hooks.mysql import MySqlHook
from airflow.operators.python import PythonOperator
from datetime import datetime, timedelta

def create_table():
    mysql_hook = MySqlHook(mysql_conn_id='airflow_db')
    sql = """
    CREATE TABLE IF NOT EXISTS employees (
        id INT AUTO_INCREMENT PRIMARY KEY,
        emp_first_name VARCHAR(50),
        emp_last_name VARCHAR(50),
        emp_email VARCHAR(100),
        created_at TIMESTAMP DEFAULT CURRENT_TIMESTAMP
    );
    """
    mysql_hook.run(sql)

with DAG(
    dag_id='create_table_using_hook',
    start_date=datetime(2024, 1, 1),
    schedule_interval=None,
    catchup=False,
) as dag:

    create_table_task = PythonOperator(
        task_id='create_table_task',
        python_callable=create_table,
        retries=1,  # Manually set retry parameters
        retry_delay=timedelta(minutes=5),
    )

    create_table_task
Press ‘ctrl+x’ to save and then enter ‘Y,’ now press the ‘Enter’ button.
Go to Airflow UI at http://localhost:8080/home, and you’ll find the created dag under the DAGs section in the menu bar.
Airflow MySQL Operators
To use operators, follow the steps mentioned in the above section. However, replace the Python file with the following code. This code creates a table using operators instead of hooks.
from airflow import DAG
from airflow.providers.mysql.operators.mysql import MySqlOperator
from datetime import datetime, timedelta
table_sql = """
    CREATE TABLE IF NOT EXISTS employees (
        id INT AUTO_INCREMENT PRIMARY KEY,
        emp_first_name VARCHAR(50),
        emp_last_name VARCHAR(50),
        emp_email VARCHAR(100),
        created_at TIMESTAMP DEFAULT CURRENT_TIMESTAMP
    );
    """

with DAG(
    dag_id='create_mysql_table_dag',
    start_date=datetime(2024, 1, 1),
    schedule_interval=None,      catchup=False,
) as dag:

    # MySqlOperator
    create_table_task = MySqlOperator(
        task_id='create_table_task',
        sql=table_sql,
        mysql_conn_id='mysql_default',  # replace with your connection id
    )

    create_table_task
Conclusion: Hevo as an Alternative for Data Integration
Don’t you feel the above process is complex and requires coding knowledge to create DAGs? That’s where Airflow alternatives like Hevo Data come in. Hevo Data is a leading data integration tool that automates pipeline ELT processes.
With seamless integration into 150+ tools, Hevo Data supports data transfers from your desired sources to target destinations. More importantly, Hevo provides an intuitive user interface without requiring you to code the workflows.
Hevo vs. Airflow for MySQL Integration
- Ease of setup: Setting up pipelines in Hevo takes minutes, and installing and configuring Airflow is complex and time-consuming.
- No-code approach: Hevo provides a complete no-code platform. On the other hand, Airflow requires you to know how to code workflows and DAGs.
- Pre-built Integrations: Hevo Data has built-in connectors and templates for working with MySQL databases. However, to interact with MySQL in Airflow, you need to use additional packages like hooks and operators.
- Scalability: Hevo data offers seamless auto-scaling capabilities for varying data loads. Airflow also provides horizontal scaling but requires manual efforts to configure and set up infrastructure.
Run mysqlcheck to verify and repair tables before executing Airflow workflows.
Try a 14-day free trial to explore all features, and check out our unbeatable pricing for the best plan for your needs.
FAQ on Airflow MySQL Connection
Does Airflow support MySQL?
Yes, Airflow supports MySQL, and interacting with it is possible through the MySQL provider package, which includes hooks and operators.
How do I add MySQL connection to Airflow?
You can add a MySQL connection to Airflow through the web or command line interfaces. The blog discusses both methods.
What database does Airflow use?
Airflow uses SQLite by default for dev/testing purposes. However, a robust database like MySQL or PostgreSQL is preferable for production environments.
Does Airflow support SQL Server?
Yes, Apache Airflow supports SQL Server through MsSql hooks and MsSql operators.
Is Airflow good for ETL?
Airflow is a good ELT tool for managing and scheduling workflow orchestrations, but it requires developers to know Python to develop ELT pipelines. Alternatives like Hevo Data are worth checking out for those who want a more simplified and automated ETL management process.
Share it with your connections.
-
 Share To LinkedIn
-
 Share To Facebook
-
 Share To X
-
 Copy Link


