


Do you want to visualize your SQL Server data in Tableau? Are you looking for a simple fix? If yes, you’ve landed at the right page! This article provides you with a step-by-step solution to help you connect SQL Server to Tableau in a matter of minutes.
This article aims at answering all your queries about connecting SQL Server to Tableau. Follow our easy guide to master the skill of connecting SQL Server to Tableau using various methods.
Table of Contents
Introduction to SQL Server

It is a relational database developed by Microsoft to store the structured data. It is known as MS SQL. SQL Server is built on top of SQL (Structured Query Language) to interact with database objects. SQL Server is tied to Transact-SQL or T-SQL (Microsoft proprietary language) for its programming interface, such as declaring the variable, stored procedure, exception handling, etc. Initially, SQL Server ran only on Windows Server and Windows devices, however now it is supported on Linux as well.
Key features of SQL Server:
- Scalable: It is easy to scale and supports large amounts of data.
- Performance: It performs exceptionally well on both Windows & Linux.
- Secure: It ensures data security & availability irrespective of whether the data is at rest or being worked on. It further supports data recovery during crashes/failures.
- Analytics Support: MS SQL supports data analytics & machine learning. It uses languages like Python or R to perform such operations.
- Integrations: It is very easy to integrate MS SQL with tools like Hadoop for big-data analytics using T-SQL commands.
- Threading: MS SQL efficiently supports multi-threading & parallel processing even with a massive amount of data & ensures powerful analytics.
For further information on SQL Server, you can check the official Microsoft site here.
Introduction to Tableau

Tableau is a powerful business intelligence tool used to turn raw data into an understandable format. It is a tool popularly used to visualize data and can be understood even by a non-technical user.
It creates visualizations with the help of dashboards and worksheets, helping users perform real-time analysis in a very fast and secure manner. It doesn’t require a user to have any programming skill or technical background to operate it.
For further information on Tableau, you can check the official site here.
Method 1: Using Tableau’s SQL Server Connector
Tableau’s in-built SQL Server connector conveniently establishes a connection with SQL Server. You can easily set up a data source and use Tableau to visualize your data to perform a fruitful analysis for your business. This method requires you to install the SQL Server ODBC driver.
Method 2: Using Hevo, A No-Code Data Integration Platform
Use Hevo, a No-Code Data Integration Platform to connect SQL Server with various other marketing applications to bring in integrated data in a matter of minutes and visualize it in your desired BI tool such as Tableau. It is the ideal solution for creating a single source of truth for marketing, that too without writing a single line of code. Its fault-tolerant architecture ensures that the data is handled in a secure, consistent manner with zero data loss.
Visit our Website to Explore HevoPrerequisites
- Working knowledge of SQL Server.
- Working knowledge of Tableau.
- Tableau installed at the host workstation.
- Permission to access the SQL Server database.
Methods to connect SQL Server to Tableau
There are many ways in which you can connect SQL Server to Tableau:
- Method 1: Using Tableau’s SQL Server Connector
- Method 2: Using Hevo, No-Code Data Integration Platform


Method 1: Using Tableau’s SQL Server Connector
Tableau’s in-built SQL Server connector conveniently establishes a connection with SQL Server. You can easily set up a data source and use Tableau to visualize your data to perform a fruitful analysis for your business.
This method requires you to install the SQL Server ODBC driver. The ODBC driver allows tableau to interact with data stored in your SQL Server database and hence perform analysis easily. The SQL Server driver comes installed by default with Tableau v9.3 and above. Users supporting any previous versions on their system can download the driver from the official site here.
This can be implemented using the following steps:
Step 1: Configuring Tableau
Launch Tableau on your workstation and select SQL Server from the connect column on the left. This will open a dialogue box where you need to provide the connection details for SQL Server.
To connect with tableau, you will need to provide information about the server which hosts your database. If you want to connect to a contained database, you can also specify the name of the database.
To connect with a port other than the default port, you need to specify the port and server as follows:
<server_name><port_number>Example query: my_server 8051
There are two ways in which you can sign-in to the server, either by using Windows authentication or by using the username and password. Using the username and password becomes a must if you’re working with a password-protected server in a non-Kerberos environment.
Click on Sign in to establish a connection. This will enable a connection without SSL. To establish an SSL enabled connection, click the Require SSL checkbox before you sign in.
SQL Server provides an option to let the user queries access the modified rows even before they have been committed. This option is called Read Uncommitted data. It saves time by preventing complex queries such as extract refreshes from locking the database and causing a delay. If this option is unchecked, Tableau makes use of default isolation levels.
If you want to run a specific SQL command every-time a new connection is established, you can use the Initial SQL option. This will open a dialogue box, where you can specify your desired SQL query.
For further information on Initial SQL command, you check the official site here.

Step 2: Configuring Data Source
The data source page loads up after configuring the Tableau connector and successfully signing in. This is how the page looks like:
Select the data source name option and give a unique name to the database you are using. It’s considered a good practice to have a unique name as it makes it much easier for users to identify the database from which data is being fetched.
To select the desired schema, you can use the schema drop-down list from the column on the left. You can also perform a text-based search to find the desired option. Now similarly find and select the desired table and drag it onto the canvas.
This is how you can connect SQL Server with Tableau. Now click on the sheets tab to begin the analysis.
Custom SQL features can be used to focus on specific SQL statements, rather than querying the entire database. Click on the Custom SQL option from the panel on the left. A new dialogue box will now open up, where you can provide the query you want to execute.
You can learn more about using Custom SQL here.
Some Limitations of This Method:
- This method requires installing the SQL Server ODBC driver beforehand.
- Fields having the Time data type aren’t imported by Tableau, due to a lack of support.
- Tableau often displays a “worksheet not available” error. This requires the user to sign-in multiple numbers of times to rectify it.
Method 2: Using Hevo to Connect SQL Server as a Source
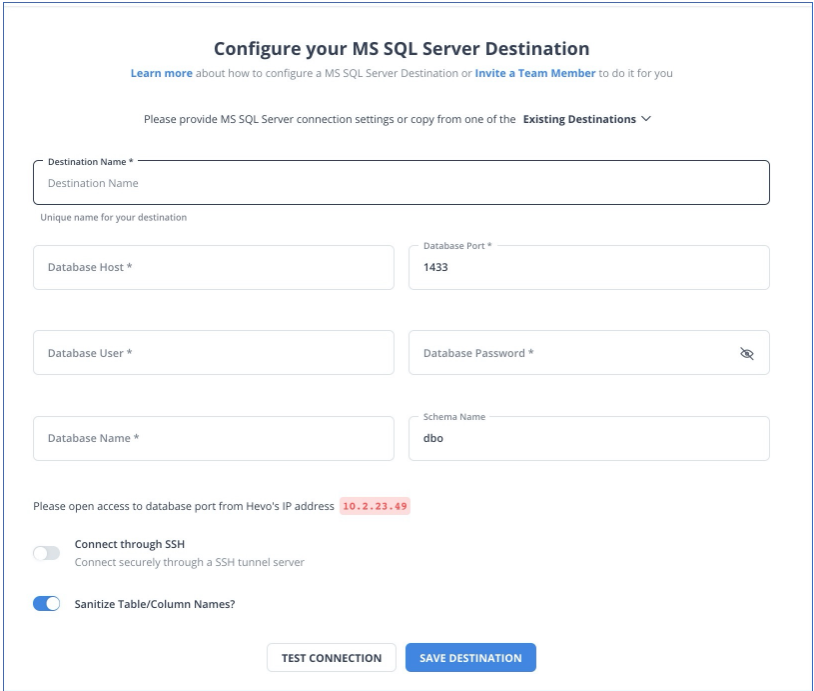
Perform the following steps to configure SQL Server as a Destination in Hevo:
- Click DESTINATIONS in the Navigation Bar.
- Click + CREATE DESTINATION in the Destinations List View.
- On the Add Destination page, select SQL Server.
- On the Configure your SQL Server Destination page, specify the following:
You can also read more about:
- Convert SQL Server to MySQL
- Databricks to SQL Server
- Debezium SQL Server Connector
- Debezium SQL Server
Conclusion
This article introduces you to the various methods that can be used to connect SQL Server to Tableau. It also provides in-depth knowledge about the concepts behind every step to help you understand and implement them efficiently. These methods, however, can be challenging especially for a beginner & this is where Hevo saves the day. Hevo, a No-Code Data Integration Platform helps you connect SQL Server to various marketing data sources and store integrated marketing data in one place and visualize it in Tableau. Hevo with its strong integration with 150+ sources & BI tools, allows you to not only export & load marketing data but also transform & enrich your data & make it analysis-ready in a jiffy.
FAQ on SQL Server to Tableau
Can you connect SQL Server to Tableau?
Yes, you can connect SQL Server to Tableau using Tableau’s native SQL Server connector by providing the server details and credentials.
Can I run a SQL query in Tableau?
Yes, you can run SQL queries in Tableau by using the Custom SQL option when connecting to a data source, allowing you to write and execute SQL queries directly.
How do I import SQL into Tableau?
To import SQL into Tableau, connect to your SQL database, select the relevant tables or write a Custom SQL query, and then import the data for analysis and visualization.

Share it with your connections.
-
 Share To X
-
 Share To LinkedIn
-
 Share To Facebook
-
 Copy Link


