


If you’re looking for a quick and easy way to connect Jira to Snowflake, you’ve come to the right place. Integrating Jira with Snowflake allows businesses to centralize project management data and unlock deeper insights by combining it with other organizational datasets.
This guide breaks down the process of integrating JIRA with Snowflake, making your data integration smooth and stress-free. These simple steps will make managing your data connection more effortless than ever.
flexible than normal data warehouse offerings.
Table of Contents
Why You Should Integrate Jira with Snowflake?
Jira is a popular project management tool that assists teams in planning, tracking, and overseeing software initiatives. In contrast, Snowflake is a cloud-based data warehouse recognized for its scalability and high performance. By linking Jira with Snowflake, organizations can:
- Facilitate Advanced Analytics: Merging Jira’s project information with additional datasets in Snowflake allows companies to develop comprehensive analytics and personalized dashboards, aiding stakeholders in making well-informed decisions.
- Centralize Data Management: Integration removes data silos by merging information into a unified source of truth, improving data access and ensuring consistency.
- Boost Team Efficiency: Automated pipelines enable teams to prioritize interpreting insights over managing data flow.
Ready to start your Data Integration journey with Hevo? Hevo’s no-code data pipeline platform lets you connect your Jira account in a matter of minutes to deliver data in near real-time to Snowflake.
Why choose Hevo?
- Experience Completely Automated Pipelines
- Enjoy Real-Time Data Transfer
- Rely on Live Support with a 24/5 chat featuring real engineers, not bots!
Take our 14-day free trial to experience a better way to manage your data pipelines. Find out why industry leaders like Thoughtspot prefer Hevo for building their pipelines.
Get Started with Hevo for FreePrerequisites
- The Snowflake platform should be set up. An account should be set up before starting.
- Python needs to be installed and set up in the system, as the blog uses Python to shift data from JIRA to the Snowflake data warehouse manually.
- You need to set up an account on the JIRA platform connected to one of your projects, from which the components of your data will be retrieved.
Method 1: Using Automated Platforms Like Hevo [Recommended]
Step 1: Configure JIRA
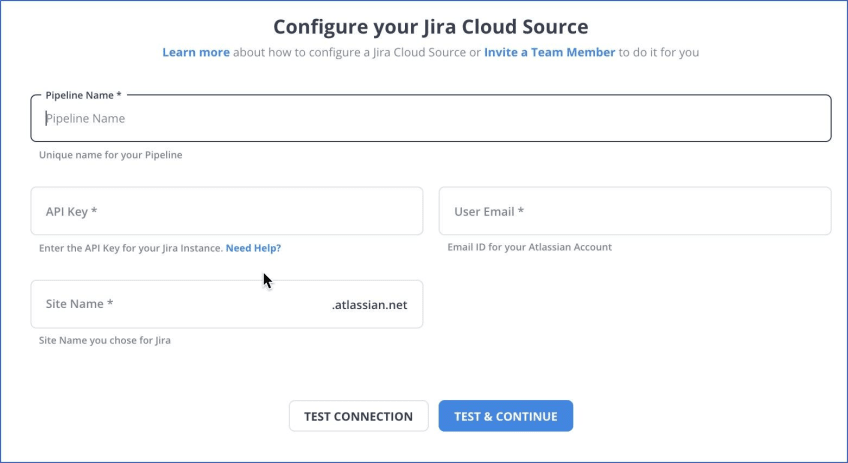
Step 2: Configure Snowflake
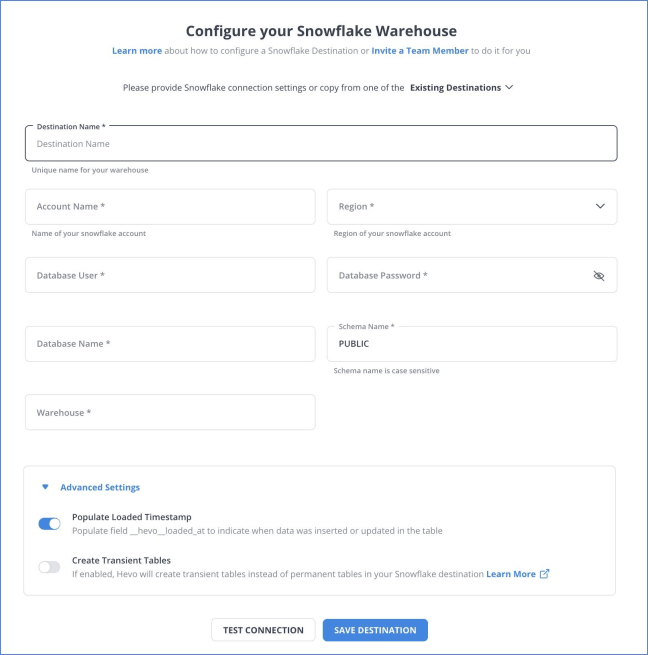
You have successfully connected your JIRA account with Snowflake. Hevo also supports integrations from JIRA to various destinations like Snowflake, AWS Redshift, Google Bigquery, etc, and supports 150+ free data sources.
Method 2: Using CSV Files
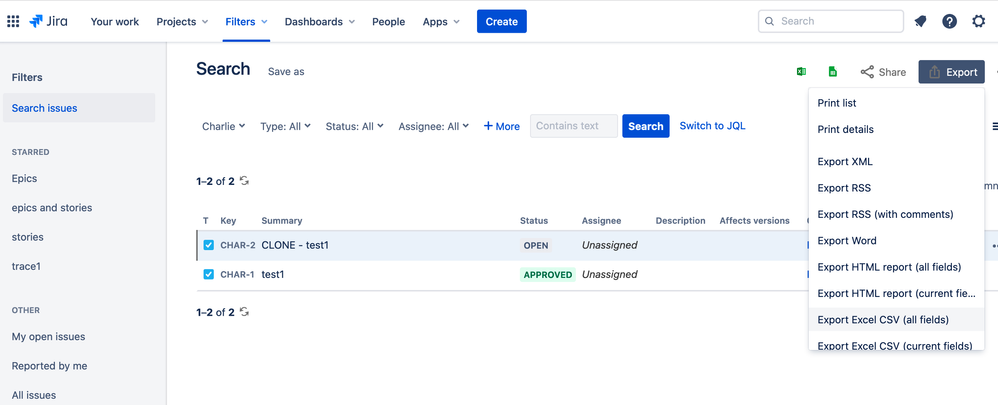
Step 1: Export Data From Jira
Jira allows you to export issues, work logs, project data, user data, and more in CSV, PDF, Word, XML, or Excel format. To export your data as CSV files, customize the columns and filters directly within Jira to suit your needs.
- Navigate to Issue Search: Access the issue search feature in Jira to locate the issues you want to export.
- Apply Filters: Use Jira’s robust filtering options to refine the issues list based on your requirements.
- Export to CSV: Click the ‘Export’ button and select the ‘CSV’ format. Jira will generate an Excel file with the issue data.
- Excel Data Management: Once exported, you can use Excel’s functionalities to format and analyze the data, making it suitable for presentations or further analysis.
Step 2: Data Cleaning
Address missing values, inconsistencies, and inaccuracies in the CSV files. Verify that the CSV data structure matches the target Snowflake table schema.
Step 3: Upload to Snowflake
Upload CSV files to Snowflake’s internal staging area using SnowSQL.
Create an internal stage
CREATE STAGE my_internal_stage

FILE_FORMAT = (TYPE = CSV);
Upload files to the stage
PUT file:///path_to_the_CSV_file/filename.csv @my_internal_stage;Load data from the staging area into the Snowflake table using COPY INTO command
COPY INTO snowflake_table FROM @my_internal_stage FILE_FORMAT = (TYPE = CSV);

Best Practices for Jira-Snowflake Integration
- Data Validation: Ensure the accuracy and consistency of data by cross-referencing records from Jira and Snowflake. Integrate validation checks in your ETL/ELT tools to identify discrepancies early.
- Incremental Loading: Rather than loading the complete dataset each time, employ incremental data loading to focus solely on new or modified records. This approach minimizes processing time and enhances efficiency performance.
- Monitor Pipelines: Continuously monitor your data pipelines using built-in monitoring tools in platforms like Hevo or custom logging scripts for manual integrations.
- Protect Data: Implement encryption protocols like TLS for data during transit and verify that Snowflake’s roles and permissions are set up correctly.
- Streamline Transformations: Ensure data transformations remain lightweight and focus solely on necessary operations before loading into Snowflake, preserving the efficiency of the pipeline.
Conclusion
Connecting Jira to Snowflake enables organizations to centralize their project management data for advanced analytics and reporting. Read about setting up Bitbucket Pipelines that enable you to build, test, and even deploy your code automatically.
While manual integration is possible, tools like Hevo Data offer a streamlined, automated solution that saves time and reduces complexity. By following the outlined steps and adhering to best practices, businesses can ensure a seamless integration that empowers teams with actionable insights, improved productivity, and enhanced decision-making capabilities. Sign up for a free 14-day trial to give Hevo a try.
FAQs
1. Does Jira use Snowflake?
Yes, you can set up and configure Snowflake to your Jira account using data pipelines like Hevo to sync in real-time without leaving Jira.
2. What is the integration between Jira and Snow?
The integration imports your Snow Asset Information into Jira Service Management allows you to synchronize issues, track updates, and manage workflows across both platforms, ensuring seamless data flow and collaboration.
3. How do I move from Jira server to cloud?
To move from Jira Server to Cloud, use Atlassian’s Cloud Migration Assistant to export your data, including projects, users, and issues, and then import it into your Jira Cloud instance.

Share it with your connections.
-
 Share To X
-
 Share To LinkedIn
-
 Share To Facebook
-
 Copy Link


