


Organizations now use a variety of technologies to communicate with customers, including chatbots, social media platforms, email, and more. But, since customer information resides in different sources, organizations struggle to use data to generate insights. As a result, organizations often fail to understand their customers properly.
To solve this problem, organizations can use Front, which allows collecting customer data from different channels in one place. Front also provides analytics to assist businesses in effectively gaining insights into customer data. But, to get an in-depth analysis of the Front data, you can use a data warehouse like Snowflake, which can later be integrated with powerful BI tools to obtain meaningful insights.
In this article, you will learn to connect Front to Snowflake. Snowflake and Front are also discussed briefly.
Table of Contents
What is Front?
Developed in 2013, Front is a customer communication hub that allows organizations to strengthen customer relationships. Front enables organizations to collect customer information across all the channels like emails, texts, social media, calls, Whatsapp, and more in one place. This allows teams in organizations to collaborate and communicate with their customers in real-time. Front also provides organizations with automated workflows and analytics that can analyze the customer data and provide a complete 360 view of all the customer information. As a result, organizations can get a complete idea of their customers, which would help them offer a superior customer experience.
Front serves as a hub for communication and the development of strong customer relationships.
Front focuses a team’s attention on customer conversations and surrounds them with collaboration tools and contextual data from multiple systems.
Complex processes and disconnected systems aren’t a hindrance to efficiency when everything is in one place. This keeps team members focused on what technology can never replace: building strong customer relationships, and ensuring that customer communications are always timely, accurate, and deeply personal.
Key Features of Front
- Automated Workflows: Front consists of no-code automation and integration capabilities that can replace the complexity of the manual integration processes. As a result, organizations can easily analyze their customer data and gain insights to optimize business processes.
- Win More Customers: Since Front allows organizations to collect data from different sources like emails, texts, calls, WhatsApp, and more, organizations get a complete view of the customer data. As a result, Front allows organizations to understand their customers and close deals faster by keeping them happy.
Method 1: Using Hevo Data to Set Up Front to Snowflake
Hevo Data, an Automated Data Pipeline, provides you with a hassle-free solution to connect Front to Snowflake within minutes with an easy-to-use no-code interface. Hevo is fully managed and completely automates the process of loading data from Front to Snowflake and enriching the data and transforming it into an analysis-ready form without having to write a single line of code.
Method 2: Using Custom Code to Move Data from Front to Snowflake
This method would be time-consuming and somewhat tedious to implement. Users will have to write custom codes to enable two processes, streaming data from Front to Snowflake. This method is suitable for users with a technical background.
Get Started with Hevo for FreeWhat is Snowflake?
Developed in 2012, Snowflake is a popular, fully managed data warehouse that can be hosted on any cloud service like Amazon Cloud Service, Microsoft Azure, or Google Cloud Storage. Snowflake helps organizations with services such as data engineering, data lakes, data warehouse, analytics, and more.
Snowflake provides data storage, processing, and analytic solutions that are faster, easier to use, and more flexible than traditional options. Snowflake isn’t based on any existing database technology or “big data” software platforms like Hadoop.
With big data, Snowflake’s architecture allows for similar flexibility. Snowflake separates the storage and computes functions, so businesses that need a lot of storage but don’t need a lot of CPU cycles, or vice versa, don’t have to pay for an integrated bundle that includes both.
Since Snowflake is a fully managed SaaS platform, users do not need to select, manage or configure the infrastructure.
Snowflake is a cloud-native data warehouse that addresses many of the issues that plague older hardware-based data warehouses, including limited scalability, data transformation issues, and delays or failures caused by high query volumes.
Snowflake is a fully managed service that is easy to use and can run an almost infinite number of concurrent workloads. Data warehousing, data lakes, data engineering, data science, data application development, and securely sharing and consuming shared data are all possible with Snowflake.
Key Features of Snowflake
- Result Caching: Snowflake has a one-of-a-kind feature that caches results on multiple levels. The results will last for 24 hrs after the query is executed. Therefore, the results are quickly delivered if the same query is executed.
- Data Sharing: The data sharing feature in Snowflake enables users to share items from one database account to another without duplicating. As a result, more storage space is guaranteed while significantly less computation is required, resulting in faster data access.
- Unique Architecture: Another essential feature that makes Snowflake different from other data warehouse services is its architecture. Snowflake allows for independent scaling of storage and computes units. As a result, organizations can use and pay for storage and computation separately.
- Connectors and Drivers: Users can use a variety of client connectors and drivers with Snowflake. It includes Python and Spark connectors and drivers such as Node.js, Go Snowflake, .NET, JDBC, PHP, ODBC, and more.
Connecting Front to Snowflake
- Method 1: Using Hevo Data to Set Up Front to Snowflake
- Method 2: Using Custom Code to Move Data from Front to Snowflake
Method 1: Using Hevo Data to Set Up Front to Snowflake
Using Hevo Data, you can connect Front to Snowflake in the following 2 steps:
Step 1: Configure Front as the Source in your Pipeline
- Step 1.1: In the Asset Palette, select PIPELINES.
- Step 1.2: In the Pipelines List View, click + CREATE.
- Step 1.3: Select Front on the Select Source Type page.
- Step 1.4: Set the following in the Configure your Front Source page:
- Pipeline Name: A name for the Pipeline that is unique and does not exceed 255 characters.
- API Token: Hevo can read data with the API token you created in your Front account.
- Historical Sync Duration: The time it takes for historical data to be synced with the Destination. 3 Months is the default value.
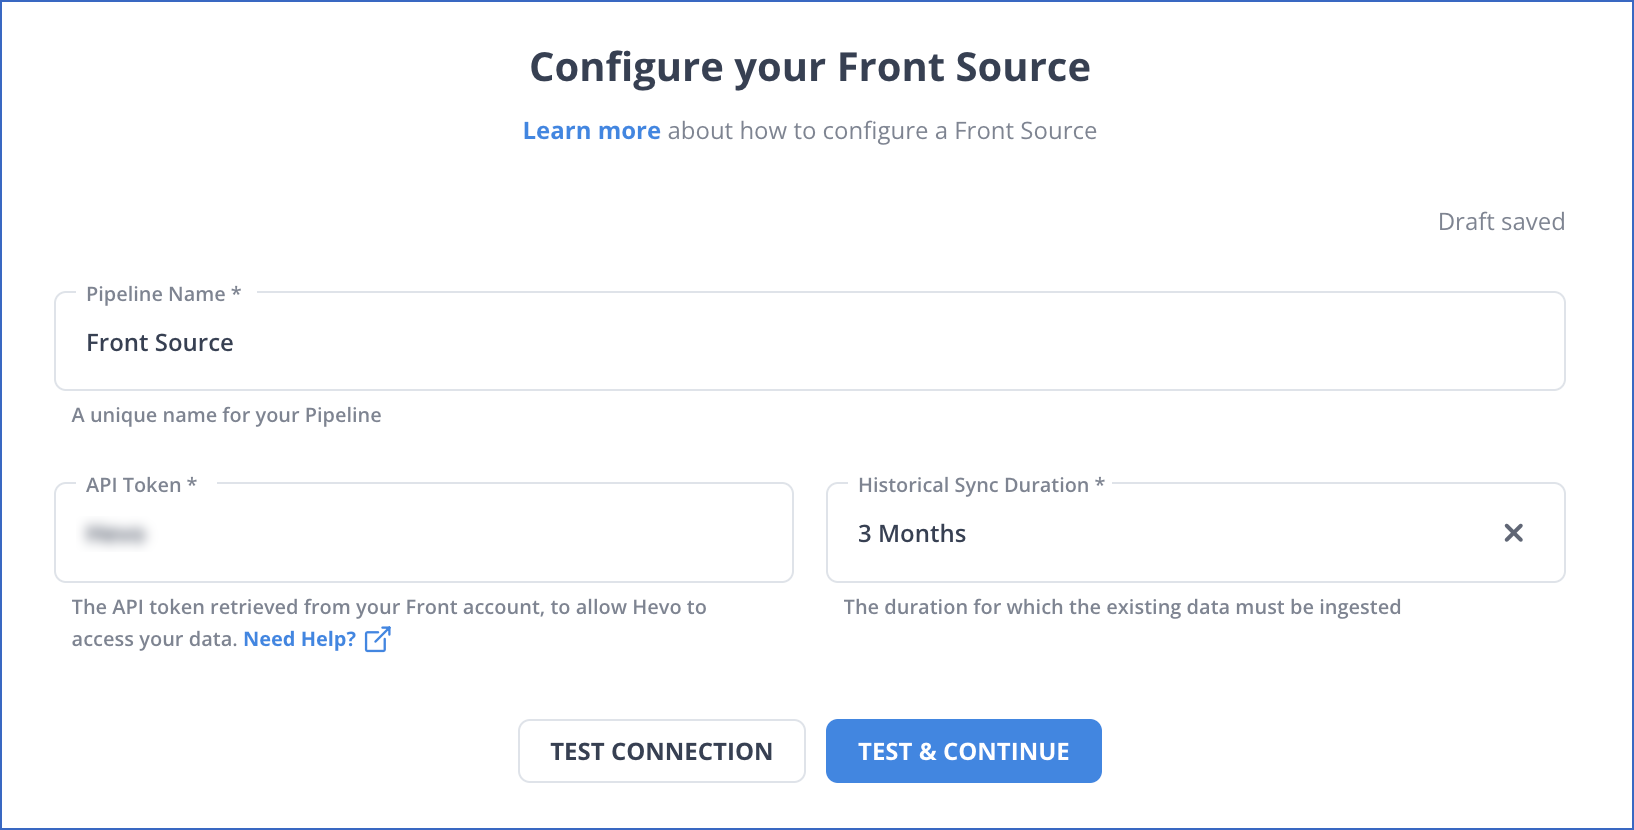
- Step 1.5: TEST & CONTINUE is the button to click.
- Step 1.6: Set up the Destination and configure the data ingestion.
Step 2: Configure Snowflake as a destination.
- Step 2.1: In the Asset Palette, select DESTINATIONS.
- Step 2.2: In the Destinations List View, click + CREATE.
- Step 2.3: Select Snowflake from the Add Destination page.
- Step 2.4: Set the following parameters on the Configure your Snowflake
- Destination page:
- Destination Name: A unique name for your Destination.
- Snowflake Account URL: This is the account URL that you retrieved.
- Database User: The Hevo user that you created in the database. In the Snowflake database, this user has a non-administrative role.
- Database Password: The password of the user.
- Database Name: The name of the Destination database where data will be loaded.
- Database Schema: The name of the Destination database schema. Default value: public.
- Warehouse: SQL queries and DML operations are performed in the Snowflake warehouse associated with your database.
- Destination page:
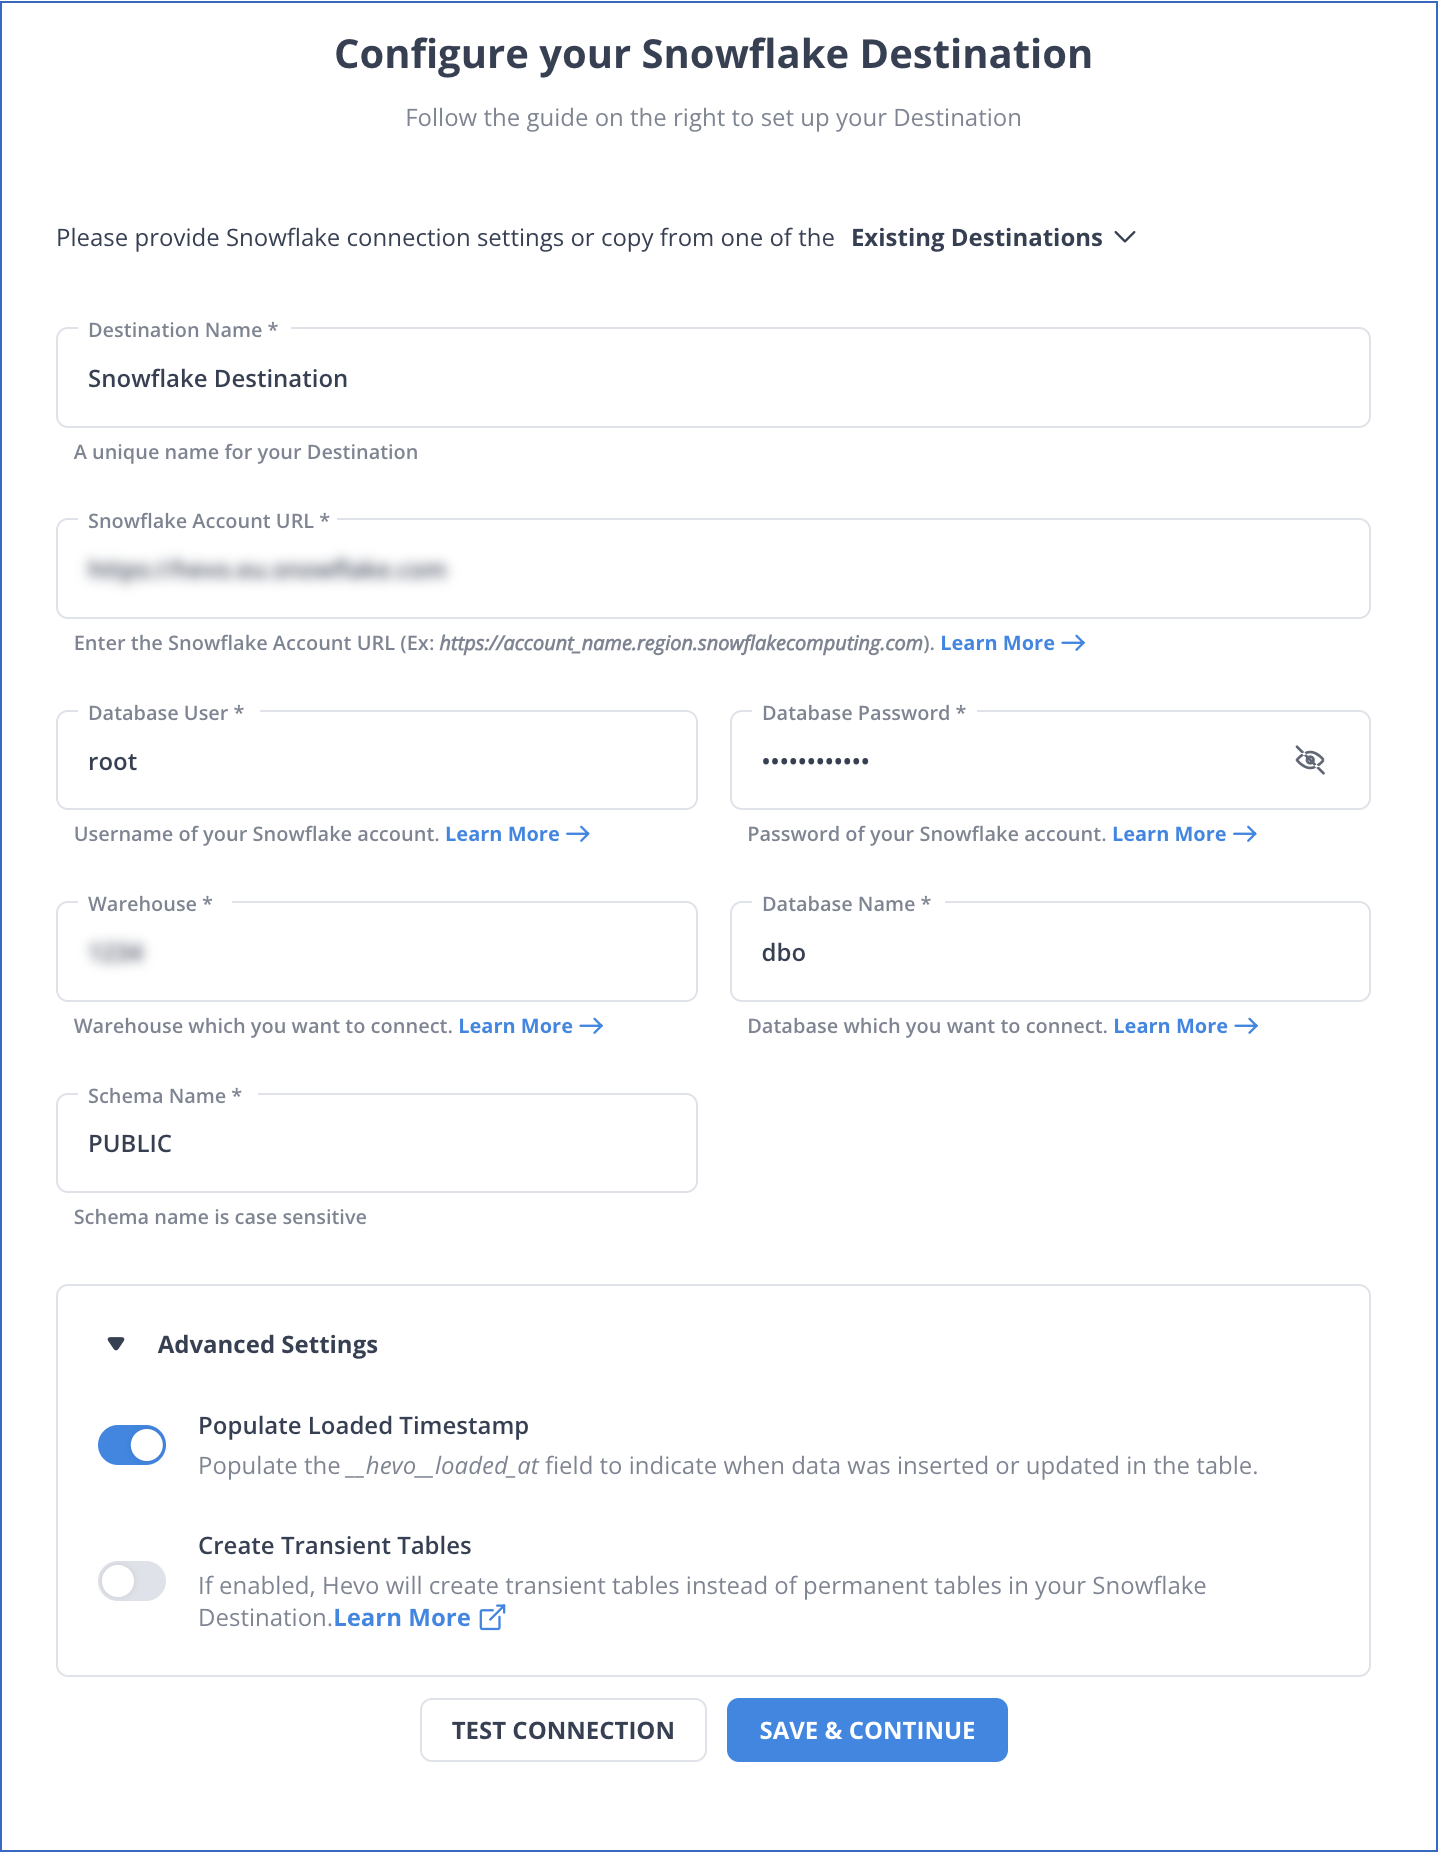
- Step 2.5: Click Test Connection to test connectivity with the Snowflake warehouse.
- Step 2.6: Once the test is successful, click SAVE DESTINATION.
Reasons to try Hevo:
- Smooth Schema Management: Hevo takes away the tedious task of schema management & automatically detects the schema of incoming data and maps it to your schema in the desired Data Warehouse.
- Exceptional Data Transformations: Best-in-class & Native Support for Complex Data Transformation at fingertips. Code & No-code Flexibility is designed for everyone.
- Quick Setup: Hevo with its automated features, can be set up in minimal time. Moreover, with its simple and interactive UI, it is extremely easy for new customers to work on and perform operations.
- Built To Scale: As the number of sources and the volume of your data grows, Hevo scales horizontally, handling millions of records per minute with very little latency.
- Live Support: The Hevo team is available round the clock to extend exceptional support to its customers through chat, email, and support calls.
Method 2: Using Custom Code to Move Data from Front to Snowflake
To connect Front with Snowflake, you must export data from Front and then import it to Snowflake.
It is assumed that you have signed in to Front. Front allows you to connect your workspace by using a Gmail account. You can create shared inboxes, collaborate with your teams, create team tags, manage rules, add message templates, and more after you’ve set up your workspace.
Front Analytics has seven dashboards built-in to help you analyze and improve the efficiency of your team. You can create reports to filter specific inboxes, channels, teammates, and more. Front also allows you to export these reports into the csv files.
Follow the below steps to export a csv file of the report view.
Exporting Front Report Data
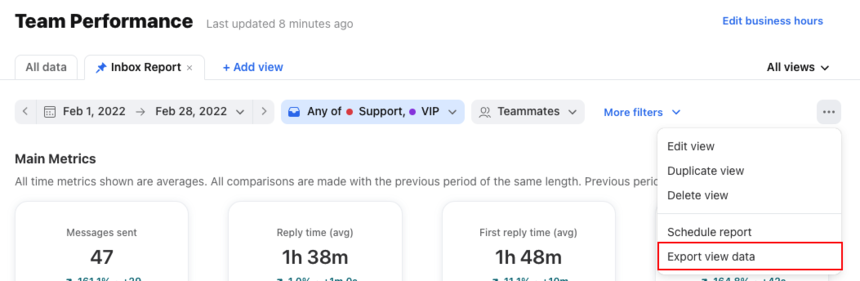
Exporting Front report view data can provide details about all the messages and events included in the view.
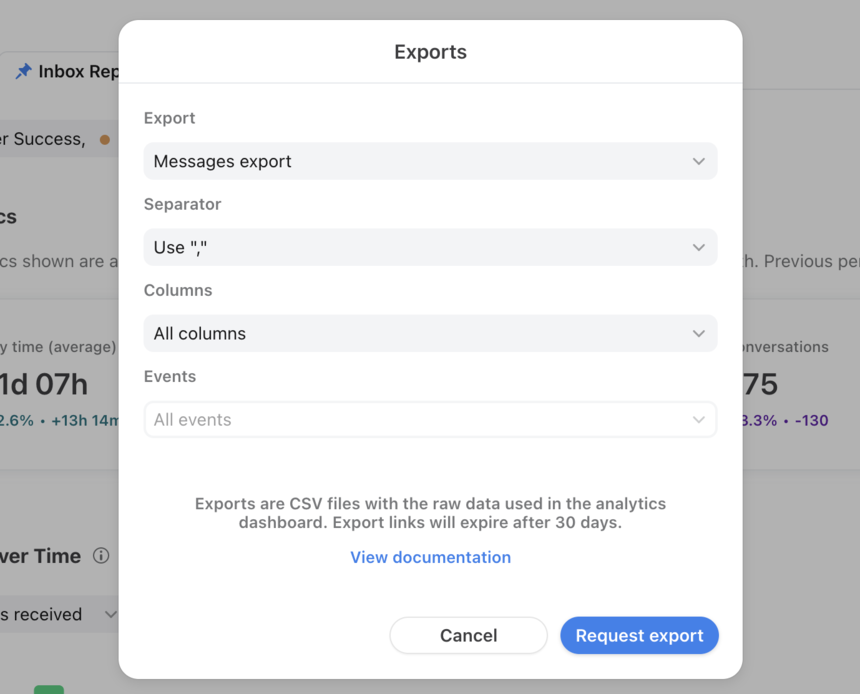
- Click on the three dots on the top right of the report view and select Export View Data.
- In the Export field, select your export type and click on Request export.

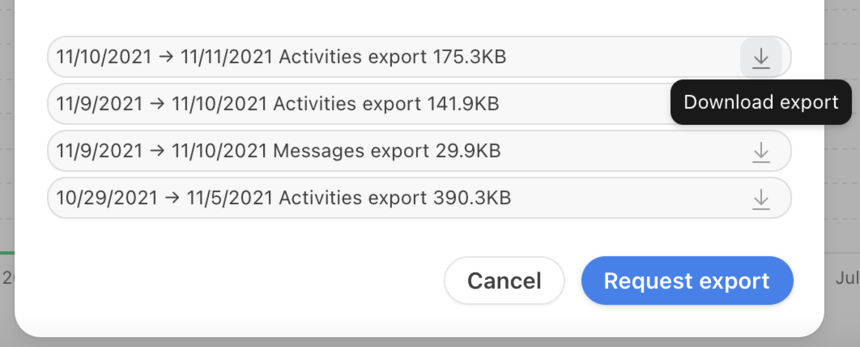
- At the bottom of the pop-up screen, you can see the prepared exports, which are ready to be downloaded. Click on the Download export arrow icon to save the export to your computer.

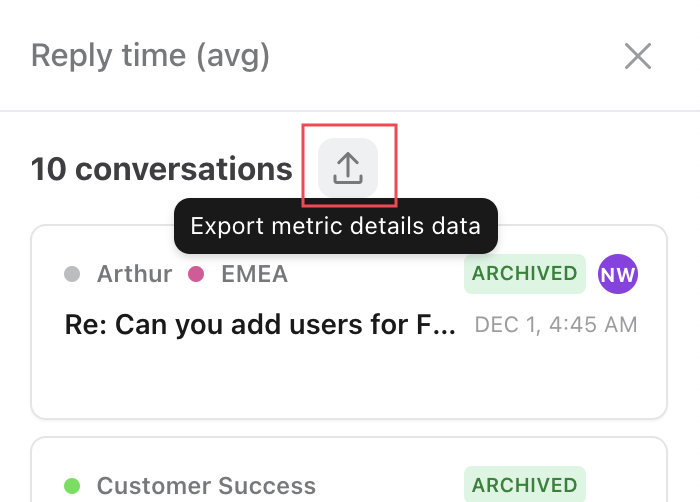
Front allows you to export metric details to view all the conversations included in a specific metric in your report. Follow the below steps to export metric details.
- Step 1: Click on the metric in your report to pull up the metric details.
- Step 2: Click on the Export icon at the top of the list of conversations, as shown below.
- Step 3: Select your export type in the Export field and click on Request export.
- Step 4: At the bottom of the pop-screen, you can see the prepared exports. Click on the Download export arrow icon to save the export.
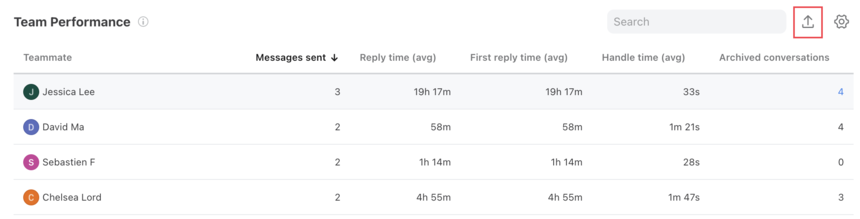
- Step 5: Front also allows users to export data from individual charts and tables in your reports. The csv file can contain the same pre-calculated metrics you can see in the corresponding chart or table on your dashboard.
- Step 6: Click on the Export icon at the top right of the table to download its data, as shown below.
Importing Data to Snowflake
The classic user interface of Snowflake offers a wizard to load data to a table from a small set of files. This wizard uses PUT and COPY commands for loading the data effectively.
Follow the below steps to import files into the Snowflake data warehouse.
- Step 1: Open the Load Data wizard
- Follow the below steps to open the Load Data wizard to load the data.
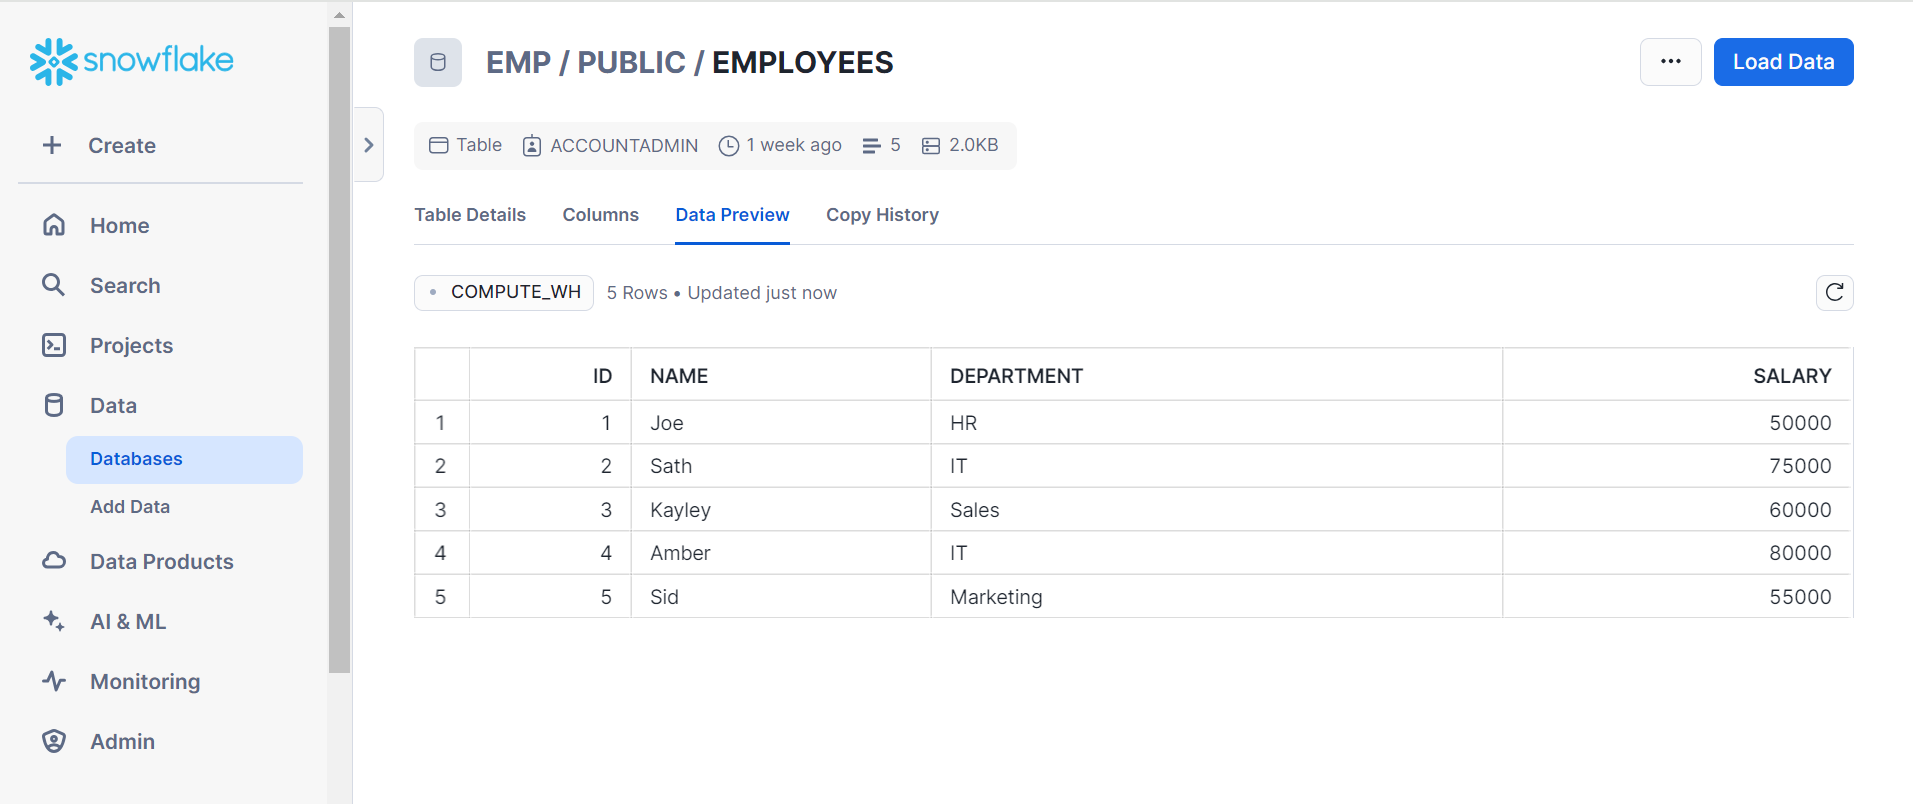
- Step 1.1: Click on Data > Databases from the left panel. Now, click on the link of a specific database to view the objects stored in the database.
- Step 1.2: Click on the Tables.
- Step 1.3: You can also click on the table name to open the Tables details page and click on the Load Data.
The Load Data Wizard, which will assist you in loading the data, is launched. Follow the next steps to select the data warehouse where you want to load the data.
- Step 2: Select the data warehouse
- Step 2.1: Select the data warehouse from the drop-down list. Snowflake use this data warehouse to load data into the table.
- Step 2.2: Click on Next to select source files.
- Step 2.3: Select files
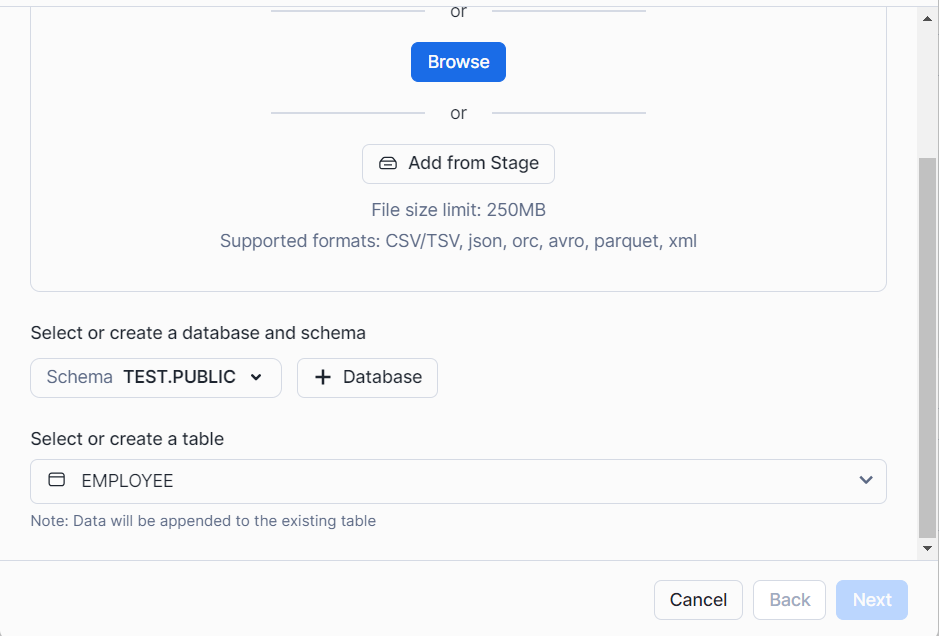
You can load data from your local storage or existing files in Amazon S3, Microsoft Azure, or Google Cloud Storage using the following steps. In this article, you will learn to load data from cloud storage.
- Step 3: Loading data from cloud storage
- You can load data from cloud storage by using the below steps.
- Step 3.1: From the drop-down menu, select Stage.
- Step 3.2: Now, click on Next to select the format for the file.
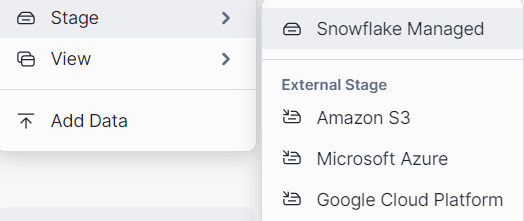
If you do not have existing files in the cloud storage, create a new Stage in the cloud.
- Step 4: Selecting a File Format
- The drop-down list allows you to select the named set of options describing the format of your data files. Follow the below steps to select the existing named file format.
- Step 4.1: From the drop-down list, select the existing file format.
- Step 4.2: To choose the data loading options, click Next.
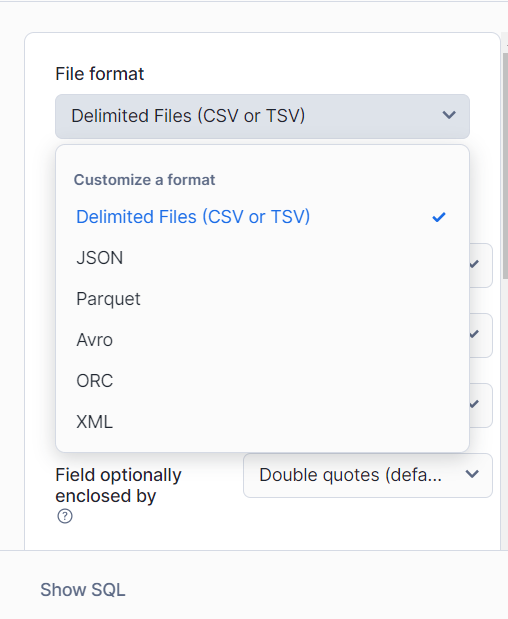
If you do not have files containing your file format, you can create a new file format for your required format.
- Step 5: Selecting a data load options
- Step 5.1: If you encounter data files errors, you can specify how Snowflake should behave. To know more, check the COPY INTO table section.
- Step 5.2: Now, click on load.
Snowflake loads your data into the table in the data warehouse of your choice. Click on OK. Now, the Load Data wizard can be closed.

Limitations of Connecting Front to Snowflake
Exporting Front data to Snowflake manually is easy, but users cannot work with real-time data with this process. Therefore, users can use standard APIs to export Front data, but using APIs can be a complex process and requires a strong technical team. As a result, to overcome such challenges, users can use third-party ETL tools like Hevo that allow seamless and automated integration between Front and Snowflake.
Conclusion
In this article, you learned about connecting Front with Snowflake. Front allows organizations to help their teams ensure every customer conversation is strengthened. With Front, organizations can collect customer data from all the communication channels and provide automated analytics to help improve customers’ relationships with brands.
Hevo Data offers a No-code Data Pipeline that can automate your data transfer process, hence allowing you to focus on other aspects of your business like Analytics, Marketing, Customer Management, etc.
This platform allows you to transfer data from 150+ sources (including 60+ Free Sources) such as Front and Cloud-based Data Warehouses like Snowflake. It will provide you with a hassle-free experience and make your work life much easier.
Want to take Hevo for a spin? Try Hevo’s 14-day free trial and experience the feature-rich Hevo suite first hand. You can also have a look at the unbeatable pricing that will help you choose the right plan for your business needs.
Frequently Asked Questions
1. What is a Snowflake stage?
In Snowflake, a stage is a location where data is stored before it is loaded into a Snowflake table.
2. What is the Snowflake process?
The Snowflake process typically refers to the workflow of data ingestion, transformation, and analysis within the Snowflake platform.
3. What is Snowflake software used for?
Snowflake is a cloud-based data warehousing platform designed to handle large-scale data storage, processing, and analysis. It is known for its scalability, performance, and ease of use.
Share it with your connections.
-
 Share To LinkedIn
-
 Share To Facebook
-
 Share To X
-
 Copy Link


