


Debezium is a Change Data Capture (CDC) approach used to replicate data between databases in real-time. It tracks every data change event like insert, update, delete on databases and makes applications respond to such events.
The Debezium ecosystem consists of Kafka topics used to handle the log messages released when Debezium connectors are connected to databases. Log messages are valuable information about data change events. Kafka topics are used to organize these messages in Kafka Clusters. Kafka Clusters consists of one or more servers called Kafka brokers running in Kafka.
You can install Debezium using different Debezium connectors like SQL, MySQL, Oracle, MongoDB, etc. Another way to install Debezium is through the Debezium server, a ready-to-use application that streams change events from the source databases.
In this tutorial, you will learn to install Debezium using KafkaConnector resources, AMQ Streams, and OpenShift.
Table of Contents
What is Debezium?

Debezium is an open-source, distributed platform that allows users to keep track of real-time changes in databases. It follows the Change Data Capture (CDC) approach to replicate data between databases in real-time. Debezium uses connectors that keep track of real-time changes in databases and write them as events to Kafka topics.
When databases are connected to the Debezium connector, it generates a lot of messages about data change events. Applications can then access these data change events through messages and react according to different use cases. Debezium consists of different connectors for databases like SQL, MySQL, Oracle, MongoDB, and many more.
Migrating customer data can be complex and error-prone. Hevo simplifies the process with automated, no-code migration, ensuring your data seamlessly integrates to your desired destination.
Why Choose Hevo?
- Automated Migration: Avoid manual errors and save time.
- Easy Setup: No technical expertise required.
Trusted by 2000+ Customers
Take the word for industry leaders such as Thoughtspot, which relies on Hevo for seamless data integration.
SIGN UP HERE FOR A 14-DAY FREE TRIALHow to install Debezium?
Install Debezium using KafkaConnector Resource
Kafka Connect is an open-source component of Kafka, which is used for data integration between databases. It is an API that moves data in and out of Kafka.
Follow the below steps to install Debezium using KafkaConnector on the MySQL database.
- Start the MySQL database server in the Docker container using the below command.
docker run -it --rm --name mysql -p 3306:3306
  -e MYSQL_ROOT_PASSWORD=debezium -e MYSQL_USER=mysqluser
-e MYSQL_PASSWORD=mysqlpw debezium/example-mysql:1.0- The below output indicates that the MySQL server has started successfully.
...
2020-01-24T12:20:18.183194Z 0 [Note] mysqld: ready for connections.
Version: '5.7.29-log' socket: '/var/run/mysqld/mysqld.sock' port: 3306 MySQL Community Server (GPL)- Open another terminal to run the MySQL client using the below command.
docker run -it --rm --name mysqlterm --link mysql --rm mysql:5.7 sh
  -c 'exec mysql -h"$MYSQL_PORT_3306_TCP_ADDR"
  -P"$MYSQL_PORT_3306_TCP_PORT"
-uroot -p"$MYSQL_ENV_MYSQL_ROOT_PASSWORD"'- Switch to the inventory database and check tables.
mysql> use inventory;
mysql> show tables;
Output:
+---------------------+
| Tables_in_inventory |
+---------------------+
| addresses |
| customers |
| geom |
| orders |
| products |
| products_on_hand |
+---------------------+
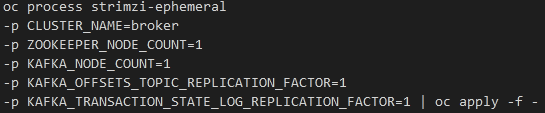
6 rows in set (0.01 sec)Follow Strimzi quickstart to create a Kafka cluster running inside a minikube.
- Start the minikube using the below command.
minikube start --memory=4096- Create the namespace for resources.
kubectl create namespace Kafka- Install Debezium cluster for the operator and associated resources.
curl -L https://github.com/strimzi/strimzi-kafka-operator/releases/download/0.16.1/strimzi-cluster-operator-0.16.1.yaml
  | sed 's/namespace: .*/namespace: kafka/'
| kubectl apply -f - -n kafka - Spin up a Kafka cluster.
kubectl -n kafka
    apply -f https://raw.githubusercontent.com/strimzi/strimzi-kafka-operator/0.16.1/examples/kafka/kafka-persistent-single.yaml
  && kubectl wait kafka/my-cluster --for=condition=Ready --timeout=300s -n kafka
Output:
- Create a Strimzi Kafka Connect image that includes the Debezium MySQL connector and its dependencies.
Now, install Debezium MySQL connector archive.
curl https://repo1.maven.org/maven2/io/debezium/debezium-connector-mysql/1.0.0.Final/debezium-connector-mysql-1.0.0.Final-plugin.tar.gz
| tar xvz- Prepare a Dockerfile that adds connector files to the Strimzi Kafka Connect.
cat <<EOF >Dockerfile
FROM strimzi/kafka:0.16.1-kafka-2.4.0
USER root:root
RUN mkdir -p /opt/kafka/plugins/debezium
COPY ./debezium-connector-mysql/ /opt/kafka/plugins/debezium/
USER 1001
EOF- Build the image from the Dockerfile and push it to dockerhub.
# You can use your own dockerhub organization
export DOCKER_ORG=tjbentley
docker build . -t ${DOCKER_ORG}/connect-debezium
docker push ${DOCKER_ORG}/connect-debezium- Create the database credentials.
cat <<EOF > debezium-mysql-credentials.properties
mysql_username: debezium
mysql_password: dbz
EOF
kubectl -n kafka create secret generic my-sql-credentials
  --from-file=debezium-mysql-credentials.properties
rm debezium-mysql-credentials.properties- Create the Kafka Connect cluster.
cat <<EOF | kubectl -n kafka apply -f -
apiVersion: kafka.strimzi.io/v1beta1
kind: KafkaConnect
metadata:
  name: my-connect-cluster
  annotations:
  # use-connector-resources configures this KafkaConnect
  # to use KafkaConnector resources to avoid
  # needing to call the Connect REST API directly
    strimzi.io/use-connector-resources: "true"
spec:
  image: ${DOCKER_ORG}/connect-debezium
  replicas: 1
  bootstrapServers: my-cluster-kafka-bootstrap:9093
  tls:
    trustedCertificates:
      - secretName: my-cluster-cluster-ca-cert
        certificate: ca.crt
  config:
    config.storage.replication.factor: 1
    offset.storage.replication.factor: 1
    status.storage.replication.factor: 1
    config.providers: file
    config.providers.file.class: org.apache.kafka.common.config.provider.FileConfigProvider
  externalConfiguration:
    volumes:
      - name: connector-config
        secret:
          secretName: my-sql-credentials

EOF
strimzi.io/use-connector-resources: “true”: It informs the cluster operator that KafkaConnector can be used to configure connectors with the Kafka Connect cluster.
spec.image: It is the image created with Docker.
config: It consists of the replication factor that is set to 1 as you have created a single-broker Kafka cluster.
Create the connector
- Create the KafkaConnect connector resource in order to connect it with the ‘inventory’ database in MySQL.
The KafkaConnector resource looks as follows.
#...
status:
  conditions:
  - lastTransitionTime: "2020-01-24T14:28:32.406Z"
    status: "True"
    type: Ready
  connectorStatus:
    connector:
      state: RUNNING
      worker_id: 172.17.0.9:8083
    name: inventory-connector
    tasks:
    - id: 0
      state: RUNNING
      worker_id: 172.17.0.9:8083
    type: source
observedGeneration: 3- metadata.labels, strimzi.io/cluster: It names the KafkaConnect cluster.
- spec.class: It is used to name the MySQL connector and can be set to 1 as it is the only task of the connector.
- database.hostname: 192.168.99.1: It is the IP address used to connect the MySQL database with minikube.
- ${file:…}: It is used for the database username and password.
- database.whitelist: “inventory”: It informs the Debezium only to watch the inventory database.
- database.history.kafka.topic:”schema-changes.inventory”: It is used for configuring how to install Debezium with schema-changes.inventory topic to store the database schema history.
- After creating the connector you can look at its status using the below command.
kubectl -n kafka get kctr inventory-connector -o yamlOutput:
#...
status:
  conditions:
  - lastTransitionTime: "2020-01-24T14:28:32.406Z"
    status: "True"
    type: Ready
  connectorStatus:
    connector:
      state: RUNNING
      worker_id: 172.17.0.9:8083
    name: inventory-connector
    tasks:
    - id: 0
      state: RUNNING
      worker_id: 172.17.0.9:8083
    type: source
  observedGeneration: 3
The connector is running in the Kafka Connect Cluster.
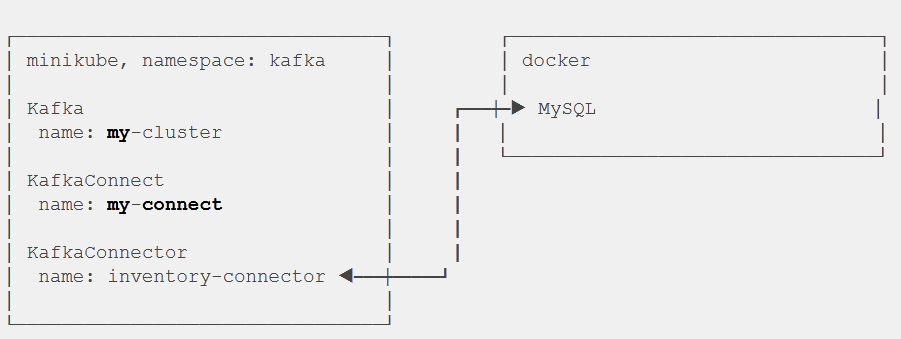
The above image shows how the MySQL database is connected to the KafkaConnector.
- You can list the topics using the below command.
kubectl -n kafka exec my-cluster-kafka-0 -c kafka -i -t -- bin/kafka-topics.sh --bootstrap-server localhost:9092 --listYou can see the list of topics below.
__consumer_offsets
connect-cluster-configs
connect-cluster-offsets
connect-cluster-status
dbserver1
dbserver1.inventory.addresses
dbserver1.inventory.customers
dbserver1.inventory.geom
dbserver1.inventory.orders
dbserver1.inventory.products
dbserver1.inventory.products_on_hand
schema-changes.inventory
From above, connect-cluster-* is the usual internal Kafka Connect topic. Debezium creates the topic for the server called (dbserver1) and for the table in the inventory database.
- Consume topics from changed topics using the below command.
kubectl -n kafka exec my-cluster-kafka-0 -c kafka -i -t --
  bin/kafka-console-consumer.sh
    --bootstrap-server localhost:9092
--topic dbserver1.inventory.customers - Go to the MySQL command-line client and run the below query.
SELECT * FROM customers;Output:
mysql> SELECT * FROM customers;
+------+------------+-----------+-----------------------+
| id   | first_name | last_name | email                 |
+------+------------+-----------+-----------------------+
| 1001 | Sally      | Thomas    | sally.thomas@acme.com |
| 1002 | George     | Bailey    | gbailey@foobar.com    |
| 1003 | Edward     | Walker    | ed@walker.com         |
| 1004 | Anne       | Kretchmar | annek@noanswer.org    |
+------+------------+-----------+-----------------------+
4 rows in set (0.00 sec)- Update the customer table using the below query.
UPDATE customers SET first_name='Anne Marie' WHERE id=1004;You could see the change events in dbserver1.inventory.customers topic as below.
{
  "schema": {
    "type": "struct",
    "fields": [
      {
        "type": "struct",
        "fields": [
          {
            "type": "int32",
            "optional": false,
            "field": "id"
          },
          {
            "type": "string",
            "optional": false,
            "field": "first_name"
          },
          {
            "type": "string",
            "optional": false,
            "field": "last_name"
          },
          {
            "type": "string",
            "optional": false,
            "field": "email"
          }
        ],
        "optional": true,
        "name": "dbserver1.inventory.customers.Value",
        "field": "before"
      },
      {
        "type": "struct",
        "fields": [
          {
            "type": "int32",
            "optional": false,
            "field": "id"
          },
          {
            "type": "string",
            "optional": false,
            "field": "first_name"
          },
          {
            "type": "string",
            "optional": false,
            "field": "last_name"
          },
          {
            "type": "string",
            "optional": false,
            "field": "email"
          }
        ],
        "optional": true,
        "name": "dbserver1.inventory.customers.Value",
        "field": "after"
      },
      {
        "type": "struct",
        "fields": [
          {
            "type": "string",
            "optional": false,
            "field": "version"
          },
          {
            "type": "string",
            "optional": false,
            "field": "connector"
          },
          {
            "type": "string",
            "optional": false,
            "field": "name"
          },
          {
            "type": "int64",
            "optional": false,
            "field": "ts_ms"
          },
          {
            "type": "string",
            "optional": true,
            "name": "io.debezium.data.Enum",
            "version": 1,
            "parameters": {
              "allowed": "true,last,false"
            },
            "default": "false",
            "field": "snapshot"
          },
          {
            "type": "string",
            "optional": false,
            "field": "db"
          },
          {
            "type": "string",
            "optional": true,
            "field": "table"
          },
          {
            "type": "int64",
            "optional": false,
            "field": "server_id"
          },
          {
            "type": "string",
            "optional": true,
            "field": "gtid"
          },
          {
            "type": "string",
            "optional": false,
            "field": "file"
          },
          {
            "type": "int64",
            "optional": false,
            "field": "pos"
          },
          {
            "type": "int32",
            "optional": false,
            "field": "row"
          },
          {
            "type": "int64",
            "optional": true,
            "field": "thread"
          },
          {
            "type": "string",
            "optional": true,
            "field": "query"
          }
        ],
        "optional": false,
        "name": "io.debezium.connector.mysql.Source",
        "field": "source"
      },
      {
        "type": "string",
        "optional": false,
        "field": "op"
      },
      {
        "type": "int64",
        "optional": true,
        "field": "ts_ms"
      }
    ],
    "optional": false,
    "name": "dbserver1.inventory.customers.Envelope"
  },
  "payload": {
    "before": {
      "id": 1004,
      "first_name": "Anne",
      "last_name": "Kretchmar",
      "email": "annek@noanswer.org"
    },
    "after": {
      "id": 1004,
      "first_name": "Anne Mary",
      "last_name": "Kretchmar",
      "email": "annek@noanswer.org"
    },
    "source": {
      "version": "1.0.0.Final",
      "connector": "mysql",
      "name": "dbserver1",
      "ts_ms": 1574090237000,
      "snapshot": "false",
      "db": "inventory",
      "table": "customers",
      "server_id": 223344,
      "gtid": null,
      "file": "mysql-bin.000003",
      "pos": 4311,
      "row": 0,
      "thread": 3,
      "query": null
    },
    "op": "u",
    "ts_ms": 1574090237089
  }
}
The schema object is used to describe the schema of the actual event payload.
- ts_ms: It is the timestamp when the change happens.
- source: It specifies the database table where the server gets changed.
- before and after: It describes the row before and after the update.
- op: It tells about the update, whereas d is for delete and c is for the insert.


Install Debezium with AMQ Streams
To set up Apache Kafka and Kafka Connect on OpenShift, you have to use Red Hat AMQ Streams.
Follow the below steps to prepare the Kafka Cluster.
- Install the AMQ Streams through RedHat AMQ.
- Choose the desired configuration and deploy the Kafka cluster.
- Deploy Kafka Connect.
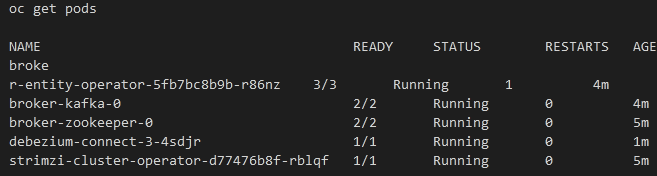
- Depending on the Kafka configuration, you can witness the below set of commands with status running.
$ oc get pods

NAME                                                      READY     STATUS      RESTARTS   AGE
debezium-kafka-cluster-entity-operator-7b6b9d4c5f-k7b92   3/3       Running     0          5m
debezium-kafka-cluster-kafka-0                            2/2       Running     0          4m
debezium-kafka-cluster-zookeeper-0                        2/2       Running     0          4m
strimzi-cluster-operator-97cd5cf7b-l58bq                  1/1       Running     0          6m
From above, the debezium-kafka-cluster is the name given to the AMQ Streams Kafka cluster.
To deploy a Kafka cluster with Debezium connectors, you need to follow the below steps.
- Download the connector archive.
- Download the specific database drivers.
- Prepare the plugin directory structure.
- Start the OpenShift build to deploy the Kafka Connect cluster.
- When you download the connector archives from the RedHat developer portal, you have to extract the archive and download the required driver dependencies.
- When you complete the download, you can see the below directory structure.
$ tree ./plugins
plugins
├── debezium-connector-mongodb
│   ├── CHANGELOG.md
│   ├── CONTRIBUTE.md
│   ├── COPYRIGHT.txt
│   ├── LICENSE-3rd-PARTIES.txt
│   ├── LICENSE.txt
│   ├── README.md
│   ├── bson-3.9.1.jar
│   ├── debezium-connector-mongodb-0.10.0.Beta1-redhat-00001.jar
│   ├── debezium-core-0.10.0.Beta1-redhat-00001.jar
│   ├── mongodb-driver-3.9.1.jar
│   └── mongodb-driver-core-3.9.1.jar
├── debezium-connector-mysql
│   ├── CHANGELOG.md
│   ├── CONTRIBUTE.md
│   ├── COPYRIGHT.txt
│   ├── LICENSE-3rd-PARTIES.txt
│   ├── LICENSE.txt
│   ├── README.md
│   ├── antlr4-runtime-4.7.0.redhat-00007.jar
│   ├── debezium-connector-mysql-0.10.0.Beta1-redhat-00001.jar
│   ├── debezium-core-0.10.0.Beta1-redhat-00001.jar
│   ├── debezium-ddl-parser-0.10.0.Beta1-redhat-00001.jar
│   ├── mysql-binlog-connector-java-0.19.1.redhat-00002.jar
│   └── mysql-connector-java-8.0.16.jar
├── debezium-connector-postgres
│   ├── CHANGELOG.md
│   ├── CONTRIBUTE.md
│   ├── COPYRIGHT.txt
│   ├── LICENSE-3rd-PARTIES.txt
│   ├── LICENSE.txt
│   ├── README.md
│   ├── debezium-connector-postgres-0.10.0.Beta1-redhat-00001.jar
│   ├── debezium-core-0.10.0.Beta1-redhat-00001.jar
│   ├── postgresql-42.2.5.jar
│   └── protobuf-java-2.6.1.redhat-1.jar
└── debezium-connector-sqlserver
    ├── CHANGELOG.md
    ├── CONTRIBUTE.md
    ├── COPYRIGHT.txt
    ├── LICENSE-3rd-PARTIES.txt
    ├── LICENSE.txt
    ├── README.md
    ├── debezium-connector-sqlserver-0.10.0.Beta1-redhat-00001.jar
    ├── debezium-core-0.10.0.Beta1-redhat-00001.jar
└── mssql-jdbc-7.2.2.jre8.jar- You have to deploy the Kafka Connect cluster from the plugin directory.
# Check the name of our build config
$ oc get buildconfigs

NAME                                     TYPE     FROM     LATEST
debezium-kafka-connect-cluster-connect   Source   Binary   2

# Build and deploy Kafka Connect cluster with Debezium
$ oc start-build debezium-kafka-connect-cluster-connect --from-dir=./plugins
Output.:
oc get pods

NAME                                                      READY     STATUS      RESTARTS   AGE
debezium-kafka-cluster-entity-operator-7b6b9d4c5f-k7b92   3/3       Running     0          10m
debezium-kafka-cluster-kafka-0                            2/2       Running     0          9m
debezium-kafka-cluster-zookeeper-0                        2/2       Running     0          9m
debezium-kafka-connect-cluster-connect-2-jw695            1/1       Running     0          1m
debezium-kafka-connect-cluster-connect-2-deploy           0/1       Completed   0          3m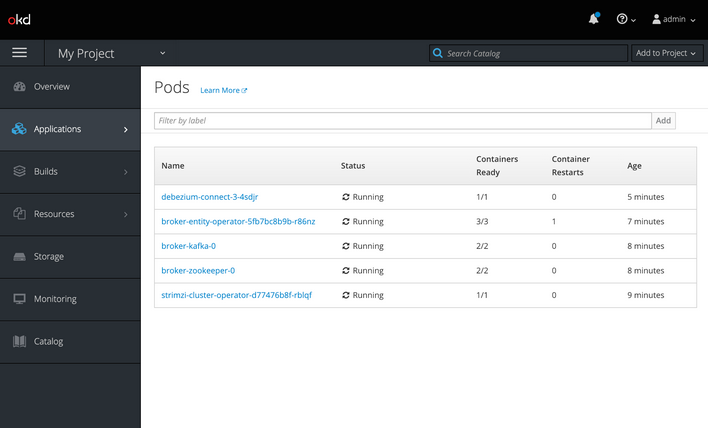
strimzi-cluster-operator-97cd5cf7b-l58bq 1/1 Running 0 11m- You can also go to the ‘Pods’ view of the OpenShift web console to confirm everything is running.
- To verify the deployment you can go to the Debezium Tutorial and follow the OpenShift installation steps.
Install Debezium on OpenShift
You can use a set of images on the Strimzi project to set up Kafka and Kafka Connect on OpenShift.
- Install the operators and templates for the Kafka Broker and Kafka Connect to the OpenShift project using the below commands.
export STRIMZI_VERSION=0.18.0
git clone -b $STRIMZI_VERSION https://github.com/strimzi/strimzi-kafka-operator
cd strimzi-kafka-operator

# Switch to an admin user to create security objects as part of installation:
oc login -u system:admin
oc create -f install/cluster-operator && oc create -f examples/templates/cluster-operator
You can learn more about setting up Apache Kafka with Strimzi on Kubernetes and OpenShift through the Strimzi deployment of Kafka.
- Deploy a Kafka broker cluster using the below command.
- With the installed connectors, create a Kafka Connect image.
- You can download and extract the archive for the MySQL Debezium connector using the below command.
curl https://repo1.maven.org/maven2/io/debezium/debezium-connector-mysql/1.8.1.Final/debezium-connector-mysql-1.8.1.Final-plugin.tar.gz tar xvz`- You can create a Dockerfile that uses Strimzi Kafka as the base image. The below example to install debezium that has a directory for each Debezium connector you want to run. You can insert a copy line for each connector you want to run.
FROM strimzi/kafka:0.18.0-kafka-2.5.0
USER root:root
RUN mkdir -p /opt/kafka/plugins/debezium
COPY ./debezium-connector-mysql/ /opt/kafka/plugins/debezium/
USER 1001
Kafka Connect loads third-party plugins in the /opt/kafka/plugins before running the connector.
- Build a Debezium image from the Docker file and push it to the container registry.
- Replace debezium-community with the name of the Docker hub organization using the below command.
export DOCKER_ORG=debezium-community
docker build . -t ${DOCKER_ORG}/connect-debezium
docker push ${DOCKER_ORG}/connect-debezium
Output:
- You can also go to the “Pods” view of the OpenShift Console alternatively like the below image.
Verification of the Deployment
You can verify the deployment of connectors following the Debezium tutorial to install Debezium in the OpenShift environment.
- Start the MySQL server using the below command.

Output:

- Register the MySQL connector to run against the deployed MySQL server using the below commands.

Kafka Connect’s log file should contain messages regarding the execution of the initial snapshot.
oc logs $(oc get pods -o name -l strimzi.io/name=debezium-connect)- Read the change events for the customer’s table from the corresponding Kafka topic using the following command.

You should see the output as shown below.
# Message 1
{
    "id": 1001
}

# Message 1 Value
{
    "before": null,
    "after": {
        "id": 1001,
        "first_name": "Sally",
        "last_name": "Thomas",
        "email": "sally.thomas@acme.com"
    },
    "source": {
        "version": "1.8.1.Final",
        "connector": "mysql",
        "name": "dbserver1",
        "server_id": 0,
        "ts_sec": 0,
        "gtid": null,
        "file": "mysql-bin.000003",
        "pos": 154,
        "row": 0,
        "snapshot": true,
        "thread": null,
        "db": "inventory",
        "table": "customers"
    },
    "op": "c",
    "ts_ms": 1509530901446
}

# Message 2 Key
{
    "id": 1002
}

# Message 2 Value
{
    "before": null,
    "after": {
        "id": 1002,
        "first_name": "George",
        "last_name": "Bailey",
        "email": "gbailey@foobar.com"
    },
    "source": {
        "version": "1.8.1.Final",
        "connector": "mysql",
        "name": "dbserver1",
        "server_id": 0,
        "ts_sec": 0,
        "gtid": null,
        "file": "mysql-bin.000003",
        "pos": 154,
        "row": 0,
        "snapshot": true,
        "thread": null,
        "db": "inventory",
        "table": "customers"
    },
    "op": "c",
    "ts_ms": 1509530901446
}
...- You can modify some records in the customer table using the below command.

You can see these changes in the consumer, which was started previously in Kafka’s topic.
Learn More About:
Deploying Debezium on Red Hat OpenShift
Conclusion
In this tutorial, you have learned about different ways to install Debezium. Debezium can be installed using AMQ Streams, Kafka Connector resources, and OpenShift. However, you can also install Debezium with Kubernetes, Confluent using Minikube.
visit our website to explore hevoHevo can help you Integrate your data from numerous sources and load them into a destination to Analyze in real-time from 150+ data sources such as SaaS applications or Databases into your Redshift Data Warehouse to be visualized in a BI tool. It will make your life easier and data migration hassle-free. and it’s user-friendly, reliable, and secure.
FAQ
How to install Debezium server?
You can install Debezium server using Docker by running the following command:
docker run -it –rm –name debezium-server -p 8080:8080 debezium/connect:latest
Can I use Debezium without Kafka?
Yes, while Debezium is often used with Kafka for streaming change data capture, you can also use it without Kafka by configuring it to write to other sinks, such as databases or message queues, using custom connectors.
How to deploy Debezium?
You can deploy Debezium in various ways, including using Docker, Kubernetes, or as a standalone application on a server. For a production deployment, using Kubernetes with Debezium’s Helm chart is recommended for better scalability and management.
Share it with your connections.
-
 Share To LinkedIn
-
 Share To Facebook
-
 Share To X
-
 Copy Link


