


 Quick Takeaway
NetSuite to SQL Server integration enables seamless data flow between your ERP and database, unlocking deeper insights and advanced analytics. Few methods of integration are :
- Method 1: How to Connect and Load NetSuite Data to SQL Server Using Hevo – A no-code, automated pipeline that ensures real-time sync and zero data loss. Ideal for teams needing reliable, hands-off integration to power reporting, analytics, and BI dashboards.
- Method 2: Load NetSuite Data into SQL Server Using ODBC – Connect NetSuite to SQL Server via ODBC drivers. Best for moderate data volumes and teams comfortable with SQL queries but requiring periodic syncs.
- Alternative Methods: Custom extraction using SuiteScript/RESTlets and Web Services – Build custom scripts for highly tailored workflows, complex business logic, or when strict compliance/customization is required.
Moving data from NetSuite to SQL Server helps teams centralize reporting, run advanced queries, and unlock deeper operational insights.
NetSuite is a leading cloud ERP platform that manages finance, CRM, inventory, and service data, while SQL Server offers a powerful relational database engine optimized for analytics and high-performance workloads.
Integrating these systems ensures that NetSuite’s operational data can be stored, transformed, and queried efficiently inside SQL Server for dashboards, audits, forecasting, and downstream applications.
In this guide, you will learn the most practical ways to move data from NetSuite to SQL Server, including automated no-code options and manual export-based methods.
Use these steps to build a reliable, scalable integration that keeps your SQL Server environment updated with the latest NetSuite data.
Table of Contents
Top Methods to Connect and Load NetSuite Data into SQL Server
| Method | Best Use Case | Prerequisites |
| Method 1: Hevo (Automated No-Code Pipeline) | Ideal for continuous sync, automated pipelines, large datasets, or when you want to avoid manual API work | NetSuite account with admin access, enabled Web Services and Token-Based Authentication, Hevo account, API credentials |
| Method 2: ODBC Connection with Linked Server | Suitable for basic, occasional data pulls from NetSuite to SQL Server via ODBC drivers | ODBC driver, SQL Server Management Studio, MSDASQL provider, TDS Remoting service, manual configuration |
| Method 3: Custom Methods (SuiteScript, Web Services, BCP, BULK INSERT) | Best for custom ETL workflows, advanced transformations, or use cases requiring full control over extraction logic | Experience with SuiteScript or SOAP API, SQL Server utilities (BCP, SSMS), strong technical knowledge, manual monitoring |
Method 1: How to Connect and Load NetSuite Data to SQL Server Using Hevo
Prerequisites
- You should be assigned the Team Administrator, Team Collaborator, or Pipeline Administrator role.
- You will need an active NetSuite account from which data will be loaded.
- You should be logged in as an Administrator to obtain the API credentials and assign roles.
- Hevo must have permission to access your NetSuite ERP data.
Step 1: Enable Web Services and Token-Based Authentication
- Log in to NetSuite as an Administrator user.
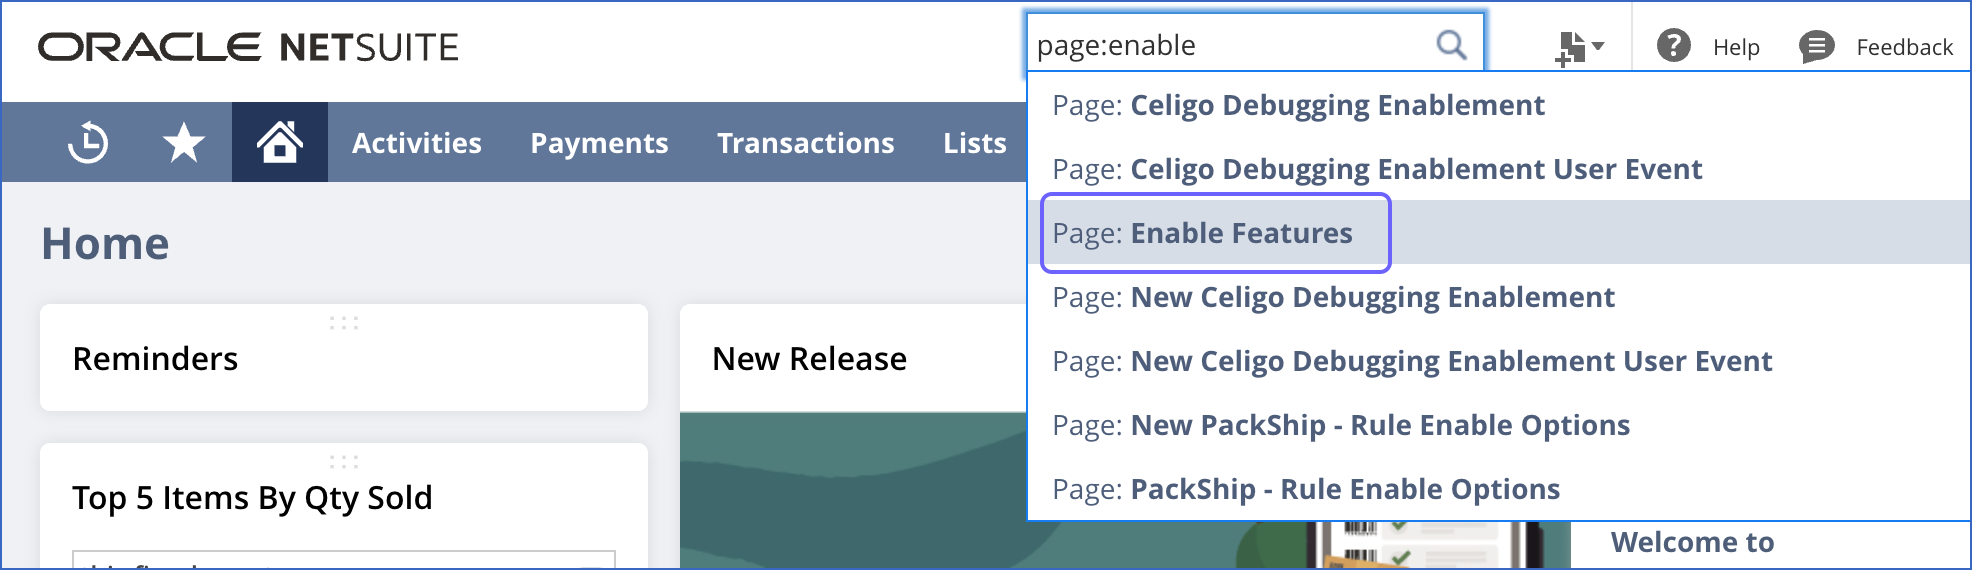
- Navigate to the NetSuite global search bar.
- Enter page: enable, and click on the Page: Enable Features result.
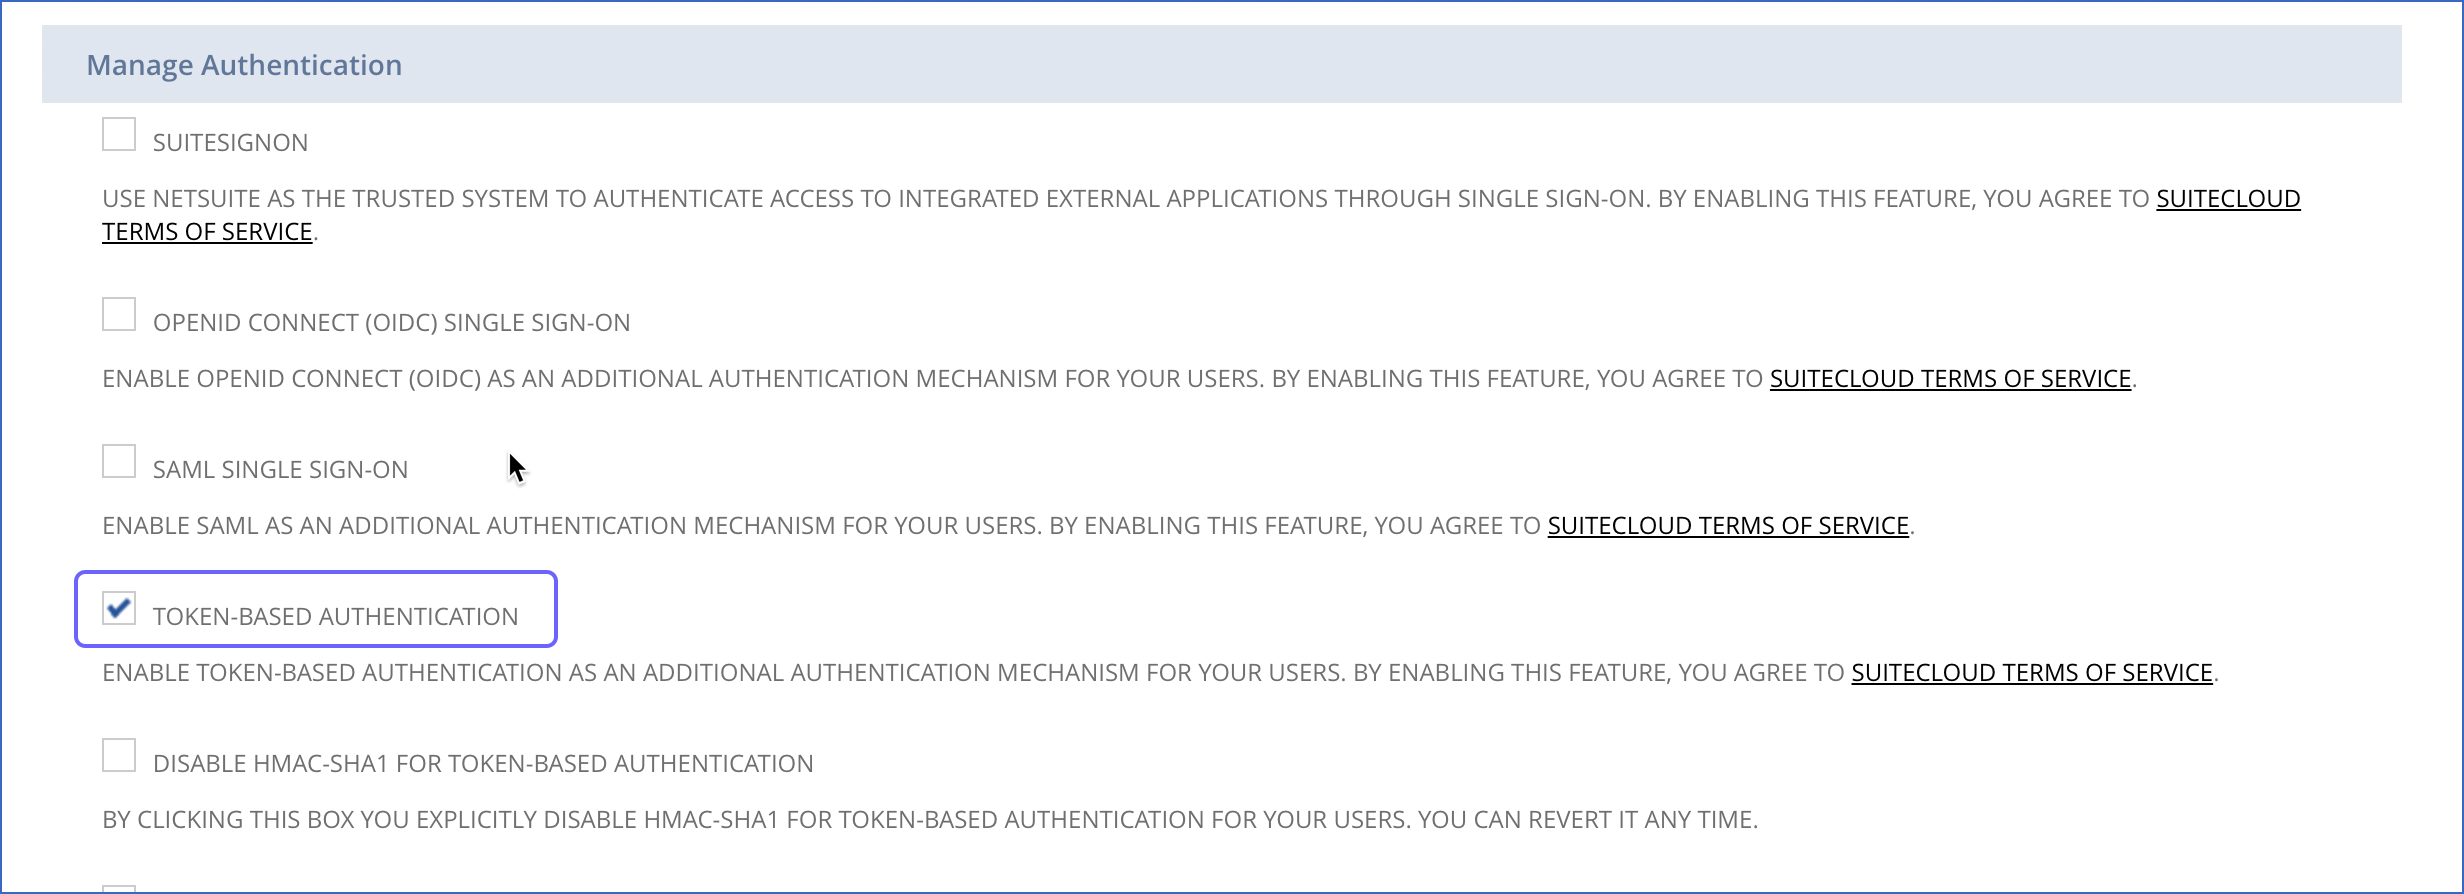
- On the Enable Features page, click on SuiteCloud. You will now be in the SuiteTalk (Web Services) section, where you need to check the SOAP WEB SERVICES and REST WEB SERVICE tabs.

- In the Manage Authentication section, select the TOKEN-BASED AUTHENTICATION checkbox and click on Save.
Step 2: Creating an Integration Record for Hevo
- Search page: integrations in your NetSuite global search bar. Click on Page: Manage Integrations.

- On the Integrations page, select New and configure the settings. Provide a proper, unique name for the integration, and then click on the check box to allow data access to Hevo.
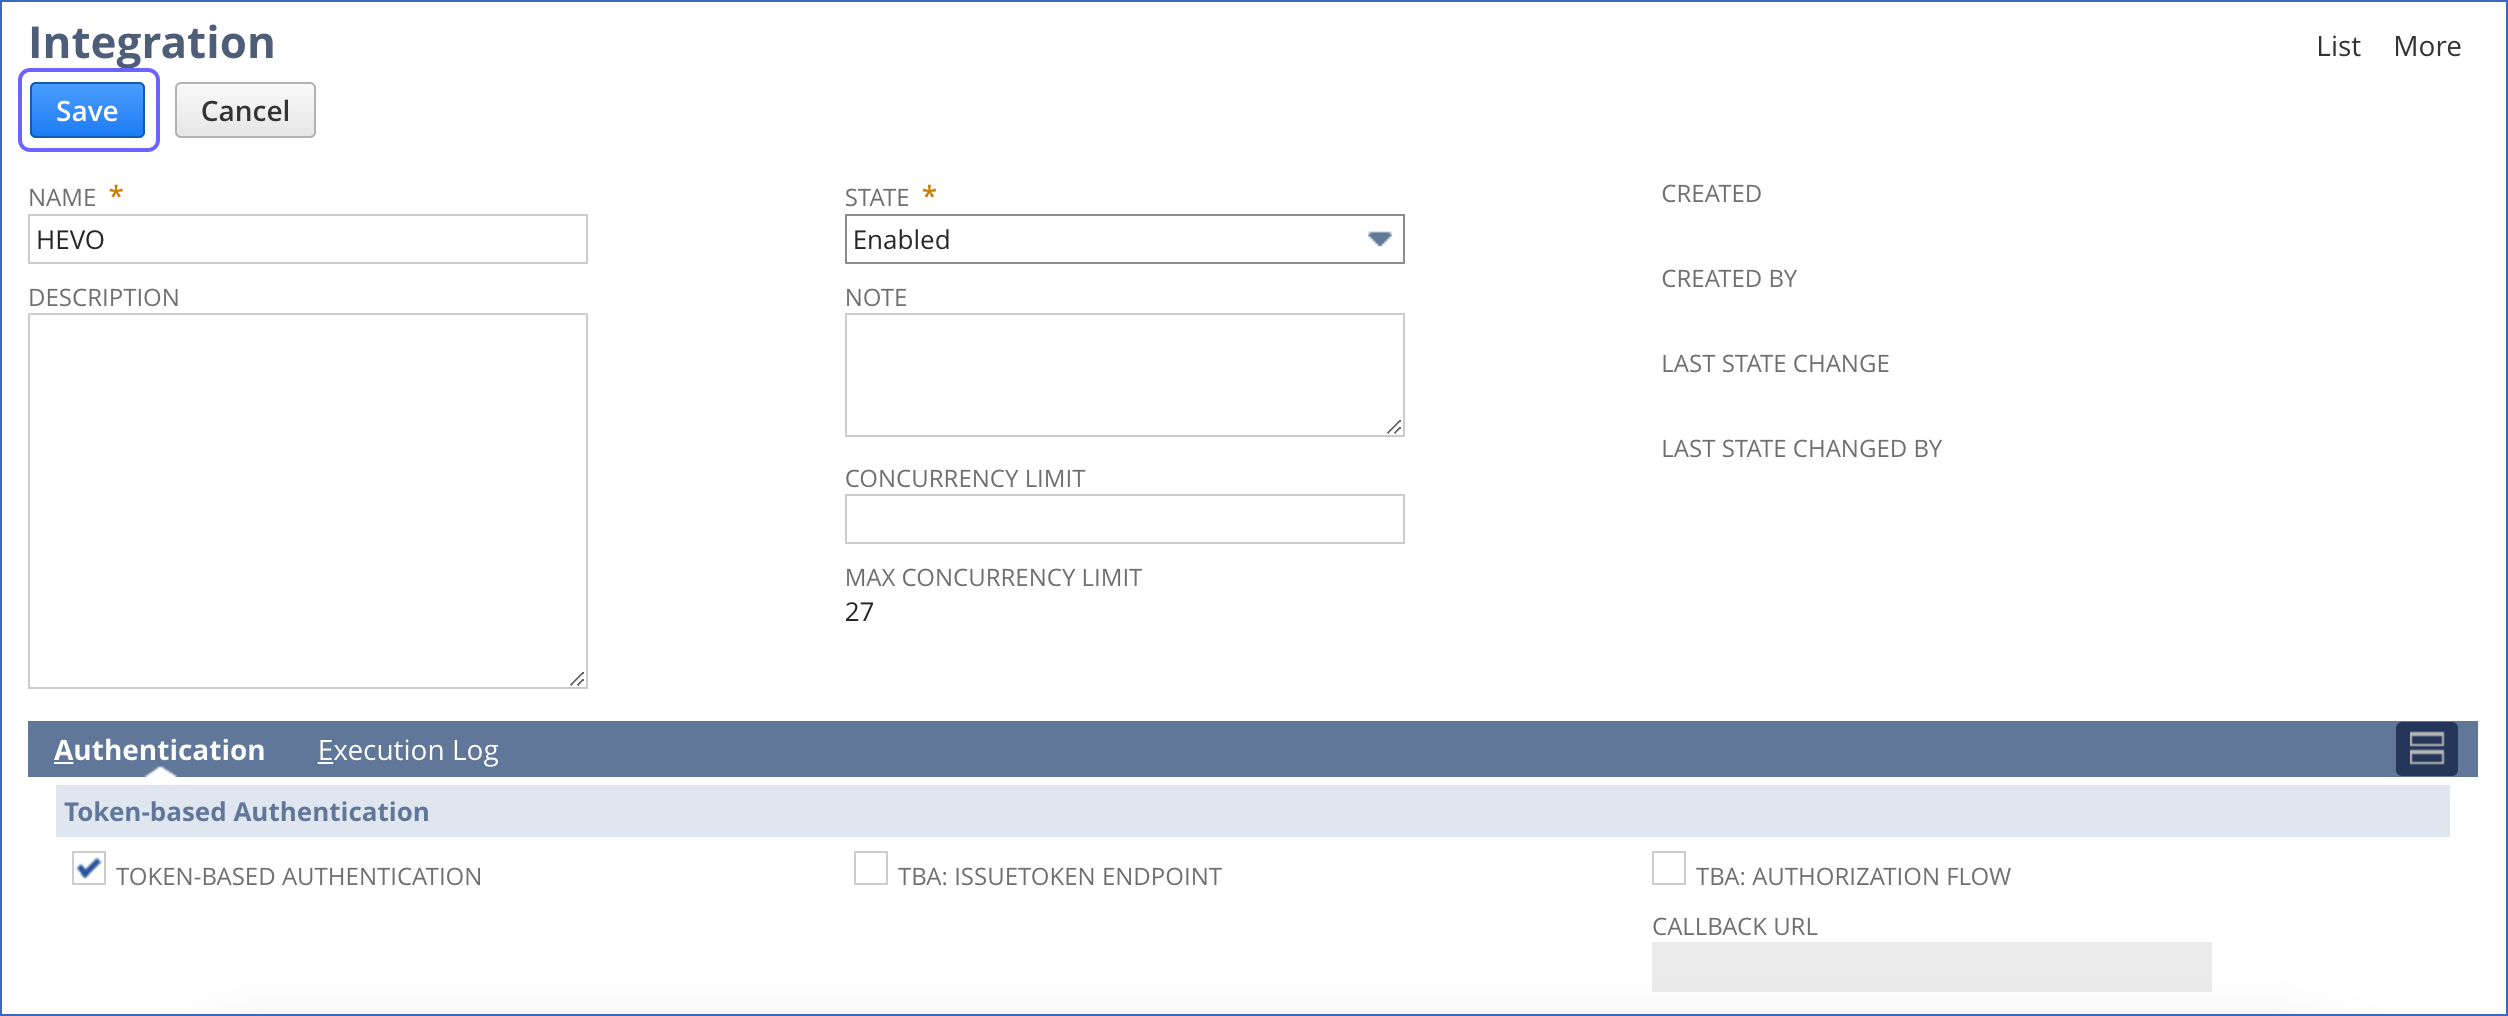
- Click on Save. A confirmation page will open. Copy the Consumer Key/secret and keep it secure. You will need this while configuring the Hevo pipeline.
Step 3: Create a role for Hevo and Configure the Permissions
- In the NetSuite global search, search for page: new role and click on Page: New Role.

- On the Role page, enter the role name in the Name field.
- In the Authentication section, select WEB SERVICES ONLY ROLE.

- Enable all the tabs under the Permissions section on the Role page and click Add. You can read more about the Hevo Role Permissions here.
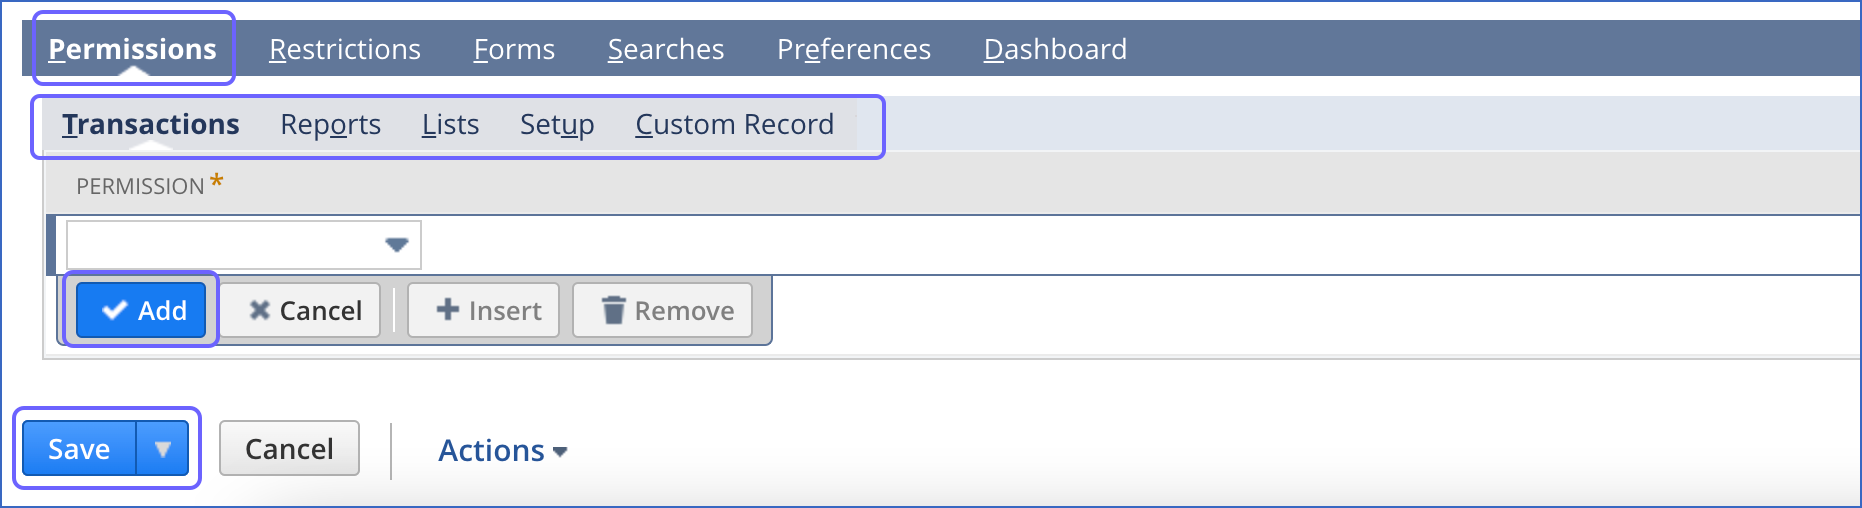
- After adding all the permissions, Click on Save.
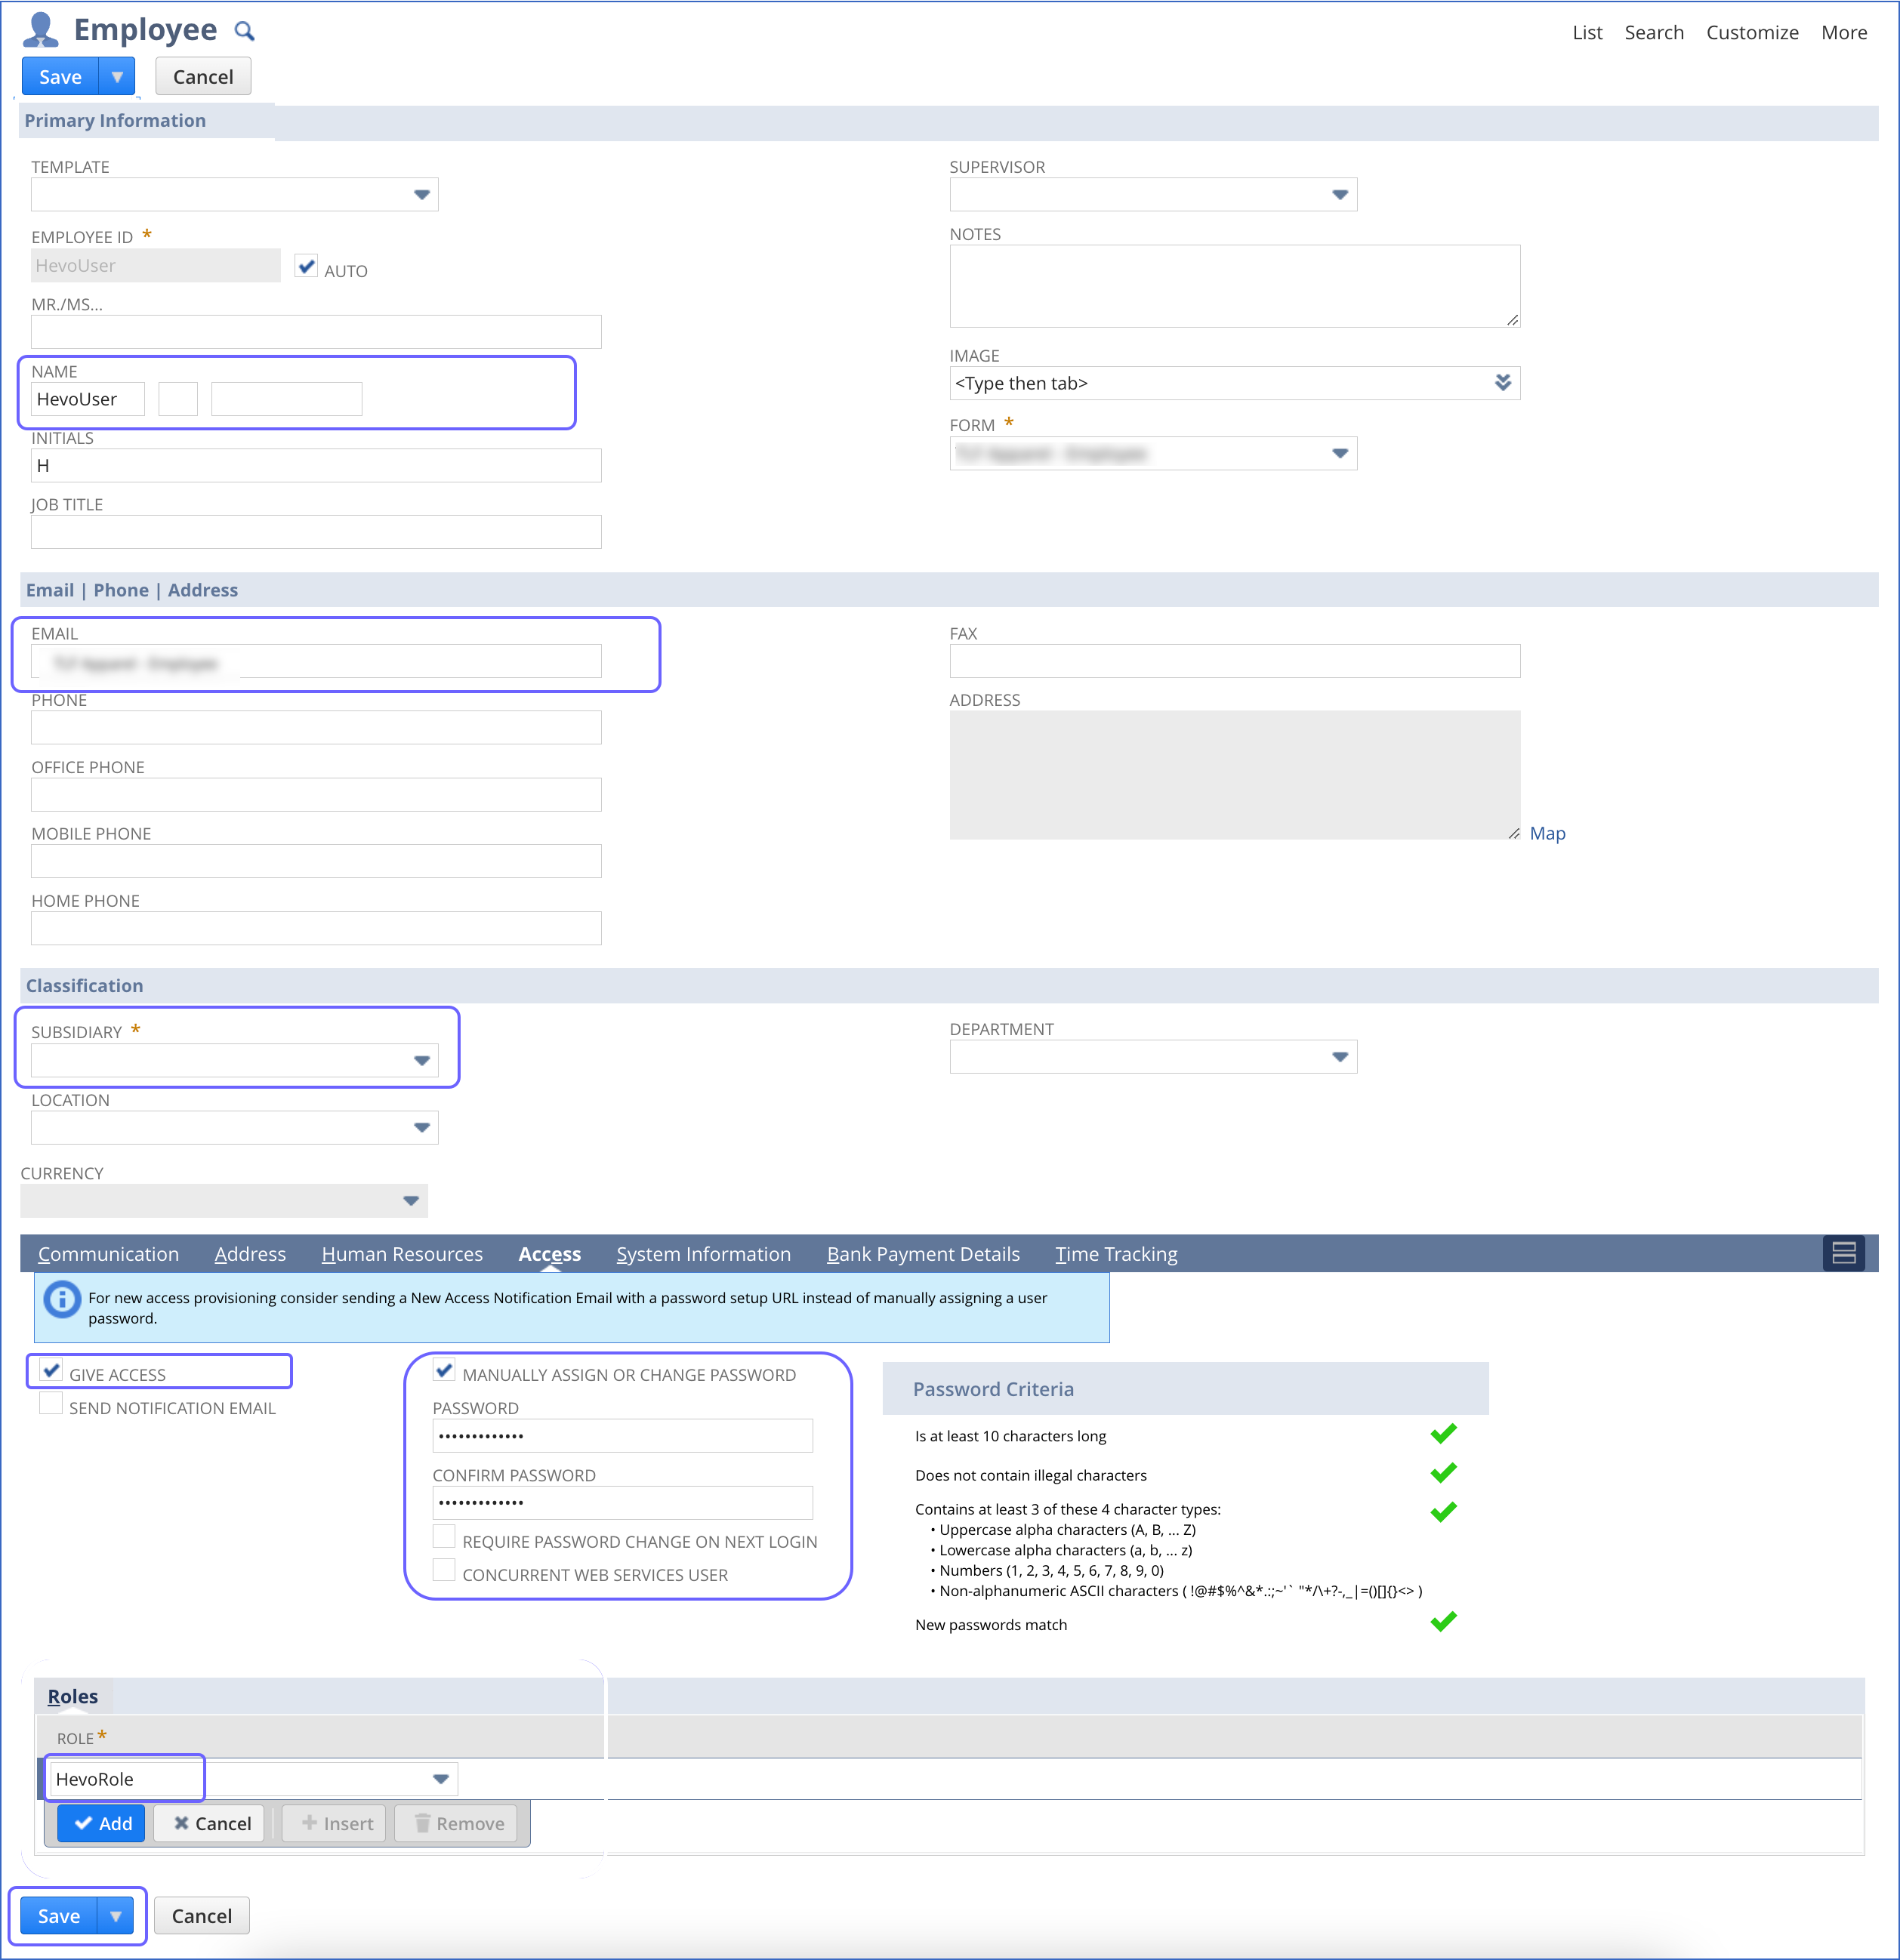
Step 4: Create a New Hevo User
- To create a new Hevo user, search for a new employee in the NetSuite search bar and select Page: New Employees.

- Enter NAME, EMAIL, and SUBSIDIARY details and any other mandatory fields on the Employee page.
- Find the Access tab and select the GIVE ACCESS check box. Change the password by clicking on the MANUALLY ASSIGN OR CHANGE PASSWORD check box.
- Under the Roles section, select the Hevo role created in the previous step from the ROLE drop-down and click on Add and Save.
Step 5: Create an Access Token for Hevo
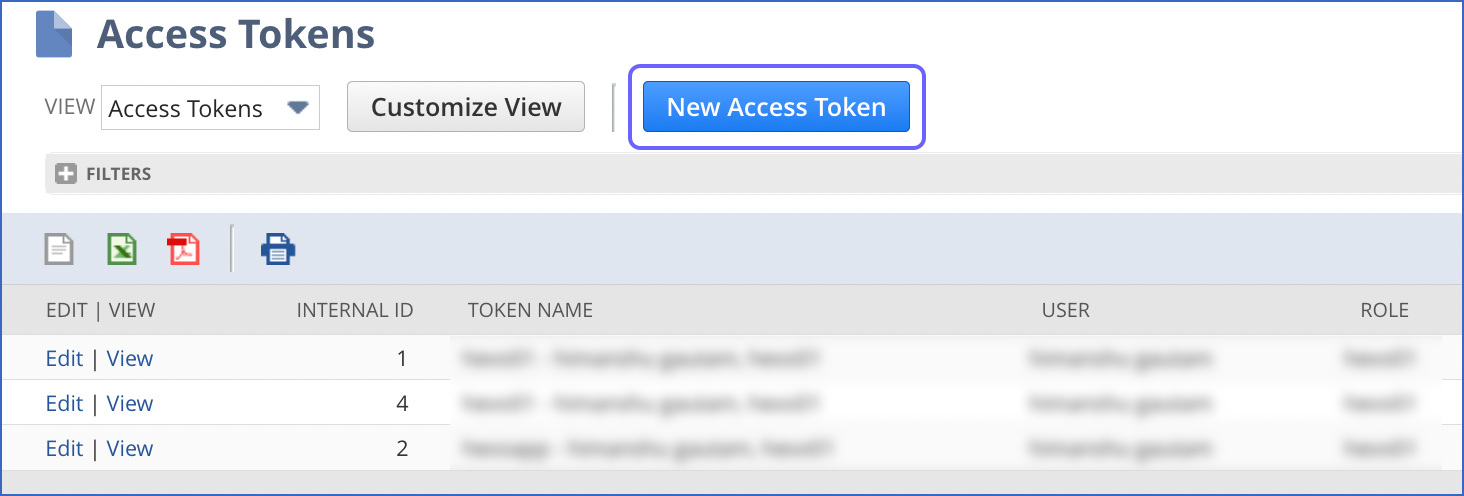
- In the NetSuite global search bar, search for page: tokens and select Page: Access Tokens.

- On the Access Tokens page, click New Access Token.
- Specify the following details in the Access Tokens page:
- Add the APPLICATION NAME that you created in step 2.
- Add the new USER that you just created in step 4.
- Add the Hevo ROLE that you created in step 3.
- Finally, add the TOKEN NAME that NetSuite might have already created. You can choose a custom name according to your preference.
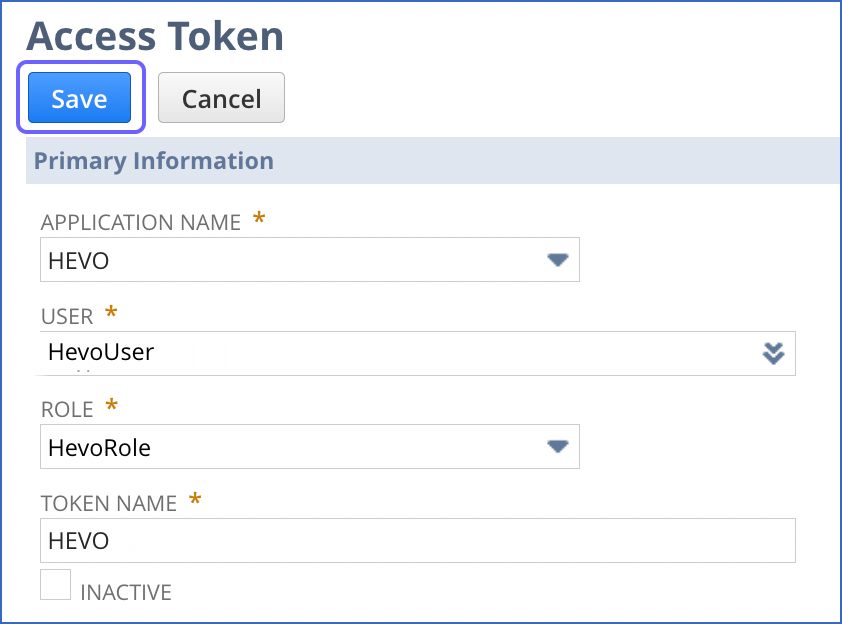
- Click Save, and a confirmation page will pop up. On that page, copy the Token ID and Secret. Store these credentials in a secure loacation as they will help you establish NetSuite as your source.
Step 6: Find your Netsuite Subdomain and Account ID
Hevo requires your NetSuite account ID and subdomain for unique identification and data access from NetSuite.
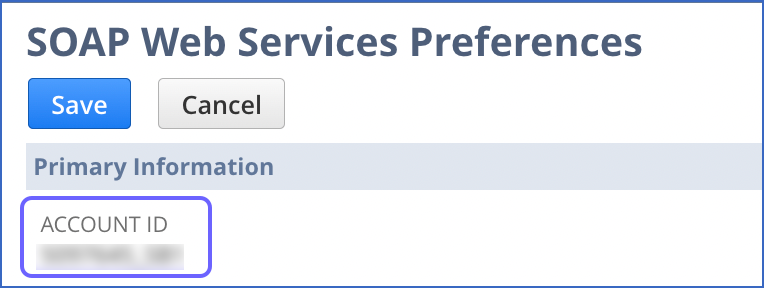
- In the NetSuite search bar, search for web services and select the Page: Web Services Preferences.
- From the SOAP Web Services Preferences page, look for the ACCOUNT ID under the Primary Information section. Copy and save this Account ID securely.
- From the dashboard URL, copy your NetSuite ERP subdomain. For instance, if your dashboard URL is https://acr.app.netsuite.com/, the subdomain is acr.
Step 7: Setting up NetSuite ERP Source
Now, we will configure NetSuite ERP as the source for your pipeline so that Hevo can fetch data from here and deliver it to the destination, i.e., your SQL server.
- Click on PIPELINES in the Navigation Bar, then click + CREATE in the Pipeline List View.
- In the Select Source Type page, select NetSuite ERP.
- You will see a window to Configure your NetSuite ERP Source page, where you can enter the details given below.
- Pipeline Name
- Account ID
- Subdomain
- Consumer Key
- Consumer Secret
- Token ID
- Token Secret
- Historical Sync Duration
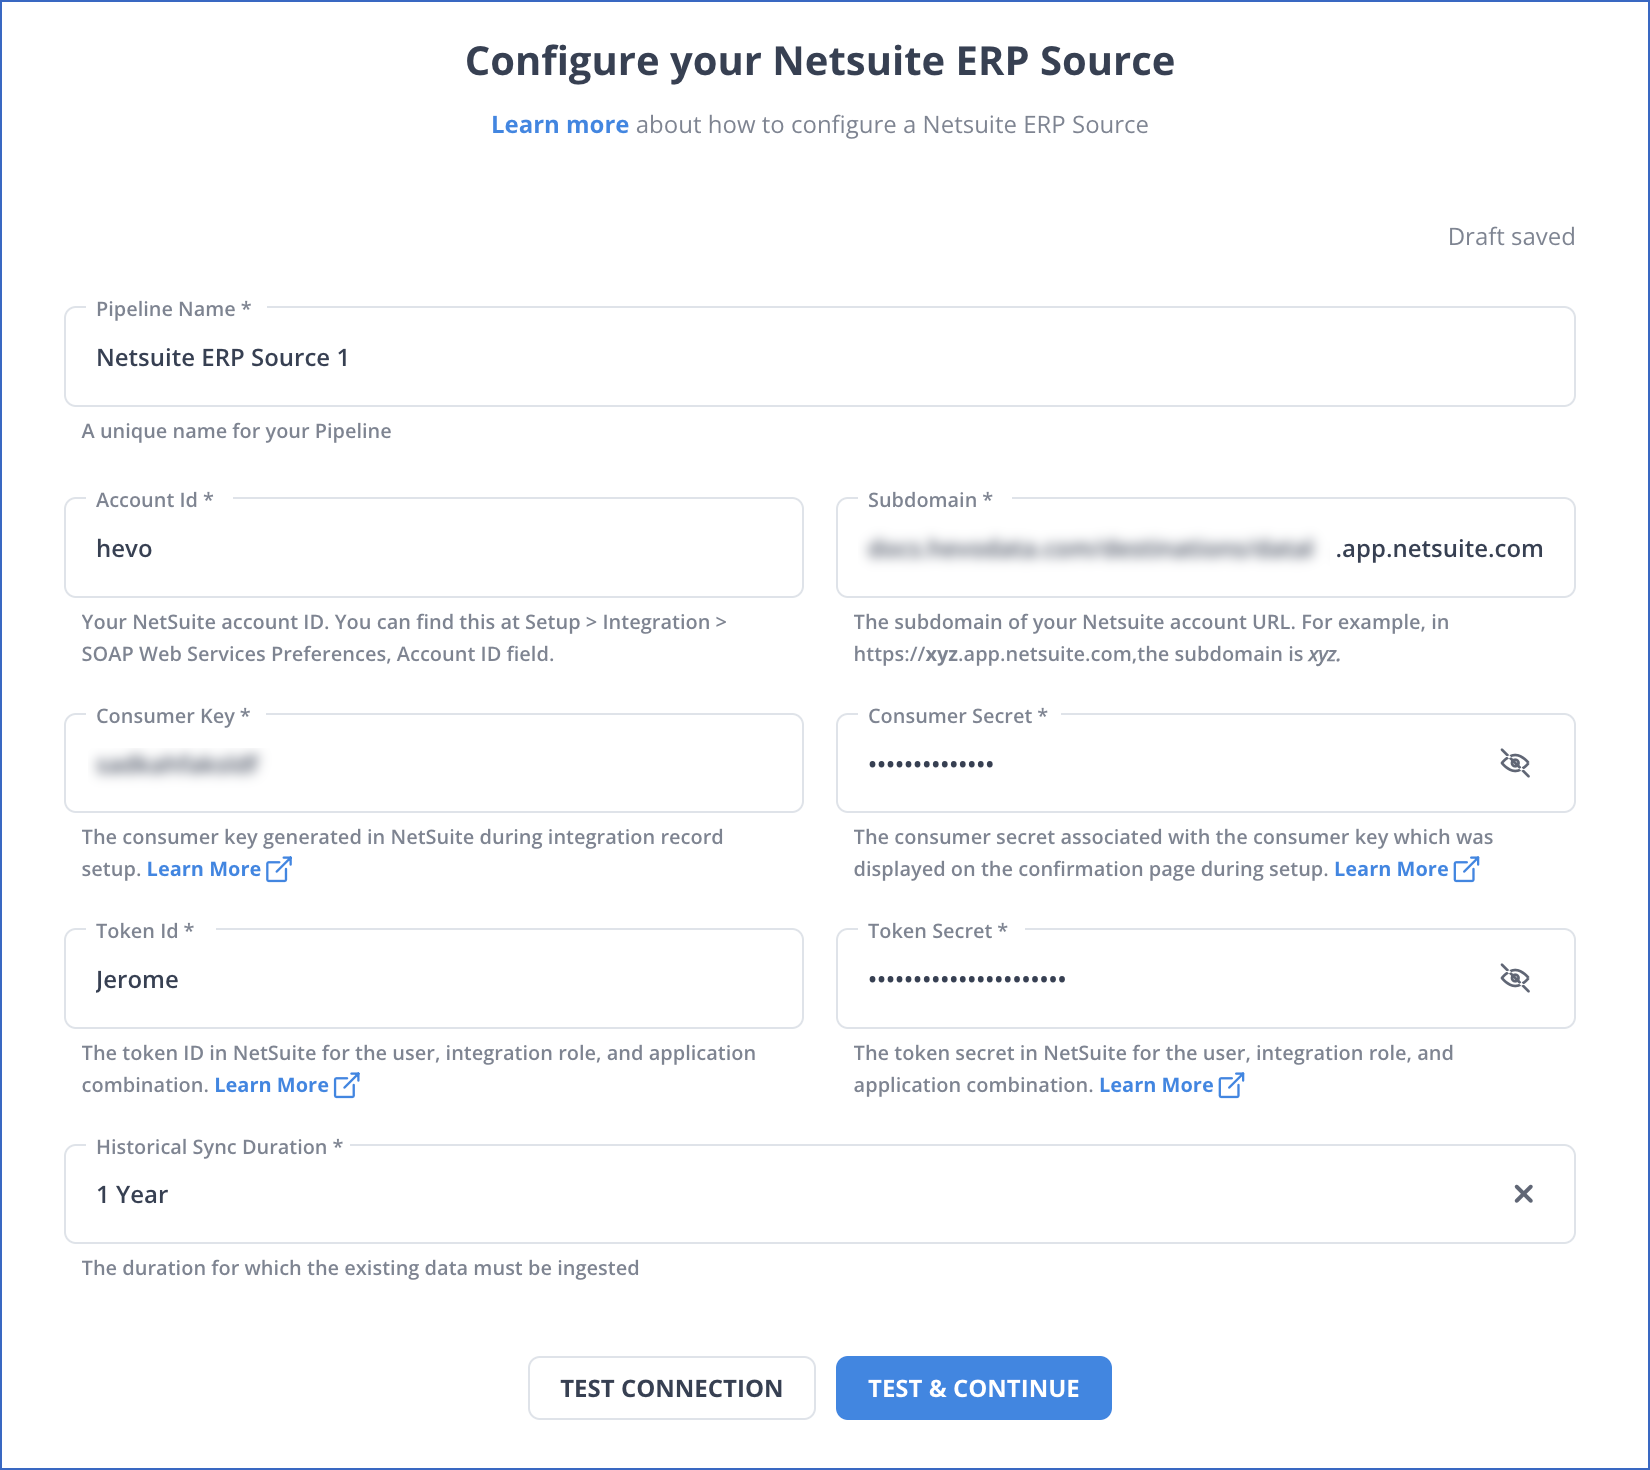
- Click on TEST & CONTINUE and proceed to set up the destination.
Step 8: Configuring SQL Server as the Destination
- Click on DESTINATIONS in the Navigation Bar.
- Click on +CREATE in the Destinations List View.
- In the Add Destinations Page, choose the option that says SQL Server. You will be taken to a page where you must configure your SQL server settings. Input the following details there:
- Destination Name
- Database Host
- Database Port
- Database User
- Database Password
- Database Name
- Schema Name
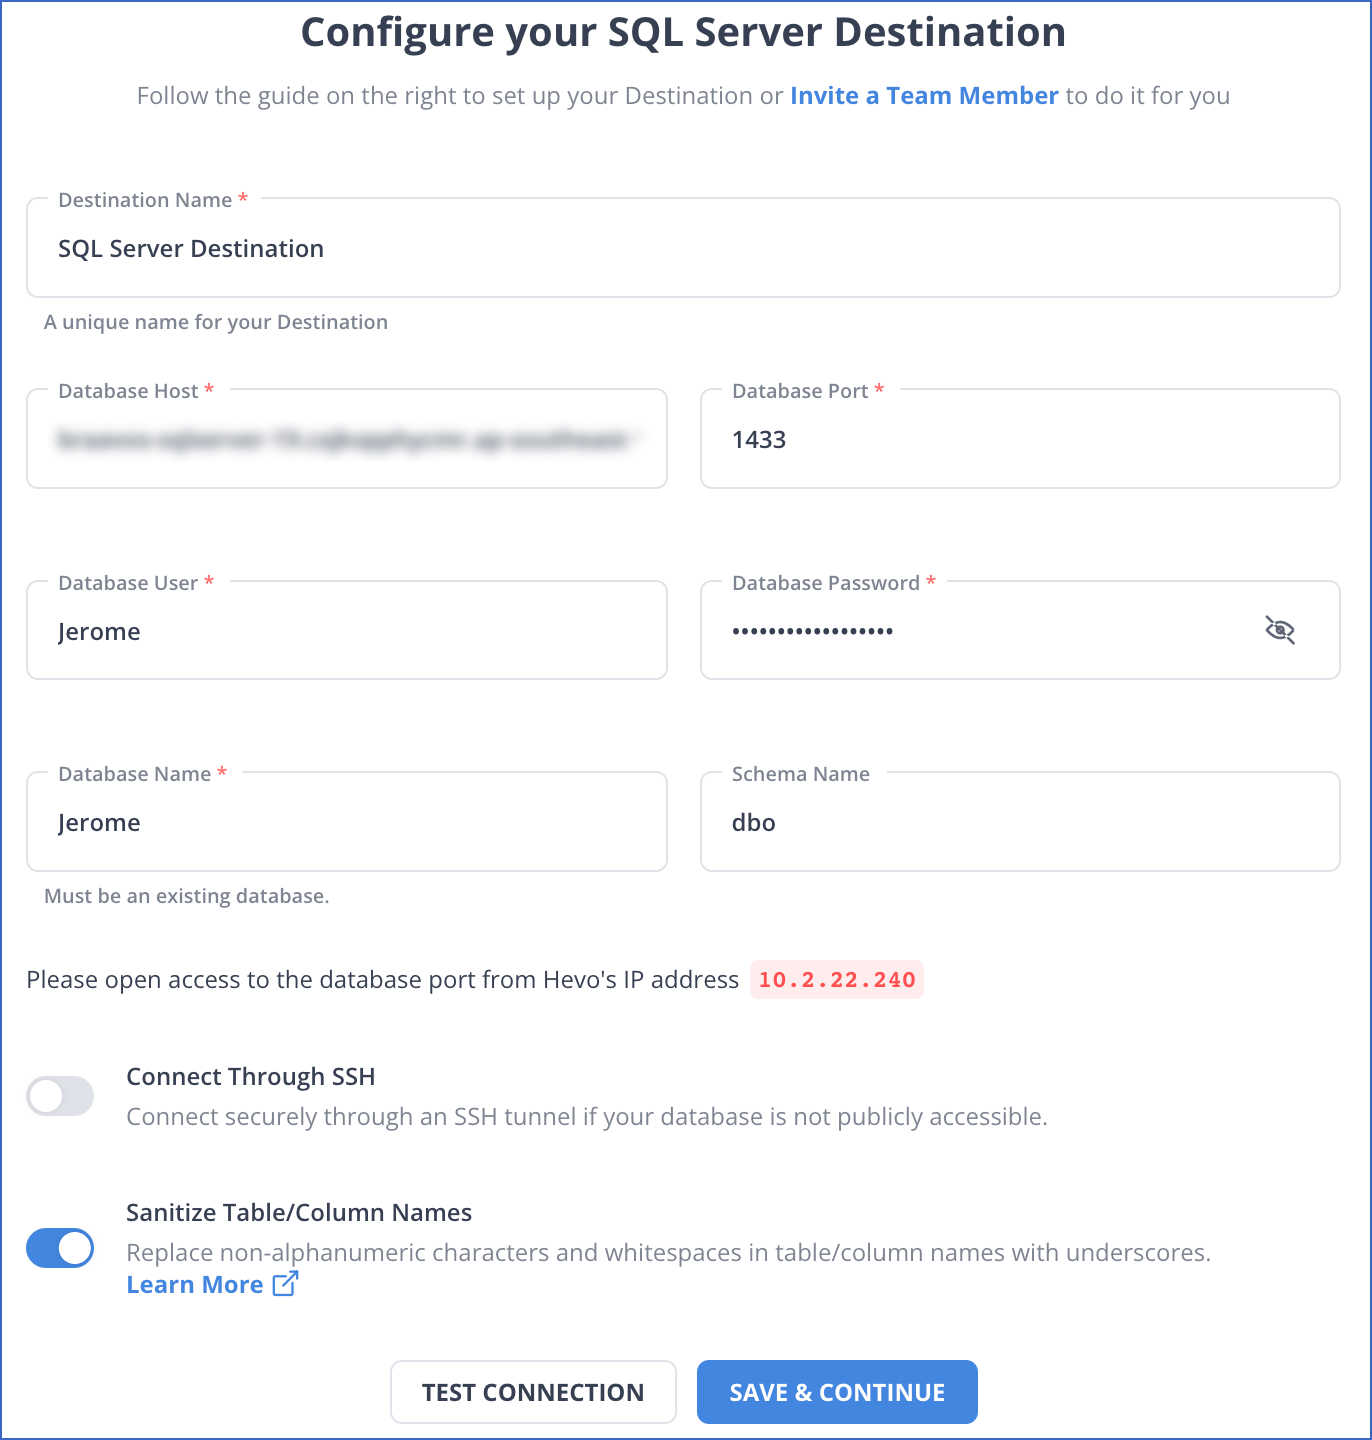
Additionally, you can connect using SSH if you do not want to connect directly to Hevo. This will provide an additional extra layer of security by not publicly exposing your SQL Server setup.
- Click on TEST CONNECTION. Then, click on SAVE & CONTINUE.
Tired of manual exports and scripts?
Hevo lets you automate Google Ads and Facebook Ads data pipelines—no coding required. Experience a hassle-free automated data replication with Hevo.
Method 2: Load NetSuite Data into SQL Server Using ODBC
Another method to connect & load data from NetSuite to SQL server is by using ODBC. This involves setting up an ODBC connection between your SQL server and NetSuite. Nevertheless, a web service is needed to sync the data back.
You must use the SQL Server Management Studio to set up a linked server. The steps are as follows:
- If Microsoft SQL Server Management Studio still needs to be preloaded, MSDASQL must be downloaded and installed before proceeding with the instructions below.
- First, set up the Remote TDS Service. The TDS remoting service is a daemon process that watches for client TDS requests.
- Create a Linked Server. Once the daemon has started running, you can call stored procedures or use the UI in SQL Server Management Studio (SSMS).
- Open the SSMS and establish a connection to the SQL Server instance. Then, extend the SQL server database node in the object explorer.
- Right-click on the Linked Servers in the Server Object Node, then select New Linked Server. A window will pop up for a New Linked Server.
- Click on the Other Data Source option and enter the details.
- For Provider, enter the details and select the SQL Server Native Client Provider that is compatible with the SQL server you are using.
- Enter the host and port details for the TDS service. Note that the value localhost in this input refers to the machine where SQL Server runs.
Import Netsuite ODBC to SQL Server
- Double-click the MSDASQL provider from the list of Linked Servers.
- The Allow in-process checkbox should be enabled when the Provider Options window appears. Establish a fresh Linked Server.
- For ODBC drivers, be careful when choosing Microsoft OLE DB Provider. You must enter the name of the linked server, which will be NetSuite.
- In the Product Name and Data Source sections, you must enter the previously generated System DSN. Then, your NetSuite tables will be retrieved.
- Click New Query in the toolbar to send a query to the connected server.
For more information on the ODBC connector, you can check out MySQL ODBC Connector.
Limitations of Using ODBC to Import Data from NetSuite to SQL Server
- ODBC is very slow compared to other methods, which would create a massive setback when handling large amounts of data.
- ODBC may not support every feature and function of SQL Server or NetSuite, which can reduce the flexibility of data loading and transformation. Setting up and maintaining several ODBC connections while working with various environments and setups can be challenging.
- ODBC cannot accurately handle data type conversions between NetSuite and SQL Server, leading to potential data loss or errors.
Alternative Methods to Connect NetSuite to SQL Server
Here are some alternative methods for extracting data from your NetSuite account to a SQL Server.
1. Extracting Data from NetSuite
There are two different methods for accessing your NetSuite account data. Read on to learn more about them.
Method 1: NetSuite Data Extraction with SuiteScript Model
- This method is useful when working with Workflow Tools or Scripts.
- You can use RESTlets to update your SuiteScript API. Restlets enable you to deploy server-side scripts that interact with your NetSuite account data.
- Restlets also support more features than NetSuite’s SOAP-based web services.
Method 2: Using the Web Service Model
- You can use this method for connecting your external applications to NetSuite.
- In this method, you must have NetSuite’s Web Services API.
- You will have to manage XML and SOAP responses at the same time.
2. Data Transformation
After getting access to your NetSuite data through any of the given methods, you need to authenticate and query the data based on your specific requirements. Before transferring the data to any database, you need to make sure that the data schemas for both source and destination match.
You must thoroughly understand the analysis to be performed on the given data and transform it according to the requirements. For instance, some of the analysis methods require the data to be normally distributed. If your data is not uniformly distributed, you must transform it.
Step 1: Loading the NetSuite Data to a Database
If you are considering moving data to Microsoft SQL, you can use SQL Server Import and Export Wizard. This tool can help you load your data to the server in bulk. Through its easy user interface, you can seamlessly manage large volumes of data.
Another method that can make the data importing process easier is the Bulk Copy Program (BCP) utility method. This command line tool can help you load and extract data in bulk from SQL servers.
When dealing with multiple database vendors, there’s another method that you can consider. You can manage huge amounts of data by following simple BULK INSERT statements. You can also add data row by row using the INSERT statement in SQL servers.
Step 2: Renewing and Updating Data in SQL Server
With the amount of data growing in your NetSuite account, you will need to update and renew the linked SQL server data to maintain synchronization. To achieve this, you need to use the UPDATE statement to reflect any changes in your NetSuite account.
Regular monitoring is required in the above custom methods to achieve data integrity and accuracy between NetSuite and SQL Server datasets. You must avoid duplicate data that may enter your database due to configuration errors in your data pipeline.
Microsoft SQL offers solutions to maintain good data quality. One such solution is Transactions in SQL Server, which can help you maintain data consistency and reliability. While this method can help you solve some of your data quality problems, you must use it efficiently and with proper data cleaning and validation processes.
Limitations of Using Alternative Methods in Moving Data from NetSuite to SQL Server
Here are some of the limitations of using the alternative methods:
- Using alternative methods to extract data from NetSuite to SQL Server requires you to move your data manually. The lack of automation can increase the amount of time you spend transferring your data.
- To swiftly carry out the migration, you must have prior technical knowledge of databases and data transformation.
- You need to monitor the data to avoid data inconsistencies continuously.

What Is NetSuite?
NetSuite is an Enterprise Resource Planning application developed by Oracle for use in a cloud environment. It helps businesses unify and streamline multiple aspects of their workflow.
Here are two main features provided by NetSuite that can help you manage resources better:
- NetSuite provides you with a cloud-based central location for resource planning so that you can seamlessly handle all the operations in specific business domains.
- NetSuite provides financial planning tools, which you can leverage to plan your budget according to the business’s current financial status.
In a recent Gartner study about NetSuite, NetSuite was ranked the best ERP and fastest-growing financial management vendor globally.
What is SQL Server?

SQL Server, as the name suggests, is a part of the Microsoft ecosystem. It is one of the most widely used Relational Database Management Systems (RDBMS). You can install SQL Server on any Windows or Linux system or deploy it on an Azure Virtual Machine or any other virtual machine platform.
Although SQL Server is a standalone product, you can integrate it with other Azure applications. This data management system allows you to perform data query, data manipulation, and access control. It offers many excellent features that make the database creation process quick and flexible.
Use Cases to Transfer Your NetSuite Data to SQL Server
- SQL Server is an excellent option for growing companies with NetSuite data since it can manage enormous volumes of data without compromising performance. It also has strong data security measures, allowing you to manage compliance while benefiting from improved data governance and security.
- SQL Server’s robust data processing features help you analyze and run complicated queries on your NetSuite data to gain deeper insights.
- NetSuite’s historical data is limited. Synchronizing NetSuite to SQL Server enables long-term data storage and longitudinal trend analysis.
Conclusion
In this article, you learned about different data loading methods from NetSuite to SQL Server. The ODBC and other custom methods require you to configure several different things to integrate your data from NetSuite to SQL Server. However, the Hevo method is much more efficient and simpler, making it a great alternative to any manual approach.
You can connect your SaaS platforms, databases, etc., to any data warehouse you choose without writing any code or worrying about maintenance. Try out a 14-day free trial and check out Hevo’s unbeatable Pricing for the best plan for your needs.
Frequently Asked Questions (FAQs)
1. What are the ways to connect NetSuite to SQL Server?
There are multiple ways to connect NetSuite to SQL Server. Here are some of the most common ones:
Connect NetSuite to SQL Server with the help of SaaS-based data pipelining service providers like Hevo.
Extract data from NetSuite to SQL Server using ODBC.
Using RESTlets to update your SuiteScript model.
Using Web Service Model to connect external services to NetSuite.
2. How can I connect data from NetSuite to SQL Server in real time?
Adding a SuiteCloud Plus license can help you with more real-time integrations. This process will maximize the number of concurrent connections for the NetSuite integration. Another way is to use Hevo, which can enable you to conduct better data transfer in real-time.
3. Does NetSuite run on SQL?
NetSuite is not based on SQL in the same sense as it uses its proprietary database system, but it does support SQL-like querying through its SuiteQL feature, allowing SQL queries to be run on a NetSuite user’s data.
4. Can I transform or clean data during migration?
Yes, most automated pipelines, including Hevo, allow you to transform, map, and clean data before loading it into SQL Server.
5. Can I maintain data security and compliance during migration?
Yes, SQL Server provides robust data governance and security features, and automated pipelines like Hevo ensure secure data transfer.

Share it with your connections.
-
 Share To X
-
 Share To LinkedIn
-
 Share To Facebook
-
 Copy Link
