


Are you looking to move data from MariaDB to Snowflake for Analytics or Archival purposes? You have landed on the right post. This post covers two main approaches to move data from MariaDB to Snowflake. It also discusses some limitations of the manual approach. So, to overcome these limitations, you will be introduced to an easier alternative to migrate your data from MariaDB to Snowflake.
Method 1: Implement an Official Snowflake ETL Partner such as Hevo Data.
Hevo is the only real-time ELT No-code Data Pipeline platform that cost-effectively automates data pipelines that are flexible to your needs. With integration with 150+ Data Sources (40+ free sources), we help you not only export data from sources & load data to the destinations but also transform & enrich your data, & make it analysis-ready.
GET STARTED WITH HEVO FOR FREEMethod 2: Build Custom ETL Scripts to move data from MariaDB to Snowflake
Organizations can enable scalable analytics, reporting, and machine learning on their valuable MariaDB data by customizing ETL scripts to integrate MariaDB transactional data seamlessly into Snowflake’s cloud data warehouse. However, the custom method can be challenging, which we will discuss later in the blog.
Table of Contents
Method 1: MariaDB to Snowflake using Hevo
Using a no-code data integration solution like Hevo (Official Snowflake ETL Partner), you can move data from MariaDB to Snowflake in real time. Since Hevo is fully managed, the setup and implementation time is next to nothing. You can replicate MariaDB to Snowflake using Hevo’s visual interface in 2 simple steps:
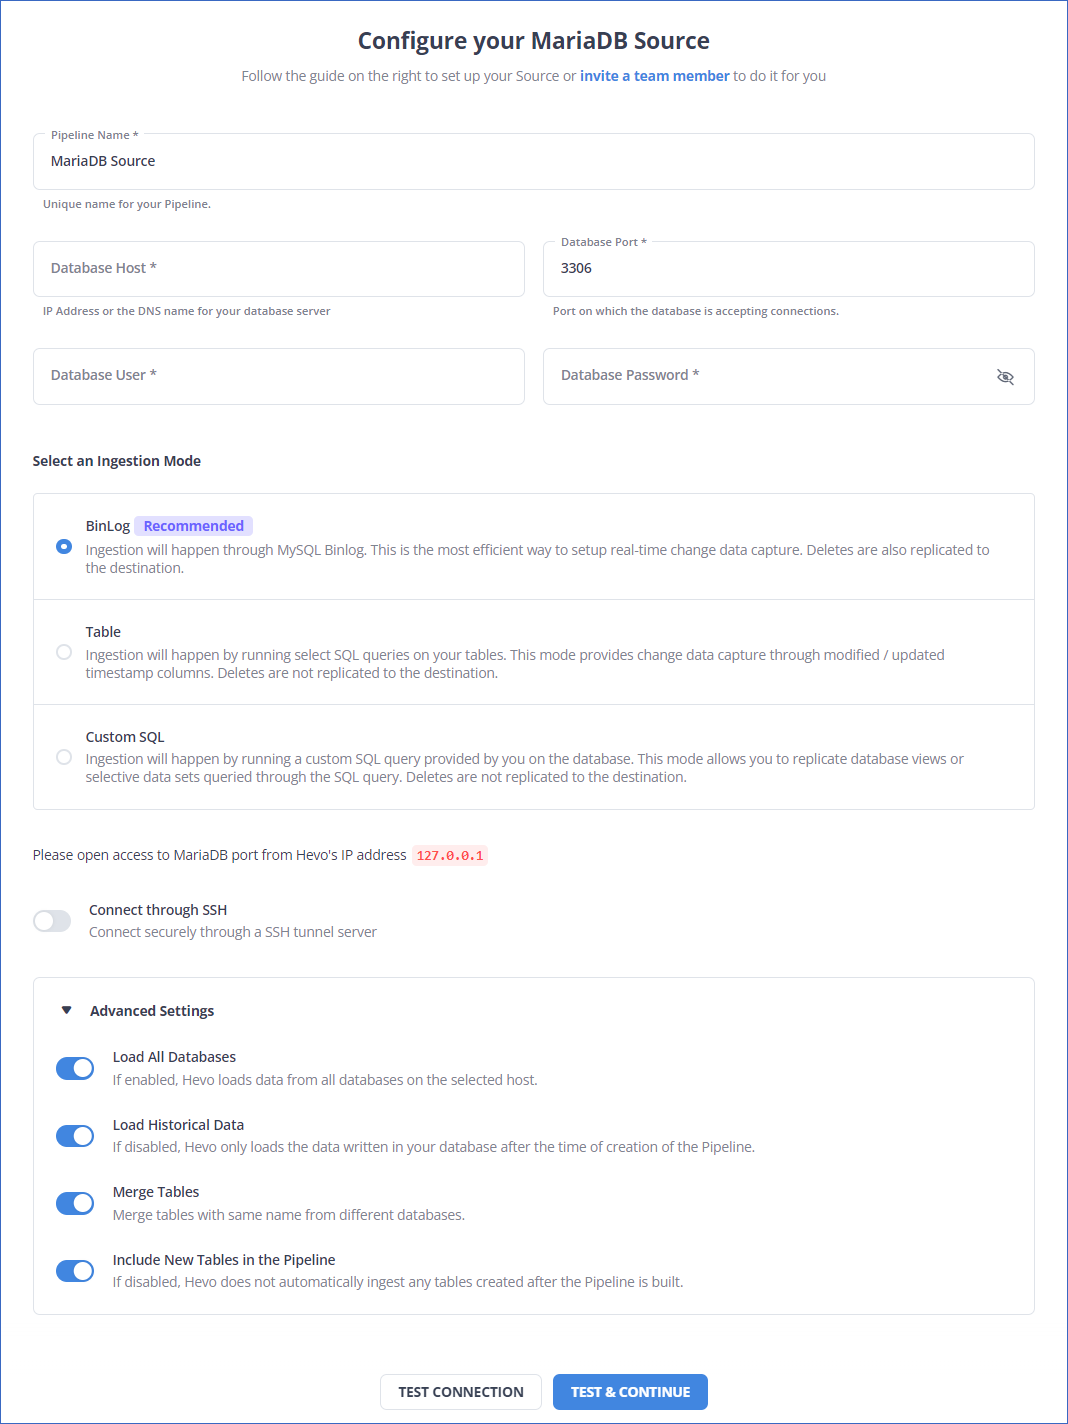
Step 1: Connect to your MariaDB Database
- Click PIPELINES in the Asset Palette.
- Click + CREATE in the Pipelines List View.
- In the Select Source Type page, select MariaDB as your source.
- In the Configure your MariaDB Source page, specify the following:
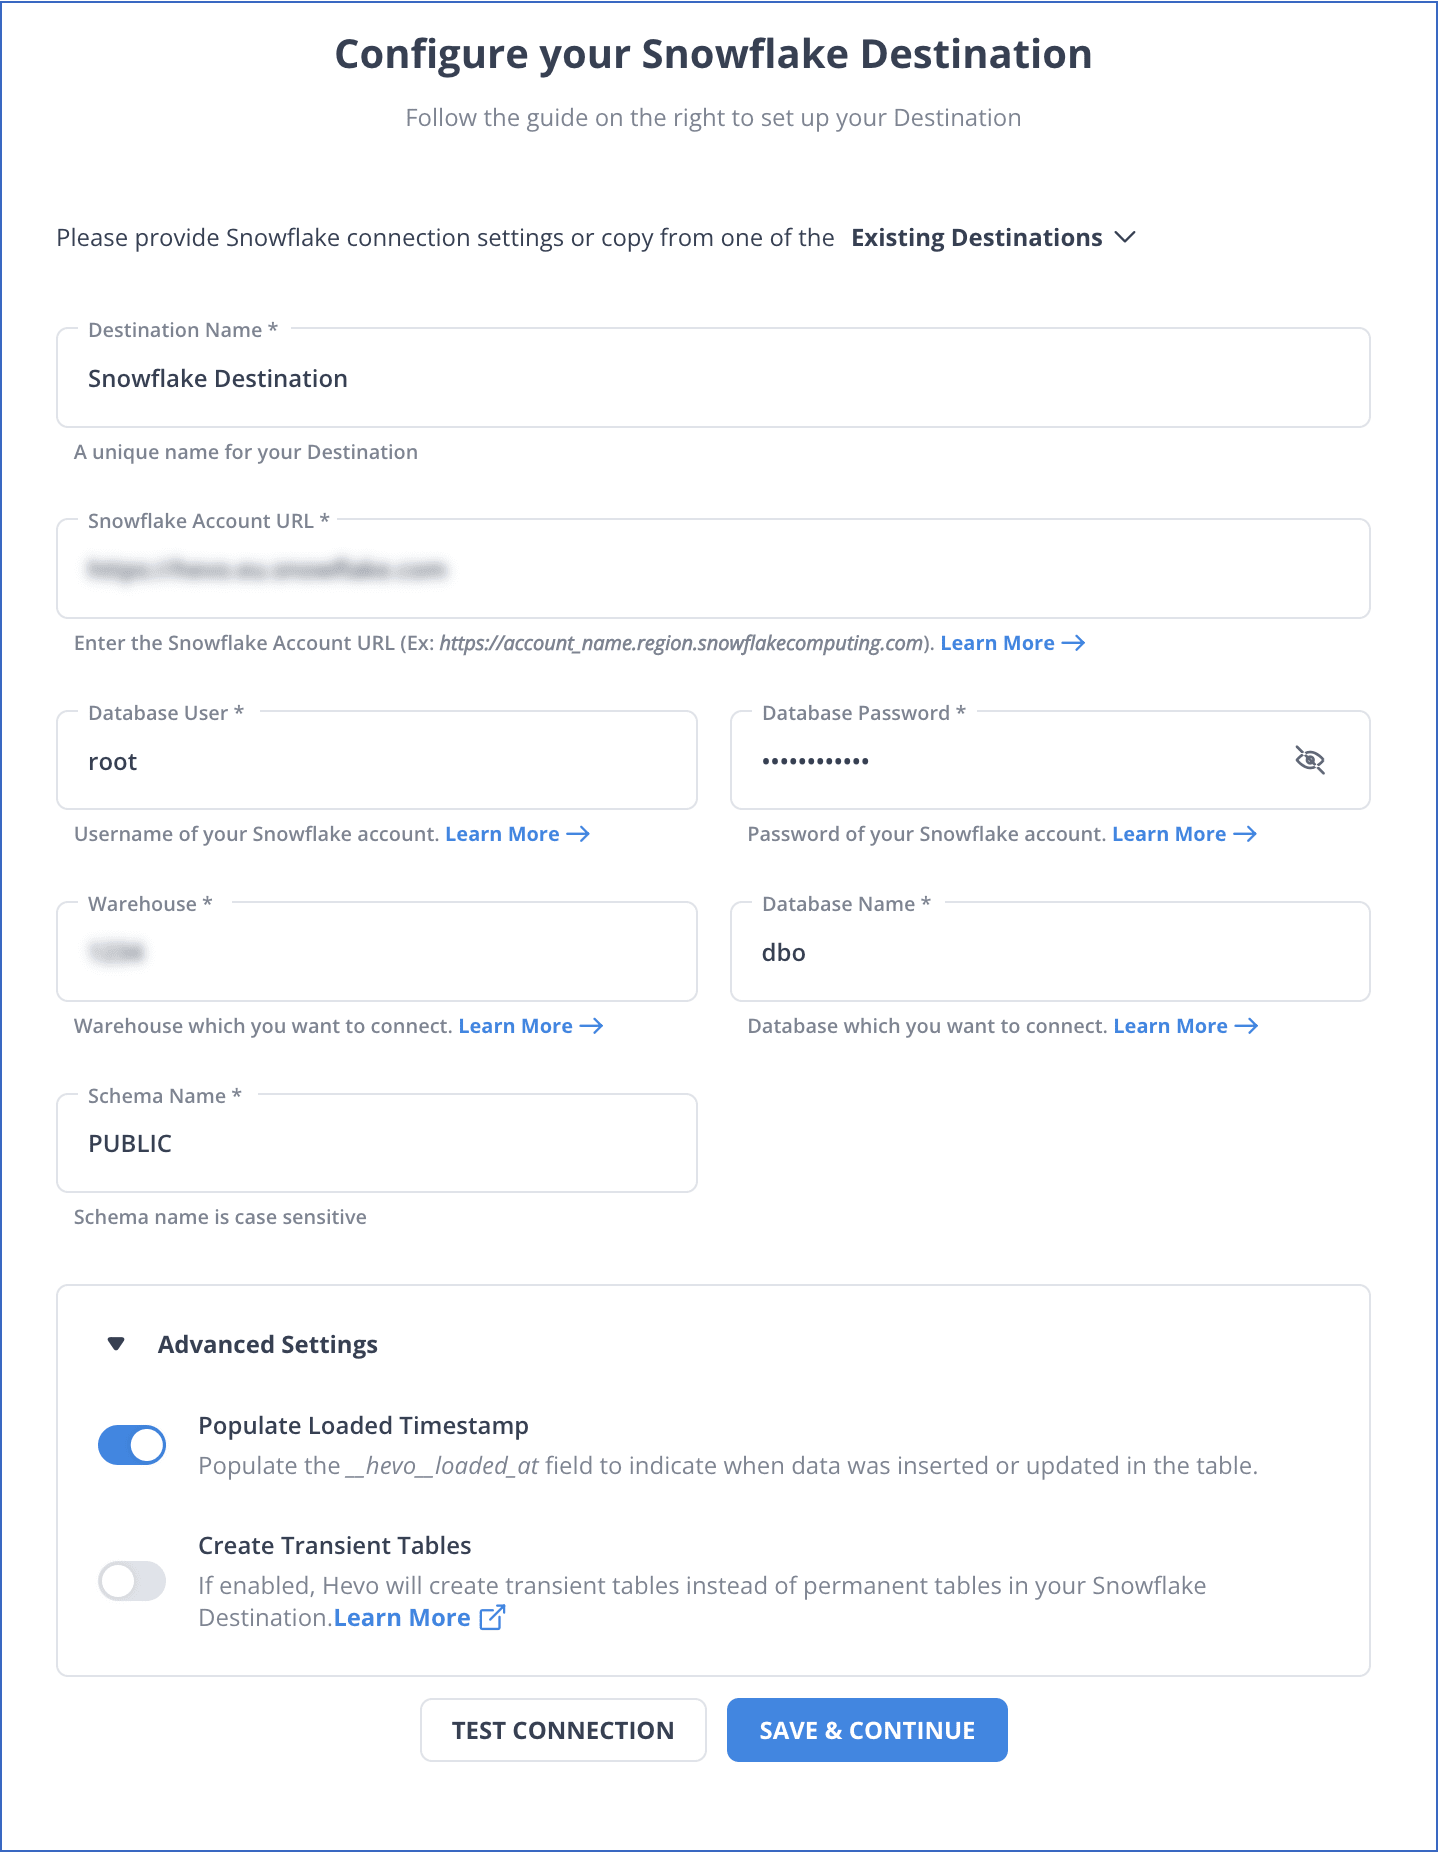
Step 2: Configure Snowflake as your Destination
- Click DESTINATIONS in the Navigation Bar.
- Click + CREATE in the Destinations List View.
- In the Add Destination page, select Snowflake as the Destination type.
- In the Configure your Snowflake Warehouse page, specify the following:
To know more about MariabDB to Snowflake Integration, refer to Hevo documentation:
SIGN UP HERE FOR A 14-DAY FREE TRIAL!Method 2: Build Custom ETL Scripts to move data from MariaDB to Snowflake
Implementing MariaDB to Snowflake integration streamlines data flow and analysis, enhancing overall data management and reporting capabilities. At a high level, the data replication process can generally be thought of in the following steps:
- Step 1: Extracting Data from MariaDB
- Step 2: Data Type Mapping and Preparation
- Step 3: Data Staging
- Step 4: Loading Data into Snowflake
Step 1: Extracting Data from MariaDB
Data should be extracted based on the use case and the size of the data being exported.
If the data is relatively small, then it can be extracted using SQL SELECT statements into MariaDB’s MySQL command-line client.
Example:
mysql -u <name> -p <db> SELECT <columns> INTO OUTFILE 'path' FIELDS TERMINATED BY ',' OPTIONALLY ENCLOSED BY '"' LINES TERMINATED BY 'n' FROM <table>;With the FIELDS TERMINATED BY, OPTIONALLY ENCLOSED BY and LINES TERMINATED BY clauses being optional
If a user is looking to export large amounts of data, then MariaDB provides another command-line tool mysqldump which is better suited to export tables, a database or databases into other database servers. mysqldump creates a backup by dumping database or table information into a text file, which is typically in SQL. However, it can also generate files in other formats like CSV or XML. A use case extracting a full backup of a database is shown below:
mysqldump -h [database host's name or IP address] -u [the database user's name] -p [the database name] > db_backup.sqlThe resulting file will consist of SQL statements that will create the database specified above.
Example (snippet):
CREATE TABLE table1 ( ‘Column1’ bigint(10)....... )Step 2: Data Type Mapping and Preparation
Once the data is exported, one has to ensure that the data types in the MariaDB export properly correlate with their corresponding data types in Snowflake.
Snowflake presents documentation on data preparation before the Staging process here.
In general, it should be noted that the BIT data type in MariaDB corresponds to the BOOLEAN in Snowflake. Also, Large Object types (both BLOB and CLOB) and ENUM are not supported in Snowflake. The complete documentation on the data types that are not supported by Snowflake can be found here.
Step 3: Data Staging
The data is ready to be imported into the Staging area after we have ensured that the data types are accurately mapped.
There are two types of stages that a user can create in Snowflake. These are:
- Internal Stages
- External Stages
Each of these stages can be created using the Snowflake GUI or with SQL code. For the scope of this blog, we have included the steps to do this using SQL code.
- Loading Data to Internal Stage:
CREATE [ OR REPLACE ] [ TEMPORARY ] STAGE [ IF NOT EXISTS ] <internal_stage_name> [ FILE_FORMAT = ( { FORMAT_NAME = '<file_format_name>' | TYPE = { CSV | JSON | AVRO | ORC | PARQUET | XML } [ formatTypeOptions ] ) } ] [ COPY_OPTIONS = ( copyOptions ) ] [ COMMENT = '<string_literal>' ]
- Loading Data to External Stage:
Here is the code to load data to Amazon S3:
CREATE STAGE “[Database Name]”, “[Schema]”,”[Stage Name]” URL=’S3://<URL> CREDENTIALS= (AWS_KEY_ID=<your AWS key ID>, AWS_SECRET_KEY= <your AWS secret key>) ENCRYPTION= (MASTER_KEY=<Master key if required>) COMMENT= ‘[insert comment]’
In case you are using Microsoft Azure as your external stage, here is how you can load data:
CREATE STAGE “[Database Name]”, “[Schema]”,”[Stage Name]” URL=’azure://<URL> CREDENTIALS= (AZURE_SAS_TOKEN=’< your token>‘) ENCRYPTION= (TYPE = “AZURE_CSE, MASTER_KEY=<Master key if required>) COMMENT= ‘[insert comment]’
There are other internal stage types namely the table stage and the user stage. However, these stages are automatically generated by Snowflake. The table stage is held within a table object and is best used for use cases that require the staged data to be only used exclusively for a specific table. The user table is assigned to each user by the system and cannot be altered or dropped. They are used as personal storage locations for users.
Step 4: Loading Data to Snowflake
In order to load the staged data to Snowflake, we use the COPY INTO DML statement through Snowflake’s SQL command-line interface – SnowSQL. Note that using the FROM clause in the COPY INTO statement is optional, as Snowflake will automatically check for files in the stage. You can connect MariaDB to Snowflake to provide smooth data integration, enabling effective data analysis and transfer between the two databases.
Loading Data from Internal Stages:
User Stage Type:
COPY INTO TABLE1 FROM @~/staged file_format=(format_name=’csv_format’)
Table Stage Type:
COPY INTO TABLE1 FILE_FORMAT=(TYPE CSV FIELD DELIMITER=’|’ SKIP_HEADER=1)
Internal Stage Created as per the previous step:
COPY INTO TABLE1 FROM @Stage_name
Amazon S3:
While you can load data directly from an Amazon S3 bucket, the recommended method is to first create an Amazon S3 external stage as described under the Data Stage section of this guide. The same applies to Microsoft Azure and GCP buckets too.
COPY INTO TABLE1 FROM s3://bucket CREDENTIALS= (AWS_KEY_ID='YOUR AWS ACCESS KEY' AWS_SECRET_KEY='YOUR AWS SECRET ACCESS KEY') ENCRYPTION= (MASTER_KEY = 'YOUR MASTER KEY') FILE_FORMAT = (FORMAT_NAME = CSV_FORMAT)
Microsoft Azure:
COPY INTO TABLE1 FROM azure://your account.blob.core.windows.net/container STORAGE_INTEGRATION=(Integration_name) ENCRYPTION= (MASTER_KEY = 'YOUR MASTER KEY') FILE_FORMAT = (FORMAT_NAME = CSV_FORMAT)
GCS:
COPY INTO TABLE1 FROM 'gcs://bucket’ STORAGE_INTEGRATION=(Integration_name) ENCRYPTION= (MASTER_KEY = 'YOUR MASTER KEY') FILE_FORMAT = (FORMAT_NAME = CSV_FORMAT)
Loading Data from External Stages:
Snowflake offers and supports many format options for data types like Parquet, XML, JSON, and CSV. Additional information can be found here.
This completes the steps to load data from MariaDB to Snowflake. The MariaDB Snowflake integration facilitates a smooth and efficient data exchange between the two databases, optimizing data processing and analysis.
While the method may look fairly straightforward, it is not without its limitations.
Limitations of Moving Data from MariaDB to Snowflake Using Custom Code
- Significant Manual Overhead: Using custom code to move data from MariaDB to Snowflake necessitates a high level of technical proficiency and physical labor. The process becomes more labor- and time-intensive as a result.
- Limited Real-Time Capabilities: Real-time data loading capabilities are absent from the custom code technique when transferring data from MariaDB to Snowflake. It is, therefore, inappropriate for companies that need the most recent data updates.
- Limited Scalability: The custom code solution may not be scalable for future expansion as data quantities rise, and it may not be able to meet the increasing needs in an effective manner.
So, you can use an easier alternative: Hevo Data – Simple to use Data Integration Platform that can mask the above limitations and move data from MariaDB to Snowflake instantly.
There are a number of interesting use cases for moving data from MariaDB to Snowflake that might yield big advantages for your company. Here are a few important situations in which this integration excels:
- Improved Reporting and Analytics:
- Quicker and more effective data analysis: Large datasets can be queried incredibly quickly using Snowflake’s columnar storage and cloud-native architecture—even with datasets that MariaDB had previously been thought to be too sluggish for.
- Combine data from various sources with MariaDB: For thorough analysis, you may quickly and easily link your MariaDB data with information from other sources in Snowflake, such as cloud storage, SaaS apps, and data warehouses.
- Enhanced Elasticity and Scalability:
- Scaling at a low cost: You can easily scale computing resources up or down according on your data volume and query demands using Snowflake’s pay-per-use approach, which eliminates the need to overprovision MariaDB infrastructure.
- Manage huge and expanding datasets: Unlike MariaDB, which may have scaling issues, Snowflake easily manages big and expanding datasets without causing performance reduction.
- Streamlined Data Management and Governance:
- Centralized data platform: For better data management and governance, combine your data from several sources—including MariaDB—into a single, cohesive platform with Snowflake.
- Enhanced compliance and data security: Take advantage of Snowflake’s strong security features and compliance certifications to guarantee your sensitive data is private and protected.
- Simplified data access and sharing: Facilitate safe data exchange and granular access control inside your company to promote teamwork and data-driven decision making.
Learn More About:
Conclusion
In this post, you were introduced to MariaDB and Snowflake. Moreover, you learned the steps to migrate your data from MariaDB to Snowflake using custom code. You observed certain limitations associated with this method. Hence, you were introduced to an easier alternative – Hevo to load your data from MariaDB to Snowflake.
VISIT OUR WEBSITE TO EXPLORE HEVOHevo moves your MariaDB data to Snowflake in a consistent, secure and reliable fashion. In addition to MariaDB, Hevo can load data from a multitude of other data sources including Databases, Cloud Applications, SDKs, and more. This allows you to scale up on demand and start moving data from all the applications important for your business.
Want to take Hevo for a spin?
SIGN UP to experience Hevo’s simplicity and robustness first-hand.
Share your experience of loading data from MariaDB to Snowflake in the comments section below!
Share it with your connections.
-
 Share To LinkedIn
-
 Share To Facebook
-
 Share To X
-
 Copy Link


