


Recurly, the industry’s top platform for recurring billing, guarantees simple setup, quick integrations, and service that grows with your company’s requirements. With Recurly, you can quickly start accepting payments and concentrate on increasing sales. You might need to get some insights from your Recurly data, to do so you would need to transfer it to a Data Warehouse such as Amazon Redshift.
In this article, you will learn how to transfer data from Recurly to Redshift using Recurly API and JSON file format. You will also know about Hevo method which is an automated solution.
Table of Contents
What is Recurly?

Recurly is the subscription growth engine that uses knowledge, technology, and insights for international businesses to enhance subscriber lifetime value that provide Billing Management solutions. Recurly has 50 million active members in 140+ currencies through ategory-defining businesses as Sling, Twitch, BarkBox, FabFitFun, Paramount, and Sprout Social.
Recurly simplifies subscriptions at scale while optimizing each stage of the life cycle, including growth, retention, and acquisition.
Key Features of Recurly
- Subscriber Economics: Recurly lessens subscriber attrition brought on by needless credit card rejections. Recovered invoices improve by 10-27% as a result of card recycling.
- Operational Efficiency: The dashboard makes it simple for merchant staff to resolve billing-related customer complaints. With only a few clicks, upgrades, downgrades, voids, and refunds can all be handled. No training is necessary.
- Easy Setup and Integration: Be operational in days rather than months. Recurly offers flexible options for custom and expert implementations, whether your business needs a quick deployment or a seamless and highly customized connection.
Method 1: Connecting Recurly to Redshift using Hevo
Transfer data from Recurly to Redshift with Hevo‘s automated data pipeline platform. Our no-code solution guarantees a smooth, efficient, and hassle-free migration, allowing you to focus on leveraging your data rather than managing the process.
Method 2: Manually Connect Recurly to Redshift using API
You’ll have to use JSON files to transfer data using this method. The process can be tough for beginners. Furthermore, you will need to update the data each time it is updated.
Get Started with Hevo for Free!What is Amazon Redshift?

Amazon Redshift, a popular, entirely scalable, and reliable data warehouse, was developed in 2012. Businesses can start using Amazon Redshift with a cluster of nodes known as an Amazon cluster. The Amazon Command Line Interface or Redshift Console can be used to administer Amazon clusters. Companies can easily analyze data by connecting SQL-based clients like BI tools to an incorporated column-oriented database in Amazon Redshift. Because Amazon Redshift is a fully scalable data warehouse, organizations don’t have to worry about administrative tasks like Memory Management, Resource Allocation, Configuration Management, and more.
To programmatically manage clusters using Amazon Redshift, businesses can utilize the AWS Software Development Kit or the Amazon Redshift Query API.
Key Features of Amazon Redshift
- ANSI-SQL: Since Amazon Redshift is based on ANSI-SQL and uses industry-recognized ODBC and JDBC connections, you can use your current SQL clients and business intelligence tools. You can quickly query files like CSV, JSON, ORC, Avro, Parquet, and more with ANSI-SQL.
- Strong Security: Using Amazon Redshift to safeguard data warehouses is completely free for users. Firewalls can be installed by Amazon Redshift users to control network access to a specific cluster of data warehouses. Users of Amazon Redshift can train the column- and row-level security control to guarantee that only individuals with authorized access may view the data.
- Result Caching: Amazon Redshift’s result caching functionality can offer a response time of less than a second for repeated searches. Any search results from earlier queries can be retrieved by searching the cache in Amazon Redshift.
Methods to Connect Recurly to Redshift
Method 1: Connecting Recurly to Redshift using Hevo
Hevo helps you directly transfer data from various sources such as Recurly to Redshift, Database, Data Warehouses, or a destination of your choice in a completely hassle-free & automated manner. Hevo is fully managed and completely automates the process of not only loading data from your desired source but also enriching the data and transforming it into an analysis-ready form without having to write a single line of code. Its fault-tolerant architecture ensures that the data is handled in a secure, consistent manner with zero data loss.
The following steps can be implemented to connect Recurly to Redshift using Hevo:
Step 1: Configure Recurly as your Source
Perform the following steps to configure Recurly as the Source in your Pipeline:
- Step 1.1: Click PIPELINES in the Asset Palette.
- Step 1.2: Click + CREATE in the Pipelines List View.
- Step 1.3: In the Select Source Type page, select Recurly.
- Step 1.4: In the Configure your Recurly Source page, specify the following:
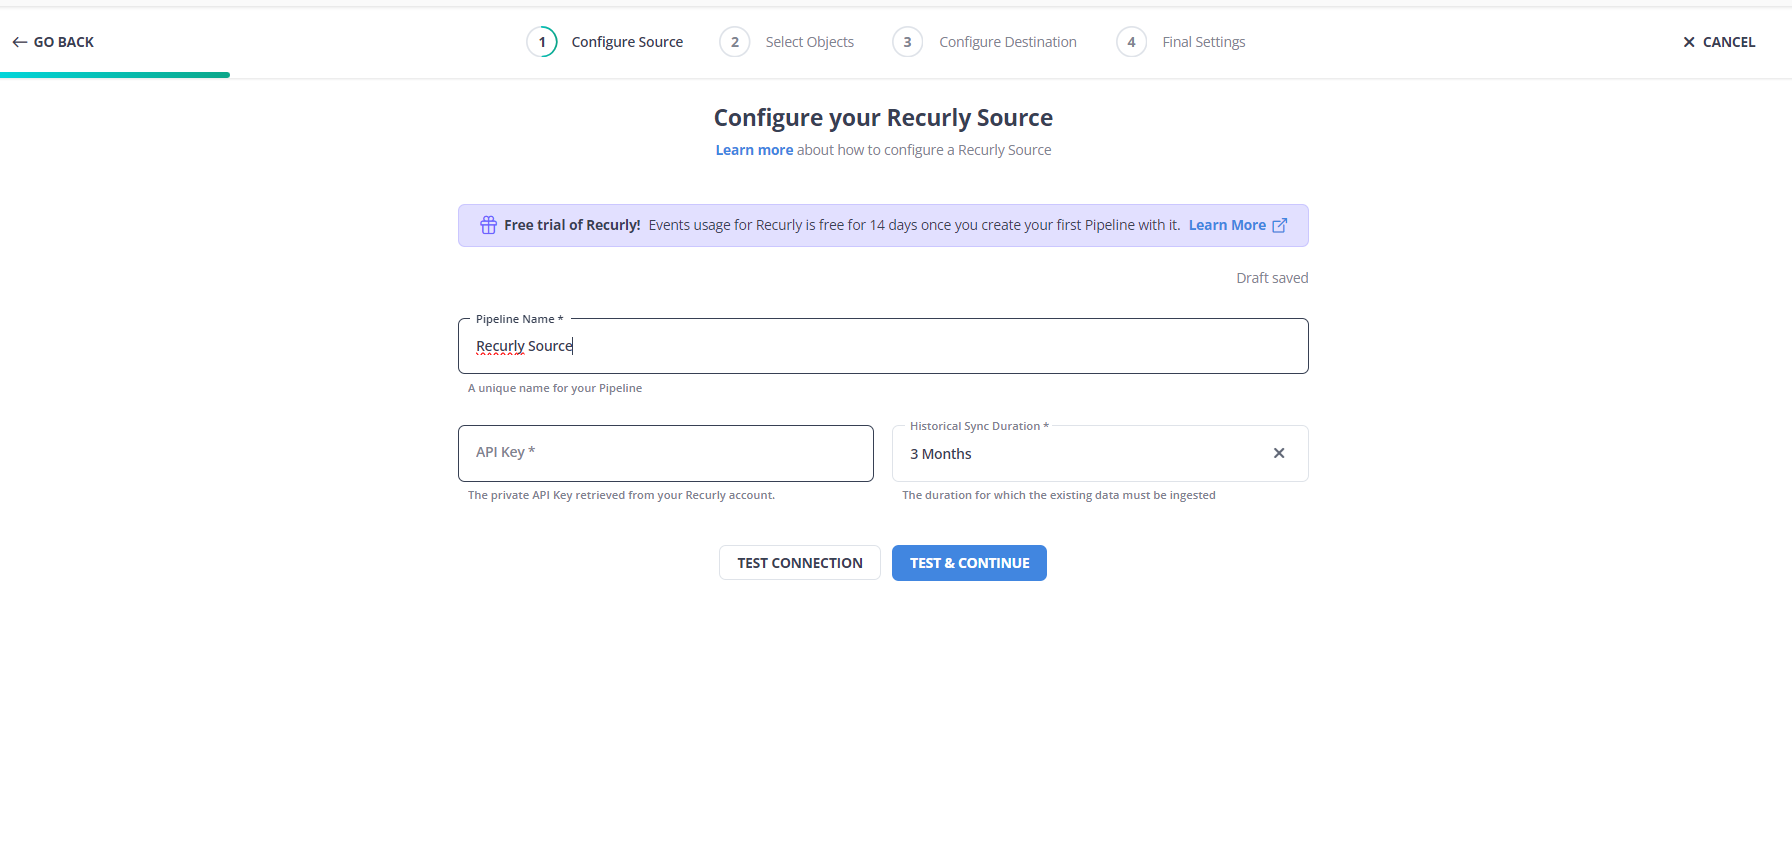
- Pipeline Name: A unique name for the Pipeline, not exceeding 255 characters.
- API Key: The private key that you created in your Recurly account, to enable Hevo to read data.
- EU Environment (only visible to users in the Europe region of Hevo): Enable this if your Recurly account is in the European Union (EU) region. Read Data Hosting in Recurly to know about all the regions that Recurly supports.
- Historical Sync Duration: The duration for which the existing data in the Source must be ingested. Default duration: 3 Months.
- Step 1.5: Click TEST & CONTINUE.
- Step 1.6: Proceed to configuring the data ingestion and setting up the Destination.
Step 2: Configure Redshift as your Destination
To set up Amazon Redshift as a destination in Hevo, follow these steps:
- Step 2.1: In the Asset Palette, select DESTINATIONS.
- Step 2.2: In the Destinations List View, click + CREATE.
- Step 2.3: Select Amazon Redshift from the Add Destination page.
- Step 2.4: Set the following parameters on the Configure your Amazon Redshift Destination page:

- Destination Name: A unique name for your Destination.
- Database Cluster Identifier: Amazon Redshift host’s IP address or DNS.
- Database Port: The port on which your Amazon Redshift server listens for connections. Default value: 5439
- Database User: A user with a non-administrative role in the Redshift database.
- Database Password: The password of the user.
- Database Name: The name of the destination database where data will be loaded.
- Database Schema: The name of the Destination database schema. Default value: public.
- Additional Settings:
- Connect through SSH: Enable this option to connect to Hevo using an SSH tunnel, instead of directly connecting your Amazon Redshift database host to Hevo. This provides an additional level of security to your database by not exposing your Redshift setup to the public. Read Connecting Through SSH.
If this option is disabled, you must whitelist Hevo’s IP addresses. - Sanitize Table/Column Names?: Enable this option to remove all non-alphanumeric characters and spaces in a table or column name, and replace them with an underscore (_). Read Name Sanitization.
- Connect through SSH: Enable this option to connect to Hevo using an SSH tunnel, instead of directly connecting your Amazon Redshift database host to Hevo. This provides an additional level of security to your database by not exposing your Redshift setup to the public. Read Connecting Through SSH.
- Advanced Settings:
- Populate Loaded Timestamp: Enable this option to append the __hevo_loaded_at_ column to the Destination table to indicate the time when the Event was loaded to the Destination. Read Loading Data to a Data Warehouse.
- Step 2.5: Click Test Connection to test connectivity with the Amazon Redshift warehouse.
- Step 2.6: Once the test is successful, click SAVE DESTINATION.
Method 2: Manually Connect Recurly to Redshift using API
You cannot directly export the data from Recurly to Redshift. To export data from Recurly to Redshift, first you will have to export data from Recurly as JSON files and then load the JSON files into Redshift.
Step 1: Exporting Recurly Data as JSON Format using Recurly API
Step A: Generating Recurly Private API Key
The first step in exporting data from Recurly to Redshift is exporting data from Recurly as JSON files. Public and Private API keys are both used by Recurly. Recurly.js recognises queries as coming from your Recurly website by using the Public API key. Javascript code can safely contain this key. Each site receives a unique Public Key via Recurly. On the API Credentials page, the Public API Key can be generated again.
To generate Private Key follow the steps below:
- There’s a good chance you’ll need to create an API key if you want to set up an integration with your Recurly account. Individual API keys can be generated and seen by users with Manager permissions. Other account users’ API keys are likewise visible to users with the Admin authority.
- You need to navigate to Integrations and you will find the API keys option there, click on it. Click the Add Private API Key button at the screen’s bottom after navigating there. Give your API key a name, any notes about how it will be used, and the name of the third-party programme to which the API key pertains. Click on Save Changes.

- Base64 Encoded API Keys: You can copy from Recurly without needing to convert a Base64 encoded API key. Click “Need help using the API Key?” to extend it in Recurly by going to Integrations > API Credentials. After “Authorization: Basic,” are the characters that make up your Base64 encoded API key.

- Regenerating a New API Key Immediately: The old key will stop functioning if you regenerate it right away, and Recurly will provide you a new API key. You will need to update applications with the new key as all applications that have access to Recurly with the old key will immediately lose access.

- Regenerating New Key after 12 Hours: If you select this option, Recurly will produce a new key, but the old key is still valid for 12 hours. You’ll have time to switch applications that are using the old key to the new key during this period. Applications using the old key will not be impacted during the 12-hour window and will be able to authenticate as usual. The previous key will stop working after 12 hours.
Step B: Making API Calls
- API Authentication: Recurly employs HTTP Basic Authentication, and the SSL channel securely encrypts your Private API key. Try this if you’re using cURL on the command line to test the API calls. Replace [apikey] and [subdomain] with the relevant values for your website:
curl -H 'Accept: Accept: application/vnd.recurly.v2021-02-25+json'
     -H 'Recurly-Version: recurly.v2021-02-25' \
     -H 'Content-Type: application/vnd.recurly.v2021-02-25+json; charset=utf-8' \
     -u '[apikey]' \
https://[subdomain].recurly.com/v3/accounts- Each request should use the Accept header to declare the version:
Accept: application/vnd.recurly.v2021-02-25
Accept: application/vnd.recurly.v2021-02-25+json- Every answer will have a Recurly-Version header indicating the request’s processing API version:
Recurly-Version: recurly.v2021-02-25- The permission header is automatically encoded by the majority of computer languages. The Authorization header for HTTP Basic Authentication is a string that contains a username and password that have been Base-64 encoded. For the Recurly API, your API key only has to be your login. Put an empty string in the password field if your library requires one.
"Authorization": "Basic " + base64_encode(API Key)- The same response schema is sent by each GET listing endpoint:
{
  "object":   "list",         // Always "list"
  "has_more": true,           // false if this is the last page of data
  "next":     "https://...",  // A URL pointing to the next page of data
  "data":     []              // The data for this page as an array
}
Your code should repeatedly call the URL next until has_more is false in order to page through each record.
- Query Parameters: The majority of GET listing endpoints accept query parameters that enable sorting and filtering of the results. Although most endpoints offer the following parameters, some endpoints have additional parameters that are listed on their individual endpoints.
- ids: A list of ids to match, separated by commas.
- limit: The number of records per page to return.
- order: The records’ order of sort.
- sort: The sorting field’s date component.
- begin_time: The filtering starts datetime (ISO 8601).
- end_time: The filtering end datetime (ISO 8601).
Now you have your JSON Data with you. The first step in exporting data from Recurly to Redshift is complete now.
Step 2: Importing Recurly Data in Amazon Redshift in JSON Format
The second step in exporting data from Recurly to Redshift is importing JSON data into Redshift. To load your data from JSON into Redshift, you can use the built-in “COPY” command in Redshift to move data from AWS S3 to the Redshift warehouse. AWS S3 is used as the source to send the data to the Redshift warehouse. The Copy command allows you to move any type of file, including CSV, Parquet, JSON, and others.
Step A: Creating and Uploading JSON File to S3
To start the Redshift JSON extraction process, let’s look at how to create and upload the JSON files to S3.
- Create a billing.json JSON file and add the sample records to it.
- Upload the JSON file to AWS S3 using the AWS CLI.
Syntax - aws s3 cp <source file> <target S3 path>
Example - aws s3 cp billing.json s3://test-bucket/json/
Step B: Creating JSONPath File
The expression JSONPath can be used to access the single element of a JSON hierarchical data structure. To properly read that element, Amazon Redshift only needs the whole JSONPath; it does not accept any JSONPath characteristics, such as wildcard characters or filter expressions. As a result, Amazon Redshift is unable to read complex, multi-level data structures.
- Create the JSONPath file for your JSON Data. The text in billing_sonpath.json should be similar to the below text with your Metrics:
{

"jsonpaths": [

"$.campaignId",
"$name",
"$tactic",
"$name",
"$startDate",
"$state",
"$costType",
"$budget",
"$budgetType",
"$deliveryProfile"
]
}- Use the AWS CLI to upload the file to S3.
Syntax - aws s3 cp <source file> <target S3 path>
Example - aws s3 cp billing_jsonpath.json s3://test-bucket/jsonpaths/
Step C: Loading the Data into Redshift
Let’s investigate how data is loaded into Redshift.
- To store the JSON schema data, the table DDL in Redshift must first be established.
- From AWS S3, load the data into Redshift using the COPY command.
copy billing
from 's3://test_bucket/json/billing.json’
credentials 'aws_iam_role=arn:aws:iam::xxxxx:role/Redshift'
region 'eu-west-3'
json 's3://test_bucket/jsonpath/billing_jsonpath.json';- You will see a successful message when the aforementioned command has finished running.
- Use the following command to confirm the loaded data.
select * from billing;Voila! You were successful in loading the data from JSON to Redshift using the COPY command. You have successfully done Recurly to Redshift data transfer.

Limitations of Manually Connecting Recurly to Redshift
- There is just one way to transfer data from Recurly to Redshift. To maintain both tools up to date, two-way sync is required.
- The manual process takes time because the records must be updated on a regular basis. This is a waste of time and resources that could be used for more vital company duties.
- Updating current data and sustaining workflows across various platforms takes a lot of engineering bandwidth, which might be frustrating for certain users.
- There is no room for transformation during data transport. This could be a significant disadvantage for businesses who want to change their data before exporting it from Recurly to Redshift.
Read More About:
How to Connect Invoiced to Redshift
Conclusion
In this article, you got a glimpse of how to connect Recurly to Redshift after a brief introduction to the salient features, and use cases. The methods talked about in this article are using automated solutions such as Hevo and JSON files. The second process can be a bit difficult for beginners. Moreover, you will have to update the data each and every time it is updated and this is where Hevo saves the day!
Hevo Data provides its users with a simpler platform for integrating data from 150+ sources for Analysis. It is a No-code Data Pipeline that can help you combine data from multiple sources like Recurly. You can use it to transfer data from multiple data sources into your Data Warehouses, Database, or a destination of your choice such as Redshift. It provides you with a consistent and reliable solution to managing data in real-time, ensuring that you always have Analysis-ready data in your desired destination.
Want to take Hevo for a spin? Try Hevo’s 14-day free trial and experience the feature-rich Hevo suite firsthand. You can also have a look at the unbeatable pricing that will help you choose the right plan for your business needs.
FAQs
1. Which of the following are best practices when loading data into Redshift?
It’s best to use the `COPY` command for loading large datasets, compress data to save space, and set up sort and distribution keys for faster queries. Staging tables can also help manage data before final storage.
2. Is Redshift good for OLAP?
Yes, Redshift is great for OLAP (Online Analytical Processing) because it’s built to handle complex data queries and large-scale analytics efficiently.
3. How do I extract data from Amazon Redshift?
You can extract data using SQL queries or tools like Hevo that automate the data export process from Redshift to your chosen destination, making it easier and faster.

Share it with your connections.
-
 Share To X
-
 Share To LinkedIn
-
 Share To Facebook
-
 Copy Link


