


 Key Takeaways
Migrating data from Salesforce to SQL Server can be achieved through various methods, each with its own set of advantages and challenges. Below are three common approaches to consider when transferring data between these two platforms:
Method 1: Export Data from Salesforce to SQL Server using Export and Import Wizards
This method involves exporting data from Salesforce to a CSV file and then importing it into SQL Server using built-in wizards.
Method 2: Manually Replicating Data from Salesforce to SQL Server
This method involves manually extracting data from Salesforce and writing custom scripts to load it into SQL Server.
Method 3: Connecting Salesforce to SQL Server Using Hevo
Using Hevo, you can easily automate data migration from Salesforce to SQL Server in real time with minimal coding.
Easily move your data from Salesforce to SQL Server to enhance your analytics capabilities. With Hevo’s intuitive pipeline setup, data flows in real-time—check out our 1-minute demo below to see the seamless integration in action!
The added complexity involved in orchestrating an ETL pipeline is one of the most challenging aspects of Salesforce to SQL Server Integration. You need to sort this issue to integrate your SQL Server with Salesforce to access and manipulate your Salesforce data in SQL Server for more advanced reporting.
Currently, both Salesforce and SQL Server do not provide a direct way of exporting objects from Salesforce into SQL Server. This post will introduce you to the different ways to carry out the integration based on your use case. You will learn how to connect Salesforce to SQL Server and replicate data seamlessly.
In this next section, you will learn how to replicate data from Salesforce to SQL Server using the Export and Import Wizards technique.
Table of Contents
What is Salesforce?

Salesforce is a SaaS, cloud-based customer relationship management(CRM) company that provides businesses with tools to help them find more leads and prospects, close more deals and provide a better customer experience. With the Salesforce CRM, businesses can track customer activity, set up dashboards and analyze all their metrics and data extensively.
Use Cases of Salesforce
- Customer Relationship Management (CRM): You can manage and analyze customer interactions, track sales activities, and maintain customer data to improve relationships and drive sales.
- Automation of Sales: You can automate sales processes such as lead tracking, opportunity management, and sales forecasting to increase efficiency and productivity.
- Customer Support: You can provide customer support through case management, knowledge base, and live chat
What is SQL Server?

Microsoft SQL Server is a relational database management system that stores and retrieves data on request from other applications—from the same computer or another system. This server can manage workloads from small single-machine applications to large Internet-facing applications with multiple users.
Use Cases of SQL Server
Let us discuss some of the key use cases of SQL Server for your better understanding.
- Transactional Processing: You can manage and process transactional data, such as sales, orders, and customer interactions, to ensure data integrity and reliability.
- Data Integration: Allows you to integrate data from multiple sources using SQL Server Integration Services (SSIS) for data transformation and loading.
- Scalable Database Management: You can scale your database performance and capacity to meet the needs of growing applications and increasing data volumes.
Method 1: Export Data from Salesforce to SQL Server using Export and Import Wizards
Using export and import wizards to transfer data from Salesforce to SQL Server is straightforward but can be limited by data volume constraints and lack of real-time synchronization.
Method 2: Manually Replicating Data from Salesforce to SQL Server
This method can be time-consuming and lacks real-time updates, making it unsuitable for dynamic or large-scale data synchronization.
Method 3: Connecting Salesforce to SQL Server Using Hevo
Hevo will be a much smarter alternative to connect Salesforce to SQL Server. All you need to do is just provide credentials to your Salesforce account and SQL Server Database.
Hevo offers seamless data integration, customizable data mapping, and a user-friendly interface to manage your data efficiently.
Join our 2000+ happy customers like Thoughspot, Deliverr and many more. Perform seamless data management with Hevo.
Reasons to Export Data from Salesforce to SQL Server
Salesforce offers a wealth of features that no other CRM program can match, including contact management, workflow development, task management, opportunity tracking, collaboration tools, customer engagement tools, analytics, and an easy-to-use dashboard that works on mobile devices. SQL Server offers improved performance thanks to its integrated transparent data compression and encryption features. Access controls and effective permission management tools are provided by SQL Server to help users protect sensitive business data.
When integrated together, moving data from Salesforce to SQL Server could solve some of the biggest data problems for businesses.
Learn more about Salesforce Connect.
Exporting Data from Salesforce to SQL Server
Below are the three possible methods to export data from Salesforce to SQL Server:
Method 1: Export Data from Salesforce to SQL Server using Export and Import Wizards
In this section of the blog post, you will learn how to ETL data from Salesforce to SQL Server using the Salesforce Data Loader export wizard and the SQL Server import wizard. This method consists of the following:
- Step 1: Export Object Records into CSV Files using the Data Loader Export Wizard
- Step 2: Import the CSV Files in your SQL Environment using the SQL Server Import Wizard
Step 1: Export object records into CSV files using the Data Loader export wizard
- Log in to your Salesforce account.
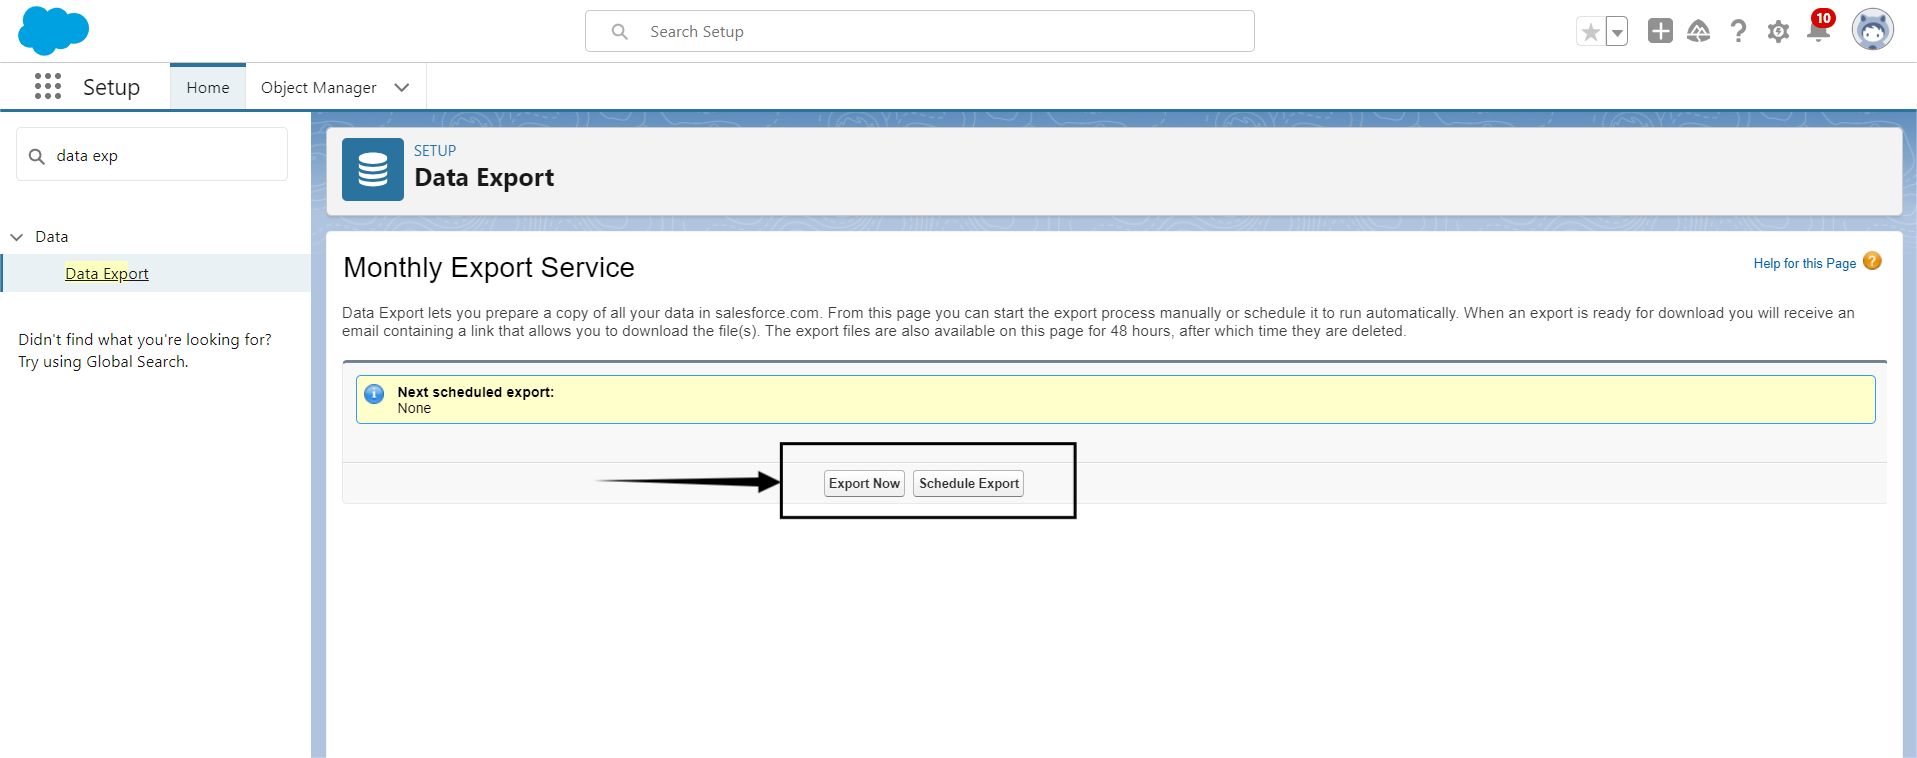
- Go to setup.

- Now, in the quick find box, type ‘Data Export’.
- Now select Export Now or Schedule Export as per your needs.
- Choose the data you want to load. You can either export all the objects.
- After selecting the objects you want to export, click Start Export, and your data will be exported in the desired format.

- If you want to export your data later rather than immediately, select Schedule Export, fill out all the details, and click on the Save option.
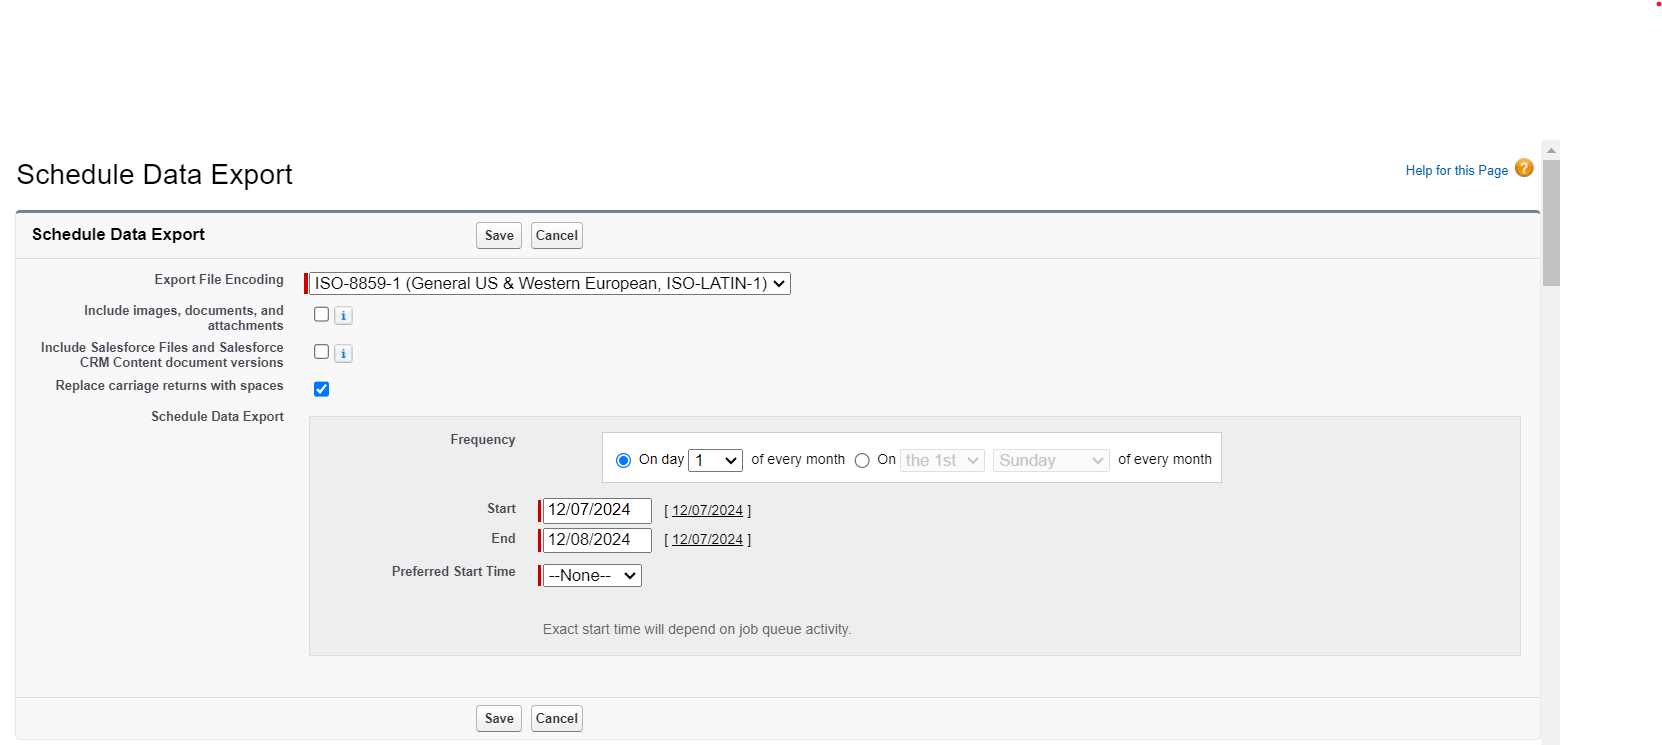
- After this, your salesforce data will be exported.
Step 2: Import the CSV files in your SQL environment using the SQL Server import wizard.
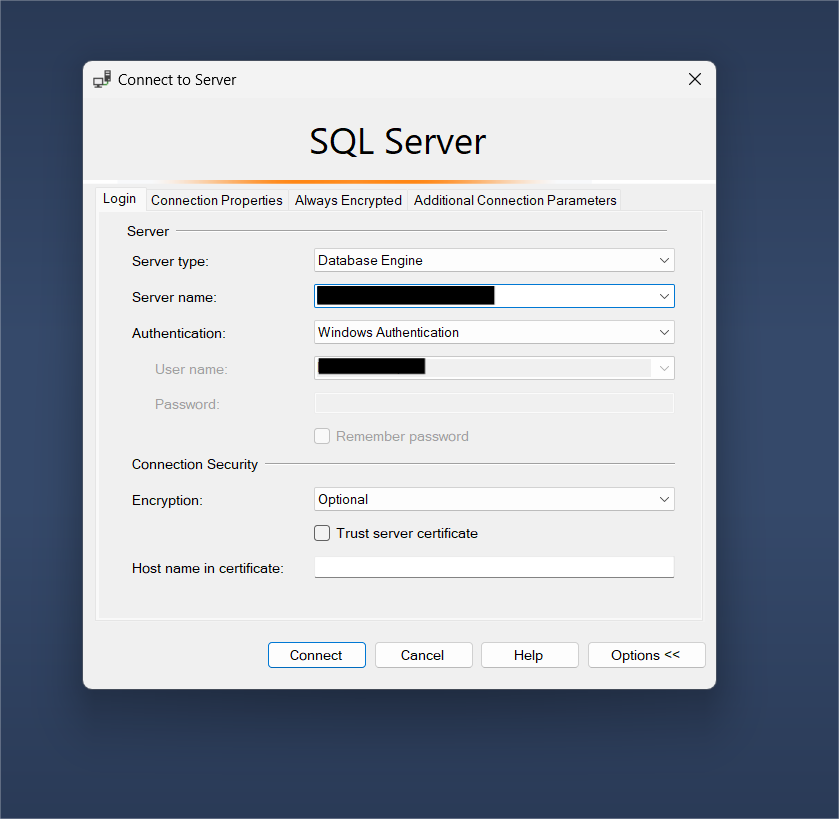
- Log into your SQL database using the SQL Server Management Studio.
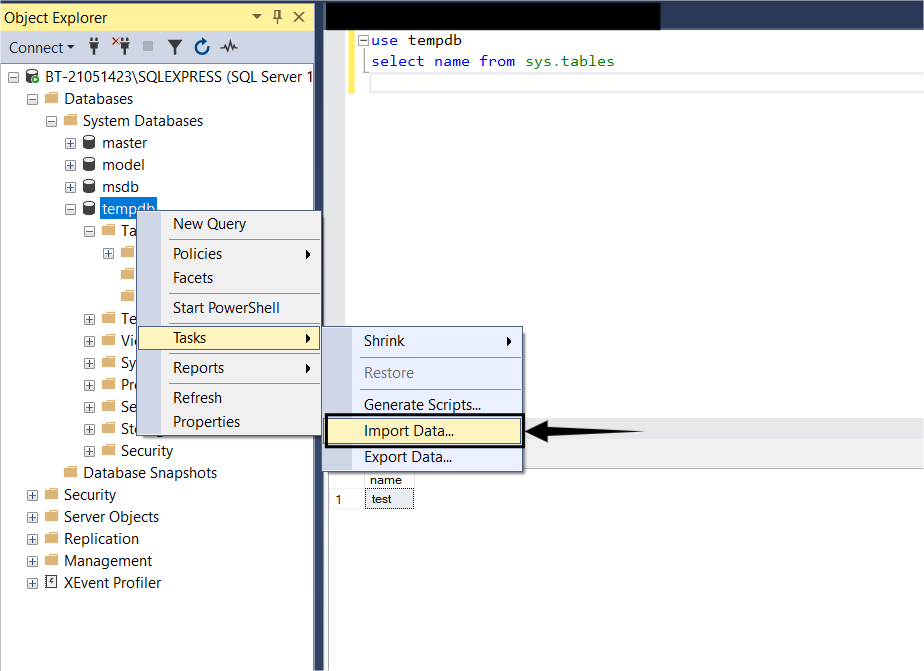
- Create a table in your database where you will be importing the CSV file containing all your data.
- Right-click on your database and select Tasks > Import Data.
- Click the Next > button.
- For the Data Source, select Flat File Source.
- Use the Browse button to select the CSV file. Here you can configure how you want the data to be imported. Once you’re done, click on the Next > button.
- For the Destination, select the correct database provider. For example, for SQL Server 2016, you can use SQL Server Native Client 11.0. Enter the Server name. Check the Use SQL Server Authentication radio button. Enter the User name, Password, and Database before clicking on the Next > button.
- On the Select Source Tables and Views window, you can Edit Mappings before clicking on the Next > button.
- Check the Run Immediately checkbox and click the Next > button.
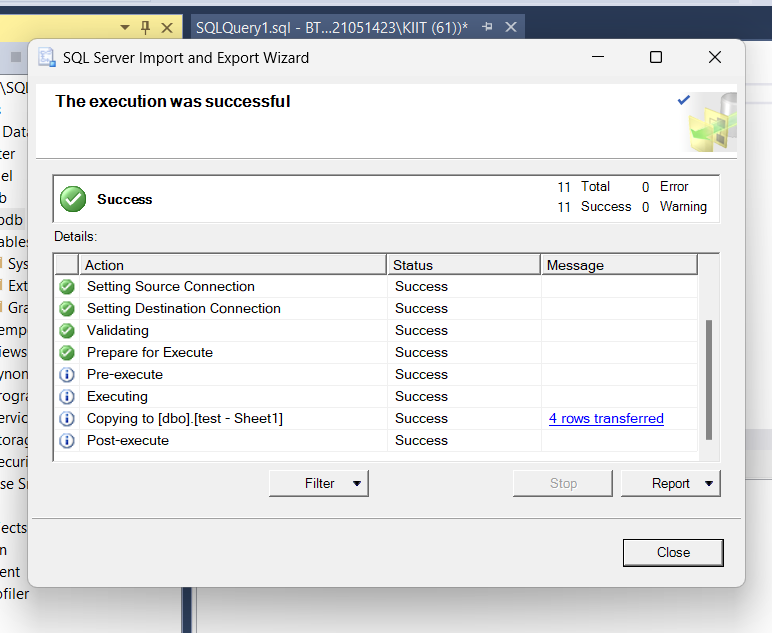
- Click on the Finish button to run the package.
- After this, you will see a Successful message prompted on your screen. This means that your data has been successfully loaded to the SQL Server.
There you have it. You now have a solid foundation for exporting data from Salesforce to SQL Server.

Limitations of Manually Exporting Data from Salesforce to SQL Server
There is one caveat to this method and that is that this method does not support bulk import and therefore if you have multiple CSV files, you will have to load them one at a time. It also does not support automatic incremental updates since it’s a manual process.
Do you want a hassle-free method of transferring your data without the drawbacks of manually writing code? Enter Hevo. Sign up for a free trial today to simplify your data transfer process.
Method 2: Manually Replicating Data from Salesforce to SQL Server
Step 1: Pull Data from Salesforce
a. Use the Salesforce REST API to pull data.
You can use CURL or Postman tools, or HTTP clients for your preferred language or framework, to interact with the REST API. Some recommendations:
- Apache HttpClient for Java
- Spray-client for Scala
- Hyper for Rust
- Ruby rest-client
- Python http-client
The Salesforce REST API supports oAuth 2.0 authentication. In order to load the data on a data warehouse, you must engage with the API’s resources and begin retrieving its data after completing the authentication process successfully.
Getting a list of all the resources we may access is simple. For instance, we can use curl to do the following operations:
curl https://na1.salesforce.com/services/data/v26.0/ -H "Authorization: Bearer token"A typical response from the server will be a list of available resources in JSON or XML, depending on what you have asked as part of your request.
{

"sobjects" : "/services/data/v26.0/sobjects",

"licensing" : "/services/data/v26.0/licensing",

"connect" : "/services/data/v26.0/connect",

"search" : "/services/data/v26.0/search",

"query" : "/services/data/v26.0/query",

"tooling" : "/services/data/v26.0/tooling",

"chatter" : "/services/data/v26.0/chatter",

"recent" : "/services/data/v26.0/recent"

}
Salesforce REST API is very expressive; it also supports a language called Salesforce Object Query Language (SOQL) for executing arbitrarily complex queries. For example, the following curl command will return the name fields of accounts:
curl https://na1.salesforce.com/services/data/v20.0/query/?q=SELECT+name+from+Account -H "Authorization: Bearer token"and the result will look like the following:
{
"done" : true,
"totalSize" : 14,
"records" :
[
{
"attributes" :
{
Following the preparation of your customer and your successful connection to Salesforce, you must do the following actions:
- choose which API resources to pull out.
- Connect these resources to each data warehouse repository’s schema that you intend to utilize.
- convert information into it and
- Using the guidelines below, load the converted data into the repository.
b. Pull Data using Salesforce Streaming API
Using the Streaming API to communicate with SalesForce is an additional intriguing method. You create queries using it, and you receive notifications each time there is a change to any data that is registered to this query. For instance, the API will notify your preferred service by push notification whenever a new account is created. This is a very strong method that can ensure updates on a Data Warehouse repository in nearly real time.
However, to put anything like that into practice, you have to ensure that whatever data management infrastructure you develop meets your use case’s delivery semantic requirements while also taking into account the limits of both ends.
Step 2: Salesforce Data Preparation for Microsoft SQL Server
The proper mapping of any data to the appropriate data types is crucial when working with data sourced from online services, where the data is often serialized as JSON. It’s crucial to give appropriate thought to data type assignments since altering the data type might cause your database to go offline.
The most common method for importing SalesForce data into a SQL Server database is to construct a schema in which every API endpoint is mapped to a table. Every key in the SalesForce API endpoint response has to be mapped to a column in that table, and you need to make sure the conversion to a data format that is compatible with SQL Server is done correctly.
Step 3: Load data from Salesforce to MS SQL Server
The SQL Server Import and Export Wizard is one tool you may use to import data into your database. It will enable mass loading of data from several data sources that are supported by a graphical user interface.
Additional SQL Server databases, Oracle databases, Flat Files, Access Data Sources, PostgreSQL, MySQL, and Azure Blob Storage can all be imported. You should absolutely think about leveraging the Azure Blob Storage connection, especially if you are using a managed version of MS SQL Server on Azure. With the Import and Export Wizard, you may load data as Blobs on Azure and your MS SQL Server database will sync with it.
The bcp tool is an additional method for importing large amounts of data into a SQL Server database, both on Azure and on-premises. This command-line utility was created especially for using an MS SQL database to load and unload data in bulk.
Lastly, you can utilize BULK INSERT SQL commands for compatibility purposes, particularly if you are managing databases from various manufacturers.
Method 3: Connecting Salesforce to SQL Server Using Hevo
Using Hevo would be a much superior alternative to this method since it’s able to automate this ETL process, allowing your developers to focus on BI and not coding complex ETL pipelines.
You can move data effortlessly with Hevo from Salesforce to SQL Server using the following steps:
Step 1: Authenticate and connect to your Salesforce account on the Hevo platform.

Step 2: Connect your SQL Server to Hevo and transfer data instantly and set up Salesforce to SQL Server Integration.

By following the above steps, you easily export Salesforce data to SQL Server.
For detailed information check out:
Hevo is the only real-time ELT No-code Data Pipeline platform that cost-effectively automates data pipelines that are flexible to your needs. With integration with 150+ Data Sources (40+ free sources), we help you not only export data from sources & load data to the destinations but also transform & enrich your data, & make it analysis-ready.
Conclusion
This article talks about the 2 simple methods you can use to transfer data from Salesforce to SQL Server. You can either connect them manually or a third-party tool like Hevo.
Hevo, a No-code Data Pipeline, helps you transfer data from 150+ data sources (Including 50+ Free Sources like Salesforce) in a fully automated and secure manner without having to write the code repeatedly.
FAQ on Salesforce to MS SQL Server
1. How to get Salesforce data into SQL Server?
You can use various ways to get Salesforce data into SQL Server
1. ETL Tools
2. Using Salesforce Data Loader
3. Using API’s
2. Is Salesforce compatible with SQL?
Salesforce uses a different data model and query language (SOQL) compared to SQL databases. However, Salesforce is compatible with SQL in the sense that data can be extracted, transformed, and loaded into SQL databases using various tools and methods.
3. Can you connect SSMS to Salesforce?
Using Third-Party Connectors:
A. CData SSIS Components for Salesforce:
– Install the CData SSIS Salesforce component.
– Use it within SSIS packages to connect to Salesforce, extract data, and load it into SQL Server.
B. Linked Servers:
– You can create a linked server in SQL Server to connect to Salesforce using an ODBC or OLE DB provider. This allows you to run queries in SQL Server that fetch data from Salesforce.

Share it with your connections.
-
 Share To X
-
 Share To LinkedIn
-
 Share To Facebook
-
 Copy Link


