

Data practitioners often need manual intervention to load large volumes of data into Snowflake in near real-time. Traditional batch loading can be slow and intensive and may lead to latency and increased operational costs.
Enter Snowflake Snowpipe. This feature automates the entire process of loading data into Snowflake via continuous or micro-batch data loading as soon as it becomes available.
You can read this guide to understand the basic concepts of Snowpipe. I have also provided a step-by-step tutorial on how you can move your data from Google Cloud Bucket to Snowflake using Snowpipe. Let’s get started!
Table of Contents
What is Snowpipe?

Snowpipe is a feature provided by Snowflake that helps with automatic data ingestion. Snowpipe facilitates continuous data loading from various cloud sources such as Google Cloud Storage, Amazon AWS S3, and Azure. Snowpipe automatically detects new data files arriving in the designated storage location, triggering the ingestion process without requiring manual intervention.
Migrating your data into Snowflake doesn’t have to be complex. Relax and go for a seamless migration using Hevo’s no-code platform. With Hevo, you can:
- Effortlessly extract data from 150+ connectors.
- Tailor your data to Snowflake’s needs with features like drag-and-drop and custom Python scripts.
- Achieve lightning-fast data loading into Snowflake, making your data analysis-ready.
Try to see why customers like Deliverr and Harmoney have upgraded to a powerful data and analytics stack by incorporating Hevo!
Get Started with Hevo for FreeWhy should you use Snowpipe?
- Real-time Data Ingestion – Snowpipe automates data ingestion into Snowflake in near real-time. It continuously monitors the designated storage locations(e.g., cloud storage buckets) for new data files and loads them into Snowflake as soon as they are available.
- Automation and Efficiency – Automating the data ingestion process reduces the need for manual/human intervention and minimizes the chances of error.
- Scalability – It scales automatically to accommodate increasing volumes of data and ingestion rates, ensuring consistent performance.
What is the difference between Snowflake Snowpipe and Bulk Loading?
Here are some critical differences between Snowpipe and bulk data load workflow using the COPY command.
| Parameters | Snowpipe | Bulk Data Load |
| Authentication | It requires critical pair authentication with JSON Web Token(JWT). | It mainly relies on the security options supported by the client for authenticating a user. |
| Load History | The loaded data is stored in the metadata of the pipe for 14 days. | The loaded data is stored in the metadata of the target table for 64 days. |
| Compute Resources | It uses Snowflake-supplied computing resources | A user-specified warehouse is required to execute the COPY statement. |
| Cost | It is billed according to the computing resources used while loading the data. | It is billed according to the time the virtual warehouses are active. |
| Transactions | Data loads are split or combined multiple or a single transaction depending on the data file size. | Data loads are always performed in a single transaction. |
Fivetran cost monitoring, built into Snowflake.

How does Snowpipe work?

Automating Snowpipe for Google Cloud Storage
Prerequisites:
- An account with billing enabled on Google Cloud Platform.
- A Snowflake Account.
Step 1: Create a Cloud Storage Integration in Snowflake
Snowflake generates a service account that allows you to access the cloud buckets that hold your data files.
1.1 Create the cloud storage integration using the command :
 CREATE STORAGE INTEGRATION <integration_name>
 TYPE = EXTERNAL_STAGE
 STORAGE_PROVIDER = 'GCS'
 ENABLED = TRUE
 STORAGE_ALLOWED_LOCATIONS = ('gcs://<bucket>/<path>/',   'gcs://<bucket>/<path>/');
Here,
<integration_name> is the name you want to give the new integration.
<bucket> is the cloud bucket name containing your data files.
<path> is an optional field, which is the location of your bucket.

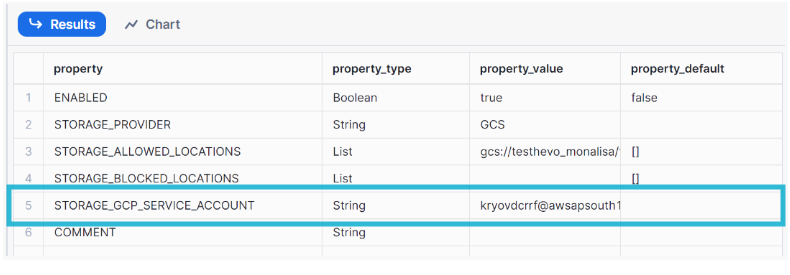
Step 2: Fetch the Cloud Storage service account for your Snowflake account
Using the command below, we will retrieve the ID for the Cloud Storage service account, which automatically gets created for your Snowflake account. Run the query provided to get the details of the integration you just created.
DESC STORAGE INTEGRATION <integration_name>;

<integration_name> is the name of the integration you just created.
Step 3: Grant the Service Account Permissions to access the Buckets
You need to grant a few permissions to your service account so that it can access your buckets; you can do so by creating a role, adding the required permissions to that role, and finally assigning the role to your service account. Create a custom role and grant the following permissions as shown below:
create role my_role;Permissions to be granted :
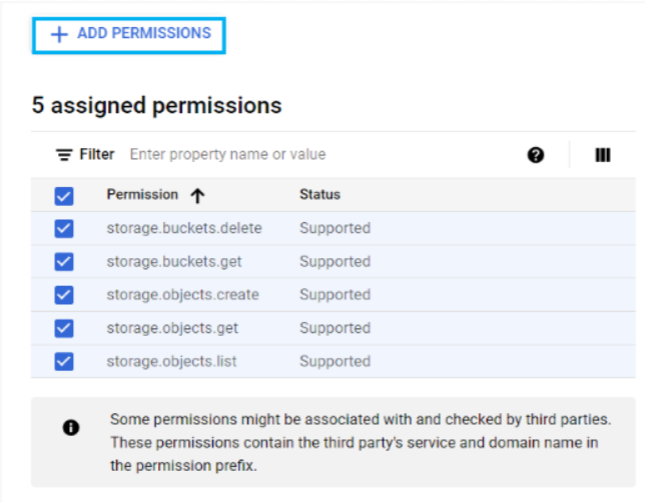
Go back to the Snowflake worksheet and grant usage on the integration created.
grant usage on integration gcs_snowpipe to my_role;
Step 4: Configuring Automation using GCS Pub/Sub
Pub/Sub is used to receive notifications about changes in the bucket. You need to configure pub/sub so that whenever new data is loaded in your bucket, it will automatically move to a snowflake using snowpipe.
4.1 Creating Pub/Sub Topic
Create a Pub/Sub Topic on your Cloud Shell using the command :
gsutil notification create -f json -e OBJECT_FINALIZE gs://example-bucket

Here, replace example-bucket with the actual name of your bucket in Google Cloud.

Output:

4.2 Creating Pub/Sub Subscription
Create a subscription with Pull Delivery using the Cloud Console; give the command:
gcloud pubsub subscriptions create SUBSCRIPTION_NAME --topic=TOPIC_NAME

Replace TOPIC_NAME with the name of the Pub/Sub topic you created above.

Output:

4.3 Retrieve the Subscription ID
To retrieve your subscription ID, you can follow the steps mentioned below:
- Log into the Google Cloud Storage Console.
- From the dashboard choose Big Data >> Pub/Sub >> Subscriptions
- Copy the Subscription ID.
Step 5: Create Notification Integration in Snowflake
Use the command below to create a notification integration. Whenever your bucket’s bucket value changes, your data in Snowflake gets updated.
CREATE NOTIFICATION INTEGRATION demo_integration
TYPE = QUEUE
NOTIFICATION_PROVIDER = GCP_PUBSUB
ENABLED = true
GCP_PUBSUB_SUBSCRIPTION_NAME = 'projects/key-range-427704-a7/subscriptions/SUBSCRIPTION_NAME';
Here,
Replace demo_integration with the name of your integration as you choose. Replace ‘projects/key-range-427704-a7/subscriptions/SUBSCRIPTION_NAME’ with the Subscription ID you retrieved and copied in the previous steps.

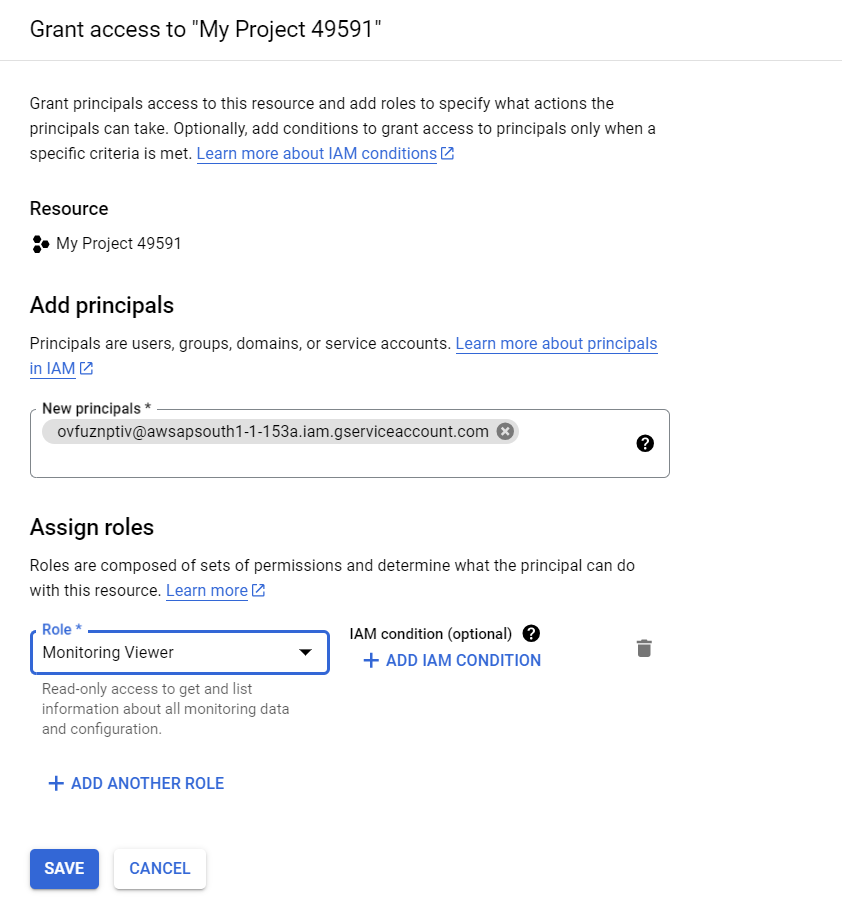
Step 6: Provide Snowflake Access to the Pub/Sub Subscription
- Execute the DESC INTEGRATION command to retrieve the service account details.
DESC NOTIFICATION INTEGRATION <integration_name>;

- Record the service account name in the GCP_PUBSUB_SERVICE_ACCOUNT column.
- Select the Subscription to configure.
- Click on SHOW INFO PANEL in the upper right corner.
- Select the ADD PRINCIPLE button.
- Select Pub/Sub Subscriber and Monitoring Viewer as the roles.
Step 7: Create a Stage
A stage is a virtual object in which data from external tables are stored in the snowflake database for loading and unloading purposes. You can create the stage using the following command:
Note:- Replace url with gcs://<your_bucket_name>
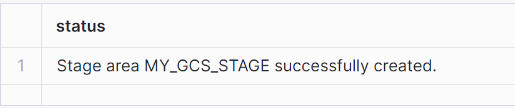
create stage my_gcs_stage
url = 'gcs://testhevo_monalisa'
storage_integration = gcs_snowpipe
file_format = my_csv_format;
Step 8: Create a Pipe with Auto-Ingest enabled
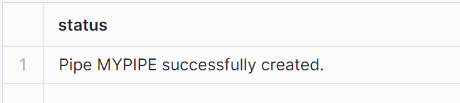
You can create a pipe using the command given below:
CREATE PIPE SNOWPIPE_DEMO.public.mypipe
AUTO_INGEST = true
INTEGRATION = 'DEMO_INTEGRATION'
AS
COPY INTO SNOWPIPE_DEMO.public.demod1
FROM @SNOWPIPE_DEMO.public.my_gcs_stage/;
When new data files are added to the bucket, the event message informs Snowpipe to load the subsequent files to the table defined in the pipe.
After correctly following the abovementioned steps, you can view your loaded table by running a SELECT query.

Managing Snowpipe
- CREATE PIPE
You can create a new pipe in the system for defining the COPY INTO <table> statement used by Snowpipe to load data from an ingestion queue into tables.
CREATE [ OR REPLACE ] PIPE [ IF NOT EXISTS ] <name>
  [ AUTO_INGEST = [ TRUE | FALSE ] ]
  [ ERROR_INTEGRATION = <integration_name> ]
  [ AWS_SNS_TOPIC = '<string>' ]
  [ INTEGRATION = '<string>' ]
  [ COMMENT = '<string_literal>' ]
  AS <copy_statement>
<name> is the identifier for the pipe.
<copy statement> loads data from queued tables to Snowflake.
- DROP PIPE
Suppose you no longer need the pipe to ingest data from the configured source; you can delete the existing pipe using the given command. This query removes the specified pipe from the current/specified schema.
DROP PIPE [ IF EXISTS ] <name>
<name> specifies the name of the pipe to be dropped.
- DESCRIBE PIPE
You might need the properties of the pipe you created for reference. This query displays the properties of the pipe as well as the values.
DESC[RIBE] PIPE <name>
<name> is the name of the pipe to be described.
Advantages and Disadvantages of using Snowpipe
Advantages of using Snowpipe
- Snowpipe can load data in real time, eliminating the need for manual triggering, automatically recognizing new data files, and reducing latency in data availability for analysis.
- Snowpipe manages data ingestion at scale and leverages Snowflake’s cloud-native architecture for seamless integration with cloud storage platforms such as Amazon S3 and Azure Blob Storage.
Disadvantages of using Snowpipe
- A potential drawback is the reliance on continuous use of cloud infrastructure, which can lead to ongoing operational costs, especially in fluctuating data volumes.
Error Notifications
When multiple pipes use a single notification integration, the body of error messages identifies the pipe name, external stage, path(optional), and file where the error originated.
- While creating the pipe, we can include Error notification integration as shown below:
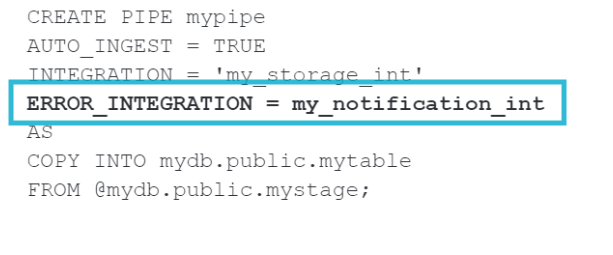
We can also modify an existing pipe to add error notification integration, as shown below:

Snowpipe Costs
- With Snowpipe’s serverless compute model, users can initiate any size data load without maintaining a virtual warehouse.
- Snowflake provides and manages computing resources, automatically scaling up and down as per the load on Snowpipe. Bills are charged based on their compute resource usage.
- File formats, sizes, and the complexity of COPY statements (including the SELECT statement used for transformations) all impact the resource consumption and file overhead charged for a Snowpipe load.


Example Queries to View Data Load History and Cost
Example 1: Suppose you want to find the list of pipes and the volume of credits consumed for the previous 30 days.
Query: This query provides a complete list of pipes and the volume of credits consumed via the service over the last 30 days.
SELECT TO_DATE(start_time) AS date,
  pipe_name,
  SUM(credits_used) AS credits_used
FROM snowflake.account_usage.pipe_usage_history
WHERE start_time >= DATEADD(month,-1,CURRENT_TIMESTAMP())
GROUP BY 1,2
ORDER BY 3 DESC;
Example 2: Suppose you want to see the average weekly credits of snowpipe used over the last year.
Query: This query shows the average daily credits of Snowpipe grouped by week over the last year.
WITH credits_by_day AS (
  SELECT TO_DATE(start_time) AS date,
    SUM(credits_used) AS credits_used
  FROM snowflake.account_usage.pipe_usage_history
  WHERE start_time >= DATEADD(year,-1,CURRENT_TIMESTAMP())
  GROUP BY 1
  ORDER BY 2 DESC
)

SELECT DATE_TRUNC('week,' date),
  AVG(credits_used) AS avg_daily_credits
FROM credits_by_day
GROUP BY 1
ORDER BY 1;
Discover other powerful data loading options by checking out our guide on Snowpipe alternatives.
Conclusion
Snowpipe is a pivotal tool in automated data loading, fundamentally transforming how businesses manage and utilize their data. This tutorial provided an overview of snowpipe, why you should use a snowpipe, how you can manage your snowpipe, and the advantages and disadvantages of snowpipe.
By following the step-by-step guide mentioned in this blog, you can create a pipe to help you ingest your data from Google Cloud Bucket to Snowflake. The cherry on top is that Hevo will make it even simpler by making the data integration process very fast!
Sign up for our 14-day free trial. Check out the pricing details to see which plan fulfills all your business needs. You can also Schedule a Demo to get to know us better.
Frequently Asked Questions (FAQs)
1. What is the difference between Snowpipe and Snowpipe Streaming?
Snowpipe ingests data from cloud storage platforms like S3 and Azure, whereas Snowpipe Streaming loads data directly from sources via API or Client SDK.
2. What if Snowpipe fails?
When an error occurs in the loading process, Snowpipe retries the loading process. The number of retries can be configured as per the user. If the load fails even after the maximum number of retries, the error is logged, and the load operation is aborted.
3. Is Snowpipe part of Snowflake?
Snowpipe is a real-time data ingestion service provided by Snowflake.
4. What file size is Snowpipe?
The recommended file size for the data loaded in Snowpipe is 100-250 MB. However, if the data flow is continuous, it should be staged within one minute of arrival.
5. How to refresh Snowpipe?
Using the REFRESH statement, you can copy the data files staged within the last seven days to the Snowpipe ingest queue.
Share it with your connections.
-
 Share To LinkedIn
-
 Share To Facebook
-
 Share To X
-
 Copy Link


