Unlock the full potential of your Shopify Webhook data by integrating it seamlessly with BigQuery. With Hevo’s automated pipeline, get data flowing effortlessly—watch our 1-minute demo below to see it in action!
In this article, you’ll go through two methods to seamlessly move data from Shopify Webhook to BigQuery.
- If you’re looking for a no-code connector to replicate data from Shopify Webhook to BigQuery in minutes, you can take a look at Hevo.
- On the other hand, if you’d like to use custom code to build a pipeline, we have a section listing the steps required for the same. Either way, we’ve got you covered.
Let’s dive in!
Table of Contents
What is Shopify Webhook?
- The e-commerce platform Shopify allows users to construct an online store and retail point-of-sale system in minutes.
- It is a market-leading online store builder used extensively by both novices and experienced users.
- This platform makes it easy for business owners to manage their operations by providing design templates, website hosting, marketing tools, and even a blog.
- Shopify Webhook allows you to run code in response to a specific event in your Shopify store or stay on top of Shopify data.
- Webhooks are a handy alternative to continuously polling for changes to the data present in a store.
What is Google BigQuery?
- BigQuery is a robust data warehouse that is exceptionally fast and reliable in handling heavy loads.
- It was launched by Google and hence has good connectivity with the other Google platform tools.
- It employs a serverless model, which makes it cost-effective and allows pricing based on users’ usage.
- It also has an integrated query engine that helps in performing analytics and since a serverless architecture is employed it enables it to process terabytes of data in seconds.
- Google BigQuery is Google’s data warehousing solution.
- As a part of the Google Cloud Platform, it deals in SQL, similar to Amazon Redshift.
Method 1: Using Hevo as a Shopify Webhook to BigQuery Connector
Hevo provides a simple two-step technique for easily migrating your data from Shopify Webhook to BigQuery and creating a robust data backup solution for the upcoming analytical workload.
Method 2: Using Custom Scripts for Shopify Webhook BigQuery Integration
In this method, you’ll manually code the script and set up the connection from Shopify Webhook to Snowflake. This method is quite complex. This strategy is best for those who want to spend time designing and managing pipelines.
Method 1: Using Hevo as a Shopify Webhook to BigQuery Connector
Configure Shopify Webhook as a Source
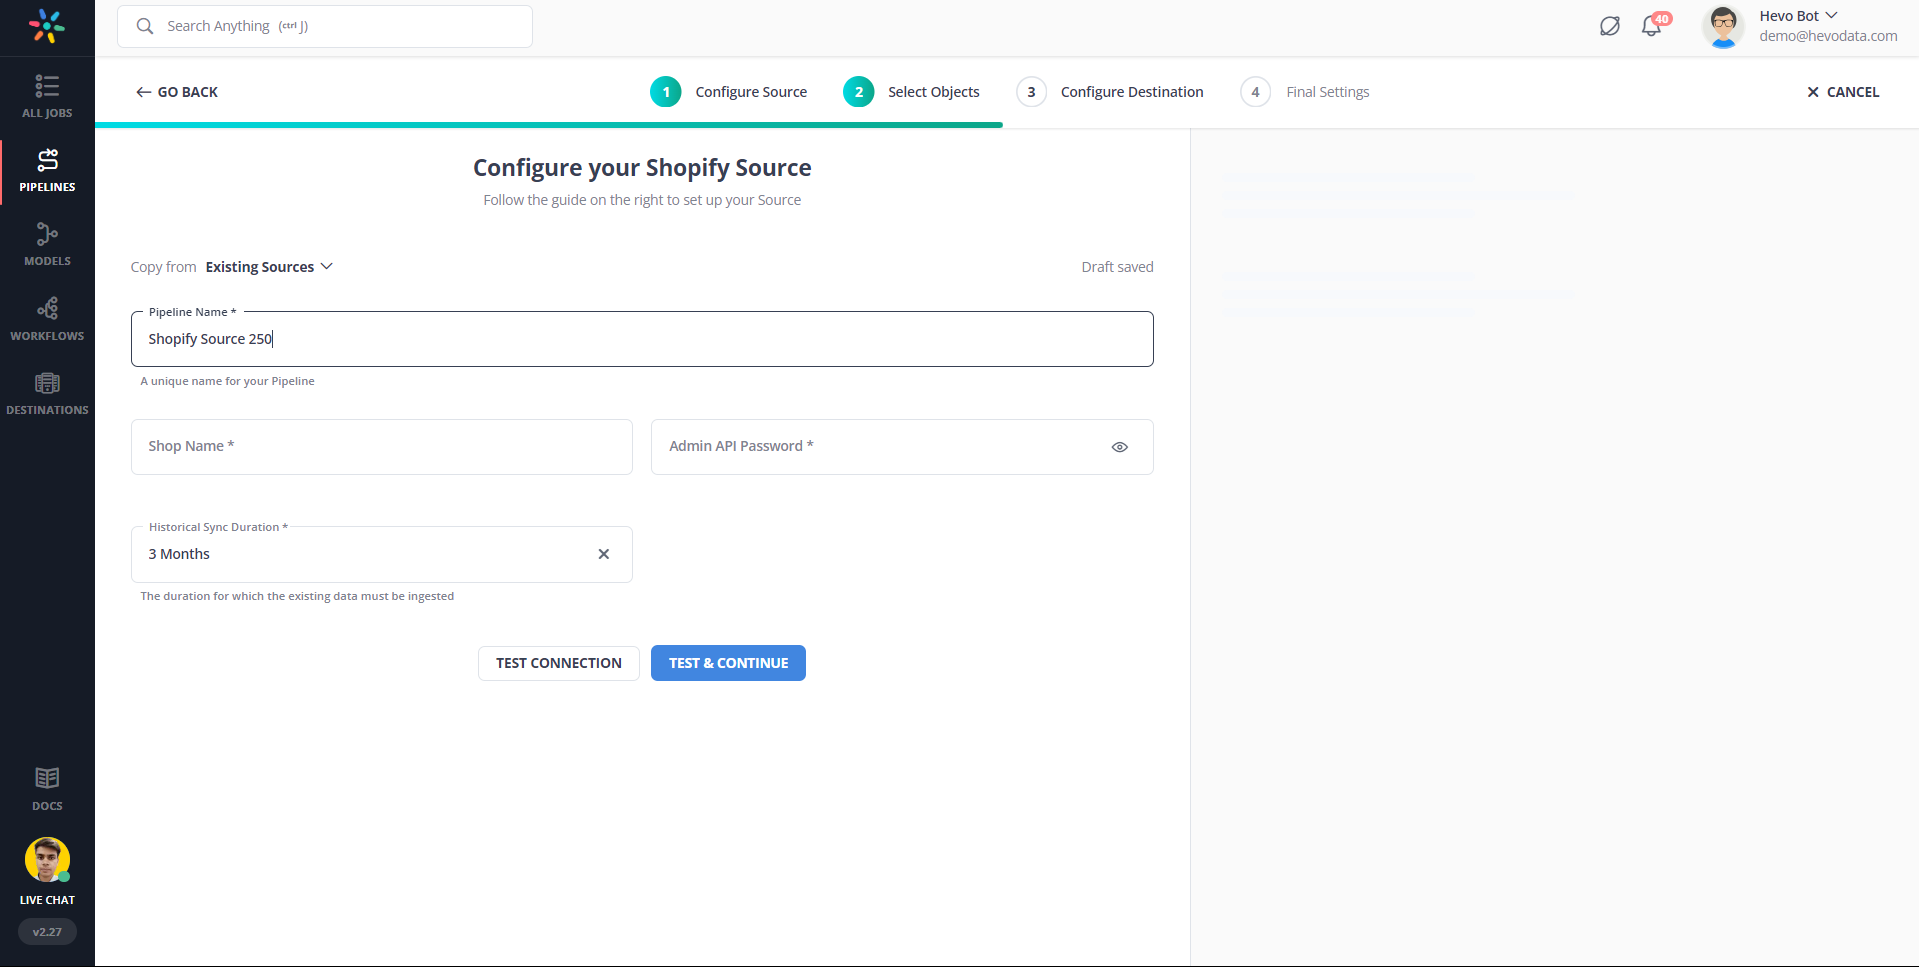
- Step 1.1: From the list of sources offered to you, you can choose Shopify as the source.
- Step 1.2: Next, you need to enter the pipeline name and click continue.
- Step 1.3: In this step, you’ll have the option to choose the destination if you’ve already created it. You can either choose an existing destination or create a new one by clicking on the ‘Create Destination’ button.
- Step 1.4: On the final settings page, you’ll have the option of selecting ‘Auto-Mapping’ and JSON parsing strategy.
- Step 1.5: Click Continue. You should see a webhook URL that is generated on the screen.
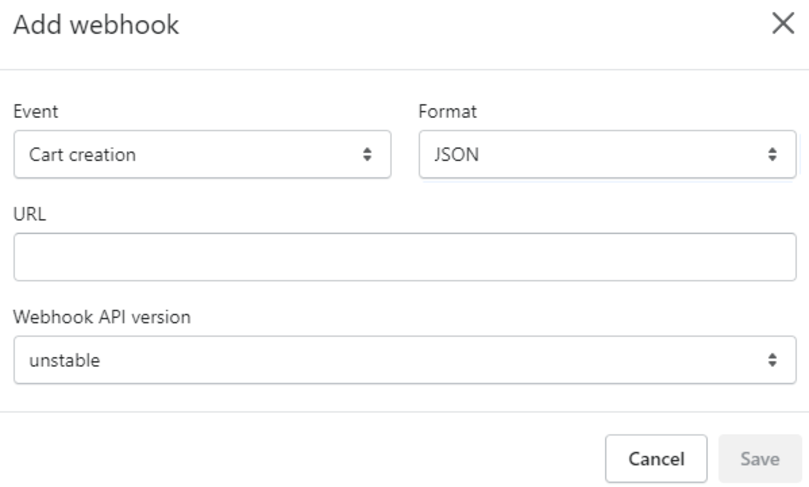
- Step 1.6: Next, you need to copy the generated webhook URL and add it to your Shopify account. Get a more detailed guide on how webhooks work in Shopify.

Configure BigQuery as a Destination
- Step 2.1: In the Asset Palette, select DESTINATIONS.
- Step 2.2: In the Destinations List View, click + CREATE.
- Step 2.3: Select Google BigQuery from the Add Destination page.
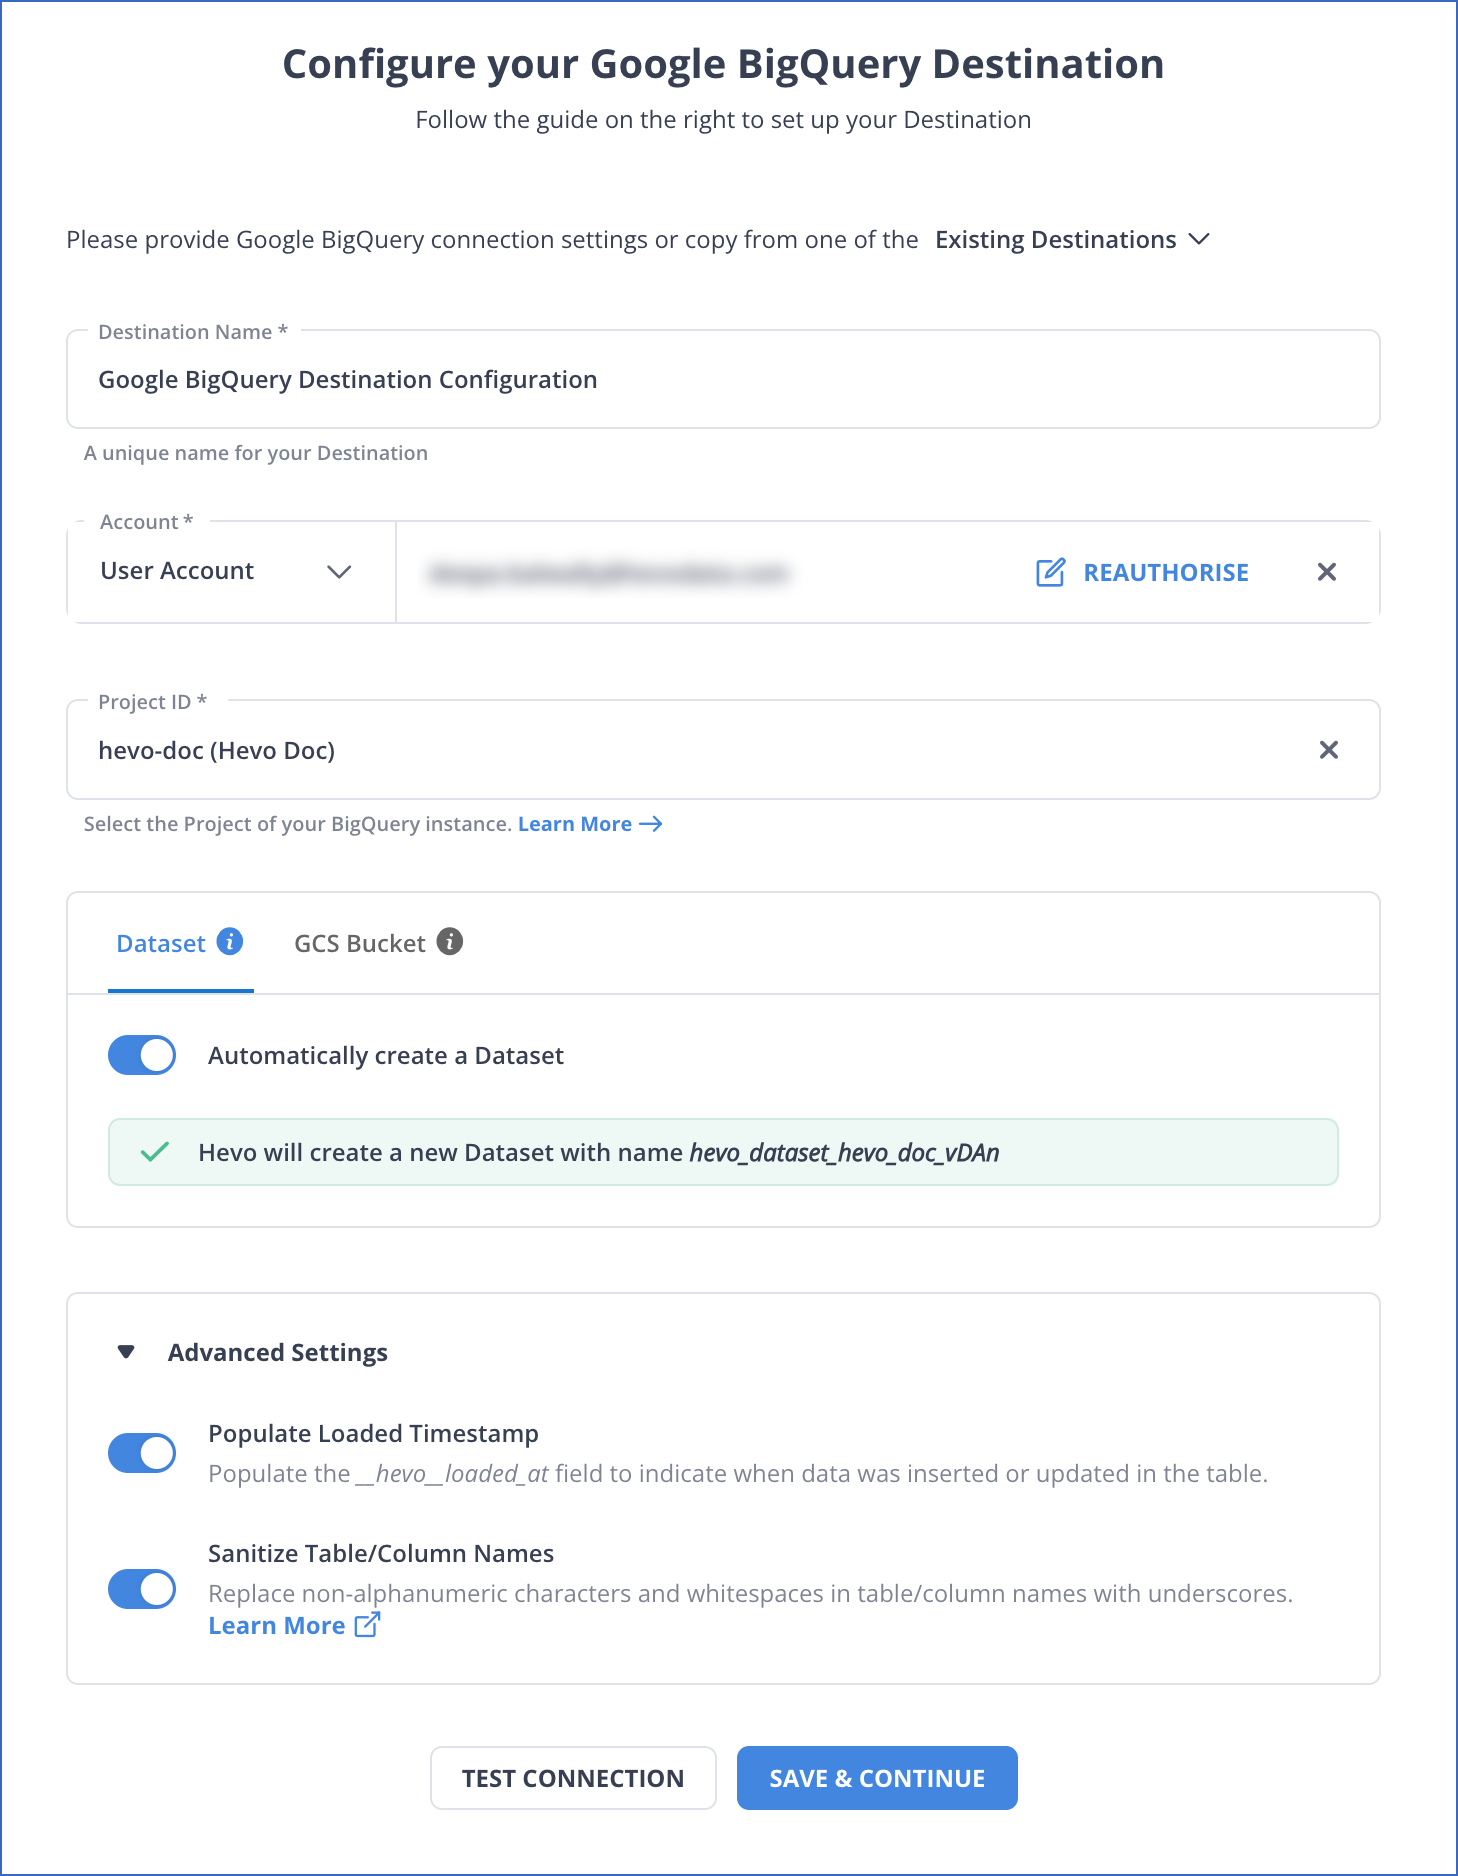
- Step 2.4: Choose the BigQuery connection authentication method on the Configure your Google BigQuery Account page.
- Step 2.5: Set the parameters on the Configure your Google BigQuery page as the image.

- Step 2.6: Click Test Connection to test connectivity with the Amazon Redshift warehouse.
- Step 2.7: Once the test is successful, click SAVE DESTINATION.
Method 2: Using Custom Scripts for Shopify Webhook BigQuery Integration
Step 1: Moving Data from Shopify Webhook to Redshift
- Step 1.1: First, you’ll need to create a Shopify Webhook by logging into your Shopify account.

- Step 1.2: To establish a secure SSL connection between the remote host and the Amazon Redshift cluster, you’ll need to retrieve the AWS Redshift Cluster Public Key and Cluster Node IP Addresses.
aws redshift describe-clusters –cluster-identifier <cluster-identifier>- Step 1.3: Create a manifest file on your local machine. The manifest file will contain entries of the SSH host endpoints and the commands to be completed on the machine to send data to Amazon Redshift. The format for the Manifest file is as follows:
{
  "entries": [
    {"endpoint":"<ssh_endpoint_or_IP>",
      "command": "<remote_command>",
      "mandatory":true,
      "publickey": "<public_key>",
      "username": "<host_user_name>"},
    {"endpoint":"<ssh_endpoint_or_IP>",
      "command": "<remote_command>",
      "mandatory":true,
      "publickey": "<public_key>",
      "username": "host_user_name"}
    ]
}- Step 1.4: You can then upload the manifest file to an Amazon S3 Bucket and give read permissions on the object to all the users.
aws s3 cp file.txt s3://my-bucket/ --grants
read=uri=http://acs.amazonaws.com/groups/global/AllUsers- Step 1.5: Finally, to load data into Amazon Redshift, you can use the COPY command to connect to your local machine and load the data extracted from Shopify Webhook to Redshift.
copy contacts
from 's3://your_s3_bucket/ssh_manifest' credentials
iam_role 'arn:aws:iam::0123456789:role/Your_Redshift_Role'
delimiter '|'
ssh;
Step 2: Moving Data from Redshift to BigQuery
- You’ll be leveraging the BigQuery Transfer Service to copy your data from an Amazon Redshift Data Warehouse to Google BigQuery.
- BigQuery Transfer Service engages migration agents in GKE and triggers an unload operation from Amazon Redshift to a staging area in an Amazon S3 bucket.
- Your data would then be moved from the Amazon S3 bucket to BigQuery.
Here are the steps involved in the same:
- Step 1: Go to the BigQuery page in your Google Cloud Console.
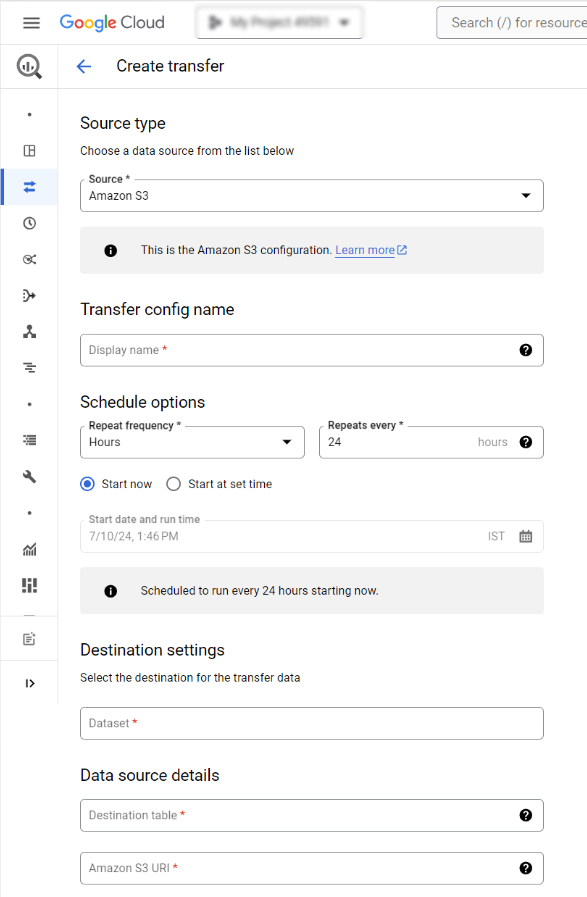
- Step 2: Click on Transfers. On the New Transfer Page you’ll have to make the following choices:
- For Source, you can pick Migration: Amazon Redshift.
- Next, for the Display name, you’ll have to enter a name for the transfer. The display name could be any value that allows you to easily identify the transfer if you have to change the transfer later.
- Finally, for the destination dataset, you’ll have to pick the appropriate dataset.

- Step 3: Next, in Data Source Details, you’ll have to mention specific details for your Amazon Redshift transfer as given below:
- For the JDBC Connection URL for Amazon Redshift, you’ll have to give the JDBC URL to access the cluster.
- Next, you’ll have to enter the username for the Amazon Redshift database you want to migrate.
- You’ll also have to provide the database password.
- For the Secret Access Key and Access Key ID, you need to enter the key pair you got from ‘Grant Access to your S3 Bucket’.
- For Amazon S3 URI, you need to enter the URI of the S3 Bucket you’ll leverage as a staging area.
- Under Amazon Redshift Schema, you can enter the schema you want to migrate.
- For Table Name Patterns, you can either specify a pattern or name for matching the table names in the Schema. You can leverage regular expressions to specify the pattern in the following form: <table1Regex>;<table2Regex>. The pattern needs to follow Java regular expression syntax.
- Step 4: Click on Save.
- Step 5: Google Cloud Console will depict all the transfer setup details, including a Resource name for this transfer. This is what the final result of the export looks like:
What is the Importance of Shopify Webhook to BigQuery Integration?
- As your app continues to grow, it can become difficult to track traffic from Shopify’s platform. Hence, if you need to manage large volumes of event notifications for a reliable and scalable system, you can configure subscriptions to send these webhooks to Google Cloud Pub/Sub.
- You’ll find it to be easier than the traditional method of going through HTTPS.
- On top of this, as your app continues to grow, it’ll be difficult to keep track of all the event notifications in various small data repositories.
- The straightforward solution is to opt for a central repository of data that can scale to meet the needs of your growing company. Google BigQuery is the ideal choice for you if you want a managed, scalable, and efficient data warehouse.
Conclusion
This article talks about how you can connect Shopify Webhook to BigQuery using two methods: Using Hevo and using custom scripts. Hevo is a reliable, cost-effective and no-code method that can solve all your data migration problems within minutes. Sign up for Hevo’s 14-day trial and get started for free!
Frequently Asked Question
1. Can Shopify receive Webhooks?
Yes, Shopify can receive webhooks. Webhooks allow Shopify to notify external services about events, such as orders or product updates, in real time.
2. How do I manually trigger a webhook on Shopify?
To manually trigger a webhook in Shopify:
A. You typically need to use a third-party tool or script to send a POST request to your webhook endpoint.
B. You can also use Shopify’s admin to simulate an event that would trigger the webhook.
3. How do I receive data from webhook?
To receive data from a webhook:
-Set up a server to listen for POST requests at the URL specified in your Shopify webhook.
-When Shopify sends data to this URL, the server will capture the JSON or XML payload.
-Process the incoming data within your application as needed.
A simpler way to connect webhooks is by using an automated platform like Hevo.


