


Unlock the full potential of your BigQuery data by integrating it seamlessly with another BigQuery account. With Hevo’s automated pipeline, get data flowing effortlessly—watch our 1-minute demo below to see it in action!
When migrating data from one BigQuery dataset to another, you can organize and manage your data more effectively for different purposes, including development, testing, and production. By segregating data into different datasets, you can ensure that the changes made during the development or testing phase will not affect the production environment.
- Additionally, migration from one BigQuery project to another provides multiple versions of the same dataset, which helps you recover the data even during disaster recovery.
- BigQuery to BigQuery migration also helpsto consolidate your data from multiple BigQuery project sources into a central repository and optimize resource usage by distributing workloads to different BigQuery projects.
Let’s look into how you can effortlessly migrate data from BigQuery to BigQuery.
Table of Contents
BigQuery: An Overview
BigQuery is a serverless and fully managed data warehouse platform provided by Google Cloud. It integrates various Google Cloud platforms, third-party tools, and built-in machine learning and business intelligence within its unified platform. With BigQuery, you can quickly handle large-scale data analytics and processing tasks to derive relevant insights.
Method 1: Migrate from BigQuery to BigQuery Using Hevo
Use Hevo’s automated, no-code pipeline to seamlessly transfer data from BigQuery to BigQuery, ensuring real-time sync and pre/post-load transformations.
Method 2: Move Data from BigQuery to BigQuery Using CSV Files
Export your data manually from BigQuery into CSV files and then upload them to BigQuery for further processing.
Key Features of BigQuery
- Scalability and cost-effectiveness are two critical features of BigQuery. You can smoothly process terabytes to petabytes of data without requiring extensive infrastructure management, and you only have to pay for the resources you use.
- BigQuery uses columnar storage format and compression algorithms to store and query massive datasets using SQL-like syntax in Google’s global storage system called Colossus.
- This helps with faster petabyte-scale query performance and optimizes storage costs. Several options are available to access BigQuery, including the Google Cloud Platform (GCP) console, BigQuery REST API calls, the bq command line tool, or client libraries like Java or Python.
Method 1: Using Hevo Data to Transfer Data from BigQuery to BigQuery
Step 1.1: Setting up Google BigQuery as Your Pipeline Source
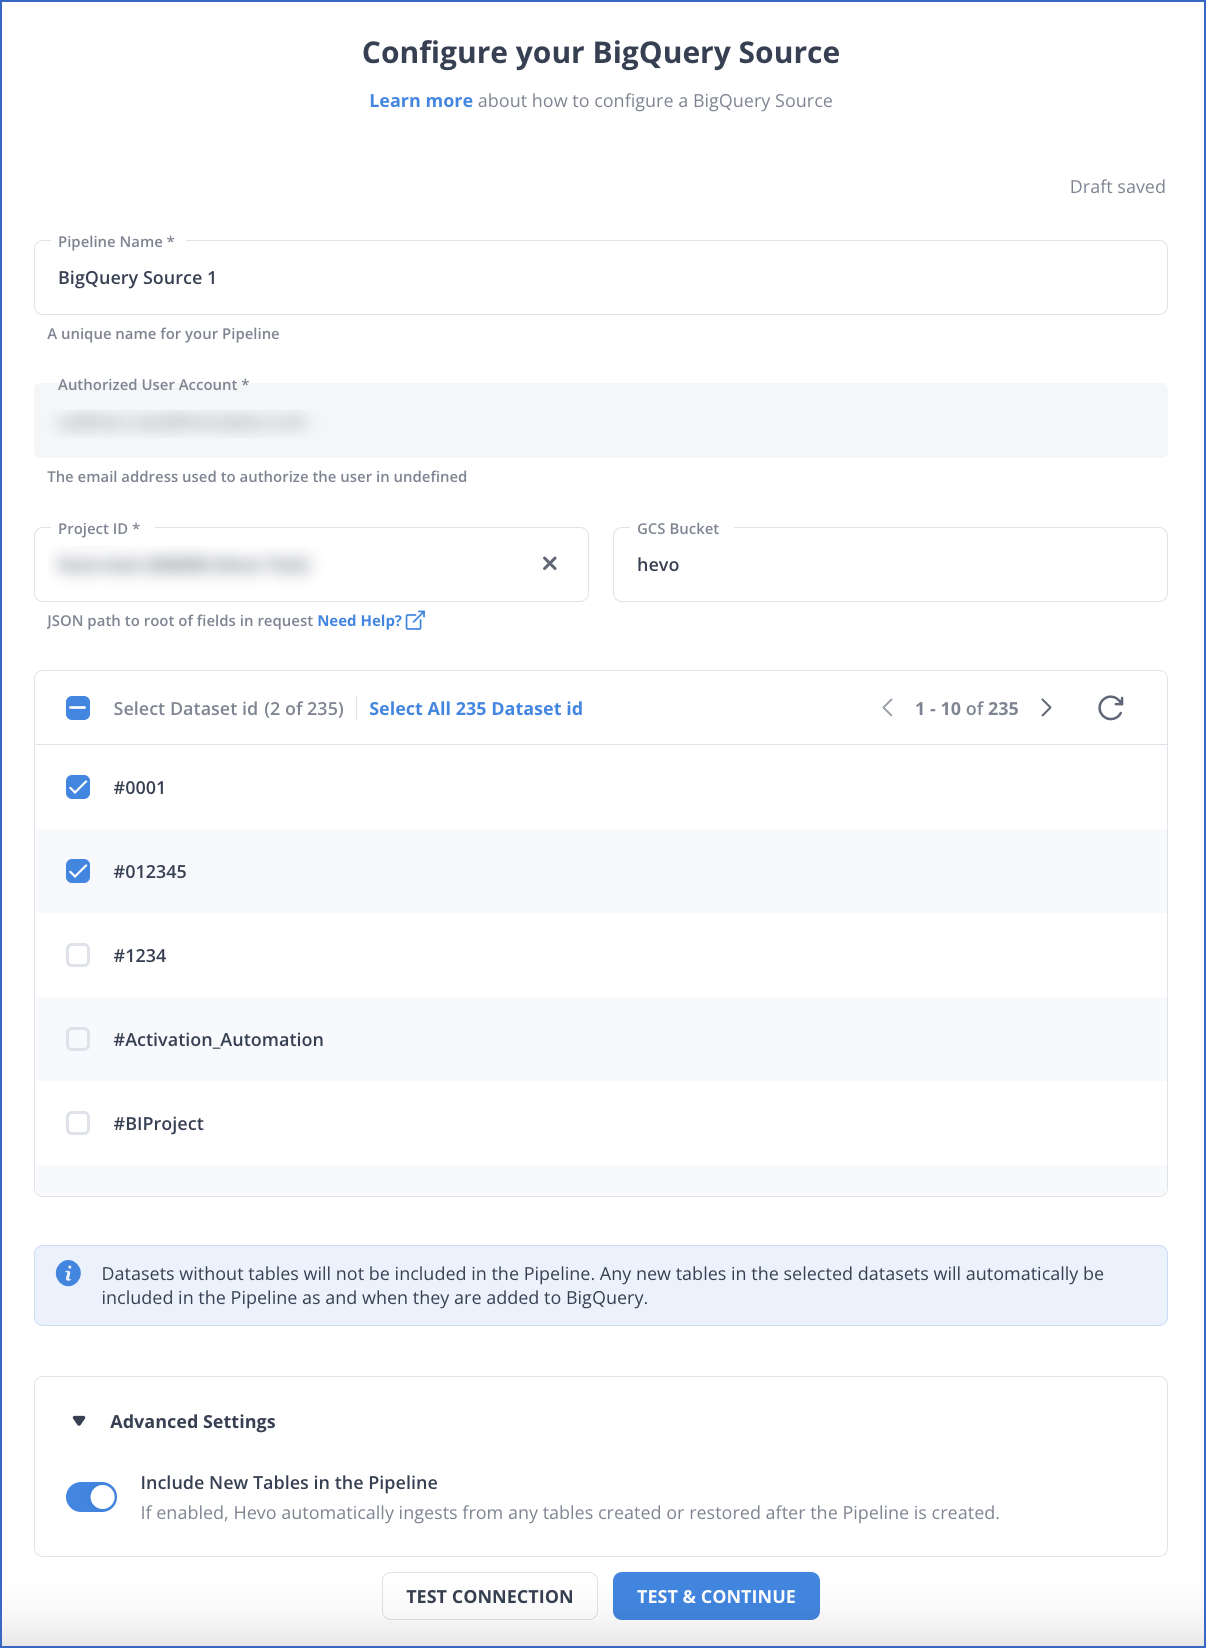
To learn more about the BigQuery configuration as a source, refer to the Hevo Documentation for Google BigQuery Source Connector page.
Step 1.2: Setting up Google BigQuery as Your Pipeline Destination
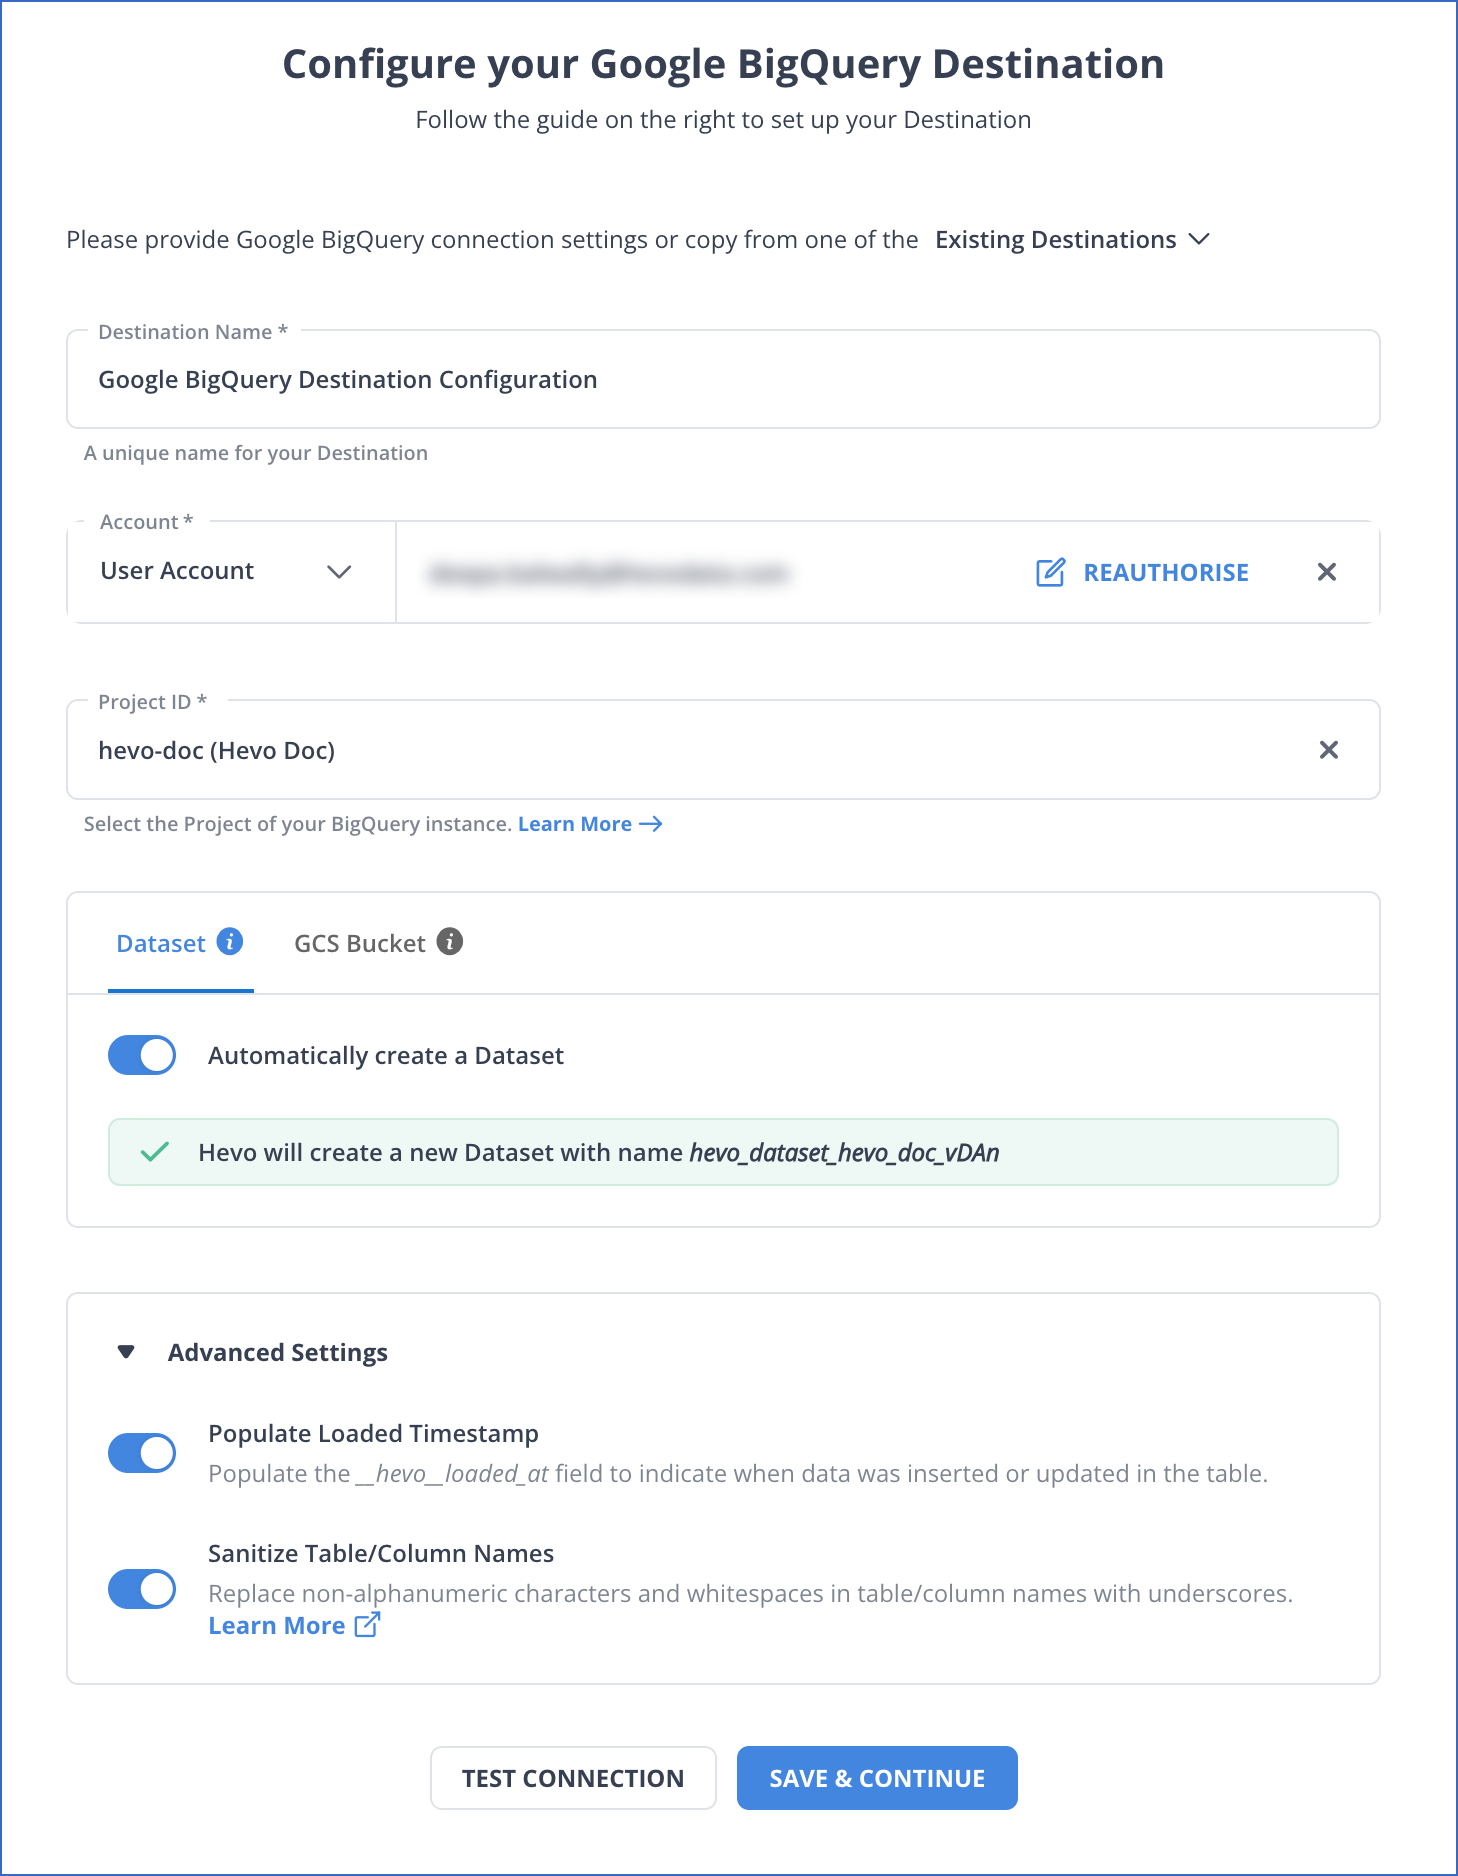
To learn more about BigQuery configuration as a destination, refer to the Hevo Documentation for Google BigQuery Destination Connector page.
If you’re searching for the best practices for creating source and destination pipelines, read Best Practices for Creating Database Pipelines.
Some Important Features of Hevo
- Data Transformation: Before loading data into the destination, you can clean, pre-process, and standardize the data using Python scripts or drag-and-drop transformation blocks.
- Auto Schema Mapping: Hevo’s Auto Mapping feature helps you to automatically define how the data accessed from your source database should be stored in the destination.
- Audit Tables: You can create Audit Tables in your destination database to track and monitor all the pipeline activities, including data ingestion, loading, and transformations for data replication.
- Data Ingestion: Hevo ingests the data in one of the following ways” because we support different strategies for different connectors. It can be Pull-based or Push-based ingestion.

Method 2: Using CSV Export/Import to Transfer Data from BigQuery to BigQuery
This section involves exporting the data from a BigQuery project dataset to a CSV file and importing the CSV file into another BigQuery project dataset.
Let’s explore the steps in detail.
Step 2.1: Export Data from BigQuery
There are mainly three ways to export data from a BigQuery dataset to a CSV file:
- Using Google Cloud Console
- Using the bq extract command in the command line tool bq.
- By submitting an extract job through client libraries or APIs.
Google Cloud Console is the easiest method to export data from a BigQuery project to a CSV file because it does not need extensive technical knowledge. Follow the steps below to export your data using Google Cloud Console.
- Go to Google Cloud Console and open the BigQuery page.
- Select the table you want to export from your BigQuery project from the Explorer panel.
- In the Details panel, click the Export button and choose the Export to Cloud Storage option.
- An Export Table to Cloud Storage dialog box will appear on your screen. Fill in the following fields:
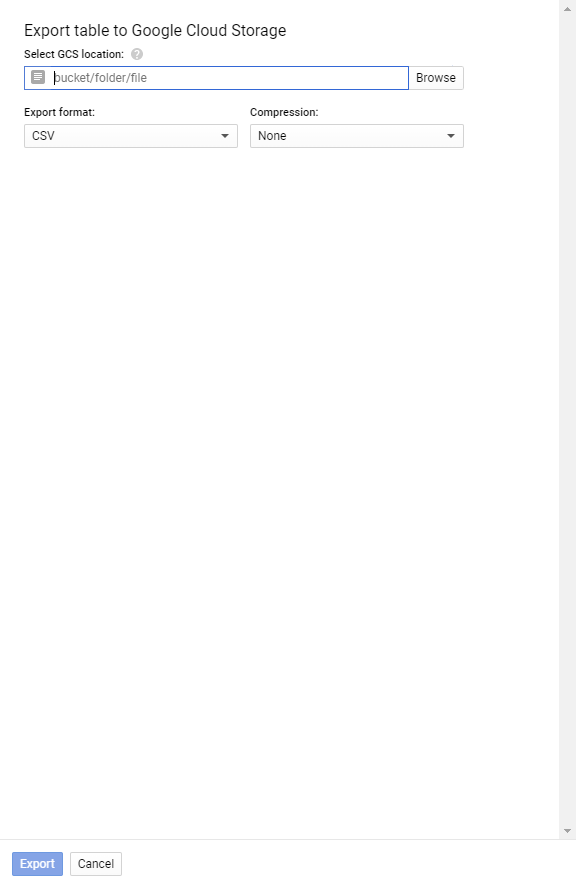
- Select GCS Location: Browse for a destination bucket, folder, or file to export your data.
- Export Format: Select CSV from the drop-down menu.
- Compression: Select GZIP compression for CSV file or None for no compression.
- Click on the Export button to move the selected BigQuery table to a CSV file.
Step 2.2: Import CSV Data into Another BigQuery Project
Just like Google Cloud Console is used for exporting data, you can also use it to import the CSV data into another BigQuery project dataset. Follow the steps below to import data from CSV to BigQuery using Google Cloud Console.
- Open the BigQuery page from the Google Cloud Console.
- From the Explorer panel, select the BigQuery project into which you want to import CSV data.
- Navigate to the Data set info, and click the Create Table option.

- A dialog box called Create Table will appear on your screen. You must specify the required fields.
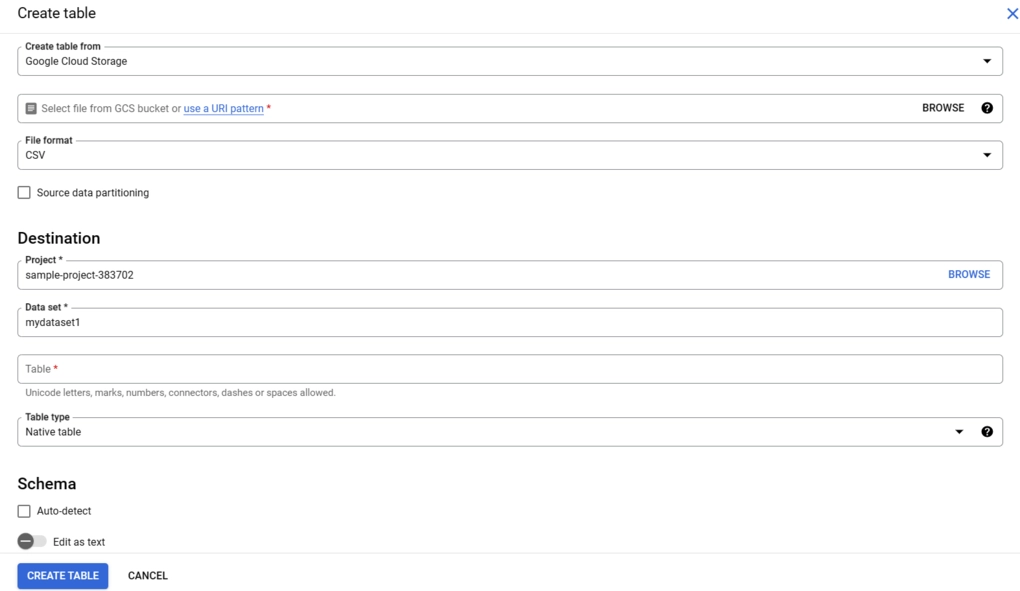
- Under the Source section, fill in the following fields:
- Create a table from: You can choose Google Cloud Storage, Upload, or Drive from the drop-down menu.
- File format: Choose CSV file format from the drop-down menu.
- Under the Destination section, fill in the following fields:
- Project: Name of the BigQuery project in destination.
- Dataset: Dataset Name of the BigQuery project in destination.
- Table: Name for the new table in the BigQuery project in destination.
- Table type: Specify the type of the table.
- Under the Schema section, choose one of the following options:
- Enable Auto-Detect to generate the schema information automatically.
- Enable Edit as text to enter the schema information manually.
- Click the Create Table button to create a new table in the BigQuery project by fetching the attached CSV data.
Limitations of CSV Export/Import for BigQuery to BigQuery Data Migration
- Slow Performance: CSV export/import is a time-consuming and resource-intensive process for medium-to-large datasets. Exporting data to CSV files and then importing them back into BigQuery can lead to a longer time for data migration.
- Data Integrity: During CSV export/import, data types or schema may not be preserved accurately. The data types or schema in the CSV file may mismatch with the destination database after the migration.
- Schema Evolution: Since the schemas of CSV and BigQuery are different, data transformations are required before or after exporting/importing data, leading to effort-intensive processes.
- No Incremental Updates: The CSV export/import does not include in-built incremental updates. If data changes frequently in the source database, the entire dataset must be transferred to the destination database. This may lead to data loss or inefficiencies.
Use Cases of BigQuery to BigQuery Data Migration
- Quick Export/Import: When migrating data from BigQuery to BigQuery, transformation is not required as both the source and destination schema are the same. This can save you time and effort when exporting and importing the data.
- Create backups: Replicating data from BigQuery to BigQuery helps create backups and maintain a separate platform for development, testing, and production.
- Data Consolidation: When migrating data from one or more BigQuery projects to a single BigQuery project, you can streamline data management and simplify the in-depth analytics tasks.
You can also look at how you can effortlessly migrate your data from BigQuery to a database like PostgreSQL.
Additional Resources on Bigquery to Bigquery Migration
Conclusion
Data migration from BigQuery to BigQuery is possible, just like data migration from BigQuery to another data warehouse. Compared to other data migrations, this would be fairly simple and require less time, especially since the schema for the source and destination are the same.
Methods for BigQuery to BigQuery data migration are not limited to one or two. You can choose either one of the methods in this article for data migration. The manual CSV Export/Import method is a time-consuming and resource-intensive process, leading to slow performance.
To ease the time and effort required for data migration, you should choose Hevo Data. To transfer data from a BigQuery table to another, you can also utilize the BigQuery to BigQuery operator provided by the Google Cloud Platform. Read about Google Cloud BigQuery to BigQuery Operator.
Sign up for a 14-day free trial and simplify your data integration process. Check out the pricing details to understand which plan fulfills all your business needs.
Frequently Asked Questions (FAQs)
1. How do you migrate the data between different BigQuery tables within a Google Cloud Platform?
To migrate data across BigQuery tables within a Google Cloud Platform, you can use Apache Airflow’s Google Cloud BigQueryToBigQueryOperator command. With this command, you can define values for the tables dynamically by using Jinja templating with source_project_dataset_tables, destination_project_dataset_table, impersonation_chain, and labels. In addition, you can combine multiple source tables to migrate into destination tables by defining write_disposition and create_disposition.
2. When performing BigQuery to BigQuery migrations using Hevo, I have encountered the limitation of replicating a maximum of 4096 columns to every BigQuery table. How can I address this limitation using Hevo itself?
To ensure a smooth replication from BigQuery to BigQuery, you can utilize the data transformations, such as handling missing columns, filtering, and aggregations, to remove the columns you no longer require in your BigQuery table.
3. How do I combine data in BigQuery?
To combine data in BigQuery, you can use SQL queries with commands like JOIN, UNION, or MERGE. These allow you to combine data from different tables or datasets based on common columns or conditions.

Share it with your connections.
-
 Share To X
-
 Share To LinkedIn
-
 Share To Facebook
-
 Copy Link


