


Does your organization use Snowflake to store data for analytics and reporting purposes? If so, the “Snowflake alter table” add column feature is one of many valuable features that help you change your data once it is ingested into the data warehouse by ensuring you can modify it to capture additional business situations or use cases.
In this blog, we will introduce the syntax and provide some examples to help you understand how it can be used within your Snowflake database.
Table of Contents
What is Snowflake?

Snowflake is a cloud-hosted data warehouse that performs data analytics and storage functions as a service. It works across different cloud platforms and allows you to mix and match between them. Its cutting-edge architecture separates storage and computations, allows independent scaling, and enables competitive pricing. You only pay for what you use and when you use it. It also provides a high level of security.
Snowflake stores data in the form of tables, which are collections of rows and columns. Sometimes, the data type or attributes of a table may change. This would require you to make changes to the structure of the table. You can do this easily by using the “Snowflake alter table” command. Let’s take a deeper look at this.
Key Features of Snowflake
Here are some of the benefits of using Snowflake as a Software as a Service (SaaS) solution:
- Snowflake enables you to enhance your Analytics Pipeline by transitioning from nightly Batch Loads to Real-time Data Streams, allowing you to improve the quality and speed of your analytics. By enabling secure, concurrent, and monitoring access to your Data Warehouse across your organization, you can improve the quality of analytics at your company.
- Snowflake uses the Caching Paradigm to deliver the results from the cache swiftly. Snowflake employs Persistent (within the session) Query results to avoid re-generating the report when nothing has changed.
- Snowflake allows you to get rid of silos and ensure access to meaningful insights across the enterprise, resulting in better Data-driven Decision-Making. This is a crucial first step toward bettering partner relationships, optimizing pricing, lowering operational expenses, increasing sales effectiveness, and more.
- Snowflake allows you to analyze Customer Behaviour and Product Usage better. You can also use the whole scope of data to ensure customer satisfaction, drastically improve product offers, and foster Data Science innovation.
- Snowflake allows you to create your own Data Exchange, enabling you to communicate live, controlled data securely. It also encourages you to improve data relationships throughout your business units and with your partners and customers.
A Snowflake-native app to monitor Fivetran costs.

What is Snowflake Alter Table?
The “ALTER TABLE” statement is used to add, delete, or modify columns in an existing table. It can also add and drop various constraints on an existing table.
The “Snowflake alter table” add column feature enables you to modify existing tables in your data warehouse by adding another column. This is useful when you need to add new measures/values, categorical values based on other columns in the table, or to capture additional information.
SYNTAX:
ALTER TABLE [ IF EXISTS ] <name> UNSET {
                                       DATA_RETENTION_TIME_IN_DAYS |
                                       DEFAULT_DDL_COLLATION       |
                                       COMMENT
                                       }
                                       [ , ... ]
Code Explanation
- “ALTER TABLE” signifies that we are making changes to an already-existing Snowflake table.
- By ensuring that the command only executes if the table is present, “IF EXISTS” helps to prevent problems.
- The name of the table that is being changed is “table_name”.
- Table-level properties can be deleted and returned to their defaults with the “UNSET” command.
- “DATA_RETENTION_TIME_IN_DAYS” removes any time travel-related custom data retention period.
- For string comparison, “DEFAULT_DDL_COLLATION” eliminates specific collation settings.
- “COMMENT” removes any description or comment that is affixed to the table.
Where:
columnAction ::=
  {
     ADD COLUMN <col_name> <col_type>
        [ { DEFAULT <expr> | { AUTOINCREMENT | IDENTITY } [ { ( <start_num> , <step_num> ) | START <num> INCREMENT <num> } ] } ]
                            /* AUTOINCREMENT (or IDENTITY) supported only for columns with numeric data types (NUMBER, INT, FLOAT, etc.). */
                            /* Also, if the table is not empty (i.e. rows exist in the table), only DEFAULT can be altered.               */
        [ inlineConstraint ]
   | RENAME COLUMN <col_name> TO <new_col_name>
Code Explanation
- To add a new column to an existing Snowflake table, use the “ADD COLUMN” command.
- “” establishes the new column’s name.
- “” specifies the data type of the column, that is, “VARCHAR”, “NUMBER”, or “DATE”.
- When it comes to numeric types, you can either declare it as “AUTOINCREMENT” or “IDENTITY” with optional starting and increment values using “( , )” or “START INCREMENT ” or optionally specify a “DEFAULT” value using an expression.
- It should be noted that only numeric columns can have “AUTOINCREMENT” or “IDENTITY” added; if the table already has rows, only “DEFAULT” can be used.
- You can specify restrictions like “NOT NULL” directly on the column by using “[inlineConstraint]”.
- As an alternative, “RENAME COLUMN” allows you to use “” and “” to modify the name of an existing column.
How to “RENAME” Tables using Alter Table in Snowflake?
The Alter Rename clause can be used to change or modify the table’s name.
Syntax
-- Alter SQL Syntax Command  :

ALTER TABLE [OLD_TABLE_NAME] RENAME TO [NEW_TABLE_NAME]
Code Explanation
- “ALTER TABLE” is used to modify an existing table in Snowflake.
- “[OLD_TABLE_NAME]” is the current name of the table you want to rename.
- “RENAME TO” specifies that you want to change the table’s name.
- “[NEW_TABLE_NAME]” is the new name you want to assign to the table.
Example
Let’s start by creating a table called Snowflake Practice, and then renaming it Snowflake Rename Practice.
-- Create Table Query  :

create or replace table Snowflake_Practice (sid int, department_name text, fees int)

-- Output

+------------------------------------------------+
| status                                         |
|------------------------------------------------|
| Table SNOWFLAKE_PRACTICE successfully created. |
+------------------------------------------------+
1 Row(s) produced. Time Elapsed: 0.452s


-- Now RENAME the table to  Snowflkae_Rename_Practice

ALter table Snowflake_Practice Rename To Snowflake_Practice_Rename;


+----------------------------------+
| status                           |
|----------------------------------|
| Statement executed successfully. |
+----------------------------------+
1 Row(s) produced. Time Elapsed: 0.392s
Snowflake Rename Table Example using GUI
--Example :
ALTER TABLE EMP RENAME TO EMP_ONE- The old table’s name was EMP, and the new table’s name was EMP ONE. As a result, the name of the table will be changed from EMP to EMP ONE.
- Select the table that needs to be renamed here. I chose EMP as the name of the table.
- Now run the command that will rename the table’s name. As a result, the name of the table will be changed from EMP to EMP ONE.
- The name has been changed to EMP ONE successfully.
How to DROP Columns using Alter Table in Snowflake?
Alter table Snowflake DROP COLUMN Example
--SQL Command Syntax :
ALTER TABLE [TABLE_NAME] DROP COLUMN [COLUMN_NAME]
--Example :
ALTER TABLE EMP DROP COLUMN NEW_INFODrop Table Explanation
- The column will now be completely removed from the EMP table.
- Choose the table and column that should be removed.
- Execute the following statement. NEW INFO will be removed from the table.
- The column NEW INFO was successfully removed.
Code Explanation
- “ALTER TABLE” changes an existing table’s structure.
- The table whose name you wish to modify is “[TABLE_NAME]”.
- “DROP COLUMN” permanently deletes a column from the table.
- The column you wish to remove is named “[COLUMN_NAME]”.
In this example, the “ALTER TABLE EMP DROP COLUMN NEW_INFO” command eliminates the “NEW_INFO” column from the “EMP” table.
How to DROP Constraints using Alter Table in Snowflake?
Alter table Snowflake DROP CONSTRAINTS Example
--SQL Command Syntax :
ALTER TABLE [TABLE_NAME] ALTER COLUMN [COLUMN_NAME] DROP [CONSTRAINT]
--Example :
ALTER TABLE EMP ALTER COLUMN INFO DROP NOT NULLDROP Constraints Explanation
- We were previously unable to add null values, but after removing the constraint, we will be able to do so.
- Choose the table and column where the constraint should be removed. Check if the INFO column has a not null constraint.
- Run the following command and check the status.
- Check the INFO null column. The NOT NULL constraint has been removed.
Code Explanation
- To modify an existing table’s structure, use the “ALTER TABLE” command.
- The table name that is being changed is specified by “[TABLE_NAME]”.
- “ALTER COLUMN” focuses on a particular table column.
- The column you wish to change is named “[COLUMN_NAME]”.
- “DROP” frees the column from a constraint.
- A constraint like “NOT NULL” can be “[CONSTRAINT]”.
In the example: By eliminating the NOT NULL constraint, the example “ALTER TABLE EMP ALTER COLUMN INFO DROP NOT NULL” permits the “INFO” column in the “EMP” database to accept null values.
How to ADD COMMENT using Alter Table in Snowflake?
Alter table Snowflake ADD COMMENT Example
–SQL Command Syntax :
ALTER TABLE [TABEL_NAME] ALTER [COLUMN_NAME] COMMENT ‘[COMMENT]’
--Example :
ALTER TABLE EMP ALTER NAME COMMENT ‘NAME OF THE EMPLOYEE’
ADD Comment Explanation
- Adding comments to the table serves as a description of the column and provides classification information.
- In the comment section, the column NAME will be changed to ‘NAME OF THE EMPLOYEE.’
- As you can see, the comment section in the table’s corner is empty for NAME.
- Run the SQL statement below and check the results.
- Now, we can look at the NAME-related comment column. NAME OF THE EMPLOYEE has been added to the comment.
- This will be used to determine the contents of a particular column.
Code Explanation
- In Snowflake, “ALTER TABLE” changes an existing table.
- The table that contains the column is named “[TABLE_NAME]”.
- “ALTER” indicates that you are changing a particular column.
- The column to which you wish to write a comment is “[COLUMN_NAME]”.
- “COMMENT” gives the column a descriptive note.
- The comment’s actual language, wrapped in single quotes, is “[COMMENT]”.
In this example:The remark “NAME OF THE EMPLOYEE” is added to the “NAME” column in the “EMP” database in the example: “ALTER TABLE EMP ALTER NAME COMMENT ‘NAME OF THE EMPLOYEE'”
How to increase the Size of a Data Type using the Alter table in Snowflake?
Alter Table Snowflake Change the Size of Data Type Example
--SQL Command Syntax :
ALTER TABLE [TABLE_NAME] ALTER [COLUMN_NAME] SET DATA TYPE [DATATYPE_WITH_SIZE]
--Example :
ALTER TABLE EMP ALTER NAME SET DATA TYPE VARCHAR(30)- The data type size was previously 20 and will now be updated to 30.
- Note that we can increase the size here, but not decrease it because that is not supported.
- Select the datatype for which the dataset’s size needs to be increased. Check the INFO datatype size at the bottom left of the image. Its dimensions are 20. Now I’m attempting to expand the size of column NAME.
- Check whether the size has increased by running the command below.
- The size of the name has been changed to 30 in the bottom left corner of the picture. The size was successfully increased.
- The capacity has been increased to 30 people. It will be impossible to reduce data type size.
How do you alter the temporary table in Snowflake?
- The rename table or swap table query clauses can be used to change or replace a temporary table with a permanent table.
Alter “Temp” table using Swap in “Snowflake.Example”
-- Alter table Customer_Temp Swap with CustomerAlter Temp table using Rename in Snowflake Example
-- Alter table Customer_Temp Rename to CustomerHow to SWAP tables using Alter Table in Snowflake?
In Snowflake, the SWAP TABLE function will be used to swap table names.
SWAP TABLE Example In Snowflake
--SQL Command Syntax :
ALTER TABLE [TABLE_ONE] SWAP WITH [TABLE_TWO]
--Example :
ALTER TABLE EMP SWAP WITH EMP_ONE- The table names are frequently interchanged. The EMP table will be called EMP ONE, and the EMP ONE table will be called EMP.
- To begin, choose which tables need to be swapped. To swap the tables, I chose EMP and EMP ONE.
- Now run the command that will swap the table names.
- Check the data in the tables for verification. As you can see, the table names were successfully swapped.
How to SET/UNSET TAG using Alter Table in Snowflake?
Syntax:
ALTER TABLE [ IF EXISTS ] <name> SET TAG <tag_name> = '<tag_value>' [ , <tag_name> = '<tag_value>' ... ]

ALTER TABLE [ IF EXISTS ] <name> UNSET TAG <tag_name> [ , <tag_name> ... ]
WHERE:
clusteringAction ::=
  {
     CLUSTER BY ( <expr> [ , <expr> , ... ] )
   | RECLUSTER [ MAX_SIZE = <budget_in_bytes> ] [ WHERE <condition> ]
     /* RECLUSTER is deprecated */
   | { SUSPEND | RESUME } RECLUSTER
   | DROP CLUSTERING KEY
  }
tableColumnAction ::=
| ALTER | MODIFY
[ COLUMN ] <col1_name> SET TAG <tag_name> = '<tag_value>' [ , <tag_name> = '<tag_value>' ... ]
, [ COLUMN ] <col2_name> SET TAG <tag_name> = '<tag_value>' [ , <tag_name> = '<tag_value>' ... ]
...
| ALTER | MODIFY
COLUMN <col1_name> UNSET TAG <tag_name> [ , <tag_name> ... ]
, COLUMN <col2_name> UNSET TAG <tag_name> [ , <tag_name> ... ]
...
inlineConstraint ::=
[ NOT NULL ]
[ CONSTRAINT <constraint_name> ]
{ UNIQUE | PRIMARY KEY | { [ FOREIGN KEY ] REFERENCES <ref_table_name> [ ( <ref_col_name> ) ] } }
[ <constraint_properties> ]Parameters:
name:
SET …: The table to change the identifier. If the identifier contains spaces or special characters, double quotes must enclose the entire string. Case is also essential for identifiers enclosed in double quotes. Sets one or more table properties or parameters (separated by blank spaces, commas, or new lines):
STAGE_FILE_FORMAT = ( FORMAT_NAME = '<em>file_format_name</em>' ) or STAGE_FILE_FORMAT = ( TYPE = CSV | JSON | AVRO | ORC | PARQUET | XML [ ... ] ): Modifies the table’s file format (for data loading and unloading), which can be one of the following:
FORMAT_NAME = file_format_name:
To use for loading/unloading data, specify an existing file format object. The format type (CSV, JSON, etc.) and other format options for data files are determined by the selected file format object.
There are no other format options specified in the string. The named file format object, on the other hand, specifies the other file format options for loading and unloading data.
TYPE = CSV | JSON | AVRO | ORC | PARQUET | XML [ … ]: The type of files to load/unload is specified. The string can contain additional format-specific options.
TAG tag_name = ‘tag_value‘ [ , tag_name = ‘tag_value‘ , … ]:
The tag name (i.e. the key) and the tag value are specified.
The tag value is always a string, and the tag value can have up to 256 characters. A maximum of 20 distinct tag keys can be assigned to an object.
UNSET …:Unsets one or more properties/parameters for the table, restoring them to their default values:
DATA_RETENTION_TIME_IN_DAYSMAX_DATA_EXTENSION_TIME_IN_DAYSCHANGE_TRACKINGDEFAULT_DDL_COLLATIONTAG <em>tag_name</em> [ , <em>tag_name</em> ... ]COMMENT
Hevo is a No-Code Data Pipeline. It can efficiently load data in Snowflake in a few simple steps. It is a fully automated platform and it completely automates the process of data migration.
Let’s see some unbeatable features of Hevo Data:
- Fully Managed: Hevo Data is a fully managed service and is straightforward to set up.
- Schema Management: Hevo Data automatically maps the source schema to perform analysis without worrying about the changing schema.
- Real-Time: Hevo Data works on the batch as well as real-time data transfer so that your data is analysis-ready always.
- Live Support: With 24/5 support, Hevo provides customer-centric solutions to the business use case.
Explore Hevo’s features and discover why it is rated 4.3 on G2 and 4.7 on Software Advice for its seamless data integration. Try out the 14-day free trial today to experience hassle-free data integration.
Get Started with Hevo for FreeSnowflake Alter Table Example
- The following examples will demonstrate how the to ALTER TABLE ADD COLUMN is applied to add three new columns to the table t1, along with the result.
-- Add a new column to table T1
alter table t1 add column a2 number;
-- Add another column with NOT NULL constraint
alter table t1 add column a3 number not null;
-- Add another column with a default value and a NOT NULL constraint
alter table t1 add column a4 number default 0 not null;
desc table t1;
What is the Masking Policy in Snowflake?
- Masking Policy is a schema-level object that is used to protect sensitive data from unauthorized access while allowing authorized users access.
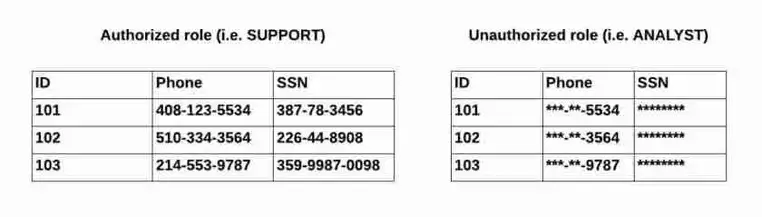
How to “CREATE MASKING POLICY” in Snowflake?
- To create a masking policy for email, use the statement below. As a result, only the ANALYST can see the value, while others will not.
--SQL Command Syntax :
CREATE [ OR REPLACE ] MASKING POLICY [ IF NOT EXISTS ] <name> AS
( <arg_name_to_mask> <arg_type_to_mask> [ , <arg_1> <arg_type_1> ... ] )
RETURNS <arg_type_to_mask> -> <expression_on_arg_name>
[ COMMENT = '<string_literal>' ];
--Example :
create or replace masking policy email_mask as (val string) returns string ->
case
when current_role() in ('ANALYST') then val
else '*********'
end;- Following the creation of the MASKING POLICY. We employ this policy, which will be applied to a single column.
Conclusion
In this blog, we have shown you the basics of using the Snowflake Alter Table command. The alter table add column feature is a very helpful command that is important to master, as it will almost certainly be required when operating your data warehouse. After completing this blog, you are now ready to start using it in your own code in your Snowflake database!
Hevo Data is a No-Code Data Pipeline that offers a faster way to move data from 150+ Data Sources, including 60+ Free Sources, into your Data Warehouse to be visualized in a BI tool. Hevo is fully automated and, hence, does not require you to code.
Take Hevo’s 14-day free trial to experience a better way to manage your data pipelines. You can also check out the unbeatable pricing, which will help you choose the right plan for your business needs.
Frequently Asked Questions
1. How can I rename a column in Snowflake using ALTER TABLE?
Use the ALTER TABLE command with the RENAME COLUMN option to rename
columns in Snowflake.
2. What is the purpose of the Masking Policy in Snowflake?
Masking Policies in Snowflake help protect sensitive data by applying specific masking rules to the columns.
3. Can I use ALTER TABLE to modify temporary tables in Snowflake?
Yes, you can alter temporary tables using the ALTER TABLE command, which is similar to regular tables.

Share it with your connections.
-
 Share To X
-
 Share To LinkedIn
-
 Share To Facebook
-
 Copy Link


