To ensure that there is continuity of operations, businesses have resorted to keeping multiple copies of their database. If the central database is not available, which may be caused by the occurrence of an unexpected event, the business can switch to one of the standby databases.
When keeping multiple copies of a database, you must ensure that each copy has the latest version of the data. This requires you to propagate the changes made to one database, mostly the central database, to the other databases. This is possible using the database replication technique.
SQL Server supports different types of replication techniques, with SQL Server snapshot replication being the most popular and simplest form of replication.
In this article, I will help you understand how to set up SQL Server Snapshot Replication. Here is a brief outline of this blog.
Table of Contents
Prerequisites
This is what you need for SQL Server Snapshot Replication:
- SQL Server 2008 or above.
- SSMS (SQL Server Management Studio).
What is SQL Server Snapshot Replication?

The SQL Server Snapshot Replication technique distributes data exactly as it appears at a particular moment in time and it does not monitor updates to the data. During synchronization of the database, the entire snapshot is generated and then sent to the subscribers. The snapshot is simply an image of all tables in the publication. So, this type of SQL Server Replication creates an image of all tables in the publication at once, then it moves the whole image to the subscribers.
SQL Server Snapshot Replication does not track the changes made to data like other types of replication, hence, the publisher incurs a little overhead. Also, if the articles being replicated are large, snapshot replication will require a large bandwidth.
Two agents are used in this type of replication:
- Snapshot Agent
- Distribution Agent
The snapshot agent is responsible for creating files with the schema of the publication and the data. The files are temporarily stored in the snapshot folder of the distribution server, and the distribution tasks are recorded in the distribution database. The work of the distribution agent is to move the schema and the data from the distributor to the subscribers.
How Does SQL Server Snapshot Replication Work?
To initialise Subscribers, all three methods of replication employ a snapshot by default. The SQL Server Snapshot Agent always creates the snapshot files, but the agent that sends them varies based on the replication type. The Distribution Agent is used to transport files in snapshot replication and transactional replication, whereas the SQL Server Merge Agent is used in merge replication. The Distributor is where the Snapshot Agent executes. For push subscriptions, the Distribution Agent and Merge Agent run at the Distributor, while for pull subscriptions, they run at Subscribers.
Snapshots can be created and applied either immediately after the subscription is created or on a schedule determined when the publication is created. The Snapshot Agent creates snapshot files containing the schema and data of published tables and database objects, saves them in the Publisher’s snapshot folder, and tracks them in the Distributor’s distribution database. When you establish a Distributor, you specify a default snapshot folder, but you can specify an alternate place for a publishing instead of or in addition to the default.
For merge publishes with parameterized filters, in addition to the regular snapshot procedure mentioned in this topic, a two-part snapshot method is employed.
The main components of SQL Server Snapshot Replication are depicted in the diagram below.
When to use Snapshot Replication?
The use of SQL Server Snapshot Replication is most appropriate under any of the following circumstances:
- When data changes infrequently.
- When it is acceptable to have data copies that are out of date with the Publisher for some time.
- When you are replicating small volumes of data.
- When a large volume of changes happens within a short period.
General Concepts of SQL Server Snapshot Integration
Here are the common terminologies in SQL Server Snapshot Replication:
- Article: This is the basic unit of SQL Server and is made up of views, tables, and stored procedures.
- Publication: A publication is a logical collection of articles from the database. It allows you to define and configure properties of articles at a higher level so that all articles in the group may inherit the properties.
- Publisher Database: The publisher is a database that contains a list of objects designed as replication articles.
- Publisher: This is a database instance responsible for making data available to other locations through replication.
- Distributor: This is a database that stores replication specific data from one or more publishers.
- Distribution Database: Each distributor should have at least one distribution database.
- Subscriber: This is a database instance that consumes the SQL Server Replication data from a publication. The subscriber can receive data from one or more publications and publishers.
- Subscription: This is a request for a copy of a publication to be sent to a subscriber. The subscription defines the publication data that is to be received, when, and where.
- Subscription Database: This is the target database of a replication model.
Next, I will be showing you how to configure the Distributor server, the Publisher server, and the Subscriber server for SQL Server Snapshot Replication.
Steps of SQL Server Snapshot Replication
You can set up the SQL Server Snapshot Replication using the following steps:
- Step 1: Configure the Distributor
- Step 2: Configure the Publisher
- Step 3: Configure the Subscriber
- Step 4: Data Verification of the Snapshot Replication
Configure the Distributor
Follow the steps given below:
- Step 1: Launch your SSMS (SQL Server Management Studio) and login to your Publisher server.
- Step 2: Navigate to the “Replication” folder in the object explorer provided on the left side of the screen. Right-click it and choose “Configure Distribution…”.
- Step 3: The “Configure Distribution Wizard” will be opened. The page will show the general guidelines for configuring the distributor. Click “Next”.
- Step 4: In the next window, you will have the option of setting up the current instance as the distributor or choose another instance that has been configured as a distributor. Since the distributor is local, go with the default setting, “‘ServerName’ will act as its own Distributor;SQL Server will create a distribution database and log”. Click “Next”.
- Step 5: In the next window, choose or type a new path to the SQL replication snapshot folder. Click “Next”.
- Step 6: In the next window, specify the name of the Distribution database and the paths to the local file and the log file. Click “Next”.
- Step 7: In the next window, select the Publisher that will use the Distribution database, then click “Next”.
- Step 8: Select “Configure distribution” and click “Next”.
- Step 9: Review the Distribution configuration settings and click “Finish”.
- Step 10: A window will appear showing that the configuration of the Distributor was successful.
Congratulations!
The Distributor is now ready!
Next, you will be configuring the Publisher.
Configure the Publisher
Follow the steps given below:
- Step 1: Expand the “Replication” folder from the “Object Explorer”. Right-click “Local Publications” and choose “New Publication”.
- Step 2: A new window will appear giving you the guidelines for creating a Publication.
- Step 3: Select the Publication database and click “Next”.
- Step 4: A new window will appear showing the different types of publications. Choose “Snapshot publication” and click “Next”.
- Step 5: Select the tables that will be part of the publication. Click “Next”.
- Step 6: In the “Filter Table Rows” window, simply click “Next” because you don’t want to filter data.
- Step 7: Click the checkbox for “Create a snapshot immediately” to activate it. Click “Next”.
- Step 8: In the “Agent Security” window, you will set up a service account under which the snapshot agent will run. Just click the “Security Settings…” button.
- Step 9: Click the following tick options and enter the username and password for the service account and click “OK”, then “Next”.
- Step 10: Choose the “Create the publication” option and click “Next”.
- Step 11: If the process was successful, you will be taken to the “Success” page.
Configure the Subscriber
Follow the steps given below:
- Step 1: Right-click your Publication from the Object Explorer and select “New Subscriber”. Choose the publication and click “Next”.
- Step 2: In the next window, choose “Run all agents…” and click “Next”.
- Step 3: Next, you should add the Subscriber server. Click the “Add Subscriber” dropdown and choose “Add SQL Server Subscriber…”.
- Step 4: Establish a connection to your Subscriber server instance using SSMS.
- Step 5: In the next window, select the database at the Subscriber server. If the database isn’t available, you can create a new one by clicking the “New database…” button.
- Step 6: Add the name and the owner of the database, then click “OK”.
- Step 7: In the next window, specify the connection details of the distribution agent. Click the ellipsis (…) button.
- Step 8: Specify the credentials of the Service account then click “OK”.
- Step 9: Select “Run continuously” for the synchronization schedule and click “Next”.
- Step 10: In the “Initialize subscription” window, initialize the subscription database with a snapshot of publication. Click “Next”.
- Step 11: Click the checkbox for “Create the subscription” and click “Next”.
- Step 12: Review the options for the configuration of the Subscriber and click “Finish”.
If the process was successful, you will be taken to the Success page.
Data Verification of the SQL Server Snapshot Replication
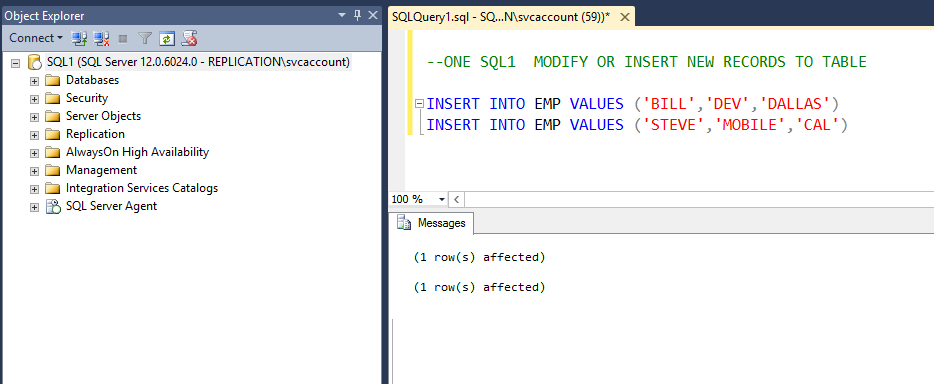
- Step 1: Add new records to the EMP table of the publisher database STUDENT in the next window.
- Add records to the Publisher SQL1 database.
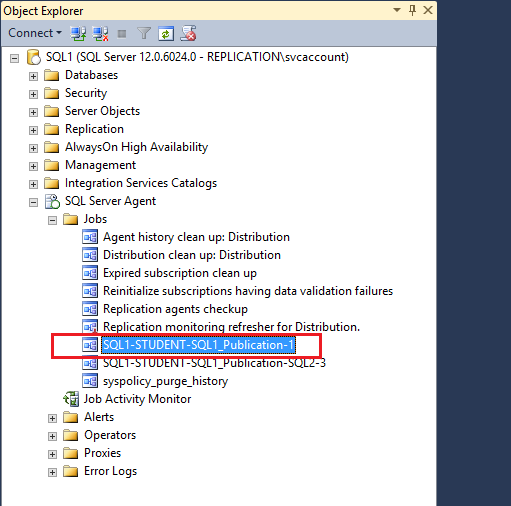
- Step 2: Run the SQL1-STUDENT-SQL1 Publication-1 job on demand from the SQL Server agent. When the job runs, it updates the subscriber server with a snapshot of the database changes.
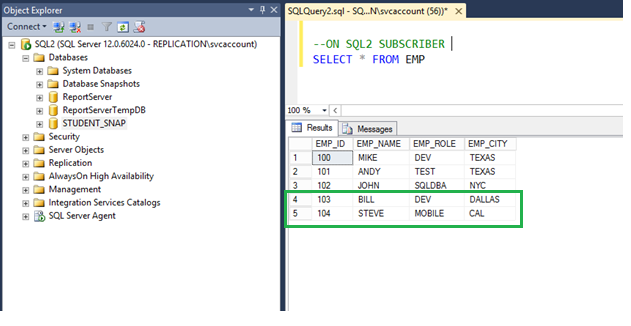
- Step 3: When the process is finished, the subscriber SQL2 is updated with the new records that were added to the publisher SQL1.
- Verify that the Subscriber SQL2 database has been updated.
Congratulations!
You now have a SQL Server Snapshot Replication setup.
Drawbacks of SQL Server Snapshot Replication
The following are the drawbacks of SQL Server Snapshot Replication:
- Modifications made to the subscriber would be lost after the new snapshot is delivered.
- The snapshot agent generates a high impact when it runs, hence, high bandwidth is required.
Conclusion
This article introduced you to SQL Server Databases and explained the SQL Server Snapshot Replication method in detail. Moreover, it also discussed the Snapshot Replication’s limitations. Other than these drawbacks, the workload of a manual setup becomes unrealistic when this task occurs on a larger scale. This is where an alternate automated technique like Hevo can be used to simplify the process.
However, as a Developer, extracting complex data from a diverse set of data sources like Databases, CRMs, Project management Tools, Streaming Services, and Marketing Platforms to your Database can seem to be quite challenging. If you are from non-technical background or are new in the game of data warehouse and analytics, Hevo Data can help!
Visit our Website to Explore HevoHevo Data will automate your data transfer process, hence allowing you to focus on other aspects of your business like Analytics, Customer Management, etc. This platform allows you to transfer data from 150+ multiple sources like Power BI to Cloud-based Data Warehouses like Snowflake, Google BigQuery, Amazon Redshift, etc. It will provide you with a hassle-free experience and make your work life much easier.
Want to take Hevo for a spin? Sign Up for a 14-day free trial and experience the feature-rich Hevo suite first hand.
You can also have a look at our unbeatable pricing that will help you choose the right plan for your business needs!