


Unlock the full potential of your Taboola data by integrating it seamlessly with Snowflake. With Hevo’s automated pipeline, get data flowing effortlessly—watch our 1-minute demo below to see it in action!
Everything in today’s digital world can be accessed and controlled online. This process generates a large amount of data, making it challenging to undertake real-time analysis. Connecting Taboola with Snowflake, a powerful cloud-based data warehouse can enhance data analysis and support powerful decision making.
Taboola is the most advanced participant in one of the most trusted but incredibly resilient categories in online advertising due to its business model. Superior Data Analytics is made possible by the Cloud-based, fully managed Snowflake data warehouse solution. AWS, Azure, and GCP are used by Snowflake to handle its cloud infrastructure and data.
In this article, you will learn how to transfer data from Taboola to Snowflake using CSV file format and an automated method.
Method 1: Connect Taboola to Snowflake using Hevo
Hevo streamlines the connection between Taboola and Snowflake with its automated ETL capabilities, enabling seamless data flow and integration. This solution reduces manual effort and accelerates access to actionable insights from your advertising data.
Method 2: Connect Taboola to Snowflake Manually using JSON Files
Manually integrating Taboola with Snowflake using JSON files requires exporting and uploading data using a series of manual steps. After staging the files, you can use SQL commands to load the JSON data into snowflake tables.
Table of Contents
Method 1: Connect Taboola to Snowflake using Hevo
Step 1: Configure Taboola as your Source
Perform the following steps to configure Taboola as the Source in your Pipeline:
- Step 1.1: Click PIPELINES in the Asset Palette.
- Step 1.2: Click + CREATE in the Pipelines List View.
- Step 1.3: In the Select Source Type page, select Taboola.
- Step 1.4: In the Configure your Taboola Source page, specify the following:
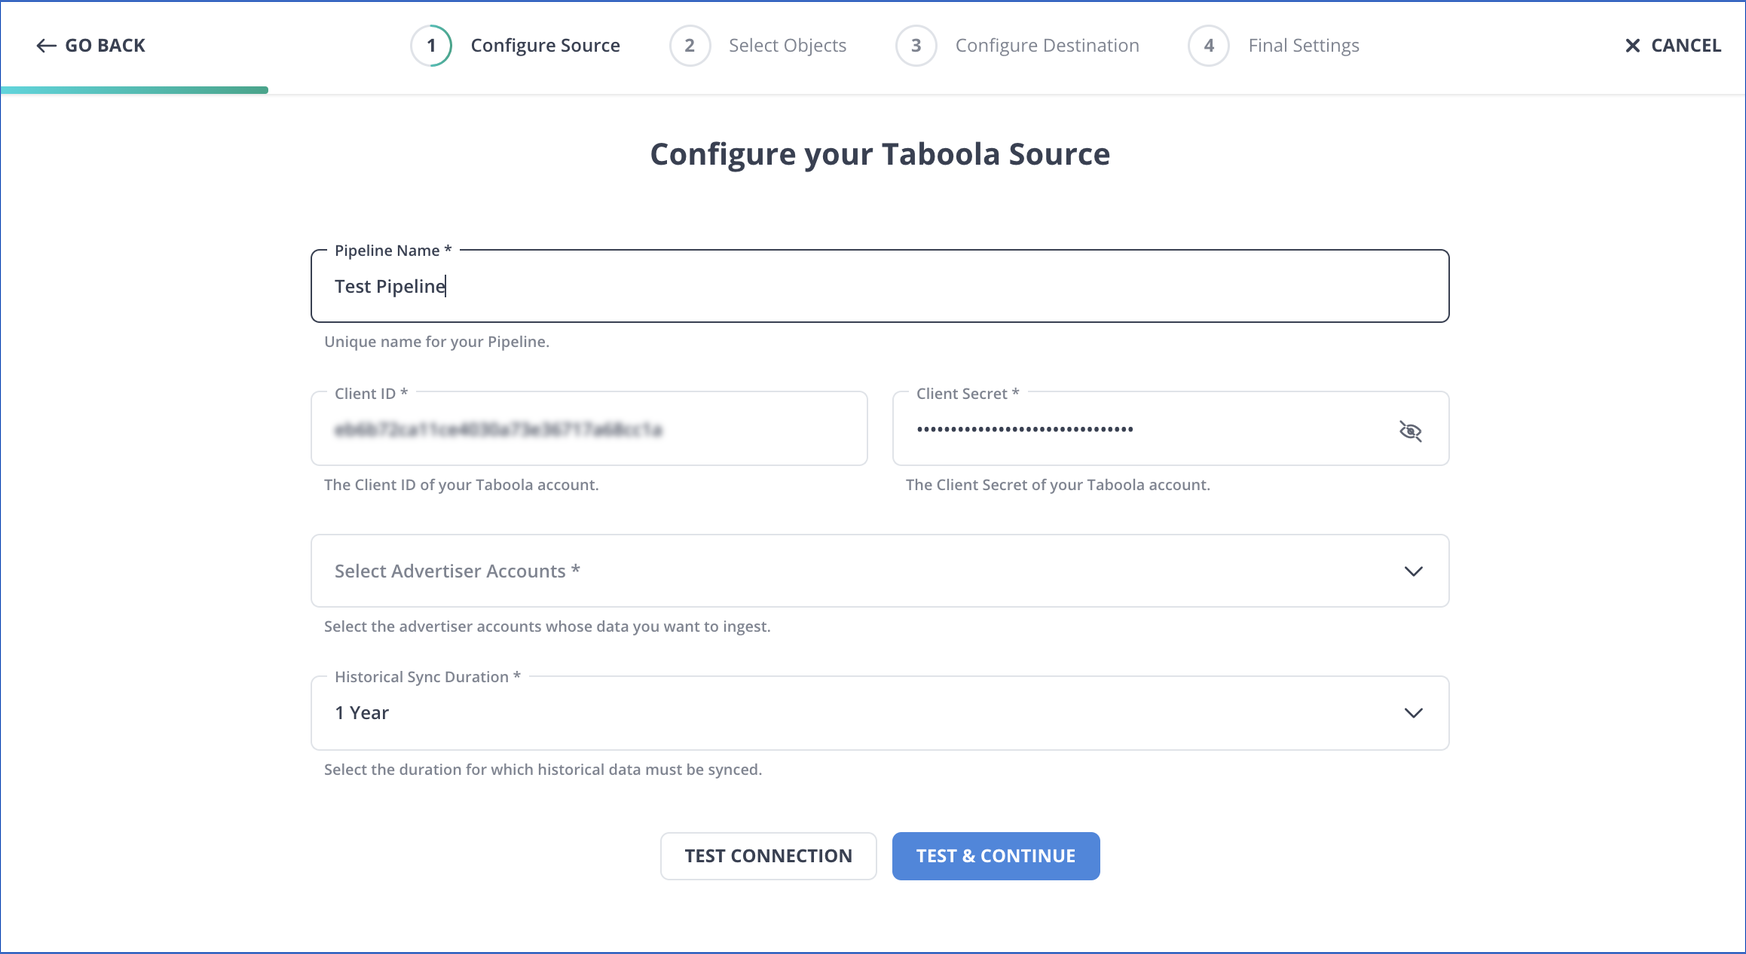
- Step 1.5: Click TEST & CONTINUE.
- Step 1.6: Proceed to configure the data ingestion and setting up the Destination.
Step 2: Configure Snowflake as your Destination
To set up Snowflake as a destination in Hevo, follow these steps:
- Step 2.1: In the Asset Palette, select DESTINATIONS.
- Step 2.2: In the Destinations List View, click + CREATE.
- Step 2.3: Select Snowflake from the Add Destination page.
- Step 2.4: Set the following parameters on the Configure your Snowflake Destination page.
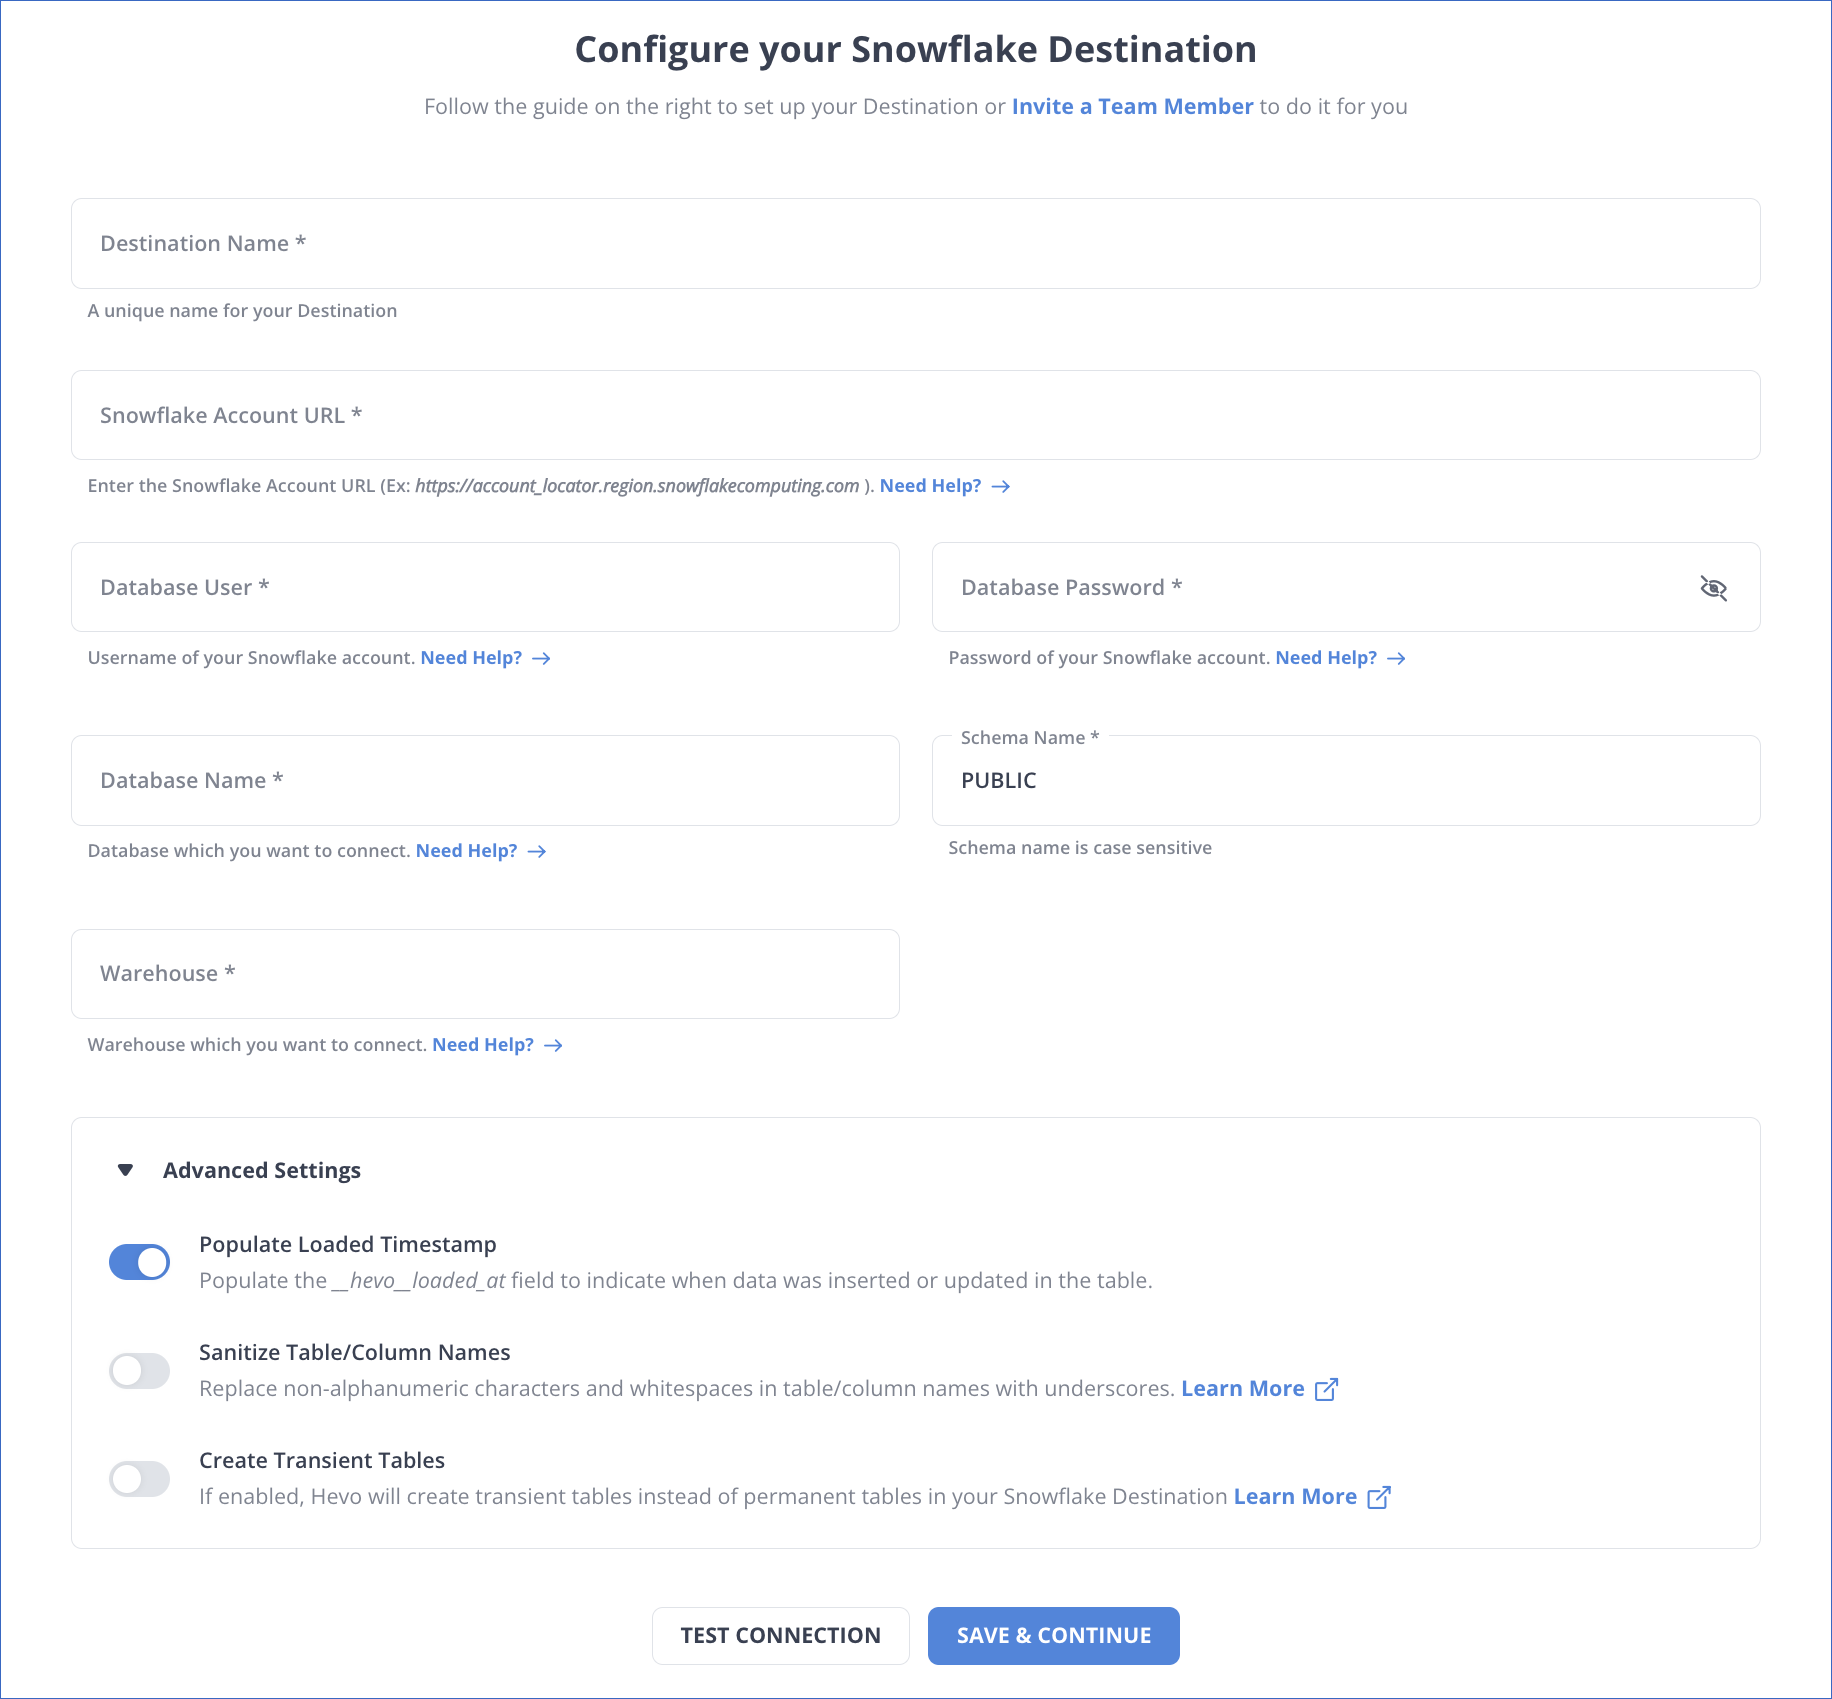
- Step 2.5: Click Test Connection to test connectivity with the Snowflake warehouse.
- Step 2.6: Once the test is successful, click SAVE DESTINATION.
Method 2: Connect Taboola to Snowflake Manually using JSON Files
You cannot directly export the data from Taboola to Snowflake. To export data from Taboola to Snowflake, you first have to export data from Taboola as JSON files and then load the JSON files into Snowflake.
Step 1: Export Data from Taboola as JSON
The first step in exporting data from Taboola to Snowflake is exporting data from Taboola as JSON files.
- How to call Taboola API
- Gather your authentication credentials.
- Choose the specific API resource from which you want to extract data.
- Set up the required parameters, method, and URL to execute your initial request (using tools like curl or Postman).
- Insert your credentials and execute your first API call.
Step 1.1: Making API Calls for Exporting Data
Developers can access the servers of Taboola and extract data via the Backstage the API. By calling API, for instance, you may obtain campaign data.
GET /backstage/api/1.0/[account-id]/campaigns/[campaign-id]/items/.
Step 1.2: Retrieving JSON Response
The Backstage API for Taboola gives a JSON Response that resembles this:
{
  "results":[
      {
      "id": "1",
      "campaign_id": "124",
      "type": "ITEM",
      "url": "http://news.example.com/article.htm",
      "thumbnail_url": "http://cdn.example.com/image.jpg",
      "title": "Demo Article",
      "approval_state": "APPROVED",
      "is_active": true,
      "status": "RUNNING"
    }
    ]
}- The JSON object contains a list of
results, each representing a campaign item. - It includes details such as
id,campaign_id, andtypewhich describe the item. - URLs for the article and its thumbnail image are provided in
urlandthumbnail_url. - The item’s title is “Demo Article”, and its approval status is marked as
APPROVED. - The item is currently
ACTIVEand in aRUNNINGstate, indicating it’s live in the campaign.
Now you have your JSON Data with you. You can create a JSON file. The first step in exporting data from Taboola to Snowflake is complete now.
Step 2: Load JSON Data into Snowflake
The second step in exporting data from Taboola to Snowflake is importing data into Snowflake.
Step 2.1: Create a Table and Load JSON Data
Run a straightforward create statement. With this command, a single-column table with the column “v” is created.
create or replace table json_table (v variant);Utilize Snowflake’s PARSE_JSON function and a straightforward INSERT statement to load a JSON file. For example:
insert into json_table
select
parse_json(
'{
      "fullName":"Robert Downey",
      "age":55,
      "gender":"Male",
      "address": {
            "areaCode":"91506",
          "suite":"916 West Burbank Blvd"
                },
      "movies": [
          {"name":"Iron Man","budget":"$150M","producer":"Avi Arad"},
          {"name":"Sherlock Holmes","budget":"$200M","producer":"Joel Silver"},
          {"name":"Dolittle","budget":"$175M","producer":"Joe Roth"}
                ]
}');- The SQL statement inserts a JSON object into the
json_tabledatabase table. - The
parse_jsonfunction is used to convert the provided JSON string into a JSON format that can be inserted into the table. - The JSON object contains basic information about a person, like
fullName,age,gender, andaddress. - The
moviesarray lists three movies with details such as the moviename,budget, andproducer. - The structure is nested, including an
addressobject and a list ofmovieswithin the same JSON object.
You have a collection of intricately nested objects in this example. In a real-world setting, you’d use snowpipe or a copy command. For example:
copy into json_table from '@demo_stage/path_to_file/file1.json;OR
copy into json_table from 's3://demo_bucket/file1.json;At load time, Snowflake divides the JSON into sub-columns depending on the key-value pairs. For optimization, these keys are saved in the metadata as pointers. Based on the schema definition inherent in the JSON string, structural information is generated dynamically (Schema-on-Read).
Step 2.2: Retrieving and Casting Data
Let’s retrieve the information from the “fullName” sub-column.
select v:fullName from json_table;| 1 Row Produced | |
| row # | V:FULLNAME |
| 1 | “Robert Downey” |
The JSON sub-columns are indicated by a colon where:
- The name of the column in the json table table is v.
- In the JSON schema, fullName = attribute.
- To specify which attribute in column “v” you wish to choose, use the notation v:fullName.
In the following step, you will cast the double-quoted table that was returned in the previous step into a proper data type.
select v:fullName::string as full_name from json_table;- This SQL query retrieves the
fullNamefield from thejson_table, which contains JSON data. - The
v:prefix indicates thatfullNameis accessed from a JSON variant type, allowing extraction from the JSON structure. - The
::stringsyntax casts thefullNamevalue to a string data type to ensure it is returned as text. - The result is labeled as
full_namefor clearer output, making it easier to understand in the query results. - This query is useful for extracting specific information from a larger JSON document stored in the database.
| 1 Row Produced | |
| row # | V:FULL_NAME |
| 1 | Robert Downey |
Just like in standard SQL, you inserted an alias with “as” and used :: to cast to a string data type. Now it’s possible to search JSON data without having to learn a new programming language.
select
    v:fullName::string as full_name,
    v:age::int as age,
    v:gender::string as gender
from json_table- This SQL statement retrieves specific fields from the
json_table, which stores JSON data. - It selects the
fullName,age, andgenderattributes from the JSON object. - Each field is cast to a specific data type:
fullNameas a string,ageas an integer, andgenderas a string. - The retrieved fields are given aliases:
full_name,age, andgenderfor clearer output. - The
v:prefix indicates that the fields are being accessed from a JSON variant type, allowing the extraction of values from the JSON structure.
| 1 Row Produced | |||
| row # | FULL_NAME | AGE | GENDER |
| 1 | Robert Downey | 55 | Male |
Voila! You were successful in loading the data from JSON to Snowflake using the different Snowflake command. You have successfully done Taboola to Snowflake data transfer.
Limitations of Connecting Taboola to Snowflake Manually
- Data can only be transferred in one direction from Taboola to Snowflake, not vice versa.
- Frequent updates during manual processing waste time and resources.
- Data transfer does not allow any transformation before loading into Snowflake.
- There is a high chance of mistakes while manually handling JSON files.

Conclusion
In this article, you got a glimpse of how to connect Taboola to Snowflake after a brief introduction to the salient features, and use cases. The methods talked about in this article are using automated solutions such as Hevo and JSON files. The second process can be a bit difficult for beginners. Moreover, you will have to update the data each and every time it is updated, and this is where Hevo saves the day!
Hevo provides a user-friendly, no-code platform for integrating data from 150+ sources. You can also have a look at the unbeatable pricing that will help you choose the right plan for your business needs. Try a 14-day free trial and experience the feature-rich Hevo suite first hand.
Share your experience of learning about Taboola to Snowflake! Let us know in the comments section below!
Frequently Asked Questions
1. What platform does Snowflake use?
A Snowflake account can be hosted on one of the following cloud platforms: Amazon Web Services, abbreviated as AWS. Google Cloud Platform, shortened as GCP. Microsoft Azure, commonly referred to as Azure.
2. Which ETL tool is used in Snowflake?
Snowflake connects easily with ETL tools like Informatica, Talend, Fivetran, and Matillion, among others. That has provided flexible data integration and transformation capabilities, especially supporting any two transformations either during or after loading – ETL (Extract, Transform, Load) or ELT (Extract, Load, Transform).
3. Does Snowflake use https?
Snowflake connections use SSL by default. And use only HTTPS connections. It does not matter whether it is a driver or the GUI. This is also the reason why you do not need to prefix https:// to your server connection.

Share it with your connections.
-
 Share To X
-
 Share To LinkedIn
-
 Share To Facebook
-
 Copy Link


