


Since organizations are increasingly relying on data, Data Pipelines are becoming an integral element of their everyday operations. The amount of data used in various business activities has grown dramatically over time, from Megabytes per day to Gigabytes per minute.
Airflow DAG is a collection of tasks organized in such a way that their relationships and dependencies are reflected. This guide will present a comprehensive understanding of the Airflow DAGs, their architecture, as well as the best practices for writing Airflow DAGs. Continue reading to know more.
Table of Contents
What is Apache Airflow?
Apache Airflow is an open-source, distributed Workflow Management Platform developed for Data Orchestration. The Airflow project was initially started by Maxime Beauchemin at Airbnb.
Following the success of the project, the Apache Software Foundation swiftly adopted the Airflow project, first as an incubator project in 2016 and then as a top-level project in 2019. Airflow ETL allows users to write programmatically, schedule, and monitor Data Pipelines. The key feature of Airflow is that it enables users to build scheduled data pipelines easily using a flexible Python framework.
Introduction to Airflow DAG – Directed Acyclic Graph
One needs to understand the following aspects to get a clear picture of what Airflow DAGs actually are.
Defining Data Pipeline as Graphs
The increasing data volumes necessitate a Data Pipeline to handle Data Storage, Analysis, Visualization, and more. A data pipeline is a collection of all the necessary steps that are responsible for a certain process. Apache Airflow is a platform that allows users to develop and monitor batch Data Pipelines.
A basic Data Pipeline, for example, consists of two tasks, each performing its own function. However, new data cannot be pushed in between the pipelines until it has undergone the transformations. In the graph-based representation, the tasks are represented as nodes, while directed edges represent dependencies between tasks.
Leverage Hevo’s No-Code Data Pipeline to seamlessly integrate, transform, and sync data from 150+ sources. Hevo helps you ensure that:
- Your analytics and project management tools are always up-to-date and accurate.
- You get real-time notifications.
- Rely on Live Support with a 24/5 chat featuring real engineers, not bots!
Take Hevo’s 14-day free trial to experience a better way to manage your data pipelines. With a 4.3 rating on G2, users appreciate its reliability and ease of use—making it worth trying to see if it fits your needs.
Get Started with Hevo for FreeThe direction of the edge represents the dependency. For example, an edge pointing from Task 1 to Task 2 (above image) implies that Task 1 must be finished before Task 2 can begin. This graph is called a Directed Graph.
Defining Types of Directed Graphs
There are two types of Directed Graphs: Cyclic and Acyclic.
In a Cyclic Graph, the cycles prevent the task execution due to the circular dependencies. Due to the interdependency of Tasks 2 and 3, there is no clear execution path.
In the Acyclic Graph, there is a clear path to execute the three different tasks.
Defining DAG
In Apache Airflow, DAG stands for Directed Acyclic Graph. DAG is a collection of tasks organized in such a way that their relationships and dependencies are reflected. One of the advantages of this DAG model is that it gives a reasonably simple technique for executing the pipeline. Another advantage is that it clearly divides pipelines into discrete incremental tasks rather than relying on a single monolithic script to perform all the work.
The acyclic feature is particularly significant since it is simple and prevents tasks from being entangled in circular dependencies. Airflow employs the acyclic characteristic of DAGs to resolve and execute these task graphs efficiently.
Apache Airflow Architecture
Apache Airflow lets users set a scheduled interval for each DAG, which dictates when the Airflow runs the pipeline.
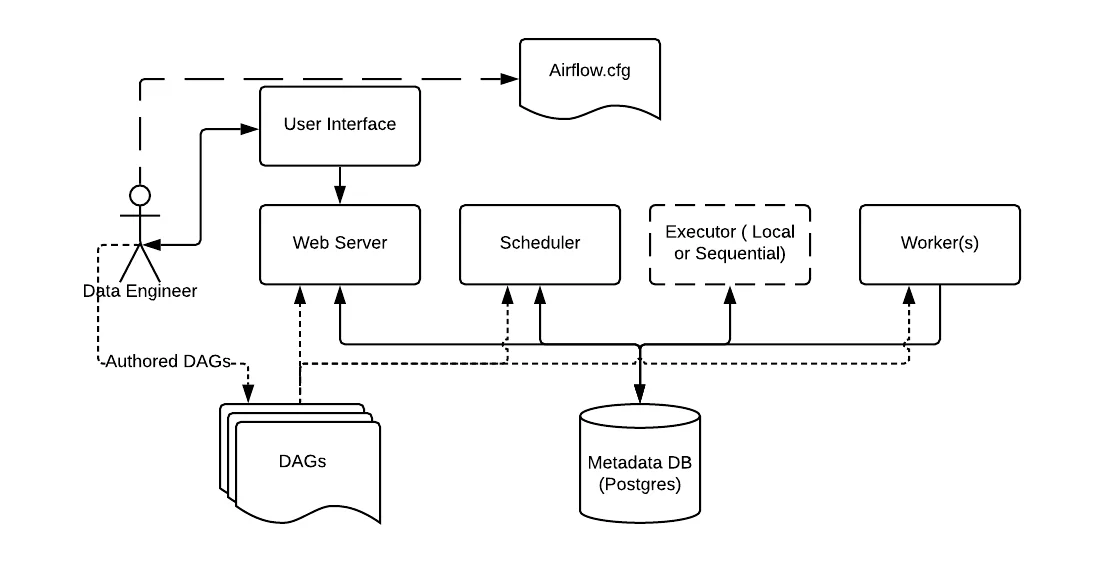
Airflow is organized into 3 main components:
- Webserver: Webserver visualizes the Airflow DAGs parsed by the scheduler and provides the main interface for users to monitor DAG runs and their results.
- Scheduler: Scheduler parses Airflow DAGs, verifies their scheduled intervals, and begins scheduling DAG tasks for execution by passing them to Airflow Workers
- Worker: Picks up tasks that are scheduled for execution and executes them.
Other components:
- Database: A separate service you have to provide to Airflow to store metadata from the Webserver and Scheduler.
How to Create DAG in Airflow?
Creating a Directed Acyclic Graph (DAG) in Apache Airflow involves defining a Python script that specifies the tasks and their relationships. Here’s a step-by-step guide to creating a DAG with code examples:
Step 1: Code to Create an Airflow DAG
from airflow import DAG
from airflow.operators.python_operator import PythonOperator
from datetime import datetime, timedelta

# Define a default set of arguments for the DAG
default_args = {
    'owner': 'airflow',
    'depends_on_past': False,
    'start_date': datetime(2023, 10, 23),
    'email_on_failure': False,
    'email_on_retry': False,
    'retries': 1,
    'retry_delay': timedelta(minutes=5),
}

# Define the DAG
dag = DAG(
    'my_first_dag',   # DAG ID (name of the DAG)
    default_args=default_args,
    description='A simple tutorial DAG',
    schedule_interval=timedelta(days=1),  # Frequency of the DAG (daily)
)

# Define the Python function to be used in a task
def print_hello():
    return 'Hello, Airflow!'

# Define the task using PythonOperator
hello_task = PythonOperator(
    task_id='hello_task',  # Task ID
    python_callable=print_hello,  # The function to be executed
    dag=dag,  # Reference to the DAG
)

# Optionally, define more tasks and dependencies
Explanation
- DAG Definition:
- The DAG object is created with the necessary arguments, such as
start_date, schedule_interval,anddefault_args.
- The DAG object is created with the necessary arguments, such as
- Python Function:
- The
print_hellofunction will be executed as part of a task.
- The
- Task:
- A task is defined using the
PythonOperator, which will call theprint_hellofunction.
- A task is defined using the
Step 2: Add More Tasks
You can add more tasks using operators like PythonOperator, BashOperator, etc. Define tasks in a similar way. Example:
def print_goodbye():
    return 'Goodbye, Airflow!'
goodbye_task = PythonOperator(
    task_id='goodbye_task',
    python_callable=print_goodbye,
    dag=dag,
)
Step 3: Set Task Dependencies
You can set task dependencies using operators like >> (to specify order):
hello_task >> goodbye_task: This makesgoodbye_taskdependent on the successful completion ofhello_task.
Step 4: Save the DAG
- Save the file in the dags folder (e.g., my_first_dag.py).
Step 5: Run Airflow Web Server
- Start the Airflow web server and scheduler:
airflow webserver --port 8080
airflow scheduler
Access the Airflow UI in your browser at http://localhost:8080, and you should see your DAG listed.


Airflow DAGs Best Practices
Follow the below-mentioned practices to implement Airflow DAGs in your system.
Writing Clean DAGs
It’s easy to get into a tangle while creating Airflow DAGs. DAG code, for example, may easily become unnecessarily intricate or difficult to comprehend, especially if DAGs are produced by members of a team who have very different programming styles.
- Use Style Conventions: Adopting a uniform, clean programming style and applying it consistently across all your Airflow DAGs is one of the first steps toward building clean and consistent DAGs. When writing the code, the simplest method to make it clearer and easier to comprehend is to utilize a commonly used style.
- Manage Credentials Centrally: Airflow DAGs interact with many different systems, leading to many different types of credentials such as databases, cloud storage, and so on. Fortunately, retrieving connection data from the Airflow connections store makes it simple to retain credentials for custom code.
- Group Related Tasks using Task Groups: Because of the sheer number of tasks required, complex Airflow DAGs can be difficult to comprehend. Airflow 2’s new feature called Task Groups assists in managing these complicated systems. Task Groups efficiently divide tasks into smaller groups, making the DAG structure more manageable and understandable.
Designing Reproducible Tasks
Aside from developing excellent DAG code, one of the most difficult aspects of writing a successful DAG is making your tasks reproducible. This means that users can simply rerun a task and get the same result even if the task is executed at various times.
- Always Require Tasks to be Idempotent: Idempotency is one of the most important characteristics of a good Airflow task. No matter how many times you execute an idempotent task, the result is always the same. Idempotency guarantees consistency and resilience in the face of failure.
- Task Results should be Deterministic: To build reproducible tasks and DAGs, they must be deterministic. The deterministic task should always return the same output for any given input.
- Design Tasks using Functional Paradigms: It is easier to design tasks using the functional programming paradigm. Functional programming is a method of building computer programs that treat computation primarily as the application of mathematical functions while avoiding the use of changeable data and mutable states.
Handling Data Efficiently
Airflow DAGs that handle large volumes of data should be carefully designed as efficiently as feasible.
- Limit the Data being Processed: Limiting Data Processing to the minimum data necessary to get the intended outcome is the most effective approach to managing data. This entails thoroughly considering the Data Sources and assessing whether or not they are all necessary.
- Incremental Processing: The primary idea behind incremental processing is to divide your data into (time-based) divisions and treat each of the DAG runs separately. Users may reap the benefits of incremental processing by executing filtering/aggregation processes in the incremental stage of the process and doing large-scale analysis on the reduced output.
- Avoid Storing Data on a Local File System: Handling data within Airflow sometimes might be tempting to write data to the local system. As a result, downstream tasks may not be able to access them since Airflow runs its tasks multiple tasks in parallel. The simplest method to prevent this problem is to utilize shared storage that all Airflow workers can access to perform tasks simultaneously.
Managing the Resources
When dealing with large volumes of data, it can possibly overburden the Airflow Cluster. As a result, properly managing resources can aid in the reduction of this burden.
- Managing Concurrency using Pools: When performing many processes in parallel, it’s possible that numerous tasks will require access to the same resource. Airflow uses resource pools to regulate how many tasks have access to a given resource. Each pool has a set number of slots that offer access to the associated resource.
- Detecting Long-running Tasks using SLAs and Alerts: Airflow’s SLA (Service-level Agreement) mechanism allows users to track how jobs are performing. Using this mechanism, users can effectively designate SLA timeouts to DAGs, with Airflow alerting them if even one of the DAGs tasks takes longer than the specified SLA timeout.
Conclusion
This blog taught us that the workflows in Apache Airflow are represented as DAGs, which clearly define tasks and their dependencies. Similarly, we learned some of the best practices while writing Airflow DAGs.
Today, many large organizations rely on Airflow to orchestrate numerous critical data processes. It is important to consolidate data from Airflow and other Data Sources into a Cloud Data Warehouse or a destination of your choice for further Business Analytics. This is where Hevo comes in.
Hevo Data, with its strong integration with 150+ Sources, allows you to not only export data from sources & load data to the destinations but also transform & enrich your data, & make it analysis-ready so that you can focus only on your key business needs and perform insightful analysis using BI tools.
Give Hevo Data a try and sign up for a 14-day free trial today. Hevo offers plans & pricing for different use cases and business needs, check them out!
Share your experience of understanding Airflow DAGs in the comments section below.
FAQs
1. How many DAGs are in Airflow?
The number of DAGs in Airflow depends on how many you create. Each DAG is defined as a Python script, and you can have multiple DAGs running in Airflow at the same time.
2. What is the difference between DAG and task?
A DAG is a collection of tasks that define the workflow and their order. A task is a single unit of work or action within the DAG, like running a script or a query.
3. In what language is an Airflow DAG written?
Airflow DAGs are written in Python. The tasks and dependencies in the workflow are defined using Python code.

Share it with your connections.
-
 Share To X
-
 Share To LinkedIn
-
 Share To Facebook
-
 Copy Link


