


Workflow Management Platforms like Apache Airflow coordinate your actions to ensure timely implementation. If you are using Airflow, you might be aware of its built-in feature called Airflow Scheduler.
In this guide, we’ll share the fundamentals of Apache Airflow and Airflow Scheduler. We’ll clarify the lingo and terminology used when creating and working with Airflow Scheduler. We’ll also provide a brief overview of other concepts like using multiple Airflow Schedulers and methods to optimize them.
Table of Contents
What is Airflow?

Apache Airflow is one such Open-Source Workflow Management tool to improve the way you work. It is used to programmatically author, schedule, and monitor your existing tasks. Comprising a systemic workflow engine, Apache Airflow can:
- Schedule and run your core jobs.
- Manage your data pipelines.
- Safeguard jobs placement based on dependencies.
- Allocate scarce resources.
- Track the state of jobs and recover from failure.
The current so-called Apache Airflow is a revamp of the original project “Airflow” which started in 2014 to manage Airbnb’s complex workflows. It was written in Python and still uses Python scripts to manage workflow orchestration. Since 2016, when Airflow joined Apache’s Incubator Project, more than 200 companies have benefitted from Airflow, which includes names like Airbnb, Yahoo, PayPal, Intel, Stripe, and many more.
Hevo Data, a No-code Data Pipeline, helps you load data from any Data Source such as Databases, SaaS applications, Cloud Storage, SDKs, and Streaming Services and simplifies your ETL process. It supports 150+ Data Sources like MySQL, PostgreSQL and includes 60+ Free Sources.
Why Hevo?
- Incremental Data Load: Hevo allows the transfer of data that has been modified in real-time. This ensures efficient utilization of bandwidth on both ends.
- Live Support: Our team is available round the clock to extend exceptional support to our customers through Chat, Email, and Support Calls.
- Automapping: Hevo provides you with an automapping feature to automatically map your schema.
Explore Hevo’s features and discover why it is rated 4.3 on G2 and 4.7 on Software Advice for its seamless data integration. Try out the 14-day free trial today to experience hassle-free data integration.
Get Started with Hevo for FreeWhat is Airflow DAG?
DAG is a geekspeak in Airflow communities. If you are new to Apache Airflow and its workflow management space, worry not. We’ll help clear everything for you.
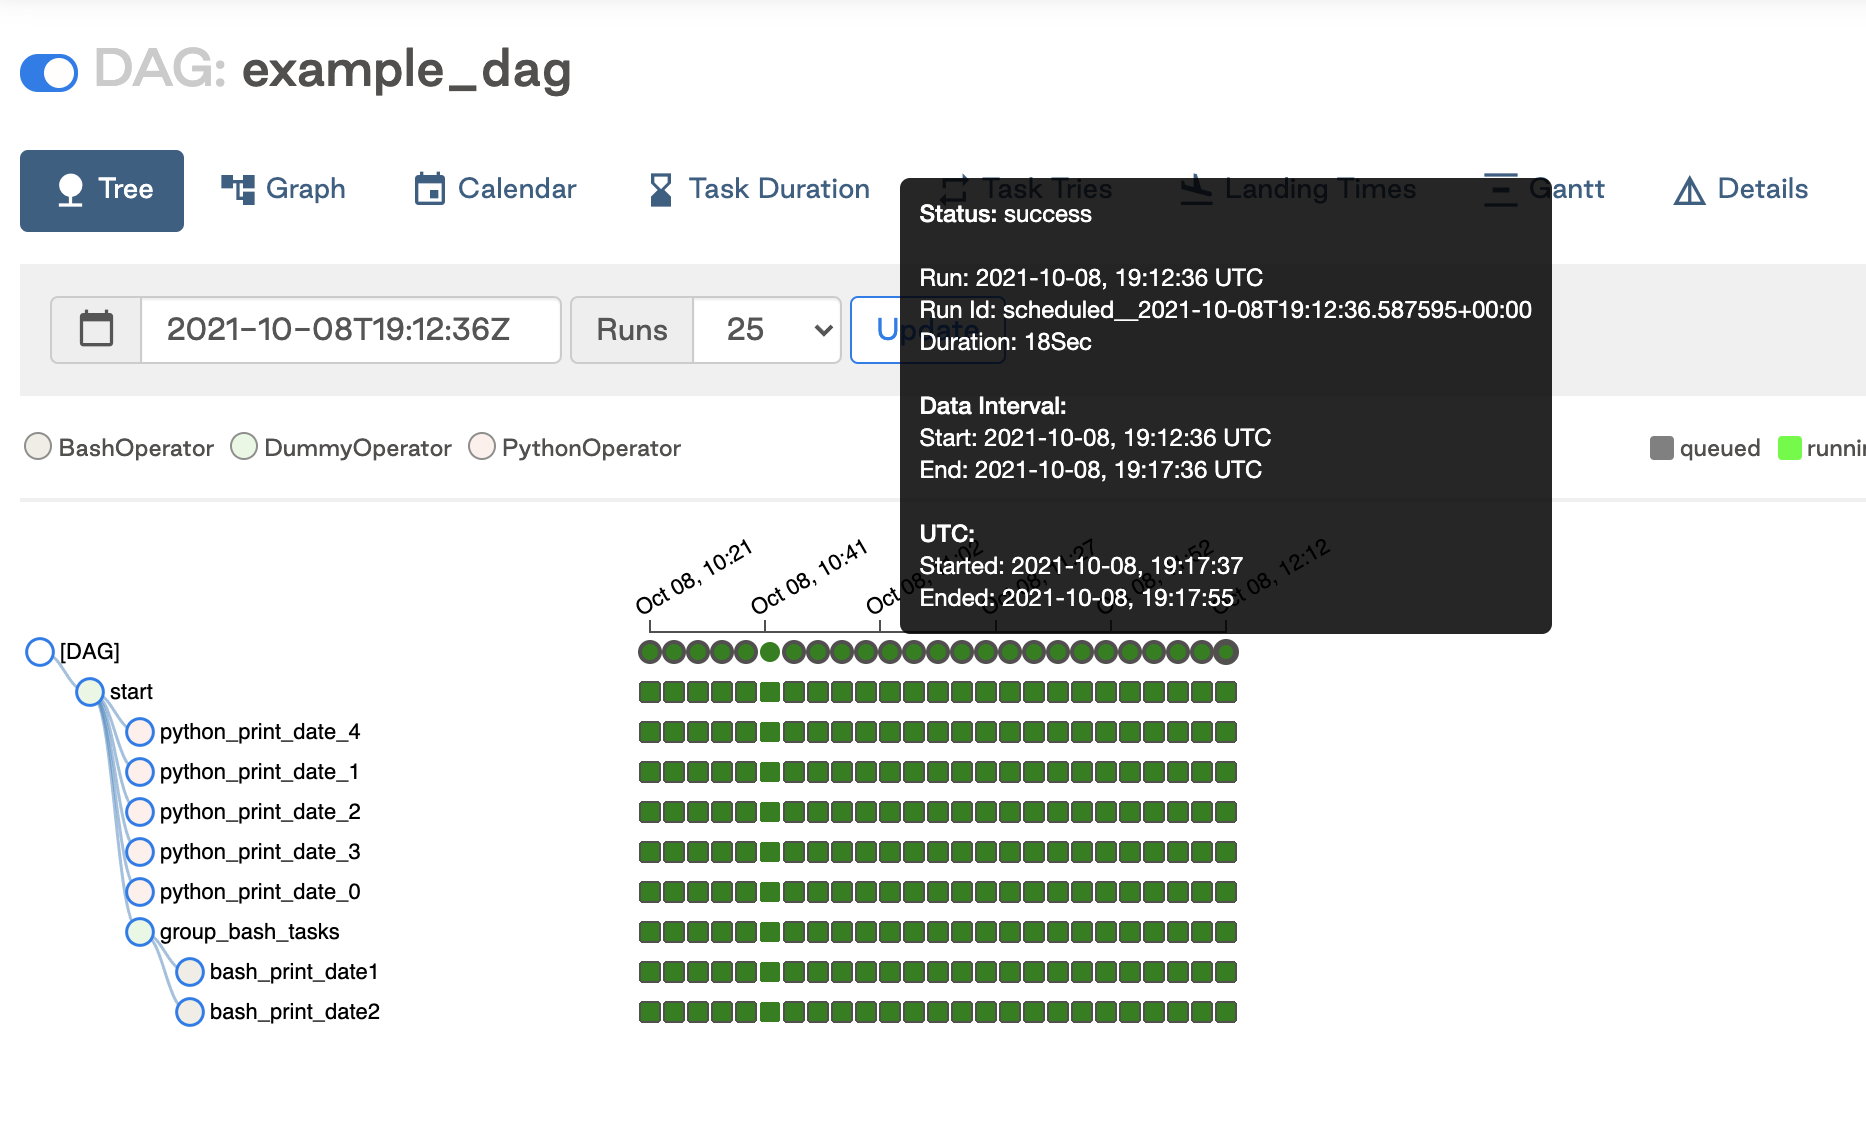
Directed Acyclic Graph or DAG is a representation of your workflow. Think of it as a series of tasks put together with one getting executed on the successful execution of its preceding task.
Task A → Task B→ Task C
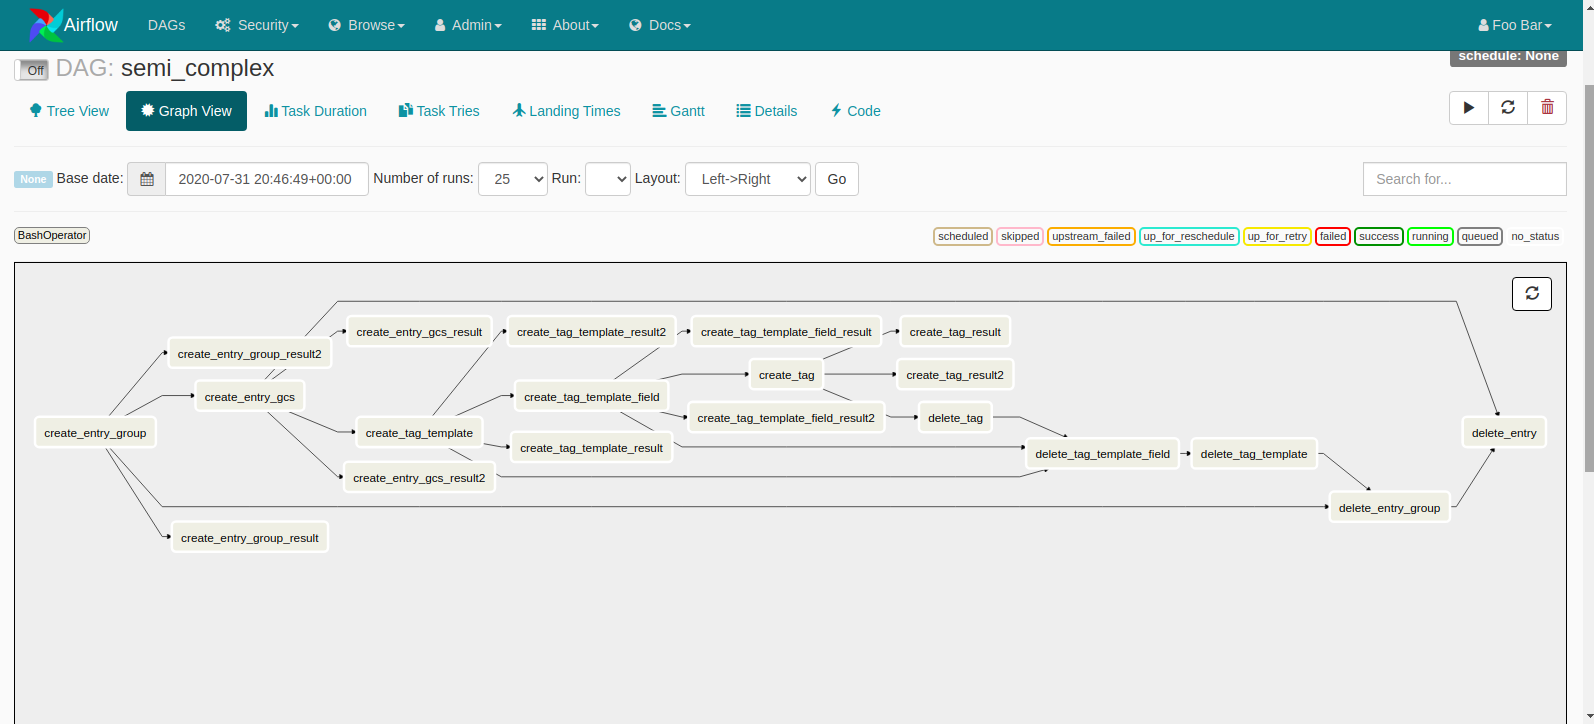
These individual elements contained in your workflow process are called “Tasks”, which are arranged on the basis of their relationships and dependencies with other tasks. Oftentimes in the real world, tasks are not reliant on two or three dependencies, and they are more profoundly interconnected with each other. It’s a usual affair to see DAGs structured like the one shown below:
You can also generate and test Airflow Dynamic DAGs.
Key Features of Apache Airflow
- Easy to Use: If you are already familiar with standard Python scripts, you know how to use Apache Airflow. It’s as simple as that.
- Open Source: Apache Airflow is open-source, which means it’s available for free and has an active community of contributors.
- Dynamic: Airflow pipelines are defined in Python and can be used to generate dynamic pipelines. This allows for the development of code that dynamically instantiates with your data pipelines.
- Extensible: You can easily define your own operators and extend libraries to fit the level of abstraction that works best for your environment.
- Elegant: Airflow pipelines are simple and to the point. To parameterize your scripts Jinja templating engine is used.
- Scalable: Airflow has a modular architecture and uses a message queue to orchestrate an arbitrary number of workers. You can expand Airflow indefinitely.
- Robust Integrations: Airflow can readily integrate with your commonly used services like Google Cloud Platform, Amazon Web Services, Microsoft Azure, and many other third-party services.
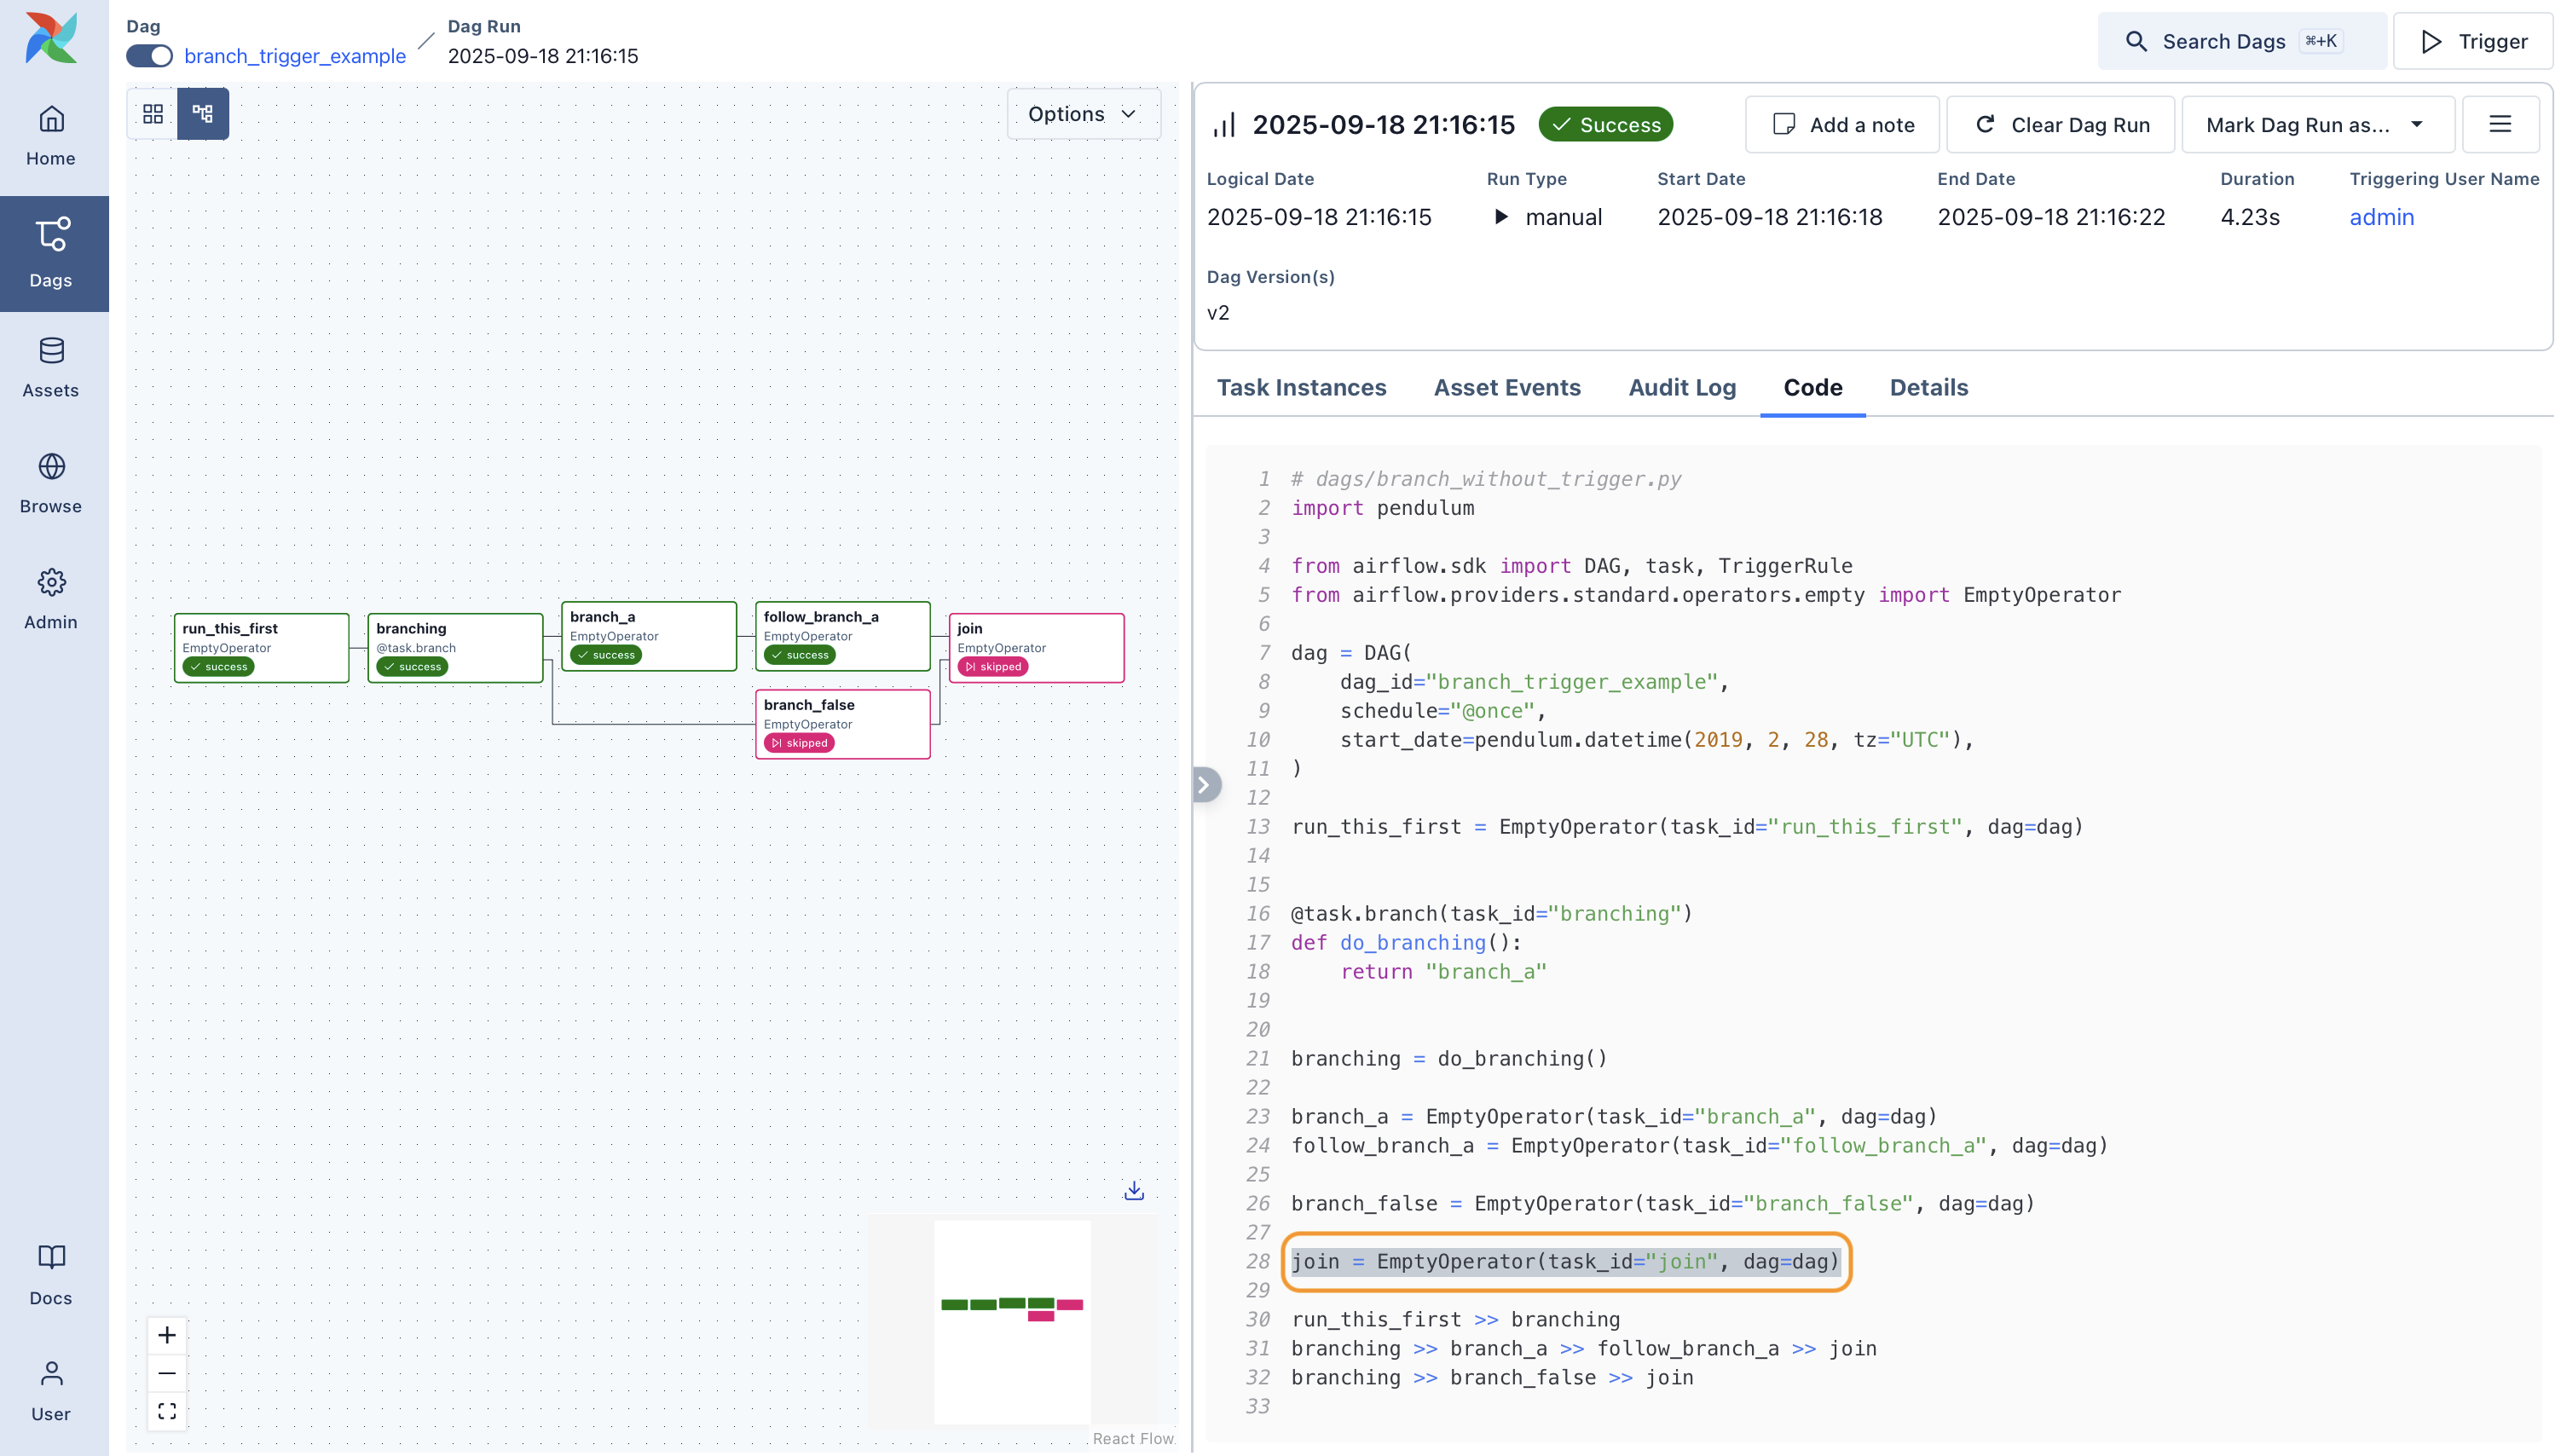
Airflow Scheduler: Scheduling Concepts and Terminology
Airflow Scheduler is a component that monitors your DAGs and triggers tasks whose dependencies have been met. Once you start the service, Airflow Scheduler runs continuously to monitor and stay in sync with your DAG folder that contains DAG objects. On a minute-to-minute basis, Airflow Scheduler collects DAG parsing results and checks if a new task(s) can be triggered.
To start the Airflow Scheduler service, all you need is one simple command:
airflow schedulerThis command starts Airflow Scheduler and uses the Airflow Scheduler configuration specified in airflow.cfg. Once this scheduler starts, your DAGs will automatically start executing based on start_date (date at which tasks start being scheduled), schedule_interval (interval of time from the min(start_date) at which DAG is triggered), and end_date (date at which DAG stops being scheduled).
Part 1: Airflow Scheduler Scheduling Terms
Before we dive right into the working principles of Airflow Scheduler, there are some key terms relating to Airflow Scheduling that you need to understand:
- DAG Run: Object representing an instance of DAG in time.
- Cron Presets: Each DAG has a schedule (schedule_interval) defined in a cron expression as a str, or a datetime.timedelta object.
- Data Interval: Data Interval is a new concept that emerged starting Airflow 2.2. It represents the time range for which a DAG run operates on a task. As an example, if your DAG run is scheduled to run on a @hourly basis, each Data Interval will begin at the start of the minute (minute 0) and end at the close of the hour (minute 59).
- data_interval_start = Start date of the data interval = execution date.
- data_interval_end = End date of the data interval.
- Logical Date: The logical date of a DAG run is the same as the start of the data interval (data_interval_start). It’s a replacement to the original “execution_date” which became confusing when you would execute multiple DAG runs.
- Timetable: The Airflow timetable is a property of a DAG that defines the schedule interval of your DAG and describes what to do if it is triggered manually or triggered by the scheduler. Airflow Timetables are essentially “plugins” that are used by the Web Server and the Airflow Scheduler.
- Run After: Run after represents the earliest time a DAG can be scheduled by the user. Depending on your DAG’s timeline, this date may be the same as the end of the data interval in your Airflow UI.
- Catchup: Airflow Scheduler, by default, examines the lifetime of the DAG (from start to end/now, one interval at a time) and executes a DAG run for any interval that has not been run (or has been cleared). This is called Catchup.
- Backfill: Backfill is a feature that allows you to re-run DAGs on historical schedules manually. This executes all DAG runs that were scheduled between start_date & end_date (of your desired historical time frame) irrespective of the value of the catchup parameter in airflow.cfg.
- Re-Run Tasks: At times, your tasks can fail during the scheduled run. Re-run allows you to re-execute your failed tasks by setting the current task instance state to “None”.
Part 2: Airflow Scheduler Parameters for DAG Runs
Here’s a list of DAG run parameters that you’ll be dealing with when creating/running your own DAG runs:
- data_interval_start: A datetime object that specifies the start date and time of the data interval. For each DAG Run, this parameter is returned by the DAG’s timetable. data_interval_start can be given by the user when creating a custom timetable or it can be created automatically by Airflow.
- data_interval_end: A datetime object that specifies the end date and time of the data interval. For each DAG Run, this parameter is returned by the DAG’s timetable. data_interval_end can be given by the user when creating a custom timetable or it can be created automatically by Airflow.
- schedule_interval: Airflow Scheduler Interval sets the repeat frequency for each DAG run. This Schedule Interval Airflow argument accepts cron expressions or timedelta objects. More on this is outlined in the section below- Airflow Scheduler: Schedule Intervals.
- timetable: A parameter that defines DAG’s timetable (either custom or built-in). Timetables can be defined explicitly within the DAG or will be determined automatically by Airflow in cases where a schedule_interval is provided. Either a timetable or a schedule_interval should be defined for each DAG, not both.
- start_date: The starting date when your first DAG run will be executed. Your DAG runs will be based on the min(start_date) for all your tasks and from that point on, the Airflow Scheduler creates new DagRuns based on your schedule_interval.
- end_date: The last date your DAG will be executed. This parameter is optional.
How Does Airflow Scheduler Work?
When you start the Airflow Scheduler service:
- The scheduler first checks the “dags” folder and instantiates all DAG objects in the metadata databases. Metadata database stores configurations, such as variables and connections, user information, roles, and policies. It is the source of truth for all metadata regarding DAGs, schedule intervals, statistics from each run, and tasks.
- The scheduler then parses the DAG file and creates the necessary DAG runs based on the scheduling parameters. For each Task in the DAG that has to be completed, a TaskInstance is created. These TaskInstances are set to “Scheduled” in the metadata database.
- The primary scheduler searches the database for all tasks that are in the “Scheduled” state and passes them on to the executors (with the state changed to “Queued”).
- Workers pick up tasks from the queue and begin performing them, depending on the execution configuration. When a task is removed from the queue, it is converted from “Queued” to “Running.”
- When a job gets finished, the worker changes the task’s status to its final state (finished, failed, etc.). This update is then reflected in the Airflow Scheduler.
Airflow Scheduler: Schedule Intervals
Setting schedule intervals on your Airflow DAGs is simple and can be done in the following two ways:
1. Cron Presets and Expressions
You have the option to specify Airflow Schedule Interval as a cron expression or a cron preset. You can pass them to the schedule_interval parameter and schedule your DAG runs. The schedule interval Airflow has listed on their website is mentioned below:
| Preset | Meaning | Cron |
| None | Don’t schedule, use for exclusively “externally triggered” DAGs | |
| @once | Schedule once and only once | |
| @hourly | Run once an hour at the beginning of the hour | 0 * * * * |
| @daily | Run once a day at midnight | 0 0 * * * |
| @weekly | Run once a week at midnight on Sunday morning | 0 0 * * 0 |
| @monthly | Run once a month at midnight of the first day of the month | 0 0 1 * * |
| @yearly | Run once a year at midnight of January 1 | 0 0 1 1 * |
As an example, if you want your DAG run to schedule at the beginning of every hour, you would use schedule_interval=’@hourly’ or schedule_interval=’0 * * * *’.
Note: If you don’t want to schedule your DAG, use schedule_interval=None and not schedule_interval=’None’.
2. Timedelta
You also get the option to use the timedelta object to schedule your DAG. This is useful for cases when you want your DAG to repeat cyclically (i.e. every 10 minutes or hourly) without any specific start point in time. For instance, schedule_interval=timedelta(minutes=10) will run your DAG every ten minutes, and schedule_interval=timedelta(days=1) will run your DAG every day.
Airflow Scheduler: Triggers in Scheduling
Airflow Triggers are small asynchronous pieces of Python code designed to run all together in a single Python process. Because they are asynchronous, these can be executed independently,
Airflow provides the following ways to trigger a DAG:
- Trigger on a schedule: When you create a DAG, you specify a schedule (schedule_interval) for it. Airflow triggers the DAG automatically based on the specified scheduling parameters.
- Trigger manually: You can trigger a DAG manually from the Airflow UI, or by running an Airflow CLI command- airflow.operators.trigger_dagrun. The TriggerDagRunOperator triggers a DAG run for a “dag_id” when a specific condition is met.
Trigger Rules
Trigger rules help you modify your DAG execution flow when your workflow needs to solve specific issues. Have a look at Airflow’s trigger rules and what they mean when you use them:
- all_success (default): All upstream tasks have succeeded.
- all_failed: All upstream tasks are in a failed or upstream_failed state.
- all_done: All upstream tasks are done with their execution.
- one_failed: At least one upstream task has failed (does not wait for all upstream tasks to be done).
- one_success: At least one upstream task has succeeded (does not wait for all upstream tasks to be done).
- none_failed: All upstream tasks have not failed or upstream_failed – that is, all upstream tasks have succeeded or been skipped.
- none_failed_min_one_success: All upstream tasks have not failed or upstream_failed, and at least one upstream task has succeeded.
- none_skipped: No upstream task is in a skipped state – that is, all upstream tasks are in success, failed, or upstream_failed state.
- always: No dependencies at all, run this task at any time.
Airflow Timetables
Timetable defines the schedule interval of your DAG. It dictates the data interval and the logical time of each DAG run.
Airflow Timetable can be created by either specifying the DAG’s schedule_interval argument or by passing the timetable argument. Due to certain constraints of using cron expressions and presets, Airflow has decided to make timetables as the primary scheduling option. You can still define and use schedule_interval, but Airflow will convert this to a timetable behind the scenes. And if a cron expression or timedelta is not sufficient for your use case, it’s better you define your own timetable.
When creating a custom timetable, you must keep in mind that your timetable must be a subclass of Timetable, and be registered as a part of the Airflow plugin.
Here is an example of creating a new Timetable called AfterWorkdayTimetable with an Airflow plugin called WorkdayTimetablePlugin where the timetables attribute is overridden.
from airflow.plugins_manager import AirflowPlugin
from airflow.timetables.base import Timetable

class AfterWorkdayTimetable(Timetable):
    pass

class WorkdayTimetablePlugin(AirflowPlugin):
    name = "workday_timetable_plugin"
    timetables = [AfterWorkdayTimetable]
After this gets implemented , you can use the timetable in your DAG:
import datetime

from airflow import DAG
from airflow.example_dags.plugins.workday import AfterWorkdayTimetable

with DAG(
    dag_id="example_after_workday_timetable_dag",
    start_date=datetime.datetime(2021, 3, 10),
    timetable=AfterWorkdayTimetable(),
    tags=["example", "timetable"],
) as dag:
    ...
Once your timetable is registered, you can use it to trigger your DAG either manually or by using the Airflow Scheduler. Airflow Scheduler calls one of the two methods to know when to schedule the next DAG run:
- next_dagrun_info: Tells the scheduler of the timetable’s regular schedule, e.g., hourly/every day.
- infer_manual_data_interval: Tells scheduler if a DAG run is manually triggered (from the web UI, for example) and how to reverse-infer out-of-schedule run’s data interval.
You can also customize DAG Scheduling with Custom Timetables.


Airflow 2.0: Running Multiple Schedulers
Multiple Schedulers or Highly Available Scheduler is an improved functionality available on Airflow versions 2.x and above.
If you were to run Airflow 1.10.x, the typical architecture would feature two Web Servers, an instance corresponding to Metastore and one instance corresponding to Airflow Scheduler. In the event your Airflow Scheduler fails, you will not be able to trigger tasks anymore. This becomes a big problem since Airflow serves as your Workflow orchestrator and all other tools working in relation to it could get impacted by that.
With the introduction of HA Scheduler, there are no more single points of failure in your architecture. The presence of multiple Airflow Schedulers ensures that your tasks will get executed even if one of them fails.
Having multiple schedulers is beneficial in the following aspects:
- Horizontal Scalability: You can add as many Airflow Schedulers to your Metastore as you require and run as many tasks, hence reducing the latency of task execution.
- Performance: If you run use cases where you are required to create new data pipelines and solve tasks every minute, the Airflow 2.0 architecture of multiple Schedulers can be of immense help.
To set up and run multiple Airflow Schedulers, you can use this Airflow 2.0 Scheduler Guide from Astronomer.
Step 1: Set up Airflow 2.0.
curl -sSL https://install.astronomer.io | sudo bash -s -- v0.22.0

# If you use windows, check the following page
# https://www.astronomer.io/docs/cloud/stable/develop/cli-quickstart/#install
mkdir airflow-2

cd airflow-2

astro dev init
Step 2: Create a new file docker-compose.override.yml and copy this code:
# docker-compose.override.yml

version: "2"
services:
  webserver:
    image: astronomerio/ap-airflow:2.0.0-buster-onbuild-22237
    command: >
      bash -c '{ airflow create_user "$$@" || airflow users create "$$@"; } && { airflow sync_perm || airflow sync-perm; } && airflow webserver' -- -r Admin -u admin -e admin@example.com -f admin -l user -p admin

  scheduler:
    image: astronomerio/ap-airflow:2.0.0-buster-onbuild-22237

  scheduler-2:
    image: astronomerio/ap-airflow:2.0.0-buster-onbuild-22237
    command: >
      bash -c "(airflow upgradedb || airflow db upgrade) && airflow scheduler"
    restart: unless-stopped
    networks:
      - airflow
    user: astro
    labels:
      io.astronomer.docker: "true"
      io.astronomer.docker.cli: "true"
      io.astronomer.docker.component: "airflow-scheduler"
    depends_on:
      - postgres
    environment:
      AIRFLOW__CORE__EXECUTOR: LocalExecutor
      AIRFLOW__CORE__SQL_ALCHEMY_CONN: postgresql://postgres:postgres@postgres:5432
      AIRFLOW__CORE__LOAD_EXAMPLES: "False"
      AIRFLOW__CORE__FERNET_KEY: "d6Vefz3G9U_ynXB3cr7y_Ak35tAHkEGAVxuz_B-jzWw="
    volumes:
      - ./dags:/usr/local/airflow/dags:ro
      - ./plugins:/usr/local/airflow/plugins:z
      - ./include:/usr/local/airflow/include:z
      - airflow_logs:/usr/local/airflow/logs
Step 3: Change the docker image of Airflow in the Dockerfile.
FROM astronomerio/ap-airflow:2.0.0-buster-onbuild-22237Step 4: Run the example DAG brought with the Astro CLI and kill the scheduler.
docker ps

docker kill <container_scheduler>
With this, your second Airflow Scheduler will be set up to execute on tasks. You can visit localhost:8080 and run your existing DAGs to see the improvement and time reduction in task execution.
Airflow Scheduler: Optimizing Scheduler Performance
Some optimizations are worth considering when you work with Airflow Scheduler. Have a look at them here:
- Monitor Hardware Capacity: Of times while running Airflow Scheduler, your CPU resource utilization might reach its full capacity. This can slow down your tasks. A better option is to add another scheduler on a new machine.
- Improve Resource Utilization: If your system is running under-utilized, you can increase the number of schedulers, parse processes or decrease time intervals for more frequent actions.
- Reduce Top-level DAG Python Code Complexity: The Top-level Python Code explains the best practices for writing your top-level Python code. This can result in significant improvements, especially if you are trying to connect to other databases or other sources. You can check about the same in this document- Reducing DAG complexity.
- Experiment with Scheduler Tunables: Try and find your performance balance by exchanging one performance aspect with another.
- Change Scheduler Behaviour: Fine-tune your scheduler behavior to get better results for your particular deployment.
Conclusion
Overall, in this blog piece, we presented to you a brief introduction to Apache Airflow and its Workflow Management System. We illustrated you on Airflow concepts like DAG, Airflow Scheduler, Airflow Schedule Interval, Timetable, and High Availability (HA) Scheduler and how you can use them in your workflow to better your work.
Thankfully, using our ETL solution, Hevo Data, you don’t have to bother asking your tech teams. Hevo Data is a No-Code Data Pipeline Solution that helps you integrate data from multiple sources like MySQL, PostgreSQL, and 150+ other data sources. Try a 14-day free trial and experience the feature-rich Hevo suite first hand. You can also check out our unbeatable pricing and make a decision on your best-suited plan.
Frequently Asked Questions
1. Is Airflow better than cron?
Airflow is considered superior to cron for its better deals with dependencies and retries with a human-friendly interface. Although the nature of the work does not demand much, cron is very suitable for simple jobs; however, since it is flexible and scalable, it makes it perfect for modern data pipelines.
2. Is Kafka similar to Airflow?
Kafka and Airflow both serve different purposes; for instance, Kafka is appropriate for real-time data streams, whereas Airflow is for workflow orchestration and scheduling. They complement each other in that Kafka manages the data ingestion and Airflow orchestrates the processing of the same.
3. What is a flight scheduler?
It is like a system or tool for managing and organizing flight schedules in such a manner that the aircraft, crew, and airports available can be optimized. Ideally, it aims to optimize flight timings, routes, and operational logistics to ensure increased overall airline efficiency.
If you have any questions, do let us know in the comment section below. Also, share any other topics you’d like to cover. We’d be happy to hear your opinions.
Share it with your connections.
-
 Share To X
-
 Share To LinkedIn
-
 Share To Facebook
-
 Copy Link


