


Kafka is one of the most popular stream-processing tools that assist organizations in managing big data to solve business problems. While Kafka can boost the overall performance of real-time applications, it can cause several performance issues if not leveraged with cloud computing platforms. You can use Azure Kafka Integration to ensure high performance and reliability while scaling data delivery among applications. However, the process of using Kafka would vary depending on the cloud platform you embrace.
This article will introduce you to Kafka and will provide you with different ways to set up Azure Kafka to improve your performance while handling a colossal amount of workloads. Read along to learn these various methods of using Azure Kafka combination and try them out by yourself!
Table of Contents
What is Kafka
Kafka is an open-source data streaming platform used to build real-time applications. It carries information from one application to another through pipelining. In Kafka, the messages are stored in events within Kafka clusters.
These events can then be used in the form of messages. The messages follow the Publish-Subscribe approach, where Publish means producing messages, and Subscribe means consuming messages by different applications.
Hevo Data, a No-code Data Pipeline, is your one-stop-shop solution for all your Apache ETL needs! Hevo offers a built-in and robust native integration with Apache Kafka or the Kafka Confluent Cloud to help you replicate data in a matter of minutes! Check out what makes Hevo amazing:
- Live Support: The Hevo team is available round the clock to extend exceptional customer support through chat, email, and support calls.
- Schema Management: Hevo takes away the tedious task of schema management by automatically detecting the schema of incoming data and mapping it to the destination schema.
- Powerful Price-to-Performance Ratio: Hevo has a transparent and flexible pricing model with three different subscription offerings – Free, Starter, and Business.
Need for Azure Kafka
Although local machines can run Kafka, you can witness critical challenges like storage issues. Besides, there can be a hindrance in performance during real-time data flow.
You can use the Azure cloud to run Kafka with better flexibility and avoid performance and storage problems. However, the Azure cloud consists of Event hubs through which different applications leverage Kafka services.
Kafka clusters consist of data changes in databases stored as events in Kafka topic, the applications built on Azure can access these data change events through Kafka services. Therefore, Kafka and Azure allow accessible online communication among applications for data change events.
Although there are many ways to use Azure Kafka, the following are some of the go-to methods.
- Data Streaming with Event Hub Using Azure Kafka Protocol
- CDC with Azure Kafka and PostgreSQL
- Using Azure Kafka with Confluent Cloud
1. Data Streaming with Event Hub Using Azure Kafka Protocol
Azure Event hub consists of data streaming information. It has the capacity of receiving and processing millions of events per second. Event hubs can store and process events using distributed services and allow you to stream these Azure Kafka clusters. This will enable your producers and subscribers to communicate with your applications.
You will need the following prerequisites to start with the data streaming of Azure Kafka.
- Java development kit: Java development kit on Azure.
- Subscription of Azure: Azure Subscription.
- Download Maven binary archive: Download Maven archive.
- Install Maven binary archive: Install Maven archive.
- Git repository: Git.
Now, perform the following steps:
- Step 1: To create an event hub in Azure, you can refer to the Azure event hub.
- Step 2: To send and receive messages in event hubs by using Kafka, follow the following steps:
- Step 3: Go to the GitHub repository and clone the Azure event hubs for the Kafka repository go to:
azure-event-hubs-for-kafka/quickstart/java/producer- Step 4: Now, update the configuration details of the producer in the Kafka repository that is in:

- Step 5: The above configuration is about building an encrypted layer between the server and the client.

- Step 6: The above configuration allows a client application to use the server-side services. Run the producer code from the following command.
mvn clean package
mvn exec:java -Dexec.mainClass="TestProducer"- Step 7: Navigate to the following path:
azure-event-hubs-forkafka/quickstart/java/consumerYou need to update the configuration details for the consumers as you updated the producers. Thus, go to src/main/resources/consumer.config file and update details as follows:


- Step 8: After running the consumer code using the below command, you can see the events in event hubs.

2. CDC with Azure Kafka and PostgreSQL
Suppose the PostgreSQL database contains a table with the customer ID, Order ID, city, transaction, etc. This data will be caught by the PostgreSQL Debezium connector and sent to the Kaka topic. The connector will send the data to Azure Data Explorer for further analysis.
- Step 1: You can refer to this repository to access the Docker images.
- Step 2: You need to have a Microsoft Azure account and command-line interface to install Docker.
- Step 3: Clone the GitHub repository using the following command.
git clone https://github.com/abhirockzz/kafka-adx-postgres-cdc-demo
cd kafka-adx-postgres-cdc-demo- Step 4: Ensure that you have set up and configured Azure Data Explorer and PostgreSQL database.
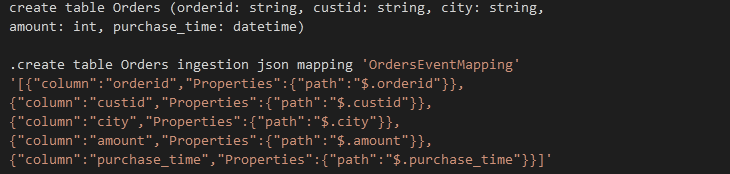
Create table Orders in PostgreSQL using the following command.
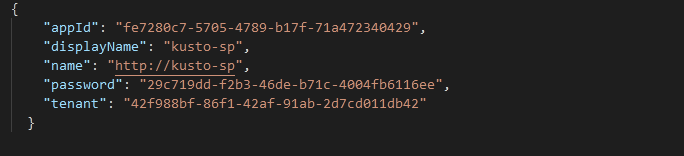
- Step 5: You have to create a service principal for the connector to connect to the Azure Data Explore service. Use the following command.
az ad sp create-for-rbac -n "adx-sp"You will get a JSON output after creating a service principal.
- Step 6: You need to provide permissions to the service principal. You can do that using the below command.
.add database <enter database name> admins (‘aadapp=<enter service principal appId>;<enter service principal tenant>’) ‘AAD App’- Step 7: Set the replication mode for Azure in the PostgreSQL database. It can be carried out with the following commands.
.add database <enter database name> admins (‘aadapp=<enter service principal appId>;<enter service principal tenant>’) ‘AAD App’- Step 8: Start the Docker container with the following command:
docker-compose --project-name adx-kafka-cdc up --build- Step 9: To check whether the container is started, use the below command:
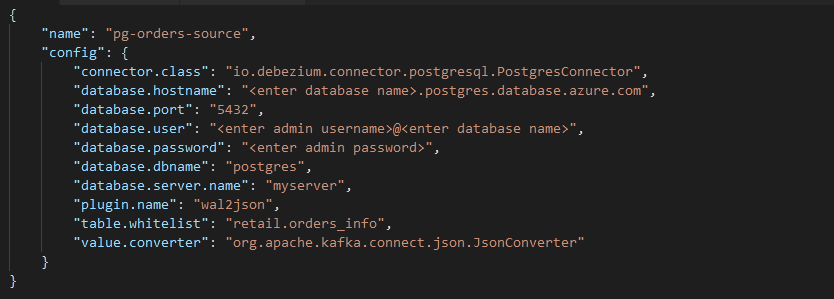
docker-compose -p adx-kafka-cdc ps- Step 10: The Debezium PostgreSQL connector should track changes in the Orders table of the PostgreSQL. Copy the below contents to the configuration file of the Debezium PostgreSQL Connectors.
- Step 11: To start the container, use the following command.
curl -X POST -H "Content-Type: application/json" --data @pg-source-config.json http://localhost:9090/connectors

# to confirm
curl http://localhost:9090/connectors/pg-orders-source- Step 12: To check the Kafka topic to watch the data change events, enter the following command.
docker exec -it adx-kafka-cdc_kafka_1 bash- Step 13: Finally, to consume these data change events, type the below commands.
cd bin && ./kafka-console-consumer.sh –topic myserver.retail.orders_info –bootstrap-server kafka:9092 –from-beginning3. Using Azure Kafka with Confluent Cloud.
Now, to use Azure Kafka and Confluent cloud, you will need a list of prerequisites:
- Microsoft Azure account
- Any programming language (this tutorial uses Python)
- Kafka Client
- Confluent Cloud
Now, the following steps will allow you to set up the Azure Kafka with Confluent Cloud:
- Step 1: If you do not have a Kafka client, install it below:
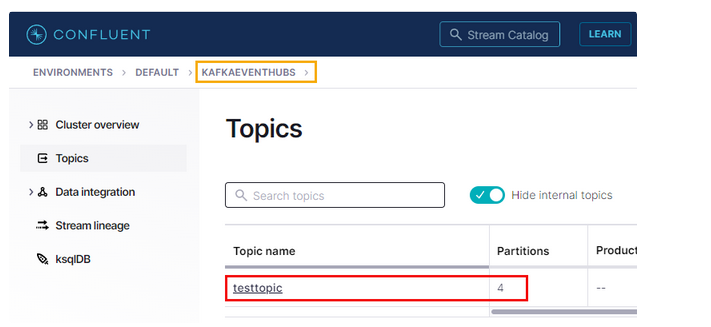
pip install confluent-kafka- Step 2: Create a Confluent cloud cluster named kafkaeventhubs and create a topic name testtopic with four partitions. It will show the below output.
- Step 3: To check how this Confluent cloud runs on Azure, you can refer to Confluent Cloud on Azure.
- Step 4: Publish the below Python code to the Kafka topic called testtopic.
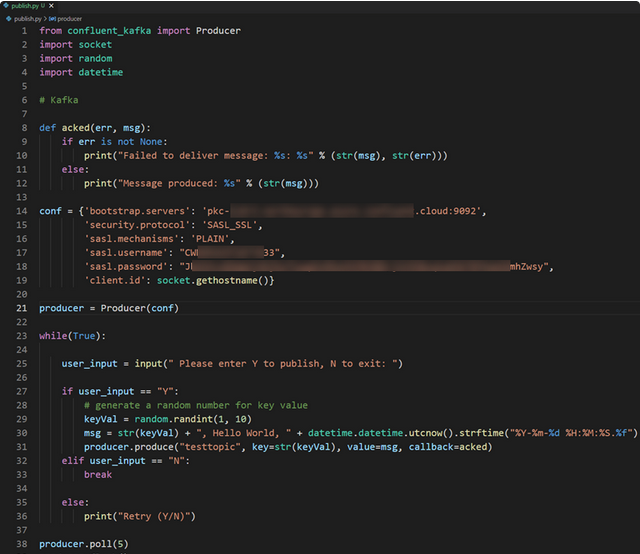
The above code consists of a configuration that has the following properties
- bootstrap.servers: It is the endpoint of the cluster.
- Security.protocol: It is the protocol used to communicate with brokers. Brokers are the servers that run in Kafka clusters.
- Sasl.mechanism: It is used for authentication. When you set it to PLAIN, it will assign a username and password to authenticate.
- Step 5: You have to create an event hub namespace. You can do that through Create event hubs in Azure. The event hub will be created as follows:
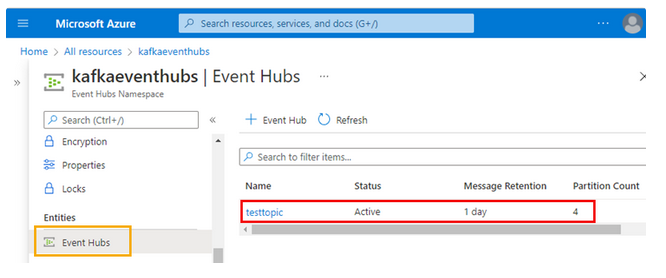
- Step 6: From above, there is an event hub namespace called kafkaeventhubs and an event hub called testtopic, as you have written in the Confluent cloud.
In the event hub, you have to create a SAS.SAS is a Shared Access Signature to enable authentication for namespace or event hubs. Thus, create SAS for testtopic event hub.
- Step 7: Go to the testtopic event, share access policies, and click on add. It will notify you that you have not created any policy. Therefore, you can create one, as shown below.
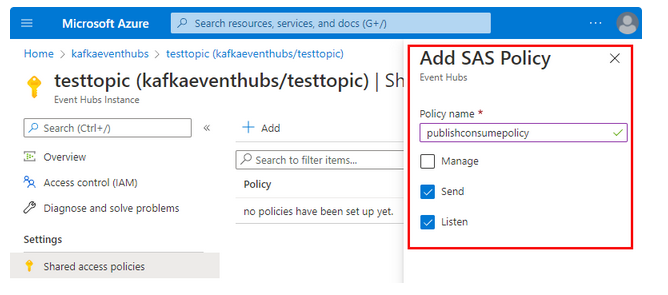
- Step 8: Look at the policy name, give the name to the policy, and claim what type of service it allows.
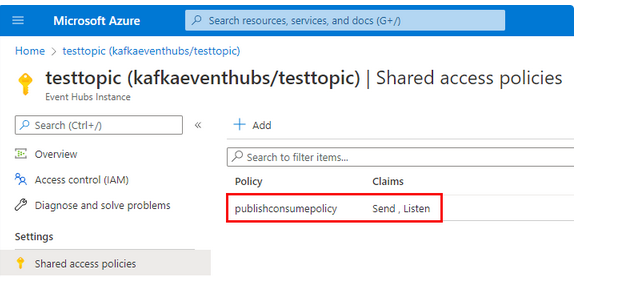
- Step 9: Now, you can see the generated policy and claim as shown in the below output:

- Step 10: From above, you can see that there are two keys and a connection string. You have to copy one of these connection keys for bootstrap servers.
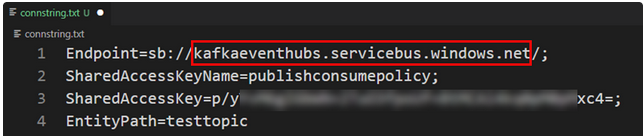
- Step 11: The red box above consists of the connection string needed for the bootstrap server to start. The bootstrap server is used to define the endpoint to connect to the client. Hence, event hubs disclose the Kafka endpoint on port 9093.
"bootstrap.servers": "kafkaeventhubs.servicebus.windows.net:9093"`- Step 12: You need to set the authentication to the event hubs. Use the following command to set the required authentication:

- Step 13: Look at the following configuration to publish events at the event hub.
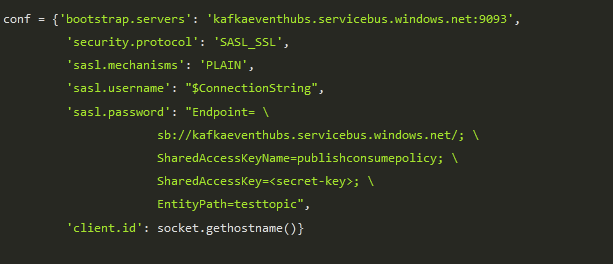
- Step 14: Check the above configuration in the Python code. Go to the ‘testtopic’ event hub in Azure, create some messages, and check.
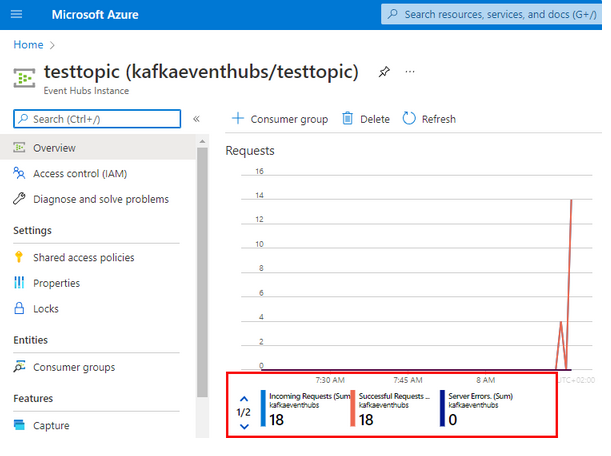
- Step 15: Since there is no straightforward way to check these published events, you can see the successful request of the messages.
That’s it! You have now learned 3 different ways of implementing the Azure Kafka combination. You can now try out these methods on your own and experience their benefits.

Learn More:
Conclusion
This article introduced you to Kafka and provided you with the different ways of using Azure Kafka on Azure event hubs, Kafka on PostgreSQL by using Azure Data Explorer, and Data streaming using Kafka protocol. However, you can also use Kafka with Bitnami to run applications and databases on virtual machines.
Now, to perform Data Analytics on your Kafka data, you first need to export this data to a Data Warehouse. This will require you to custom code complex scripts to develop the ETL processes. Hevo Data can automate your data transfer process, hence allowing you to focus on other aspects of your business like Analytics, Customer Management, etc. This platform allows you to transfer data from 150+ multiple sources to Cloud-based Data Warehouses like Amazon Redshift, Snowflake, Google BigQuery, etc. Try a 14-day free trial and experience the feature-rich Hevo suite firsthand. Also, check out our unbeatable pricing to choose the best plan for your organization.
Frequently Asked Questions
1. Does Azure offer native Kafka support?
Azure supports native Kafka: With Kafka API, Azure Event Hubs will enable running Kafka-based applications without changing your code.
2. How does Azure Event Hubs compare to Kafka?
Azure Event Hubs is a fully managed event streaming service with similar features to Kafka but provides an entirely seamless integration with the ecosystem of Azure and is even simpler to manage.
3. How does Kafka scale on Azure?
Scaling for Kafka on Azure happens horizontally, where there are more brokers and partitions. That can happen easily using services like HDInsight or Event Hubs, allowing the scalability without manually dealing with infrastructure.
Share it with your connections.
-
 Share To LinkedIn
-
 Share To Facebook
-
 Share To X
-
 Copy Link


