


Webhooks allow real-time notification of events between applications. PostgreSQL is a trusted relational database. Combining the two can strengthen real-time vigilance so your system updates instantly when events occur. However, you need a reliable ETL pipeline to connect them.
This post will show you how to easily ETL Webhooks data into PostgreSQL in just minutes using Hevo. With Hevo, you can establish a Webhooks PostgreSQL connection and keep your data up-to-date without building and managing complex ETL scripts.
Table of Contents
What is a Webhook?
A webhook is an HTTP request that is triggered by an event in a source system and delivered to a destination system, that, too, frequently with a data payload. In general, Webhooks are automated, which means they are sent out when an event occurs in the originating system.
When an event occurs, one system (the source) can “talk” (HTTP request) to another system (the destination) and communicate information (request payload) about the event.
What is PostgreSQL?
PostgreSQL is a relational database management system. The database contains data points in rows, with columns representing various data properties. It distinguishes itself by emphasizing more on integrations and extensibility. PostgreSQL database is scalable since it interacts with many different technologies and adheres to numerous database standards.
Method 1: How to Establish Webhooks PostgreSQL Connect using Hevo
We can establish the Webhooks PostgreSQL connection using Hevo Data’s No-code Data Pipeline. It will ensure that you have a seamless integration without writing a single line of code.
Method 2: Creating a Webhook and Trigger through Supabase
Using Supabase which is a backend built on top of PostgreSQL, you can create a new webhook and enable it to send requests to your API endpoint. Even though this method works but it is not very efficient and requires proficient technical knowledge.
Get Started with Hevo for FreeMethods to Connect Webhooks to PostgreSQL
In this section of this tutorial article, we’ll be establishing the Webhooks PostgreSQL connect using two methods. Let’s all see how.
Method 1: Using Hevo Data to Connect Webhooks to PostgreSQL
In this method, we will use Hevo Data to establish a connection between Webhooks and PostgreSQL.
Step 1: Configuring Webhook as a Source
- From the list of Sources, select Webhook. (In case, Webhook is not displayed click on “View All,” and check for Webhook. Webhook logo will be visible now, select it to continue.

- A page named, “Configure your Webhook Source” will appear. Now, indicate the JSON path to the root of the Event name as well as the root of the fields in your payload.
- Click on “CONTINUE.”

Step 2: Specifying PostgreSQL Connection Settings
Specify the following in the “Configure your PostgreSQL Destination” page:
- Pipeline Name: A unique name for your pipeline is recommended.
- Database Host: The table listed below shows some examples of PostgreSQL hosts.
| Variant | Host |
|---|---|
| Amazon RDS PostgreSQL | postgresql-rds-1.xxxxx.rds.amazonaws.com |
| Azure PostgreSQL | postgres.database.azure.com |
| Generic PostgreSQL | 10.123.10.001 or postgresql.westeros.inc |
| Google Cloud PostgreSQL | 35.220.150.0 |
- Database Port: The default value is 5432.
- Database User: The user is listed as read-only, having permission to only read tables in your database.
- Database Password: The password for your database for the read-only user.
- Select Ingestion Mode: Read Ingestion Modes to know more.
- Connection settings:
- Connecting through SSH: Enabling this option allows you to connect to Hevo via an SSH tunnel rather than directly connecting your PostgreSQL database server to Hevo. This adds an extra layer of protection to your database by not exposing your PostgreSQL configuration to the public.
- Use SSL: Allow it to utilize an SSL-encrypted connection. If you’re utilizing Heroku PostgreSQL databases, you also need to activate this. To activate it, enter the following:
- CA File: This is the file that contains the SSL server certificate authority (CA).
- Client Certificate: The public key certificate file for the client.
- Client Key: The file containing the client’s private key.
- Advanced Settings:
- Load Historical Data: This option is only available for Pipelines in Logical Replication mode. If this option is enabled, the complete table data is retrieved during the Pipeline’s initial run. If this option is turned off, Hevo will only load data that was written in your database after the Pipeline was created.
- Merge Tables: For Pipelines in Logical Replication mode. When you choose this option, Hevo combines tables with the same name from separate databases while loading data into the warehouse. With each record, Hevo populates the Database Name column. If this option is turned off, the database name is prefixed to each table name. See How Does the Merge Tables Feature Work? for more information.
- Add New Tables to the Pipeline: Except for Custom SQL, this applies to all Ingestion modes.
2. To proceed with the Webhooks PostgreSQL connection, click on “Test & Continue.”

Step 3: Setting up Webhook
Copy and paste the Webhook URL obtained in Step 2 above into the application from which you wish to send events to Hevo.
Step 4: Few Final Settings
Optionally, as part of the final settings, you can configure Transformations to purify or enhance the Source data in any way. You may also use the Schema Mapper to inspect and update the Source to Destination field mapping.
Your first pipeline with the Webhooks PostgreSQL Connect has been set up, and data intake has begun.

Method 2: Creating a Webhook and Trigger through Supabase
You can create new webhooks with Supabase and trigger them on events such as INSERT, UPDATE, or DELETE. Before moving ahead, you will need to meet some prerequisites.
Prerequisites
- Supabase: It is an open-source Backend-as-a-Service (BaaS) platform built on top of PostgreSQL.
- Vercel: Vercel is a cloud platform for static sites and serverless functions.
- PostgreSQL server installed on your system.
I have explained step by step how you can create a new webhook and trigger events to PostgreSQL using Supabase.
Step 1: Create a new Webhook
You can enable the creation of a new Database Webhook in your Supabase project.
- Go to Database >> Webhooks.
- Select Enable Webhooks.

- Click on Create Webhook.
- This step will continue after the creation of an endpoint.
Step 2: Create an endpoint with an API
You can create an API endpoint so that it has two endpoints: the GET endpoint and the POST endpoint.
- Make a route.ts file (you can give any name to it) in your text editor, which contains the GET and POST Api.
- With GET API, we will get data in return, which will be the data sent by the webhook.

- With the POST API, whenever any update is made in the data, the GET API will be notified.
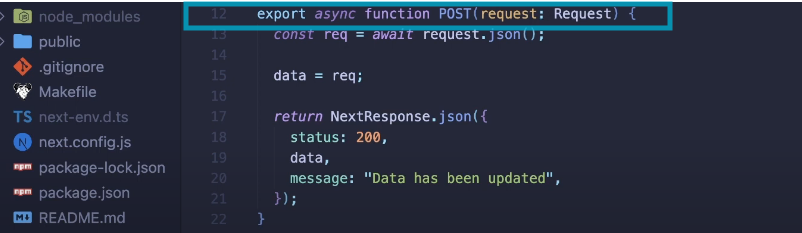
- You can deploy this application on Vercel to check if it is working.
- Once your API is deployed, you can get the API.

This is what your API data will look like.
Step 3: POST on the created endpoint using Webhook
Now, you need to POST on the API endpoint we created in the above steps to see if the subsequent changes are being made through the GET API or not.
- We will continue the creation of Webhook from Step 1 and fill in the required details such as the name of the Webhook and Table.

- Select the events on which you want your Webhook to send requests. For instance, I have selected INSERT as an event, which means my Webhook will only watch insert events.

- Configure your Webhook to send an HTTP request to any URL.

- Configure your HTTP request and mention the URL to the endpoint that you created above, along with POST as the method.

Step 4: Update to the endpoint
You can send an invitation to a new user through Supabase and subsequently check whether the updates appear in the endpoint you created or not.
- Once you have added a new user, open the API endpoint you had created before.

As you can see, the details have been updated and your work is done.
Importance of Webhooks PostgreSQL Integration
Webhooks PostgreSQL connect can be advantageous. It can help you store information almost immediately and later be used for analysis fetching the much-needed business advantage. Using the Webhooks PostgreSQL connect, you not just save information from tables and columns but also save index and data types, which is a valuable attribute when it comes to Webhooks PostgreSQL ETL needs. With this fusion, you’ll be benefited in the following ways:
- Flexibility when it comes to choosing Data Types: All data types such as documents, primitives, geometry, structures, etc. are supported by PostgreSQL Database, making it super reliable for when big transitions are taking place in terms of database migration.
- PostgreSQL’s Data Integrity really comes in handy: PostgreSQL ensures data integrity by imposing limits and restricting the data you contribute. You can forget about invalid or orphan records when you use PostgreSQL.
- ETL Pipeline’s high-performance rate with little to no data latency issues: In its latest update, the feature list of PostgreSQL has increased. The updates have been focused on boosting and optimizing the performance especially. So, nothing to worry about in that aspect.
- Internationalization & Text Search: PostgreSQL supports international character sets for internationalization and text search. It also supports full-text search to expedite the search process and incorporates case-insensitive and accent-insensitive collations.
Use Cases of Webhooks PostgreSQL Integration
Let us discuss some of the use cases that will give a brief idea about why you should perform Webhooks PostgreSQL Integration.
- You can integrate Webhooks with PostgreSQL to create a notification system. On receiving events such as new order or a payment received, PostgreSQL can trigger Webhook for sending email, SMS or other push notifications to the potential customers.
- You can utilize Webhooks to automatically make inserts or updates to data in your PostgreSQL database. For instance, when a file is uploaded to a cloud storage service (like Dropbox or Google Drive), a Webhook can trigger PostgreSQL to process and store relevant data.
- You can integrate Webhooks with PostgreSQL for data collection from sources, including social media platforms or devices like IoT. Such data is then aggregated and analyzed in real-time, or on schedule, for reporting and business intelligence purposes.
Conclusion
In this blog post, we have learned how to build and establish Webhooks PostgreSQL connect via Hevo’s no-code data pipeline.
The established connection will let your Webhooks data flow to PostgreSQL error-free and with no delays. Further, if you want to know in detail about how to create a Hevo data pipeline, either of the two documentation links can help a great deal:
FAQs about Webhooks PostgreSQL Integration
1. What are webhooks used for?
Webhooks are a powerful tool used in web development and integration scenarios to facilitate real-time communication and automated actions between different applications or services.
2. Can Postgres make an HTTP request?
PostgreSQL itself does not have built-in capabilities to directly make HTTP requests.
3. Are there triggers in Postgres?
Yes, PostgreSQL supports triggers, which are special types of stored procedures that are automatically executed in response to certain events on a table or view.
4. How to connect webhook to database?
To connect a webhook to a database, create a server-side script that listens for incoming webhook requests, parses the data, and inserts or updates relevant information in the database based on the webhook payload.
5. What is the difference between a Webhook and a Websocket?
A webhook is a mechanism for communication where an external service sends HTTP POST requests to a predefined URL in response to events. WebSocket is a communication protocol that provides full-duplex communication channels over a single TCP connection.
Share it with your connections.
-
 Share To LinkedIn
-
 Share To Facebook
-
 Share To X
-
 Copy Link


