


As more businesses migrate to cloud platforms for data management, the risks of data breaches and unauthorized access to sensitive information increase. Snowflake, the popular cloud data warehouse, addresses these challenges by providing robust data encryption, access controls, monitoring, and network security to protect your data throughout its lifecycle.
With Snowflake’s security integration features, you can create a security environment that meets your requirements. This approach helps you effectively implement security measures within the data cloud, facilitate authorized access, and reduce incident response time, enhancing your organization’s overall security.
This article is a Snowflake data security integration guide that will help you understand how to secure your data in Snowflake. Calculate Snowflake costs in real-time and make smarter financial decisions.
Table of Contents
What is Snowflake Security Integration?
Security integration in Snowflake involves implementing security measures according to your organization’s requirements and compliance needs. Snowflake security features are designed to be flexible and customizable, helping protect your organization’s sensitive data cohesively.
A comprehensive security integration in Snowflake defines policies and procedures for access controls, monitoring activities, establishing secure connections, and more.
By integrating these security features into the cloud environment, you can actively mitigate risks and enhance your organization’s data security capabilities, thereby enhancing resilience against threats. Also Read:
- Snowflake Data Encryption
- Snowflake Data Quality Practices
- Snowflake Security and Sharing Best Practices
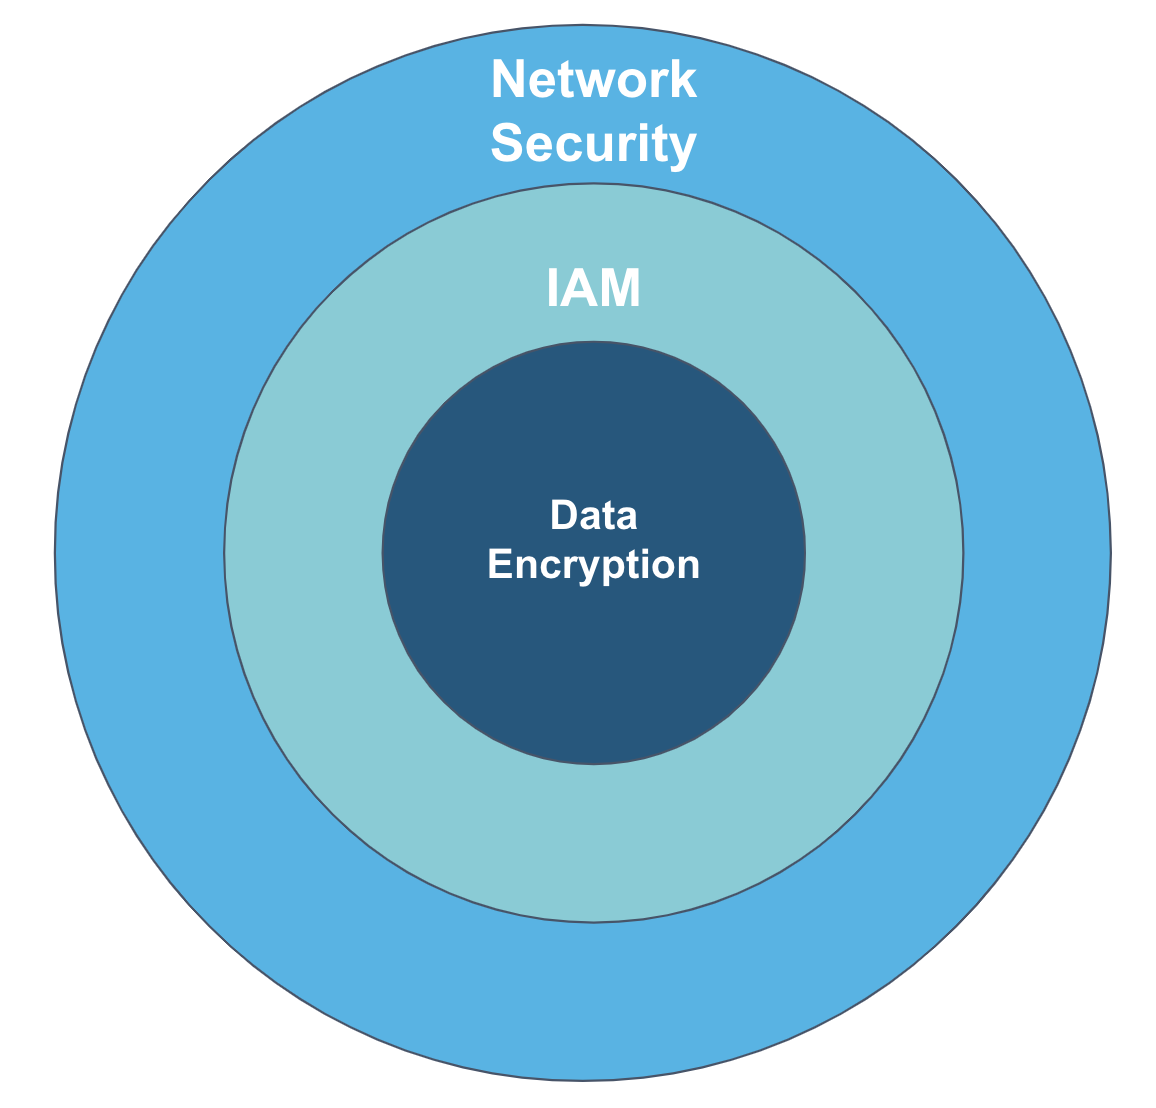
Snowflake Security Architecture
Understanding the security architecture is crucial to properly configuring security integration in Snowflake. This architecture ensures data confidentiality, availability, and integrity within your organization.
Snowflake security architecture uses three robust security layers that secure your data in its cloud environment.
A fully managed No-code Data Pipeline platform like Hevo Data helps you integrate data from 150+ Data Sources (including 60+ Free Data Sources) to a destination of your choice, such as Snowflake, in real-time in an effortless manner. Check out why Hevo is the Best:
- Live Support: The Hevo team is available round the clock to extend exceptional customer support through chat, E-Mail, and support calls.
- Schema Management: Hevo takes away the tedious task of schema management & automatically detects the schema of incoming data and maps it to the destination schema.
- Incremental Data Load: Hevo allows the transfer of data that has been modified in real-time. This ensures efficient utilization of bandwidth on both ends.
Network Security Layer
The network security layer helps protect data in transit to prevent eavesdropping and cyber attacks. Some of the best practices for implementing network security include:
- Enforce network policies by setting up rules about who can access the data and how access is handled in your Snowflake account.
- Private connectivity options such as Azure Private Link or AWS PrivateLink should be used instead of public internet connections to enhance security.
- Set up a firewall to manage client applications’ communication with Snowflake.
- Grant Snowflake permissions, including read and write accesses, to access your data on cloud storage for data loading and unloading.
Identity Access Management (IAM)
You must set up the access controls for your Snowflake account for user authentication. The IAM layer best practices include:
- Create users and assign roles before granting access.
- Implement authentication and sign-on measures.
- Establish sessions to define specific user roles and access controls, including object-level, column-level, and row-level access controls for authorization.
Data Encryption
For transparent encryption of your data in Snowflake, you can use different implementation measures like:
- Use a key hierarchy system to encrypt individual data elements in your Snowflake warehouse.
- To enhance security, utilize Snowflake’s Tri-Secret Secure feature for the customer-managed keys (CMK).
- When using the Replication feature to replicate a database to another account, enable Tri-Secret Secure in the target account.
- Enable period rekeying if your organization requires data rekeying at regular intervals.
ETL cost visibility without leaving Snowflake.

How to Create Security Integration in Snowflake?
A security integration in Snowflake is an object that provides an interface between a third-party service and the cloud platform.
You can create a new security integration or replicate the existing one for an account by using this syntax:
CREATE [ OR REPLACE ] SECURITY INTEGRATION [ IF NOT EXISTS ]

  <name>

  TYPE = { API_AUTHENTICATION | EXTERNAL_OAUTH | OAUTH | SAML2 | SCIM }

  ENABLED {TRUE | FALSE }

…
The parameters that are common for every integration type.
- <name> – Specify a unique identifier for the integration.
- TYPE – Specifies the type of interface you are creating between Snowflake and the external service.
- ENABLED {TRUE | FALSE} – Specifies whether the security integration is enabled or disabled.
NOTE: The parameters for implementing security integration measures in Snowflake differ based on the type of integration you want to apply to your account. Also, to create Snowflake security integration measures, you must have the role of ACCOUNTADMIN.
Snowflake provides five types of security integration, as follows:
1. Security Integration for External API Authentication
You can create security integration for external API authentication in Snowflake to validate and secure access to external services.
The list of optional parameters for this integration must be configured to match the parameters configured when creating a secret based on the chosen OAuth flow.
2. Security Integration for External OAuth
The external OAuth security integration allows the client to use third-party authorization server to obtain access tokens required for interaction with Snowflake.
The required parameters for this integration include:
EXTERNAL_OAUTH_TYPE: Specifies the authorization server used for authentication.EXTERNAL_OAUTH_ISSUER: Specifies the URL defining the authorization server.EXTERNAL_OAUTH_TOKEN_USER_MAPPING_CLAIM: Maps the access token claims with the user record.EXTERNAL_OAUTH_SNOWFLAKE_USER_MAPPING_ATTRIBUTE: Specifies the Snowflake user record attribute for mapping the access token with a user record.
Other than this, optional parameters define the integration components you want to add when implementing the measures.
3. Security Integration for Snowflake OAuth
The Snowflake OAuth security integration enables clients who support OAuth to redirect users to the authorization page, where they can generate access tokens for Snowflake access.
The required parameters for this integration include the following:
OAUTH_CLIENT: Specifies the client type and creates an OAuth interface between Snowflake and a custom client as well as with the partner application.OAUTH_REDIRECT_URI: Specifies the client’s URI. Once the authentication is complete, the browser redirects the user to this URI.
Other than this, there are optional parameters for all clients and additional parameters for custom clients, which you can add when implementing the measures.
4. Security Integration for SAML2
The SAML2 security integration measure in Snowflake facilitates single sign-on workflows. It enables you to create an interface between Snowflake and a third-party Identity Provider (IdP).
The important parameters for this integration include:
SAML2_ISSUER: A string value that contains Entity ID or Issuer of the IdP.SAML2_SSO_URL: A string that contains the IdP SSO URL, where the Snowflake service provider will redirect the user with a SAML authentication request message.SAML2_PROVIDER: A string that describes the type of IdP.SAML2_X509_CERT: A Base64 encoded signing certificate of the IdP.
Other than this, optional parameters define the integration components you want to add when implementing the measures.
5. Security Integration for SCIM
The SCIM security integration allows you to automate the management of user roles and identities by creating an interface between Snowflake and a third-party Identity Provider (IdP).
The required parameters for this integration include:
SCIM_CLIENT: Specifies the type of SCIM client.RUN_AS_ROLE: Specifies the Snowflake SCIM role owning any roles and users imported from IdP to Snowflake using SCIM.
Other than this, optional parameters define the integration components you want to add when implementing the measures.


Replicating Security Integration & Network Policies in Snowflake for Various Accounts
Snowflake allows the replication of security integrations and network policies for federated authorization standards – OAuth, SSO (SAML2), and SCIM. It also provides the option to enable failover/failback for each integration and network policy.
As each security integration and network policy has different use cases, the steps involved in replication differ slightly. In some cases, you might also need to implement Snowflake alter security integration measures that help you modify the properties of your existing integration.
1) Replication for SAML2 Security Integration
- The replication of SAML2 security integration in Snowflake links your source and target accounts to the IdP by specifying a connection URL in the security integration definition of SAML2.
- You need to update the identity provider and confirm that users exist in the source account.
- With these updates, you can ensure that the user is able to access the target account.
To replicate SAML2 security integration, follow the steps below:
Source Account Steps
- Configure your source account for Database Failover/Failback and Client Redirect.
alter connection global
enable failover to accounts example.northamericaeast;- Create a Snowflake application in the IdP, specifying the connection URL.
- Update the SAML2 security integration to specify the connection URL in the source account.
create or replace security integration my_idp
  type = saml2
  enabled = true
  saml2_issuer = 'http://www.okta.com/exk6e8mmrgJPj68PH4x7'
  saml2_sso_url = 'https://example.okta.com/app/snowflake/exk6e8mmrgJPj68PH4x7/sso/saml'
  saml2_provider = 'OKTA'
  saml2_x509_cert='MIIDp...'
  saml2_sp_initiated_login_page_label = 'OKTA'
  saml2_enable_sp_initiated = true
  saml2_snowflake_issuer_url = 'https://example-global.snowflakecomputing.com'
saml2_snowflake_acs_url = 'https://example-global.snowflakecomputing.com/fed/login';- Assign the Snowflake application to users.
- Verify SSO configuration for the source account.
- Create a failover group in the source account or alter the existing one to include integrations.
create failover group FG
  object_types = users, roles, warehouses, resource monitors, integrations
  allowed_integration_types = security integrations
  allowed_accounts = example.northamericaeast
  replication_schedule = '10 MINUTE';
Target Account Steps
- Verify the number of security integrations and users in the target account.
- Create a secondary connection and failover group in your target account.
create connection GLOBAL as replica of example.northamericawest.global;- Refresh the secondary failover group to verify whether the operation is successful or not.
alter failover group fg refresh;- Promote the secondary connection as the primary in the target account.
alter connection global primary;For detailed information, refer to the document section: replicating SAML2 security integration.
2) Replication for OAuth Security Integration
Replication for OAuth security integration measures include Snowflake OAuth and External OAuth security integrations. To replicate the security integration for OAuth, follow the steps below:
Source Account Steps
- Configure your failover group in your source account to specify security integrations.
alter failover group fG set
  object_types = users, roles, warehouses, resource monitors, integrations
  allowed_integration_types = security integrations;
Target Account Steps
- Refresh the secondary failover to update the target account, including OAuth security integration objects.
alter failover group fg refresh;- Verify the connection for each Snowflake account using your choice of OAuth client.
- Promote the secondary failover group and secondary connection to the primary in the target account. This will make the target account the new source account.
alter failover group fg primary;- Reverify the connection to each Snowflake account.
Note:
a) With Snowflake OAuth, you do not need to re-authenticate your target account every time after replication.
b) With External OAuth, you might need to re-authenticate the target account after replication.
For detailed information, refer to the Snowflake document section: replicating OAuth security integration.
Replication of Network Policies
When you replicate a network policy from the source account to the target account, the administrators can restrict access to the target account. The restriction is based on the origin of the request in the target account.
Note: When performing replication for network policies, it includes both the network policy object and references/assignments. If the referenced object or the network policy-assigned object does not exist in the target account, then include the object type in the same replication or failover group as the network policy.
To replicate the network policies, follow the steps below:
Source Account Steps
- Verify that the network policies exist in the source Snowflake account using the SHOW NETWORK POLICIES command.
- Verify the inclusion of a network policy in the Snowflake OAuth and/or SCIM security integrations using the SHOW INTEGRATIONS command followed by the DESCRIBE INTEGRATION command on the OAuth security integration.
- Using the
ALTER FAILOVER GROUPcommand, update the failover group to include network policies and relevant account parameters.
alter failover group fG set
  object_types = users, roles, warehouses, resource monitors, integrations, network policies, account parameters
  allowed_integration_types = security integrations;
Target Account Steps
- Refresh the secondary failover group to update the network policy objects in the target account and the Snowflake OAuth security integration specifying the network policy.
- Execute a SHOW NETWORK POLICIES command to verify the network policy object exists, followed by the DESCRIBE SECURITY INTEGRATION to verify the Snowflake OAuth security integration specifies the replicated network policy.
- Verify the activation of network policy for the target account as per the identification of a network policy activated at the account or user level.
- Verify the connection to each Snowflake account with your choice of Snowflake OAuth client.
For detailed information, refer to the Snowflake document section: replicating network policies.
Challenges in Implementing Snowflake Security Integration
Even though Snowflake creates security integration to enhance data security, some challenges are associated with implementing these measures.
- Complex Configuration: Each type of security integration in Snowflake requires specific parameters and configurations, making the setup process complex and time-consuming.
- Maintaining Updates: It is difficult to track the integration changes when dealing with third-party services.
- Scalability: It can be challenging to scale large volumes of authentication requests without impacting operational efficiency.
Best Practices for Snowflake Security Integration
Implementing security in Snowflake data warehouse helps you maintain a secure data environment. Here are some of the best practices to apply robust security measures within this cloud platform:
- Multi-Factor Authentication(MFA): MFA requires you to verify your identity with multiple methods of authentication to gain access to the Snowflake account. Consider enabling MFA for all users in your Snowflake environment to protect sensitive data from unauthorized access.
- Prevent Data Exfiltration: It is important to prevent your sensitive data from being copied and retrieved without permission. You can use Snowflake’s encryption features, such as customer-managed keys, role-based encryption, and private connectivity for securing connections.
- Data Monitoring: Continuous data monitoring allows you to track data access and activities and respond to potential threats promptly. Set up automated alerts in Snowflake to identify unusual data access patterns or security breaches.
Learn More About:
Conclusion
Snowflake security integration features offer confidentiality and data security in your cloud warehouse. The platform offers comprehensive security integration features designed to protect your data across various stages of data handling.
Discover how Snowflake data encryption works and ensures data security with our in-depth guide.
You can implement or replicate different types of integrations within the Snowflake environment tailored to your specific security requirements. For continuous vigilance over your security measures, you can use an ELT tool like Hevo. It facilitates the secure integration of your data in near real-time, ensuring that data transfers are handled with the highest security standards. This helps maintain data confidentiality and integrity throughout its lifecycle in Snowflake.
Want to take Hevo for a spin? Sign Up for a 14-day free trial and experience the feature-rich Hevo suite firsthand. Also, check out our unbeatable pricing to choose the best plan for your organization. Share your experience of Snowflake Security integration in the comments section below!
FAQs
1. How to integrate Snowflake with security tools?
You can use OAuth to provide third-party security tools with secure delegated access to Snowflake. Alternatively, you can also enable access and query history in Snowflake to monitor data activities.
2. What are some of the Snowflake compliance and regulatory standards?
Snowflake follows industry standards to assure its customers of data compliance, integrity, and security. Here are some of the compliance and regulatory standards followed by Snowflake:
– ISO-27001, ISO-27017, ISO-27018
– SOC 1 Type II, SOC 2 Type II
– HITRUST CSF
– PCI DSS
– C5
– CJIS
You can refer to the regulatory compliance document to know the complete list of compliance standards Snowflake follows.
3. What are the security features of Snowflake?
Some of the security features that Snowflake provides include:
– Password and federated authentication
– Key pair authentication in Snowpipe
– Multi-factor authentication
– Network policies to restrict access to and from the Snowflake network
Share it with your connections.
-
 Share To LinkedIn
-
 Share To Facebook
-
 Share To X
-
 Copy Link


