Usually, users have to write codes in PHP, HTML, or Java for having contact forms their your website. However, it is time-consuming and complex for people without technical or coding knowledge. To avoid such complications, you can use many available plugins in the market that enable you to have contact forms on your website without writing a single line of code.
One such plugin is WPForms, which enables you to build and embed forms on your website to collect visitor information. WPForms not only collects visitors’ information but also shares the collected information with other third-party apps, including Google Sheets, to easily interpret and analyze data to make meaningful decisions.
In this article, you will learn about WPForms, Google Sheets, and different steps to connect WPForms to Google Sheets.
Table of Contents
What is WPForms?
WPForms is a user-friendly plugin that helps you create forms in WordPress from scratch. One of the best features of WPForms is its drag and drop builder, which allows you to add or remove fields to the form according to your needs. You can either start building forms from scratch with the drag and drop builder or use pre-built form templates to customize your form based on your use cases. Being 100% mobile responsive, WPForms works well on several gadgets including, mobile, tablets, and desktops.
With WPForms, you can also receive donations, payments, and online orders without hiring any operations specialist or writing any code. After creating and customizing forms, you can easily embed them with any blog or web page. You can also integrate WPForms with other third-party apps to collect all the responses filled in your form.
Effortlessly sync your data, eliminate manual work, and keep your spreadsheets always up to date. Let Hevo do the heavy lifting, so you can focus on what matters! With Hevo, you can:
- Automate Data Extraction: Effortlessly pull data from Google Sheets(and other 60+ free sources).
- Transform Data effortlessly: Use Hevo’s drag-and-drop feature to transform data with just a few clicks.
- Seamless Data Loading: Quickly load your transformed data into your desired destinations.
Try Hevo and join a growing community of 2000+ data professionals who rely on us for seamless and efficient migrations.
Get Started with Hevo for FreeWhat is Google Sheets?
Being one of the most popular tools among Google Suite, Google Sheets is a free web-based application used for storing information, creating dashboards, and more. Since files are stored in the Cloud, with Google Sheets, you can work with the same document every time. Whenever you make changes in a document, they are automatically saved and tracked by a revision history. Instead of emailing multiple copies back and forth, you can easily share files with others for real-time editing, collaborating, and commenting. Google Sheets can also be integrated with other Google products, including Google Form and Google Finance, to enhance collaboration.
How to Connect WPForms to Google Sheets?
Here are the simple steps to Connect WPForms to Google Sheets!
- WPForms to Google Sheets Step 1: Create a New Form Using WPForms
- WPForms to Google Sheets Step 2: Installing and Activating the Plugin
- WPForms to Google Sheets Step 3: Connecting your Google Account to the Plugin
- WPForms to Google Sheets Step 4: Connecting your WPForm to Google Sheets
Step 1: Creating a New Form using WPForms
Initially, you have to activate the contact form on your WordPress site, which will act as the data collecting source. For creating contact forms, you can use the WPForms plugin. Since this plugin has a drag and drop online form builder feature, you can build any contact form seamlessly.
You can create a contact form using WPForms plugin in two ways: creating a form by using templates or using the drag and drop builder for adding form fields based on your use cases.
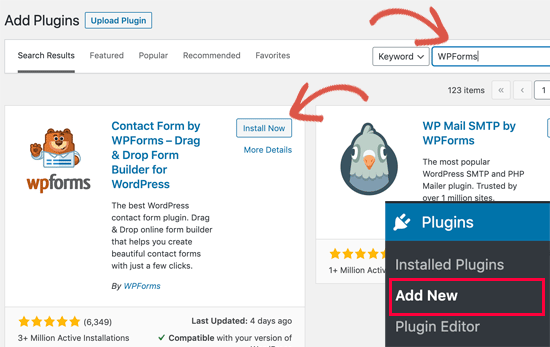
- Login to your WordPress Dashboard and navigate to Plugins > Add New. In the search bar, type WPForms. You will see the “Contact Form by WPForms” plugin. Click on the “Install Now” button. After installing, activate the plugin.
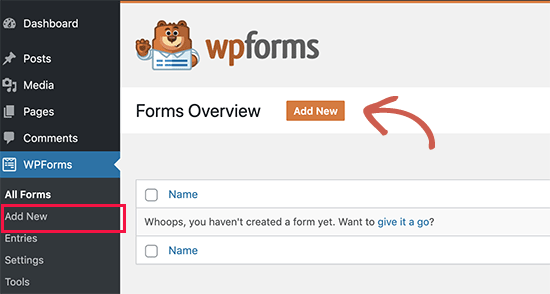
- Go to your WordPress Dashboard and click on WPForms in the left side panel.
- Then, click on Add New. You can see the WordPress form drag and drop form builder.
- Give an appropriate name to your form. Below the “Name Your Form,” in the “Select a Template” section, you will find various form templates. Now, you can choose a predesigned template to create a form quickly or choose a blank form to build from scratch. For now, select the simple contact form template to add very basic fields in your form, like name and email.
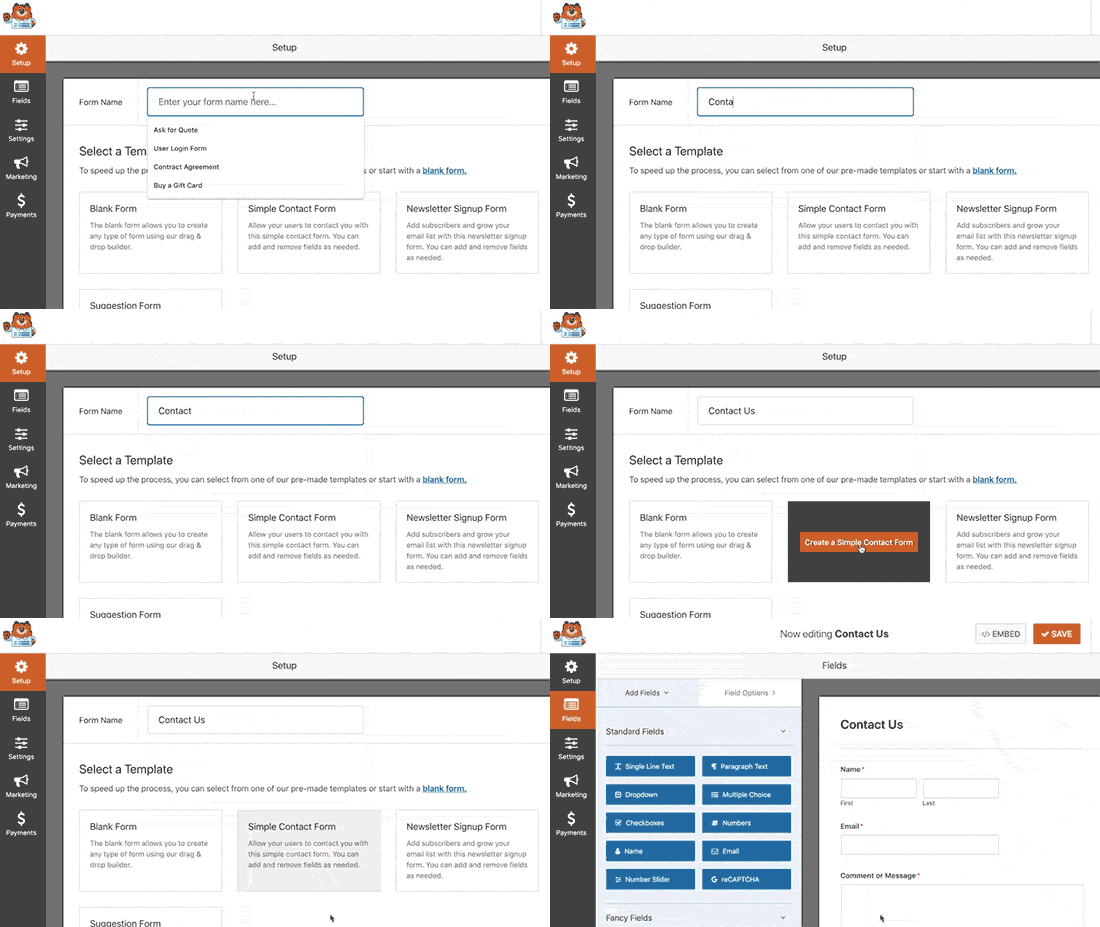
- Once you click on the template, you will be directed to the Form Builder section, where you can create and customize forms. You can also include additional form fields on the left side by simply dragging them from the left side panel and dropping them to the right-side panel.
- You can customize your form by adding or removing forms fields based on your preferences. On creating the form, click on the “Save” button in the top right corner.
- After creating and customizing your form, you can publish it on your WordPress page.
- Your form will be active and ready to collect responses.

- Then, you have to create a Google Sheets spreadsheet to which you have to add your collected data from your forms created using WPForms. For creating a new Google spreadsheet, go to this link and click on “Blank.”
- Your browser will open a new spreadsheet. You can add column names for all the data you have to collect from your forms. Make sure the columns in the Google Spreadsheet match with the fields in the WordPress Forms so that they can be connected accordingly.
- In this case, you have previously added three fields such as ‘Name’, ‘Email’, and ‘Message’ in your WordPress form. Similarly, your Google Spreadsheet should also have the same three columns in it.
By this method, you have successfully created both WordPress Forms and Google Spreadsheets. In the below steps, you will see how to connect WPForms to Google Sheets.
Step 2: Installing and Activating the Plugin
To connect WPForms to Google Sheets, you will be using the Uncanny Automator plugin. Uncanny Automator Plugin serves as a connector between WordPress and any third-party apps to easily communicate with one another for sharing information. In this case, Uncanny Automator lets your WPForms connect with Google Sheets to keep a record of all submissions done on your website.
When a visitor fills an active form on your website, the Uncanny Automator plugin will send the filled response to your Google Sheet by adding a new row of records into it. This plugin gives you the flexibility to correctly map each field on your WPForms to the respective Google Sheet columns. In the below steps, you will see how to install the Uncanny Automator plugin to integrate WordPress Forms and Google Sheets.
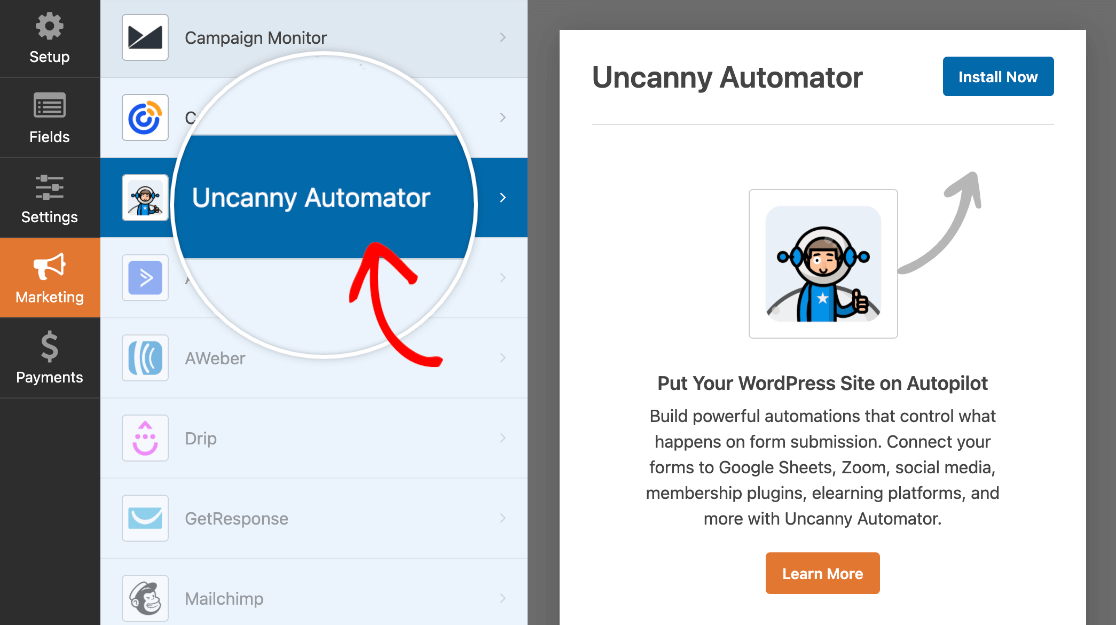
- In your WPForms, go to the Marketing option at the left side panel and select the “Uncanny Automator.” Click on the “Install Now” button.
- You will see a popup screen asking you to confirm the installation. Click on the “Yes, install and activate” button.
- Once again, a popup window will appear asking you to refresh the form builder. Click on the “Yes, save and refresh” button to continue.
- Now, you have successfully installed and activated the Uncanny Automator plugin.
Step 3: Connecting your Google Account to the Plugin
After installing and activating the Uncanny Automator, you have to connect it to your Google account. You are providing authentication or permission to access your Google Sheets by doing this.
- For that, in the WordPress Dashboard, go to the “Automator” option on the left side panel and click on Settings. It will open the Uncanny Automator’s settings page. From there, select the Google tab and click on the “Connect an Account” button.
- Select a Google account you want to use and click on the “Allow” button.
- Once again, click on the “Allow” button to confirm your choices.
- Now, your account is successfully connected to Uncanny Automator. You will be taken back to the WordPress Dashboard, where you will see the success message as shown in the above image.


Step 4: Connecting your WPForm to Google Sheets
Since you have already created WordPress Forms and Google Sheets, you are now all set to connect WordPress Forms with Google Sheets.
- In WordPress Dashboard, go to the Automator option and select “Add New” for creating a new workflow.
- Uncanny Automator calls workflow as Recipes. In the “Select a recipe type” tab, you will be asked to select between two options: Logged-in Users & Everyone. Select the logged-in user’s option when you only want logged-in users to fill a form on a website. If you are going to allow any visitors to fill out the form on your website, click on the Everyone option.
- After selecting the right option, click on the “Confirm” button. You can also give a name to your recipe to remember it easily.
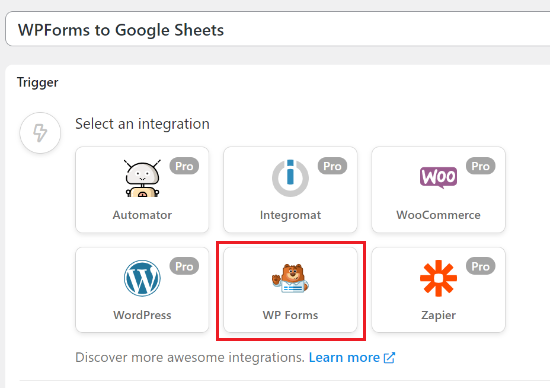
- In the next step, you have to choose WPForms from the trigger meta box.
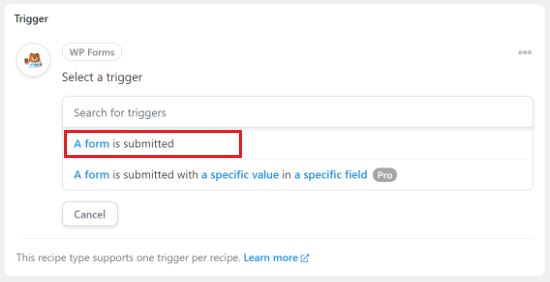
- You will see the two options to choose from.
- A Form is Submitted: This adds all responses submitted in a specific WPform to its respective Google Sheets.
- A Form is Submitted with a Specific Value in a Field: This adds responses submitted in WordPress form to Google Sheets only when it satisfies the particular criteria or condition.
- You can select from those two options based on your requirements. In this case, the first option is selected, which adds all responses in the forms to the respective Google Sheets.
- Once selected, click on the “Save” button.
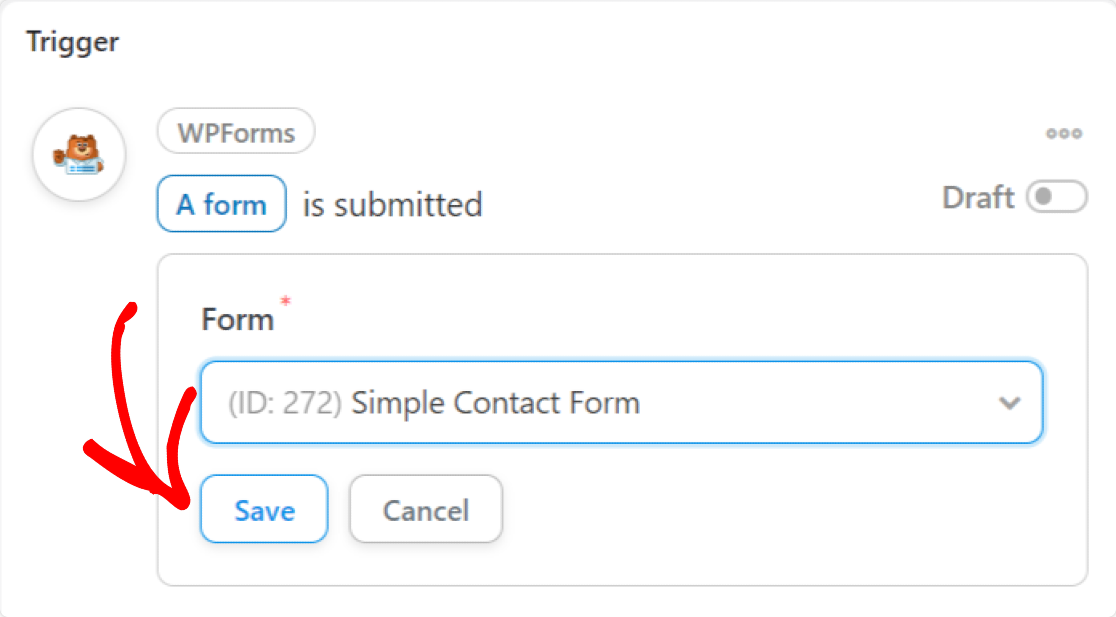
- In the next step, you have to select the specific form from the dropdown menu, which you have to connect with your Google Sheets.
- After selecting the form, click on the “Save” button.
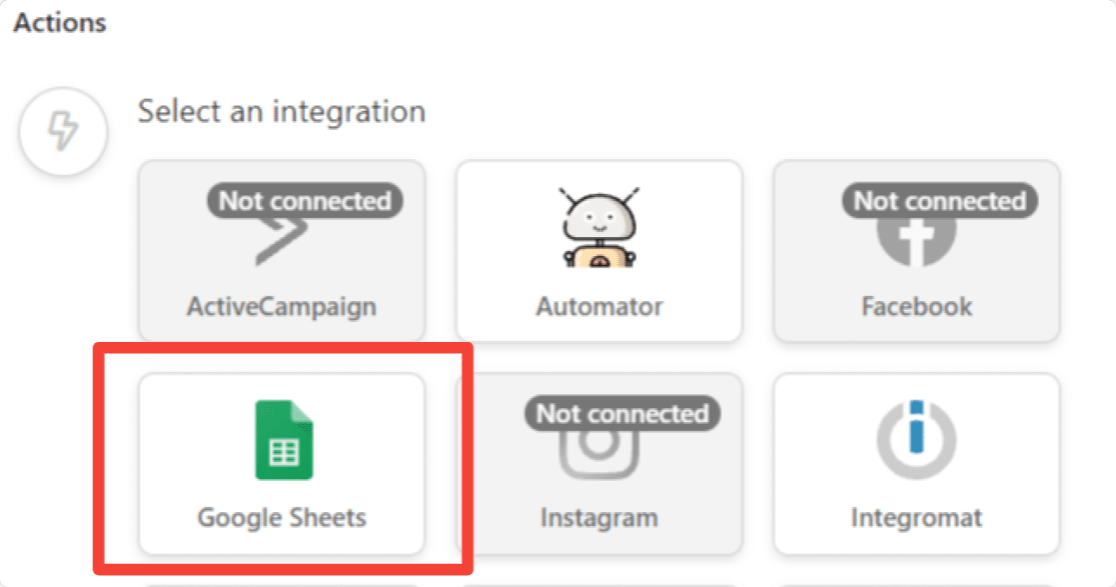
- Once configuring the trigger section, you have to configure the actions part.
- For that, click on the “Add Actions” button. You will see a list of available integrations. From that, choose Google Sheets.
- Then under “Select an Action Section,” choose “Create a Row in a Google Sheet.”
- Now, you will see a dropdown menu for selecting your Google Sheets that you created before to receive responses. Select the respective Spreadsheet and Worksheet.
- Now, click on the “Get Columns” button at the bottom left corner.
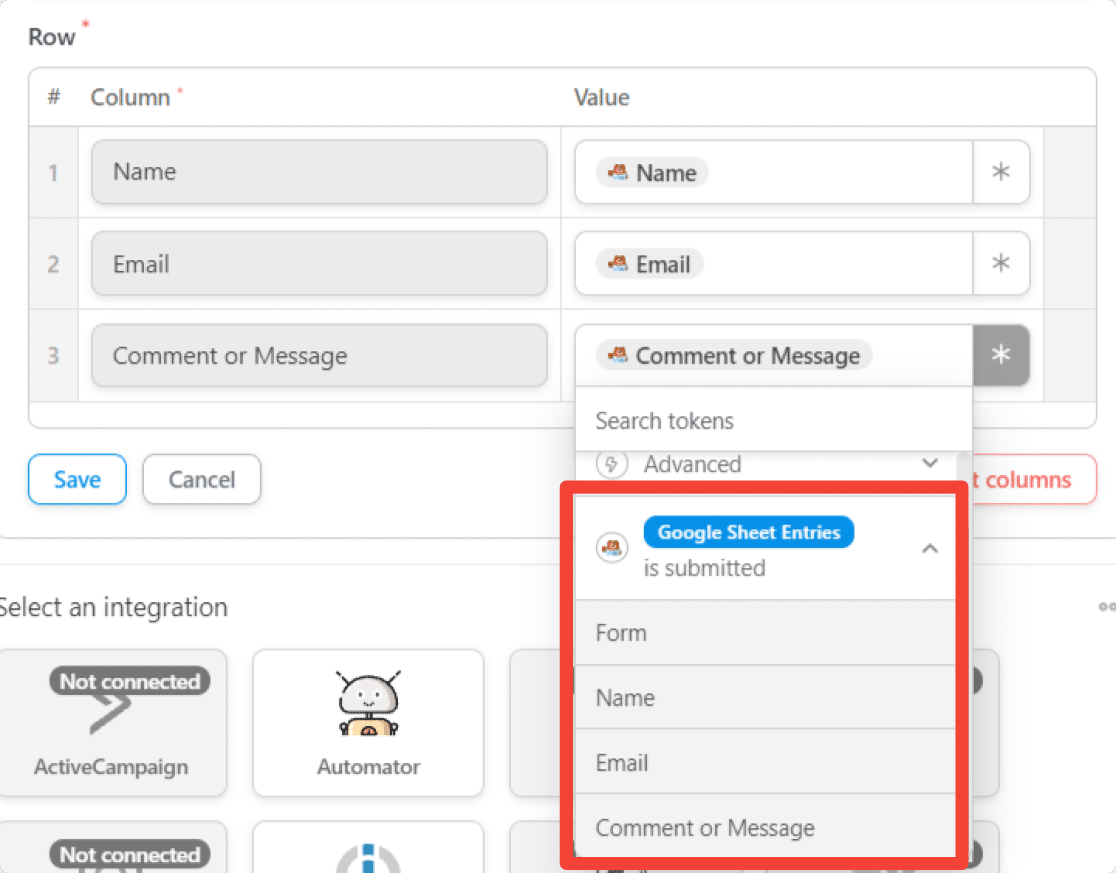
- This will show you the list of columns present in the spreadsheet. With this, you can correctly map the fields from your forms to the columns of your spreadsheets.
- Finally, ensure that your column name is the same as your value name, as shown in the above image.
- Click on the “Save” button. Now, your Recipe is created.
- Now, you have to publish your Recipe to automatically send your form entries collected from your websites to the Google Sheet.
- To publish your recipes, change the blue colour toggle button from Draft to Live in the sidebar.
- You have successfully connected your WordPress form to Google Sheet.
Whenever a visitor fills a new response in your form, it will instantly add the entry to the respective Google Sheet.
Conclusion
Connecting WPForms to Google Sheets is a simple yet powerful way to streamline your data management. By following these 4 easy steps, you can automate form submissions directly to Google Sheets, making it easier to organize, analyze, and share your data. Whether you’re collecting customer information, feedback, or leads, this integration saves you time and eliminates the need for manual data entry.
Start connecting WPForms to Google Sheets today and take your form data management to the next level with seamless automation! Sign up for Hevo’s 14-day free trial and seamlessly connect sources like Google Sheets within minutes.
FAQs
1. Can you integrate Google Forms with Google Sheets?
Yes, Google Forms integrates directly with Google Sheets. Responses from Google Forms automatically populate into a linked Google Sheet, which you can set up by clicking on the “Responses” tab in your form and selecting the Google Sheets icon.
2. Can you make fillable forms with Google Sheets?
No, Google Sheets itself doesn’t support creating fillable forms. For that, use Google Forms. You can create fillable sheets in Google Sheets.
3. How do I import Forms into Sheets?
You can import Google Forms responses into Google Sheets by opening your Google Form, going to the “Responses” tab, and clicking the Google Sheets icon.


