

In this tutorial, you’ll learn how to create an Apache Airflow MongoDB connection to extract data from a REST API that records flood data daily, transform the data, and load it into a MongoDB database. This setup is ideal for automating data ingestion from external sources, enabling you to process and analyze data efficiently.
Table of Contents
Why Use MongoDB?

MongoDB is a popular NoSQL database known for its flexible document-based architecture, making it ideal for storing and managing diverse data types. Some key features include:
- Schema Flexibility: MongoDB’s schema-less design allows you to store data without predefined structures, making it ideal for Machine Learning (ML) workflows that involve varying data formats.
- Complex Data Storage: It efficiently handles complex data structures, including nested arrays and embedded documents, making it easy to store features, labels, and metadata.
- Scalability: MongoDB’s horizontal scalability ensures that your database can handle increasing amounts of data as your application grows.
- Aggregation Framework: This powerful tool allows you to transform, filter, and manipulate data before feeding it to your ML models.
- Indexing: Optimizes query performance, ensuring fast data retrieval even as your dataset grows.
Why Use Apache Airflow?

Apache Airflow is an open-source workflow automation platform that allows you to programmatically author, schedule, and monitor workflows. It is widely used for organizing complex computational tasks, building data processing pipelines, and performing ETL (Extract, Transform, Load) processes.
Key Features:
- Scalability: Airflow can scale from a single machine to large-scale distributed systems.
- Extensibility: You can extend Airflow by creating custom operators and hooks to connect to any system.
- UI Dashboard: A user-friendly interface for monitoring and managing workflows.
- Modular: Airflow allows you to build reusable and modular DAGs (Directed Acyclic Graphs) for efficient workflow management.
- Dynamic: DAGs can be generated dynamically, allowing for flexible workflow construction.
Migrating your data from MongoDB doesn’t have to be complex. Relax and go for a seamless migration using Hevo’s no-code platform. With Hevo, you can:
- Effortlessly extract data from MongoDB and other 150+ connectors.
- Tailor your data to your desired destination’s needs with features like drag-and-drop and custom Python scripts.
- Achieve lightning-fast data loading, making your data analysis ready.
Try to see why customers like Harmoney have upgraded to a powerful data and analytics stack by incorporating Hevo!
Get Started with Hevo for FreeSteps to Create Airflow Mongodb Connection to Ingest API Data
Airflow uses Directed Acyclic Graphs (DAGs) to represent workflows. A DAG consists of tasks (nodes) and the dependencies (edges) that link them together. The Airflow scheduler executes tasks on an array of workers while following the specified dependencies.
Prerequisites:
Before you begin, ensure you have the following:
- Python installed on your machine.
- Apache Airflow installed and configured.
- MongoDB installed locally or on a cloud service (e.g., MongoDB Atlas).
- Basic understanding of Python, Airflow, and MongoDB.
Step 1: Set Up the Airflow Environment
1. Set up a Virtual Environment
Create and activate a virtual environment for your Airflow project:
# Create a virtual environment

virtualenv airflow_env

# Activate the virtual environment

source airflow_env/bin/activate
2. Install Required Packages
To get started, install the necessary Python packages:
pip install pymongo apache-airflow- pymongo: For interacting with MongoDB.
- apache-airflow: For creating and scheduling workflows.
3. Initialize Airflow and Create a User
(airflow_env) username@device_name~/airflow_workspace % cd airflow(airflow_env) username@device_name~/airflow_workspace/airflow % airflow db initOUTPUT:
Modules imported successfully<br>Initialization done
Create a dags folder. All the future dags will be stored here and accessed by the airflow components.
(airflow_env) username@device_name~/airflow_workspace/airflow % mkdir dags# Create an Airflow user
airflow users create --username admin --password your_password --firstname your_first_name --lastname your_last_name --role Admin --email <a href="mailto:your_email@example.com">your_email@example.com</a>#Run the following command to check if the user was created successfully:
(airflow_env) username@device_name~/airflow_workspace/airflow % airflow users listOUTPUT:
id | username | email | first_name | last_name | roles
===+==========+=======+============+===========+======
1 | admin | your_email@some.com | yout_first_name | your_last_name | Admin
4. Run airflow using the following command:
Now we will start the airflow scheduler using the airflow scheduler command after activating the virtual environment:
(airflow_env) username@device_name~/airflow_workspace/airflow % airflow schedulerOpen a new terminal, activate the virtual environment, go to the airflow directory, and start the web server.
username@device_name~/airflow_workspace source airflow_env/bin/activate(airflow_env) username@device_name~/airflow_workspace % cd airflow(airflow_env) username@device_name~/airflow_workspace/airflow % airflow webserverAlternatively, you can start the scheduler and web server simultaneously.
4. airflow standalone
Once the scheduler and webserver get initialized, open any browser and go to http://localhost:8080/.
Port 8080 should be the default port for Airflow, and you see the following page:
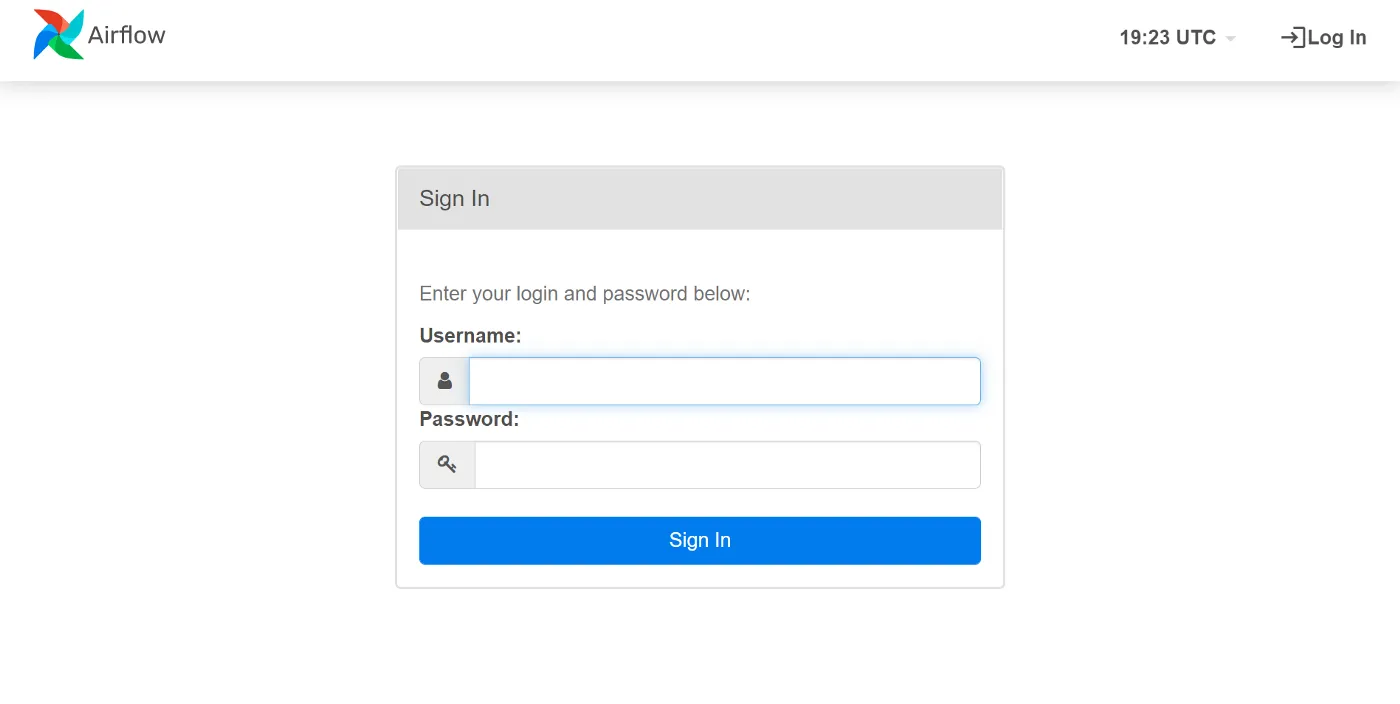
After logging in using our airflow username and password, we should see the following web server UI.

Alternatively, you can install Airflow with docker
Instead of manually setting up Apache Airflow and MongoDB, consider using Docker for a more streamlined setup. Docker containers provide isolated environments, making the installation process simpler and more reproducible. The Astronomer CLI is a great tool for setting up Airflow using Docker.
Steps:
- Install Docker on your machine.
- Install the Astronomer CLI.
- Run astro dev start to spin up an Airflow environment using Docker.
In this tutorial, we will be using Airflow under a virtual environment only.
Step 2: Connect API Data to MongoDB Atlas Account Cluster
MongoDB Atlas Data Federation allows you to query data across multiple sources (e.g., MongoDB clusters, Amazon S3 buckets) in a single query. This feature can be particularly useful for advanced use cases where data needs to be combined from various locations.
Our Use Case:
If you have flood data stored in MongoDB and weather data in an S3 bucket, you can use Atlas Data Federation to join this data for more comprehensive analysis.
Steps:
- Log in to your MongoDB Atlas account.
- Go to your cluster and click the “Connect” button.
- Choose “Connect your application” and copy the connection string, which will look something like this:
mongodb+srv://<username>:<password>@cluster0.mongodb.net/<your_database_name>?retryWrites=true&w=majorityNext, connect to MongoDB Atlas using pymongo:
Import requests

import pymongo

from pymongo.errors import DuplicateKeyError

url = "http://environment.data.gov.uk/flood-monitoring/id/floods"

# MongoDB connection string

connection_string = "mongodb+srv://<username>:<password>@cluster0.mongodb.net/floodMonitorDB"

# Create a MongoDB client

client = pymongo.MongoClient(connection_string)

db = client["floodMonitorDB"]

collection = db["floodData"]

# Fetch data from API

response = requests.get(url)

data = response.json()

# Insert data into MongoDB

if data:

    try:

        collection.insert_many(data["items"], ordered=False)

    except DuplicateKeyError as e:

        print(f"Duplicate key error: {e}")
Step 3: Set Up MongoDB Connection in Airflow
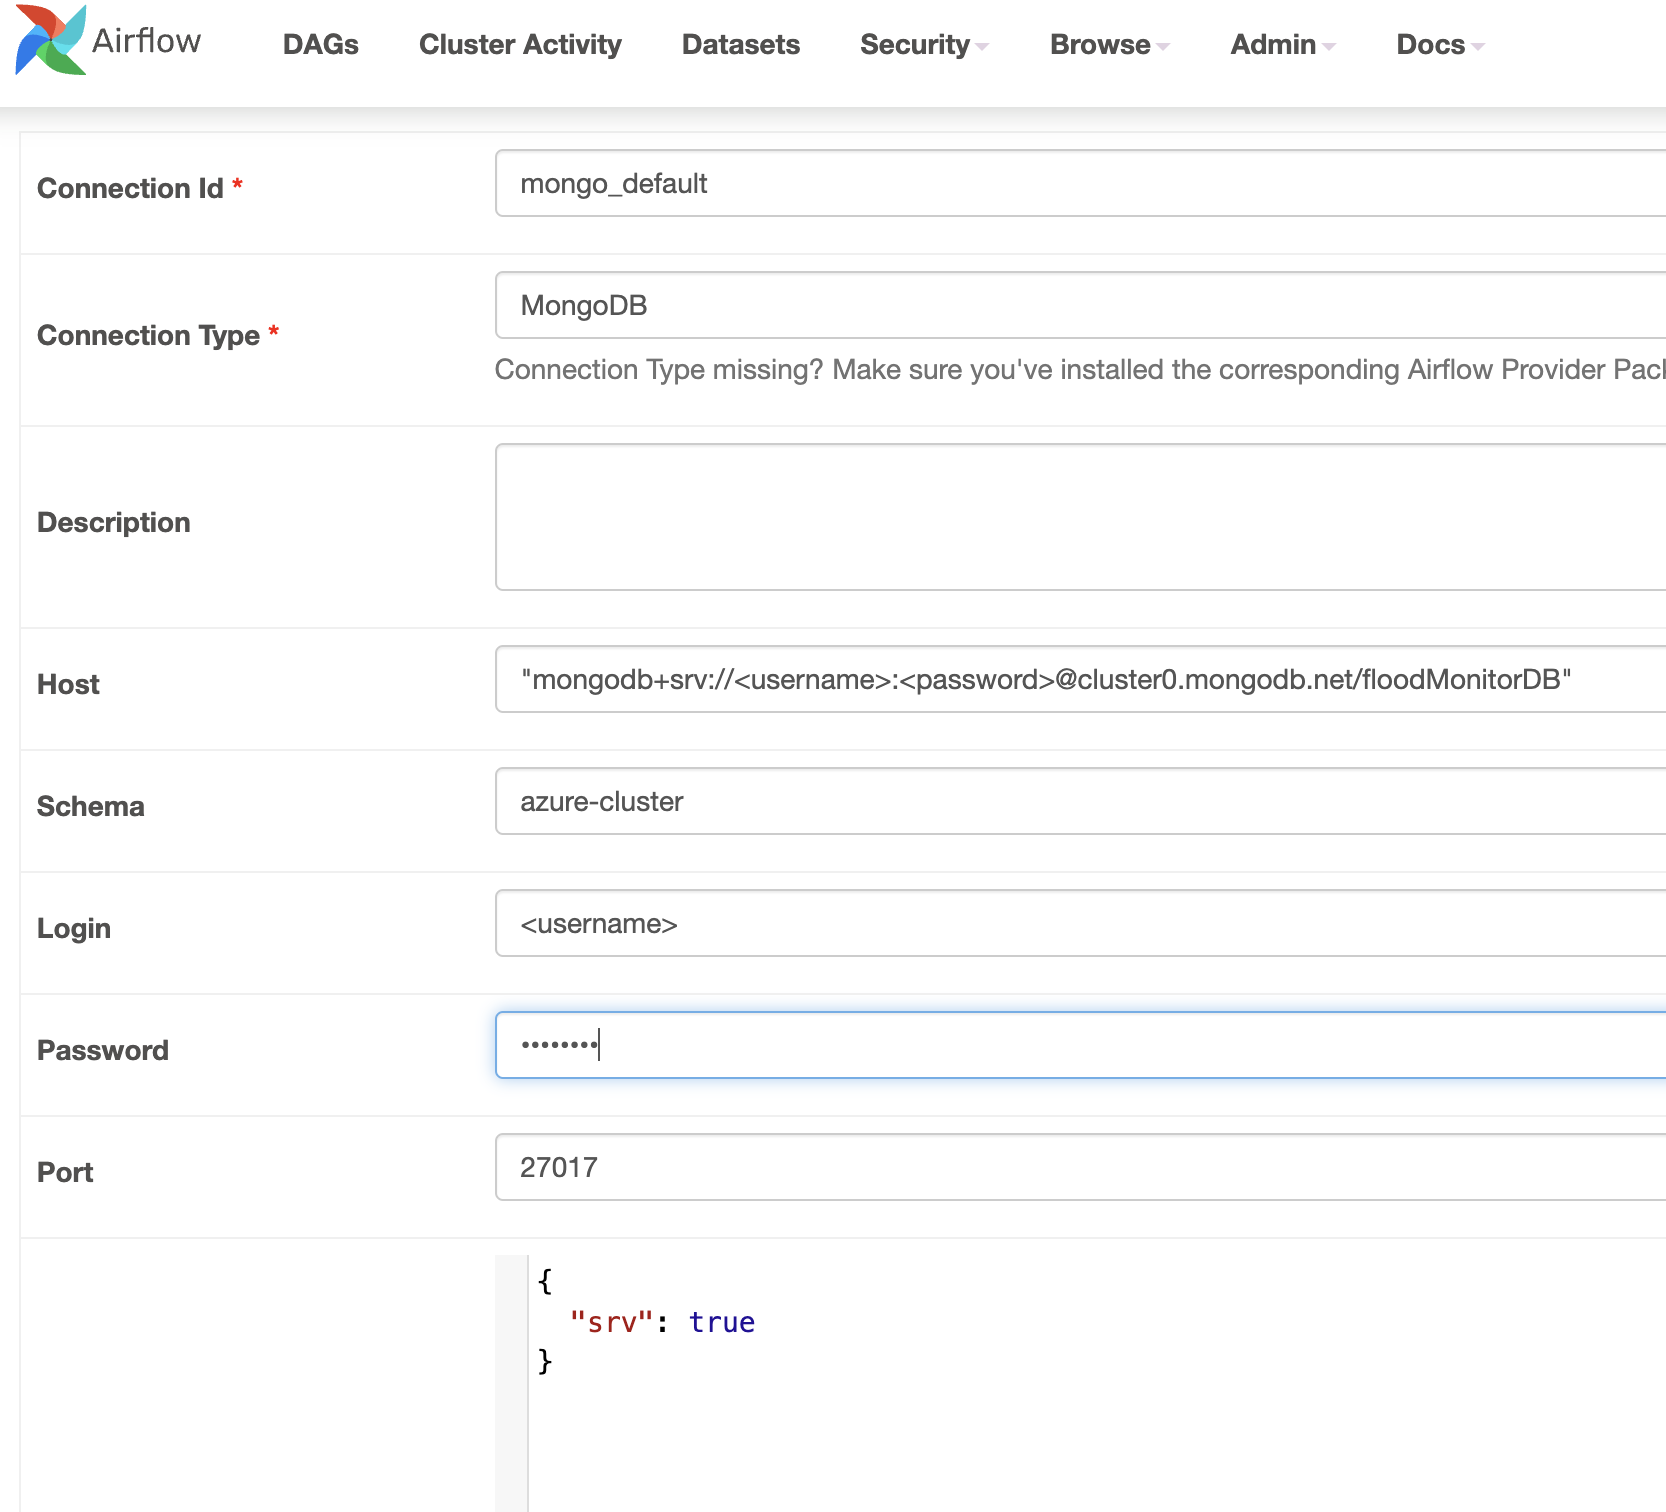
- Go to the Airflow UI.
- Click on the “Admin” tab, then “Connections.”
- Click the “Create” button and set up a new connection with the following details:
- Conn Id:
mongo_default - Conn Type:
MongoDB - Host: Your MongoDB Atlas connection string “
mongodb+srv://<username>:<password>@cluster0.mongodb.net/floodMonitorDB“ - Port: Leave this field blank.
- Schema:
floodMonitorDB - Login and Password: Your MongoDB credentials.
- Conn Id:
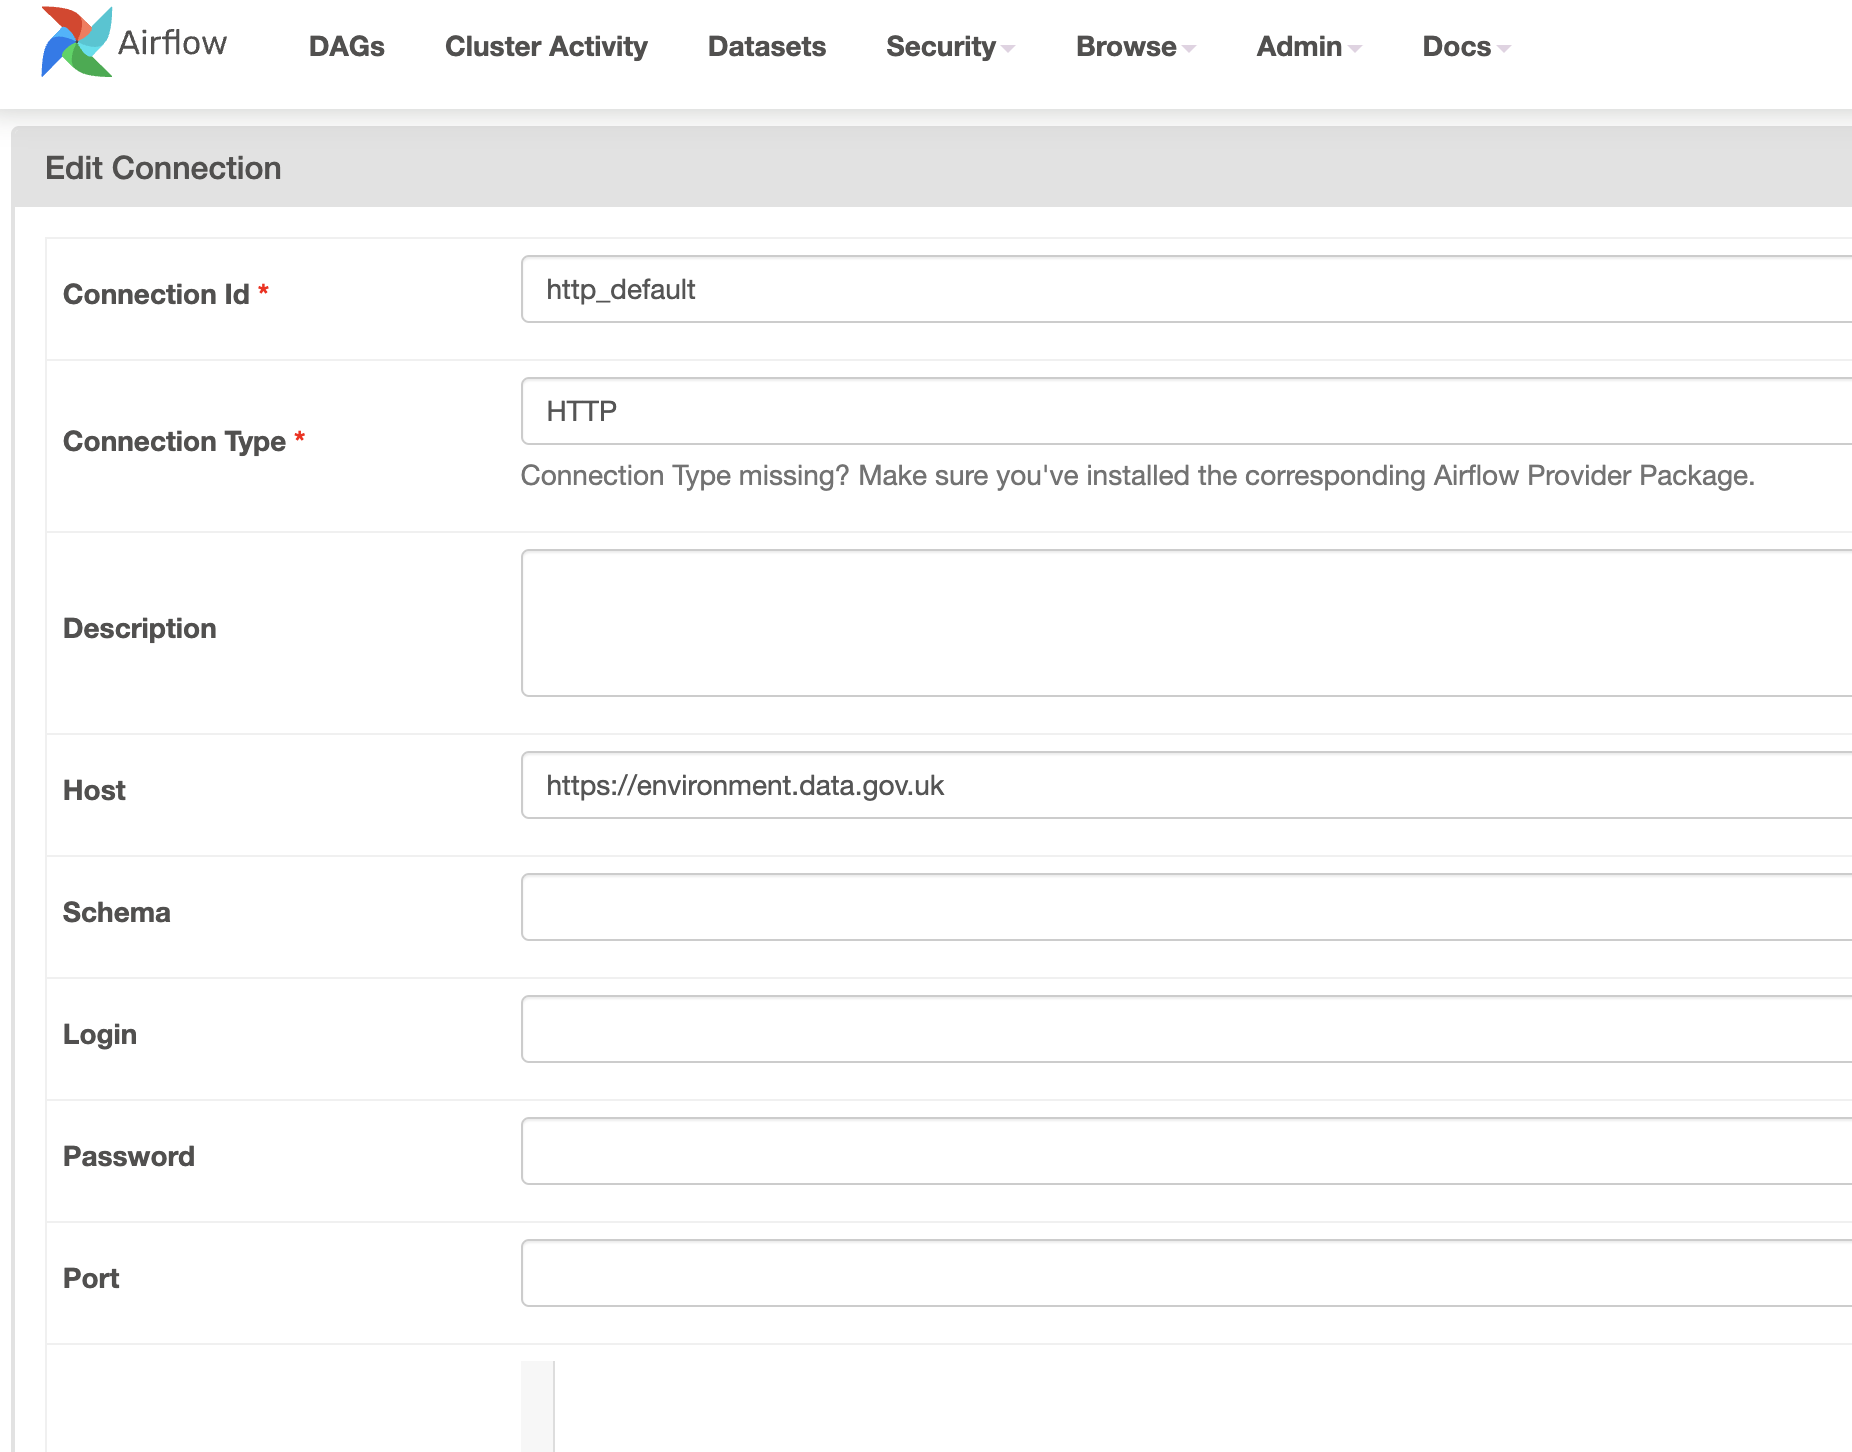
Step 4: Set up API Connection in Airflow:
The API we are using is from the following url: http://environment.data.gov.uk
The endpoint we will be using is: ‘/flood-monitoring/id/floods’,
- Go to the Airflow UI.
- Click on the “Admin” tab, then “Connections.”
- Click the “Create” button and set up a new connection with the following details:
- Conn Id:
http_default - Conn Type:
HTTP - Host: http://environment.data.gov.uk
- Port: Leave this field blank.
- Schema: Leave this field blank.
- Login and Password: Leave this field blank.


Step 5: Create a DAG Workflow
Now, create a DAG (Directed Acyclic Graph) in Airflow to automate the data ingestion process:
import requests

import pymongo

from pymongo.errors import DuplicateKeyError, PyMongoError

import pendulum

from airflow.decorators import dag, task

from airflow.providers.mongo.hooks.mongo import MongoHook

from airflow.providers.http.operators.http import SimpleHttpOperator

from airflow.providers.http.sensors.http import HttpSensor

from airflow.operators.python import PythonOperator

import json

# Define the DAG

with DAG(

    dag_id='ingest_api',

    schedule_interval='@daily',

    start_date=pendulum.datetime(2024, 8, 30),

    catchup=False,

) as dag:

    # Task 1: Check if API is active

    api_status = HttpSensor(

        task_id='is_api_active',

        http_conn_id='http_default',

        endpoint='flood-monitoring/id/floods',

        timeout=30,

        retries=3,

    )

    # Task 2: Get data from the API

    get_api_data = SimpleHttpOperator(

        task_id="get_api_data",

        method="GET",

        http_conn_id='http_default',

        endpoint="flood-monitoring/id/floods",

        headers={"Content-Type": "application/json"},

        response_filter=lambda response: json.loads(response.text),

        log_response=True,

    )

    # Task 3: Upload data to MongoDB

    def upload_data_to_mongodb(ti, **kwargs):

        try:

            hook = MongoHook(mongo_conn_id='mongo_default')

            client = hook.get_conn()

            db = client.floodMonitorDB

            collection = db["floodData"]

            data = ti.xcom_pull(task_ids='get_api_data')

            if data and 'items' in data:

                items = data['items']

                if isinstance(items, list):

                    collection.insert_many(items, ordered=False)

                else:

                    collection.insert_one(items)

        except Exception as e:

            print(f"Error: {e}")

    upload_to_mongodb = PythonOperator(

        task_id='upload_to_mongodb',

        python_callable=upload_data_to_mongodb,

    )

    # Define task dependencies

api_status >> get_api_data >> upload_to_mongodbOutput:
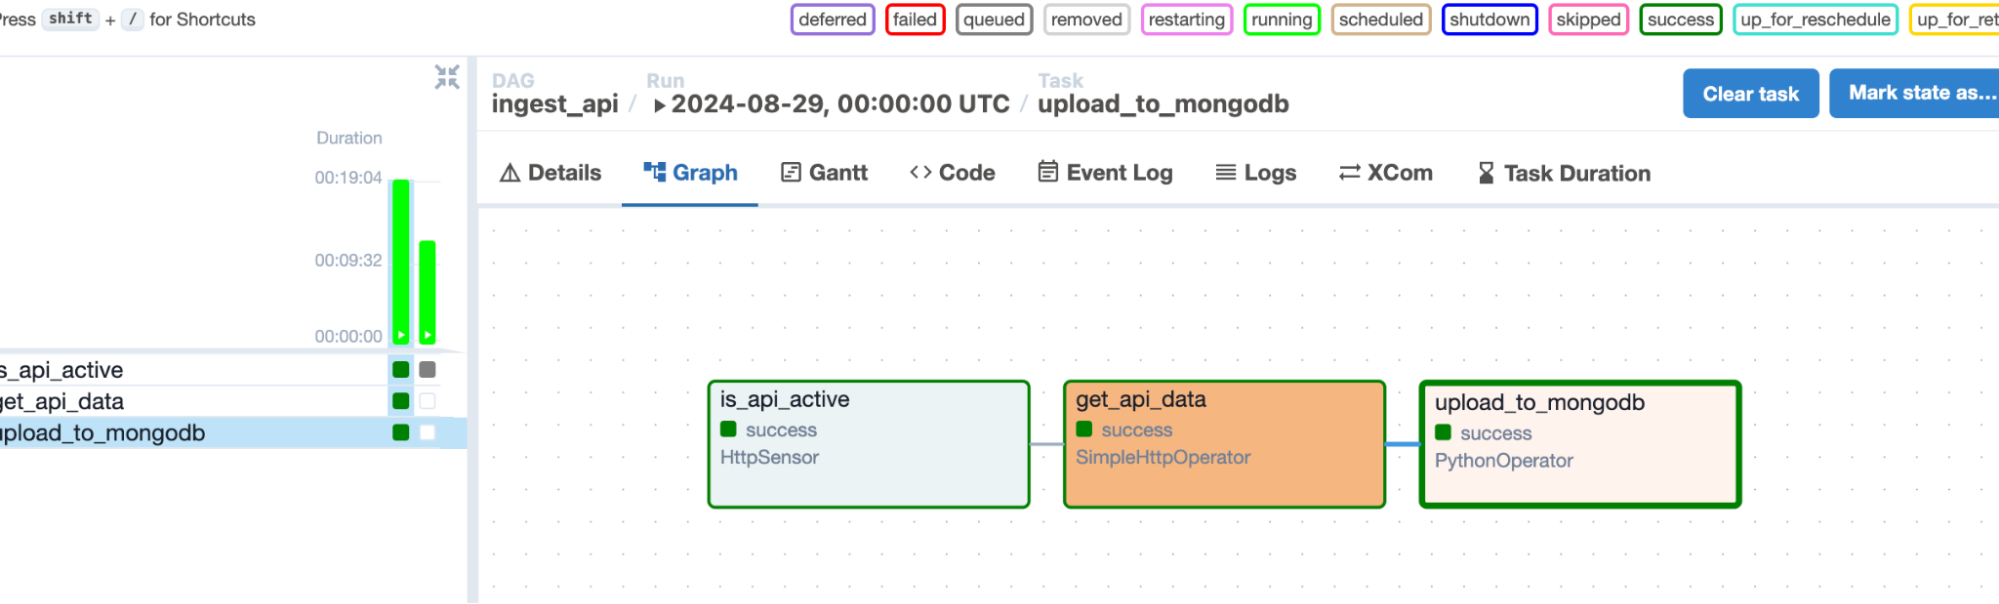
In the Airflow UI – you can see how the task moves from checking the api-status to getting the api data and then uploading it to mongodb subsequently, as the graph shows it is a successful run.
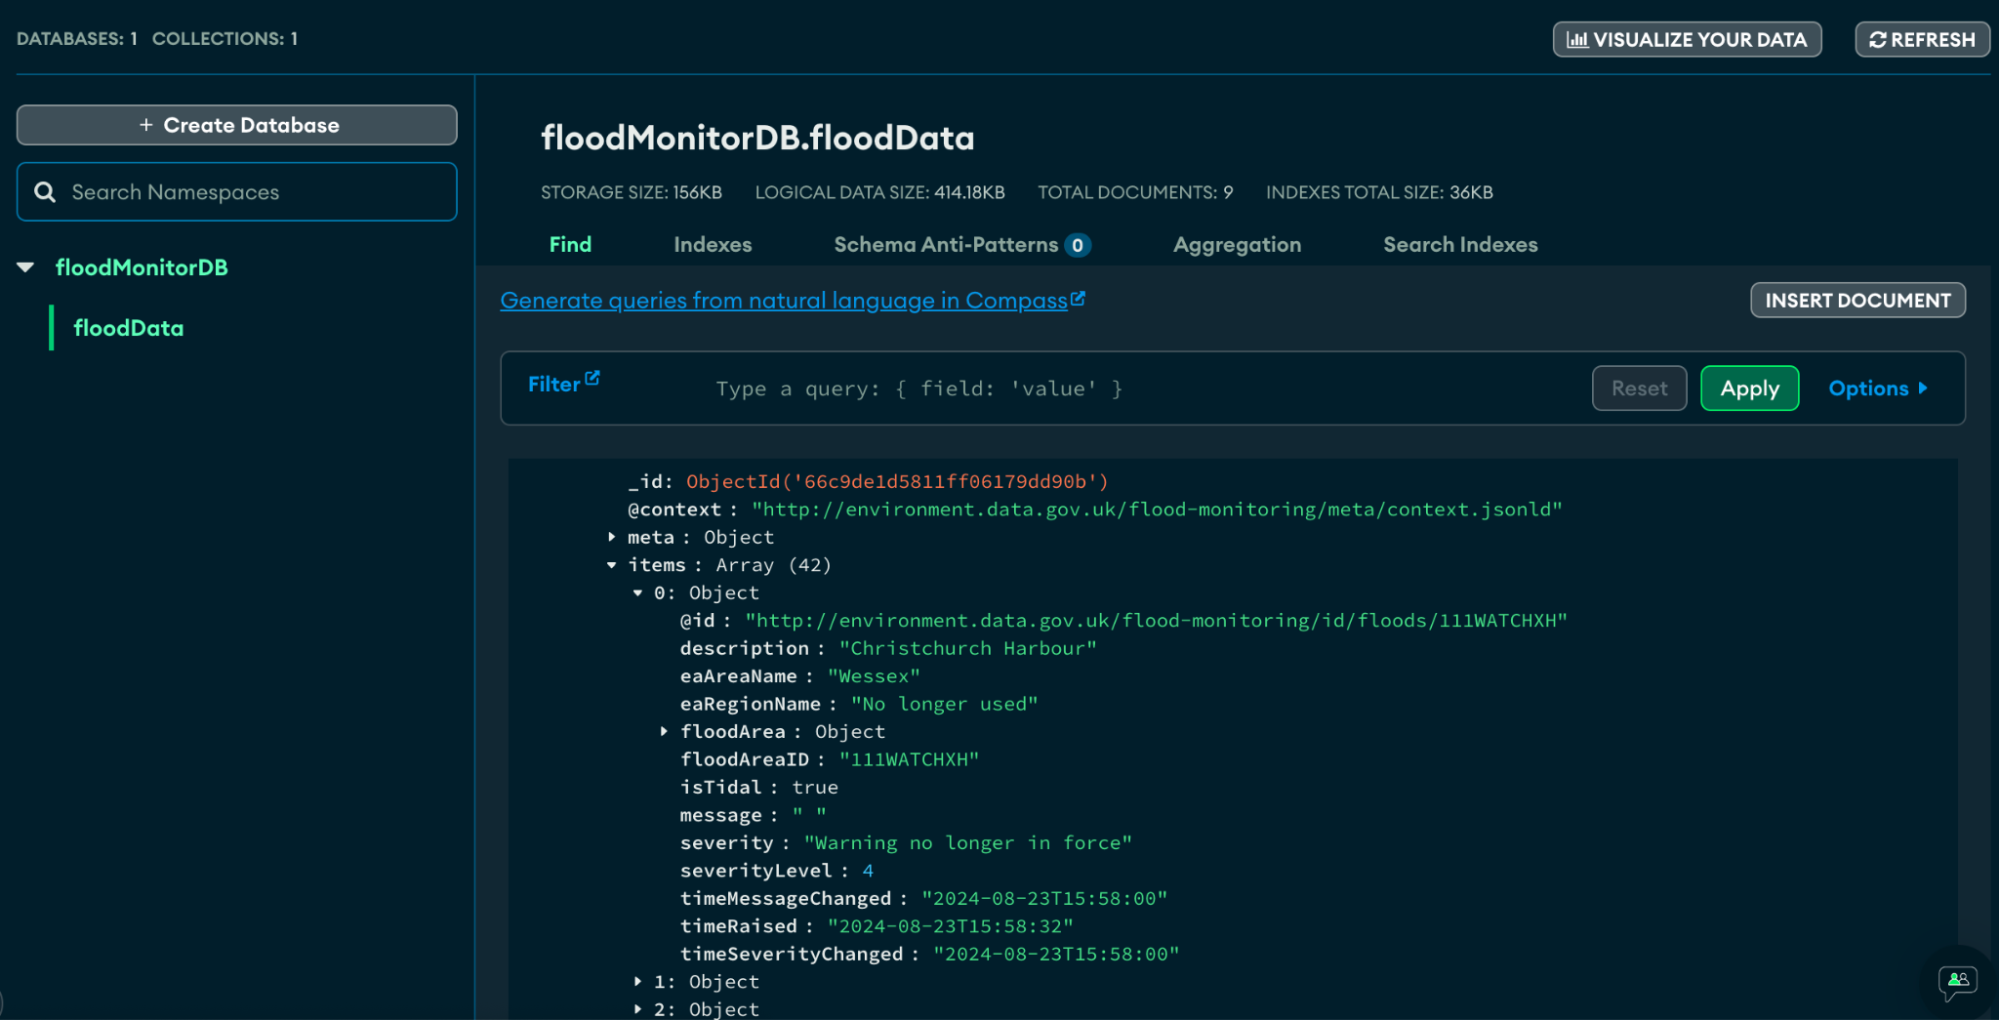
Here is the database and collection that was populated in MongoDB as a result of the process of airflow.
You can also individually test each task to see if it runs successfully and get its outputs
- dag_id – ingest_api
- task_id – get_api_data
- date
airflow tasks test ingest_api get_api_data 2024-8-30
Output: You will receive an output that will look like:
"@context" : "<http://environment.data.gov.uk/flood-monitoring/meta/context.jsonld>" ,<br>"meta" : { <br>"publisher" : "Environment Agency" ,<br>"licence" : "<http://www.nationalarchives.gov.uk/doc/open-government-licence/version/3/>" ,<br>"documentation" : "<http://environment.data.gov.uk/flood-monitoring/doc/reference>" ,<br>"version" : "0.9" ,<br>"comment" : "Status: Beta service" ,<br>"hasFormat" : [ "<http://environment.data.gov.uk/flood-monitoring/id/floods.csv>", <br><http://environment.data.gov.uk/flood-monitoring/id/floods.rdf>", "<br><http://environment.data.gov.uk/flood-monitoring/id/floods.ttl>", "<http://environment.data.gov.uk/flood-monitoring/id/floods.html>" ]<br>} ,<br>"items" : [ { …..
Step 6: Running the DAG
- After running airflow standalone, in the
localhost:8080navigate to your DAG: - Toggle on your DAG named here as ingest_api:

- Press the play button to run the DAG manually

Possible Next Steps: Visualization with MongoDB Charts
After ingesting data into MongoDB, you can use MongoDB Charts to create visualizations directly from your database. This feature allows you to create dashboards to monitor flood data trends and patterns, making your data more accessible to non-technical stakeholders.
Example:
Create a chart showing the severity levels of different flood warnings over time. This visualization can help quickly identify patterns and assess risks.
Post-Migration Considerations
While Apache Airflow is a powerful tool for automating workflows, there are some limitations to consider:
- Complexity: Setting up and maintaining an Airflow environment can be complex, especially for large-scale projects.
- Error Handling: Airflow requires careful handling of potential errors and retries, especially when dealing with external systems like APIs and databases.
- Performance: Airflow may not be the best solution for real-time data ingestion due to its batch-oriented nature.
You can also take a look at our comprehensive guide on data integration tools to explore the best solutions for seamless data integration.
Why Hevo Can Be a Game Changer?
If you find that Airflow’s setup is too complex or not meeting your needs, consider using Hevo, an automated data pipeline platform that simplifies the process of data integration and automation. Hevo offers:
- A user-friendly interface.
- Robust data integration with 150+ connectors.
- Support for custom Python code transformations.
- Transparent pricing and excellent customer support.
Conclusion
By following this tutorial, you’ve learned how to set up an Airflow pipeline to ingest API data into a MongoDB database. Both Airflow and MongoDB offer powerful features that make them well-suited for data engineering tasks, from handling complex data structures to automating and scheduling workflows.
Migrating data using Airflow could be daunting due to the need for high technical expertise and coding. Try a simpler no-code method like Hevo by signing up for a 14-day free trial.
Additional resources and links for users who want to explore more advanced features of Airflow and MongoDB, such as:
Frequently Asked Questions
1. Does Airflow support MongoDB?
Yes, Airflow can interact with MongoDB using operators like MongoHook or through custom scripts.
2. What is the best database for Airflow?
PostgreSQL and MySQL are the most commonly used databases for Airflow’s metadata store.
3. What is Airflow db used for?
Airflow’s database stores metadata about workflows, task statuses, schedules, and configuration settings.
Share it with your connections.
-
 Share To LinkedIn
-
 Share To Facebook
-
 Share To X
-
 Copy Link


