

Are you looking to perform Amazon Redshift bulk load? If yes, you are in the right place! Redshift is Amazon’s fully managed, NoOps, low-cost analytics data warehouse in the cloud.
With Redshift, you can query petabytes of data without having any infrastructure to manage or needing a database administrator.
- A lot of the data that they are uploading is split into files that can hold millions of records of small data files and this poses a significant challenge for any organization that relies on new data to improve Machine Learning performance.
- This is because inefficient data loading to Redshift can result in slow data migration which means that the business does not have the data it needs at the right time.
- Furthermore, some of the cumbersome data format conversions can lead to a lack of data quality and also having several jobs doing smaller tasks makes it more difficult to maintain the data flow.
- To address this edge case, this post will walk you through how to achieve Redshift bulk load in an automated fashion — avoiding repetitive SQL scripting.
Table of Contents
Overview of Redshift
Amazon Redshift, offered by Amazon Web Services (AWS), is a cloud data warehousing service that helps corporations manage large amounts of data and produce valuable insights. Amazon Redshift provides you with a wide variety of features that can assist you meet the needs of your business requirements.
Some popular features include its parallel processing abilities, automated data compression to reduce storage space requirements, columnar storage that makes the data easy to query by only considering specific columns, and many more.
A fully managed No-code Data Pipeline platform like Hevo Data helps you integrate and load data from 150+ different sources (including 60+ free sources) to a Data Warehouse such as Redshift or Destination of your choice in real-time in an effortless manner.
Let’s see some unbeatable features of Hevo Data:
- Fully Managed: Hevo Data is a fully managed service and is straightforward to set up.
- Schema Management: Hevo Data automatically maps the source schema to perform analysis without worrying about the changing schema.
- Real-Time: Hevo Data works on the batch as well as real-time data transfer so that your data is analysis-ready always.
- Live Support: With 24/5 support, Hevo provides customer-centric solutions to the business use case.
Prerequisites
Before you begin, complete the following prerequisites:
- You need an AWS account. If you don’t already have an AWS account, you must create one.
- You need a Redshift cluster. Sign-in to the AWS console and create a new Redshift cluster.
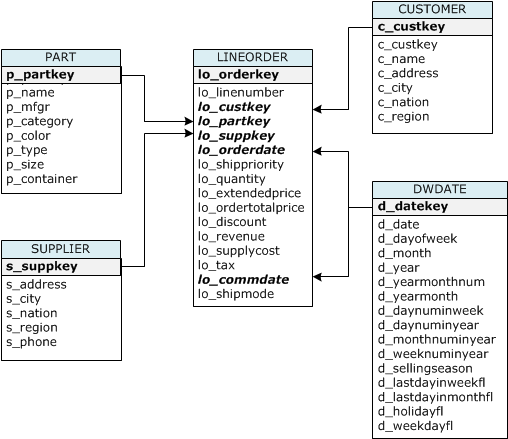
- You need to create a table in your Redshift cluster.
- You need an S3 bucket to stage your files. For more information, see Create a Bucket.
- A Browser, such as Chrome or Firefox
Method 1 – Use the COPY Command for Amazon Redshift Bulk Load
- In this method, you will use the SQL-like
COPYcommand with Key-based access control to load data into Redshift. - The COPY command can load data in parallel from Amazon DynamoDB, Amazon EMR, Amazon S3 or a remote host. The remote host needs to be a Unix or Linux computer configured to accept Secure Shell (SSH) connections.
- You can take maximum advantage of Amazon Redshift’s massively parallel processing (MPP) architecture by splitting your data into multiple files to load bulk data much more efficiently. When using the COPY command, the files have to have the same structure as the target table in your AWS Redshift cluster.
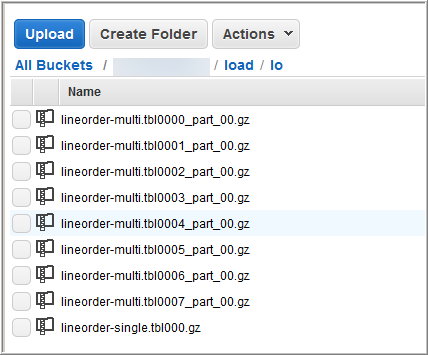
Step 1.1: Split your data into multiple files
- By default, the
COPYcommand expects the source data to be in character-delimited UTF-8 text files such as Avro, CSV, JSON, Parquet, TXT, or ORC formats. Split your data into multiple files so that the files are evenly distributed across the slices in your cluster. - You need to make sure that the files are roughly the same size, between 1 MB and 1 GB after compression.
- For example, the customers.csv file might be split into four files, as follows:
| customers.csv.1 customers.csv.2 customers.csv.3 customers.csv.4 |
Step 1.2: Upload your files to Amazon S3
- Create an Amazon S3 bucket to hold your files, and then upload the files to the S3 bucket. Ensure that the Amazon S3 bucket that holds your data is created in the same AWS Region as your cluster
Step 1.3: Enable Key-based access control to your S3 bucket
There are two ways to use the COPY command, either by role-based access control or key-based access control. For this demo, you will use the latter. Create an access key to allow data load using the COPY command.
- Go to the IAM Management Console.
- Click on Access Management > Users > Add User
- Set the user name
- Allow programmatic access for this user
- Next, define the permissions. Attach an existing policy that is the “AmazonS3ReadOnlyAccess”.
- Create the user.
- Copy and store the secret key in a secure location since it is only accessible during creation time.
Step 1.4: Run a COPY command to load the data from Amazon S3
The syntax to specify the files to be loaded is as follows:
copy <table_name> from '<data_source>'
authorization;
Use the query editor on the Amazon Redshift console to run the COPY command. The command loads the customers table using the data files with the prefix ‘customers’ in the Amazon S3 bucket testbucket.
copy customers
from 's3://testbucket/customers'
access_key_id '<access-key-id>'
secret_access_key '<secret-access-key';
Step 1.5: Verify that the data was loaded correctly
After you populate the table with data, use a SELECT statement to display the data contained in the table. The <strong>SELECT</strong> * statement returns all the column names and row values for all of the data in a table and is a good way to verify that the recently added data was correctly inserted into the table. The following SELECT command uses a <strong>LIMIT</strong> clause to restrict the number of returned rows. It will return the first 10 rows in the Redshift table ignoring the rest so that you don’t use too many resources.
select * from customers
limit 10;Method 2: Use Hevo Data for Amazon Redshift Bulk Load
Hevo is fully-managed and completely automates the process of not only exporting data from your desired source but also enriching the data and transforming it into an analysis-ready form without having to write a single line of code.
This utility builds on the COPY command by using a native AWS connection and this enables Engineers to upload data from multiple data repositories, enabling parallel processing, and eliminating repetitive SQL scripting to speed up the ETL process.
Hevo Data’s bulk loading feature allows users to reduce the data upload time by loading the data through a single transformation step. It eliminates custom code by providing a visual representation of the data flow. You can also configure reusable data pipelines for repetitive load jobs.
How it Works
- Point the service to your database or storage buckets using the dashboard and it will automatically discover your datasets, infer the data structure inside your files, and extract all the schema and store this information inside tables.
- The Hevo Data wizard will generate the ETL scripts that are needed to Extract, Transform, and Load that data into tables in Redshift. These scripts will flatten all semi-structured data no matter how complex the data is, transform the input into target data types, and drop any unneeded column.
Why Choose Hevo?
- Reduces data upload time.
- Eliminates custom code.
- Creates reusable data pipelines.


Conclusion
This blog post explored two methods for achieving efficient Amazon Redshift Bulk Load. For users comfortable with SQL scripting, the COPY command offers a straightforward approach using key-based access control. However, for those seeking a completely automated solution, Hevo Data provides a user-friendly interface to streamline data extraction, transformation, and loading into Redshift, eliminating the need for manual scripting.
For more information about how to use the COPY command with other data stores, see the following topics:
- Loading data from Amazon EMR
- Loading data from an Amazon DynamoDB table
- Loading data from remote hosts
Sign up for a 14-day free trial and simplify your data integration process. Check out the pricing details to understand which plan fulfills all your business needs.
Frequently Asked Questions
1. Can Amazon Redshift be used for batch processing?
Yes, Amazon Redshift is commonly used for batch processing large datasets efficiently.
2. What is the most efficient and fastest way to load data into Redshift?
The fastest way to load data into Redshift is by using the COPY command. Tools like Hevo can automate and optimize this process for seamless data integration.
3. How to load CSV data into Redshift?
To load CSV data, upload the file to an S3 bucket, then use the COPY command in Redshift to import the data from S3.
Share it with your connections.
-
 Share To LinkedIn
-
 Share To Facebook
-
 Share To X
-
 Copy Link


