


Easily move your data from AWS Elasticsearch to Snowflake to enhance your analytics capabilities. With Hevo’s intuitive pipeline setup, data flows in real-time—check out our 1-minute demo below to see the seamless integration in action!
Built on Apache Lucene, AWS Elasticsearch is a distributed search and analytics engine. Elasticsearch, which was introduced in 2010 and has since grown to be the most widely used search engine, is frequently used for use cases involving log analytics, full-text search, security intelligence, business analytics, and operational intelligence.
Superior Data Analytics are made possible by the Cloud-based, fully managed Snowflake data warehouse solution. AWS, Azure, and GCP are used by Snowflake to handle its cloud infrastructure and data. The data is subjected to SQL queries by Snowflake in order to convert and offer insights.
In this article, you will learn how to transfer data from AWS Elasticsearch to Snowflake using CSV files format.
Table of Contents
What is AWS Elasticsearch?
AWS Elasticsearch is a distributed, open-source search and analytics engine with a strong REST API that can be used on a variety of platforms due to its speed and scalability. It permits the analytics of textual, numerical, and even geospatial data, which can be used for any intended purpose. Additionally, tasks such as data ingestion, storage, analysis, enrichment, and visualization can be carried out smoothly with it.
Method 1: Connect AWS Elasticsearch to Snowflake using Hevo
Effortlessly integrate AWS Elasticsearch with Snowflake using Hevo Data’s intuitive no-code platform. Hevo Data supports automated data pipelines, ensuring seamless data transfer and real-time analytics without the need for manual coding.
Method 2: Connect AWS Elasticsearch to Snowflake Manually using CSV Files
Integrating AWS Elasticsearch to Snowflake is a tedious and time-consuming process. To do so, export your data manually using CSV files and load the files into your Snowflake Account.
Get Started with Hevo for FreeKey Features of AWS Elasticsearch
- Fast APIs: Elasticsearch makes it simple to get started and quickly construct applications for a range of use-cases by providing simple REST based APIs, a simple HTTP interface, and uses schema-free JSON documents.
- High Performance: Elasticsearch’s distributed architecture enables it to handle enormous amounts of data concurrently, swiftly locating the best matches for your searches.
- Multiple Language Support: Numerous languages, including Java, Python, PHP, JavaScript, Node.js, Ruby, and many more, are supported by Elasticsearch.
What is Snowflake?
Snowflake is a fully managed SaaS (Software as a Service) platform. Data warehousing, data lakes, data engineering, data science, data application development, and secure sharing and consumption of real-time / shared data are all merged into one platform.
To meet the demanding requirements of expanding enterprises, Snowflake provides pre-built capabilities including Storage and Compute Separation, On-the-Fly Scalable Compute, Data Sharing, Data Cloning, and Third-Party Tool Support.
Key Features of Snowflake
The following are some of the features of Snowflake as a Software as a Service (SaaS) solution:
- Snowflake enables you to create your own Data Communicate, enabling you to securely exchange real-time, controlled data.
- By switching from nightly batch loads to real-time data streams in Snowflake, you may be able to improve the precision and effectiveness of your analysis.
- Using the Caching Paradigm, Snowflake swiftly distributes cache results.
- You may learn more about the habits and usage patterns of your customers with the aid of Snowflake.
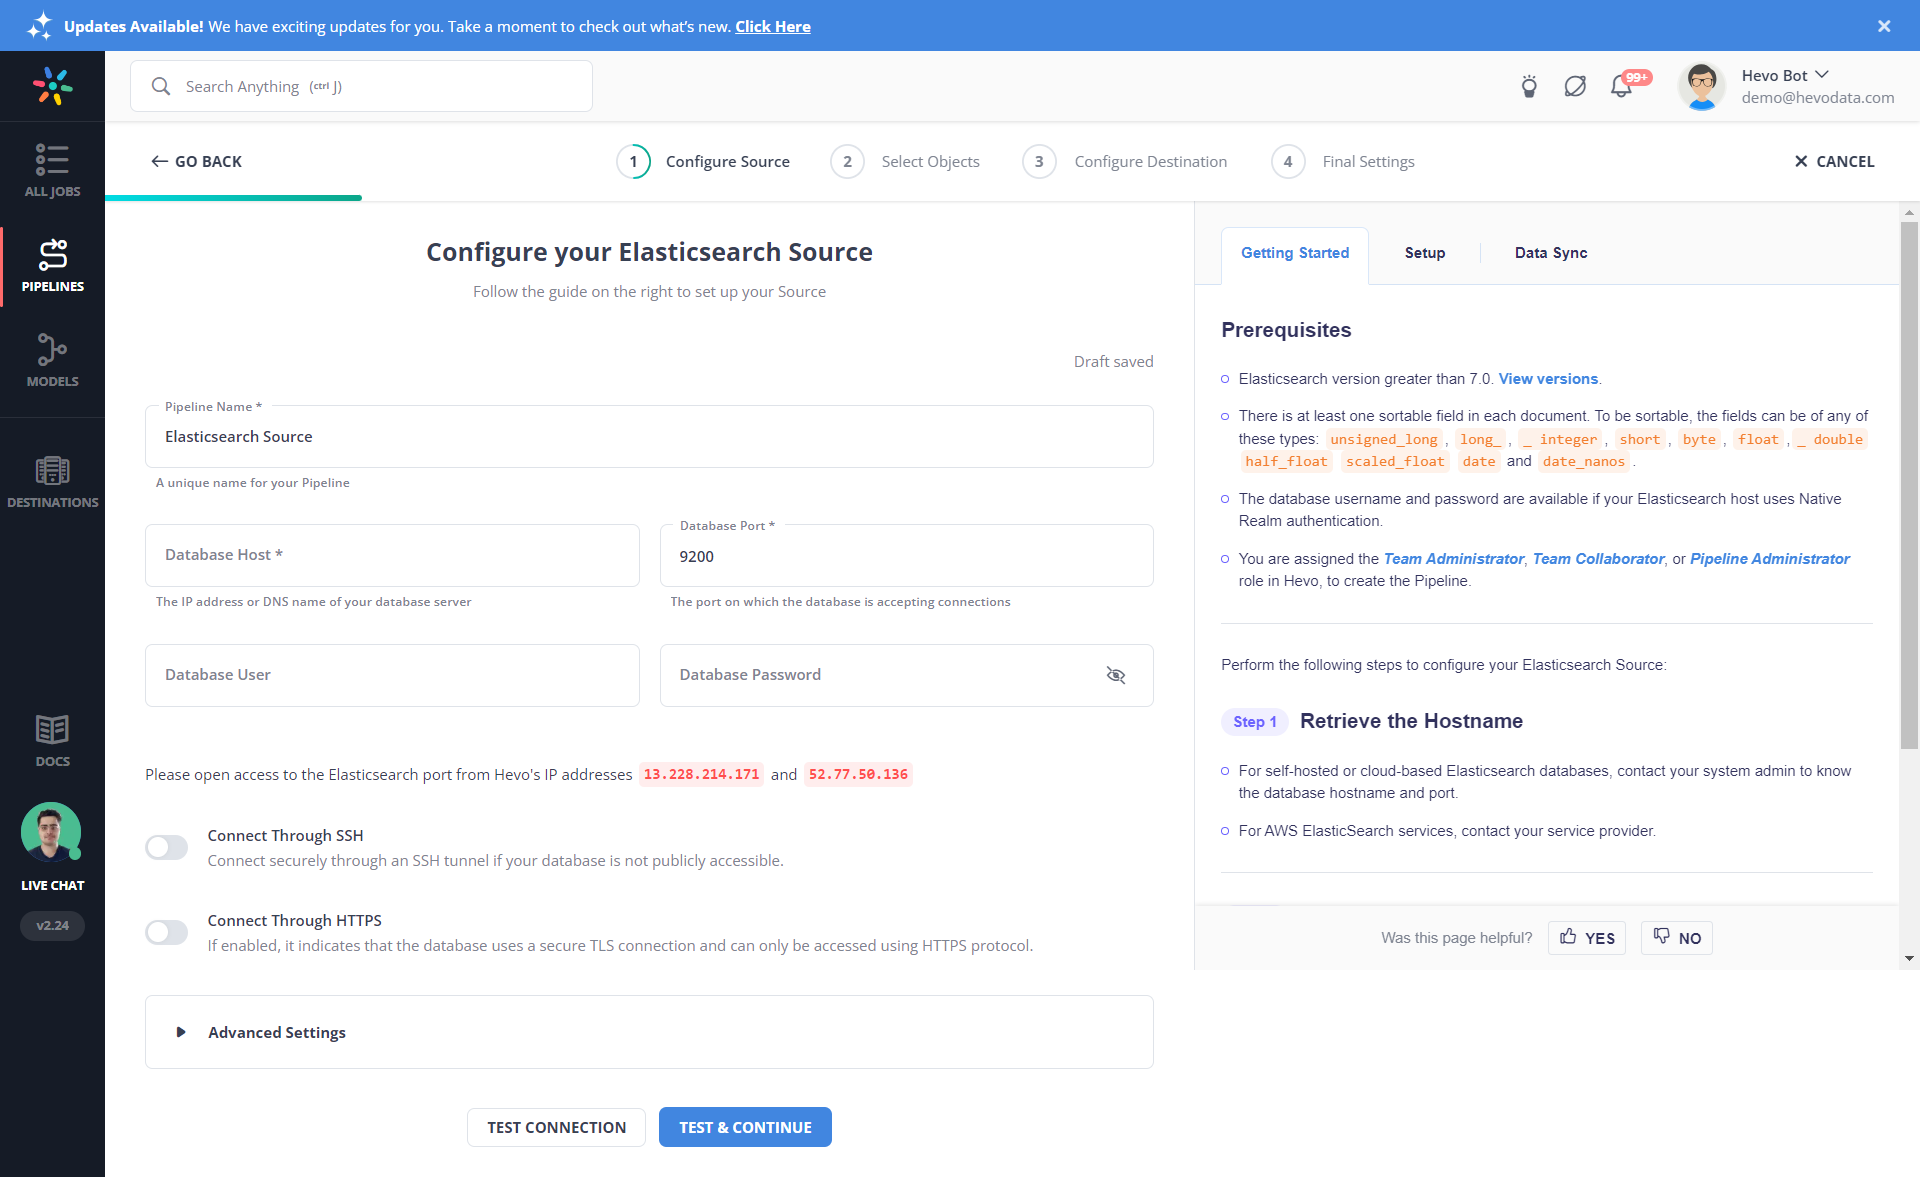
Method 1: Connect AWS Elasticsearch to Snowflake using Hevo
Step 1.1: Configure AWS Elasticsearch as your Source
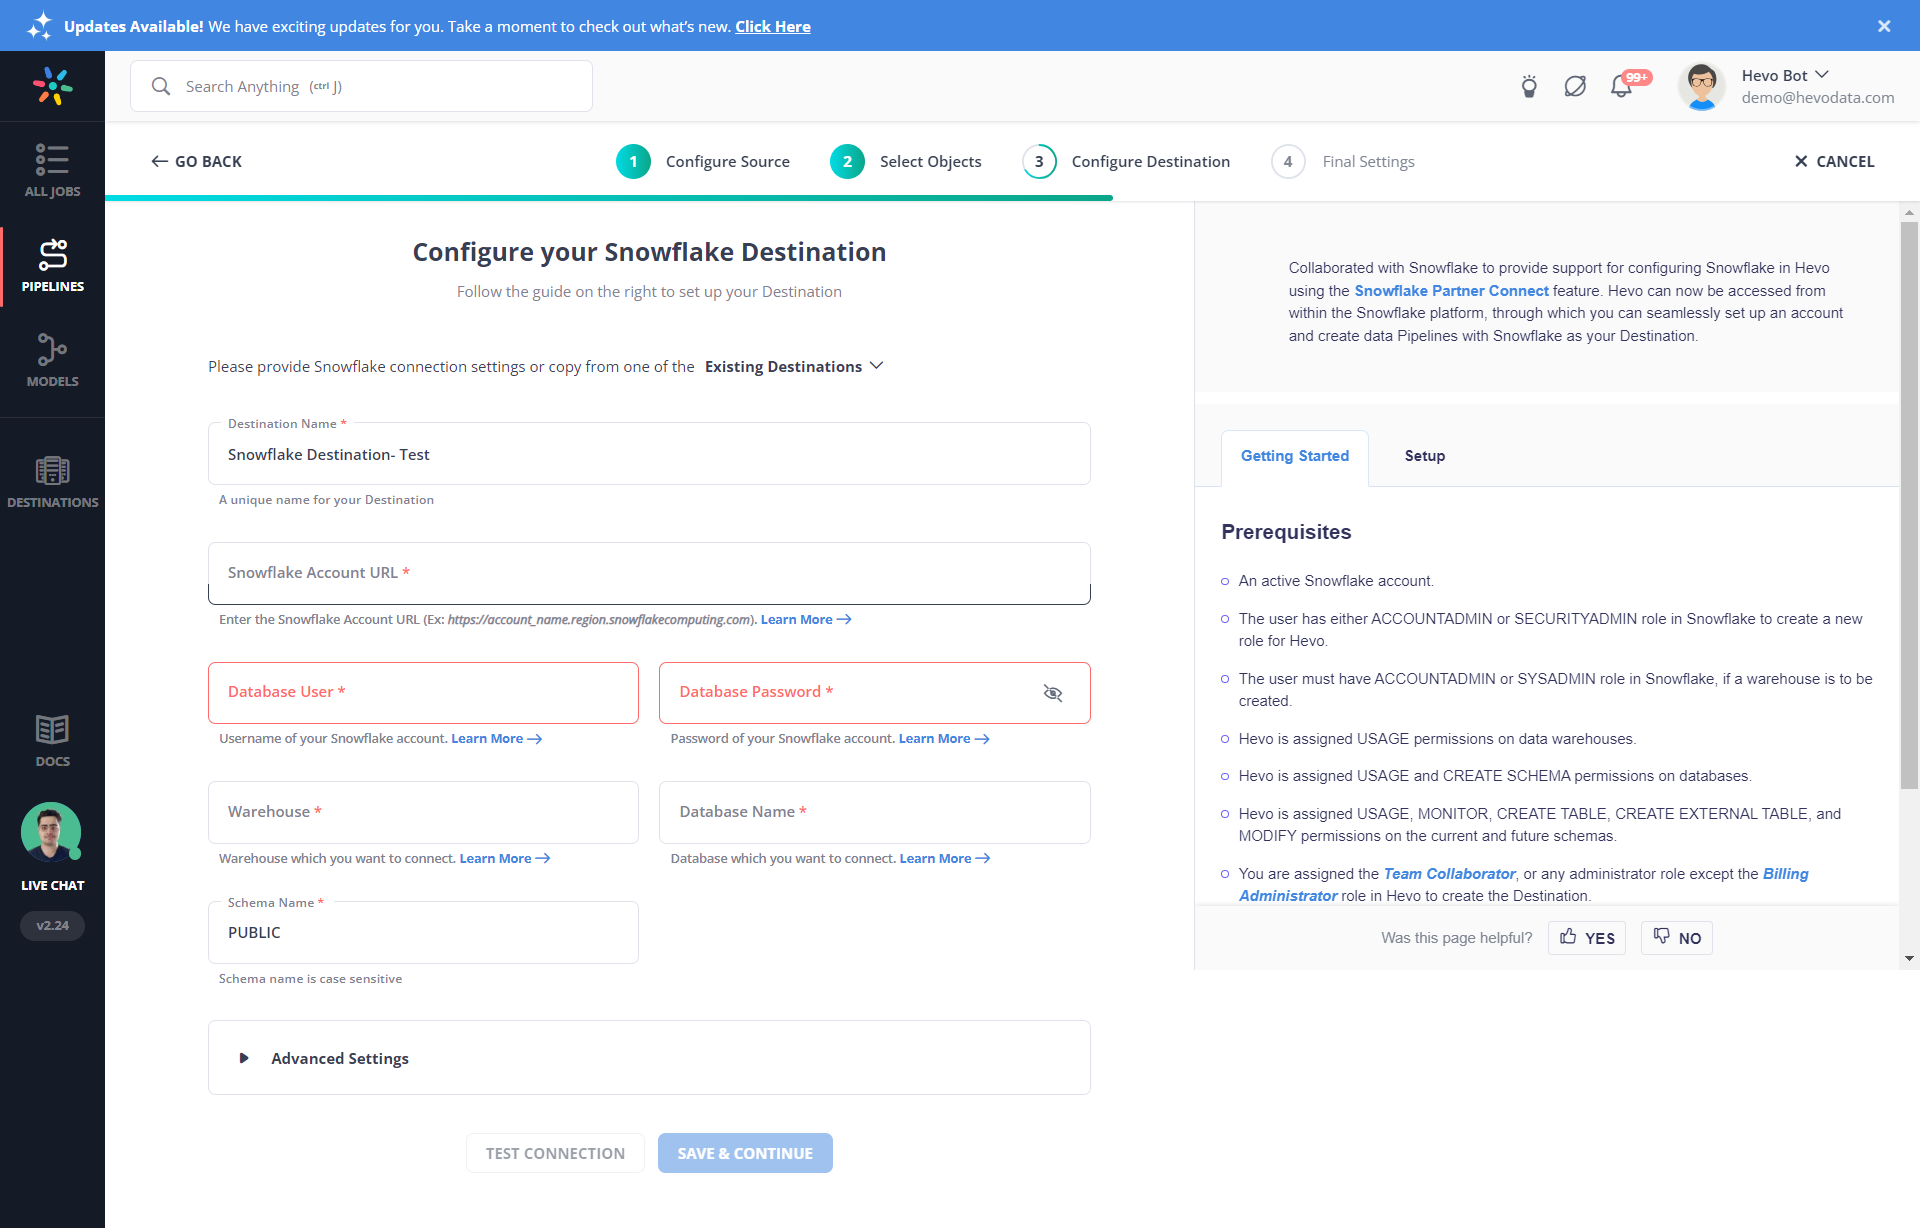
Step 1.2: Configure Snowflake as your Destination
Why use Hevo?
- Wide Range of Connectors: Instantly connect and read data from 150+ sources, including SaaS apps and databases, and precisely control pipeline schedules down to the minute.
- In-built Transformations: Format your data on the fly with Hevo’s preload transformations using either the drag-and-drop interface, or our nifty Python interface. Generate analysis-ready data in your warehouse using Hevo’s Postload Transformation.
- Transparent Pricing: Say goodbye to complex and hidden pricing models. Hevo’s Transparent Pricing brings complete visibility to your ELT spend. Choose a plan based on your business needs. Stay in control with spend alerts and configurable credit limits for unforeseen spikes in data flow.
- Security: Discover peace with end-to-end encryption and compliance with all major security certifications, including HIPAA, GDPR, and SOC-2.

Method 2: Connect AWS Elasticsearch to Snowflake Manually using CSV Files
You cannot directly export the data from AWS Elasticsearch to Snowflake. To export data from AWS Elasticsearch to Snowflake, first you will have to export data from AWS Elasticsearch as CSV files and then load the CSV files into Snowflake.
Step 2.1: Export Data from AWS Elasticsearch as CSV using Python Pandas
The first step in exporting data from AWS Elasticsearch to Snowflake is exporting data from AWS Elasticsearch as CSV files.
- Documents can be exported in a variety of formats using Python Pandas. Elasticsearch Pandas may export files in the formats of HTML, CSV, or JSON. Use the following command to install PIP for Python 3.
sudo apt install python3-pip
sudo yum install python36
sudo yum install python36-devel
sudo yum install python36-setuptools
sudo easy_install-3.6 pip- The entire Python Pandas script for exporting and starting a data export in any of these formats is as follows:
#!/usr/bin/env python3
#-*- coding: utf-8 -*-

import sys, time, io
start_time = time.time()

if sys.version[0] != "3":
    print ("nThis script requires Python 3")
    print ("Please run the script using the 'python3' command.n")
    quit()
try:
    # import the Elasticsearch low-level client library
    from elasticsearch import Elasticsearch
    # import Pandas, JSON, and the NumPy library
    import pandas, json
    import numpy as np
except ImportError as error:
    print ("nImportError:", error)
    print ("Please use 'pip3' to install the necessary packages.")
    quit()
# create a client instance of the library
print ("ncreating client instance of Elasticsearch")
elastic_client = Elasticsearch()

"""
MAKE API CALL TO CLUSTER AND CONVERT
THE RESPONSE OBJECT TO A LIST OF
ELASTICSEARCH DOCUMENTS
"""
# total num of Elasticsearch documents to get with API call
total_docs = 20
print ("nmaking API call to Elasticsearch for", total_docs, "documents.")
response = elastic_client.search(
    index='employees',
    body={},
    size=total_docs
)
# grab list of docs from nested dictionary response
print ("putting documents in a list")
elastic_docs = response["hits"]["hits"]

"""
GET ALL OF THE ELASTICSEARCH
INDEX'S FIELDS FROM _SOURCE
"""
#  create an empty Pandas DataFrame object for docs
docs = pandas.DataFrame()
# iterate each Elasticsearch doc in list
print ("ncreating objects from Elasticsearch data.")
for num, doc in enumerate(elastic_docs):
    # get _source data dict from document
    source_data = doc["_source"]
    # get _id from document
    _id = doc["_id"]
    # create a Series object from doc dict object
    doc_data = pandas.Series(source_data, name = _id)
    # append the Series object to the DataFrame object
    docs = docs.append(doc_data)

"""
EXPORT THE ELASTICSEARCH DOCUMENTS PUT INTO
PANDAS OBJECTS
"""
print ("nexporting Pandas objects to different file types.")

# export the Elasticsearch documents as a JSON file
docs.to_json("objectrocket.json")
# have Pandas return a JSON string of the documents
json_export = docs.to_json() # return JSON data
print ("nJSON data:", json_export)
# export Elasticsearch documents to a CSV file
docs.to_csv("objectrocket.csv", ",") # CSV delimited by commas
# export Elasticsearch documents to CSV
csv_export = docs.to_csv(sep=",") # CSV delimited by commas
print ("nCSV data:", csv_export)
# create IO HTML string
import io
html_str = io.StringIO()
# export as HTML
docs.to_html(
    buf=html_str,
    classes='table table-striped'
)

# print out the HTML table
print (html_str.getvalue())
# save the Elasticsearch documents as an HTML table
docs.to_html("objectrocket.html")

print ("nntime elapsed:", time.time()-start_time)
You can check out other methods for exporting data from AWS Elasticsearch. Now you have your CSV Data with you. The first step in exporting data from AWS Elasticsearch to Snowflake is complete now.
Step 2.2: Load CSV Data into Snowflake
The second step in exporting data from AWS Elasticsearch to Snowflake is importing CSV data into Snowflake.
This section explains how to bulk load data into Snowflake using the SnowSQL client. Data can be loaded in bulk using SQL from any delimited plain-text file, such as Comma-delimited CSV files. Bulk loading is also possible for semi-structured data from JSON, AVRO, Parquet, or ORC files. But loading from CSV files is the article’s main focus. On what are referred to as stages on the inside, you can stage files in Snowflake. Each patron and each table has a stage. Snowflake further enables the development of named stages, such as demo stages.
- Step 2.2.A: Upload your data files so that Snowflake can access them to get started. What this amounts to is staging your files.
- Without utilizing any external resources, internal stages enable convenient and safe data file storage. However, you can avoid staging and load directly from these external destinations provided your data files are already staged in a compatible Cloud storage like GCS or S3.
- Additionally, you can simply upload CSV files from your personal computer.
- Step 2.2.B: From these prepared files, you next load your data into your tables. The “use” statement will be used to choose the previously built database.
Syntax:
Use database [database-name]; Example:
use database dezyre_test;Output:

- Step 2.2.C: Setting up a named file format for a collection of staged data that can be read or loaded into Snowflake tables.
Syntax:
CREATE [ OR REPLACE ] FILE FORMAT [ IF NOT EXISTS ]
                      TYPE = { CSV | JSON | AVRO | ORC | PARQUET | XML } [ formatTypeOptions ]
                      [ COMMENT = '' ]
Example:
create or replace file format my_csv_format
  type = csv
  field_delimiter = '|'
  skip_header = 1
  null_if = ('NULL', 'null')
  empty_field_as_null = true
  compression = gzip;
Output:

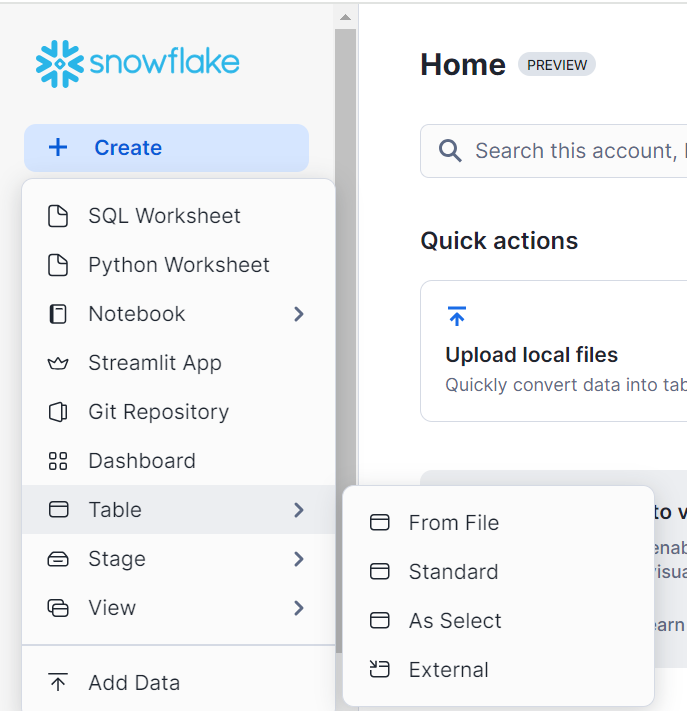
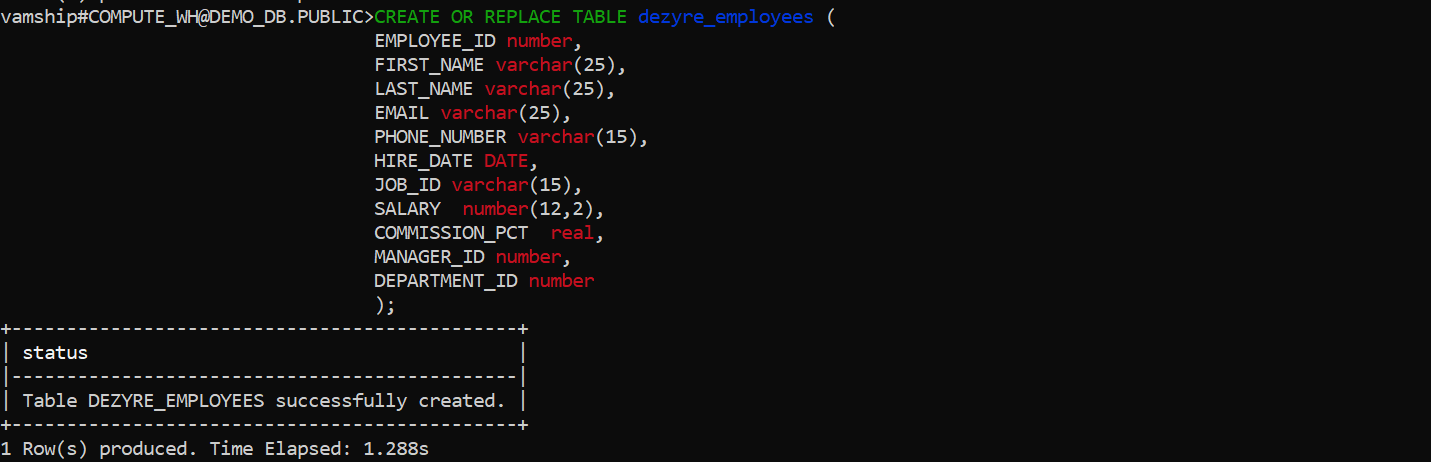
- Step 2.2.D: At this point, a table is created using the Create statement, as seen below. It either creates a new table or changes an existing one in the current or specified schema.
Syntax:
CREATE [ OR REPLACE ] TABLE [ ( [ ] , [ ] , ... ) ] ;Example:
CREATE OR REPLACE TABLE dezyre_employees (
EMPLOYEE_ID number,
FIRST_NAME varchar(25),
LAST_NAME varchar(25),
EMAIL varchar(25),
PHONE_NUMBER varchar(15),
HIRE_DATE DATE,
JOB_ID varchar(15),
SALARY  number(12,2),
COMMISSION_PCT  real,
MANAGER_ID number,
DEPARTMENT_ID number
);Output:
- Step 2.2.E: Using your local computer, upload the CSV data file to the Snowflake’s staging area as shown below. Additionally, if the location is secured, you can include the access credentials along with the URLs for the locations of the staged CSV files. You can also create named stages that point to different locations.
Syntax:
put file://D:\dezyre_emp.csv @DEMO_DB.PUBLIC.%dezyre_employees;Output:

- Step 2.2.F: At this point, as seen below, the CSV data is loaded into the previously created target Snowflake table.
Example:
copy into dezyre_employees
  from @%dezyre_employees
  file_format = (format_name = 'my_csv_format' , error_on_column_count_mismatch=false)
  pattern = '.*dezyre_emp.csv.gz'
  on_error = 'skip_file';
Output:

- Step 2.2.G: You can verify that the information loaded into the target database is accurate by performing the select query shown below.
Example:
select * from dezyre_employees;Output:
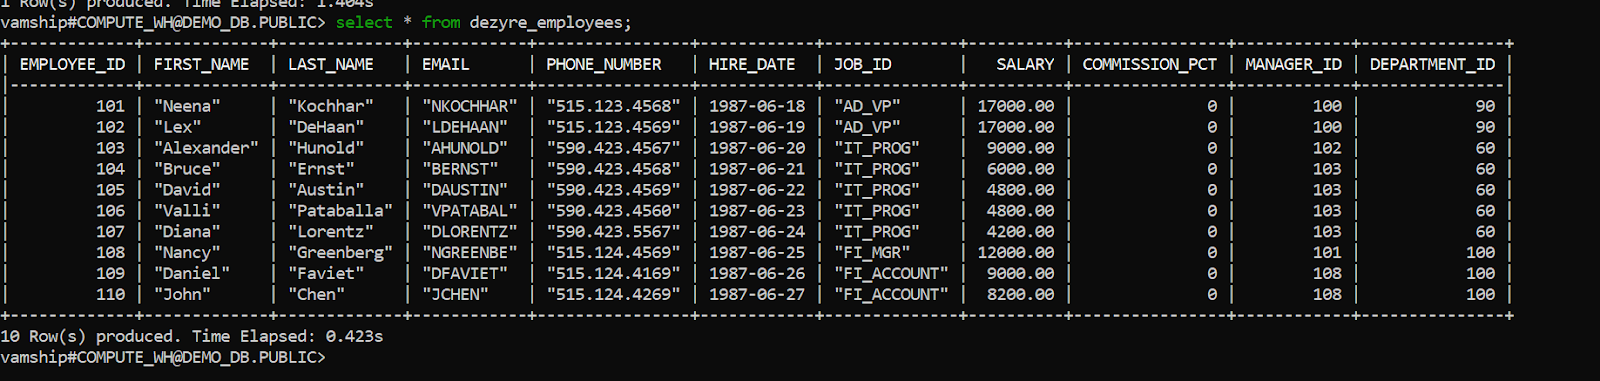
You have successfully done AWS Elasticsearch to Snowflake data transfer.
Limitations of Connecting AWS Elasticsearch to Snowflake Manually
- Data can only be moved from AWS Elasticsearch to Snowflake in one direction using the manual method. In order to maintain both tools up to date, two-way sync is required.
- The manual process takes time because the records need to be updated often. This is a waste of time and resources that could be used for more crucial company duties.
- Some customers may find the amount of engineering bandwidth needed to maintain workflows across numerous platforms and update current data bothersome.
- No transformation is possible during data transport. This could be a big problem for companies that want to change their data before moving it from AWS Elasticsearch to Snowflake.
Conclusion
In this article, you got a glimpse of how to connect AWS Elasticsearch to Snowflake after a brief introduction to the salient features, and use cases. The methods talked about in this article are using automated solutions such as Hevo and CSV files.
The second process can be a bit difficult for beginners. Moreover, you will have to update the data each and every time it is updated and this is where Hevo saves the day!
Sign up for a 14-day free trial and simplify your data integration process. Check out the pricing details to understand which plan fulfills all your business needs.
Frequently Asked Questions
1. How do I connect Elasticsearch to Snowflake?
To connect Elasticsearch to Snowflake, you can export data from Elasticsearch using a tool like Logstash or custom scripts, and then load the data into Snowflake using Snowflake’s Snowpipe or Bulk Load feature.
2. How do I transfer data from AWS to Snowflake?
To transfer data from AWS to Snowflake, use AWS S3 as an intermediary by storing the data in S3 and using Snowflake’s COPY INTO command to load the data from S3 into Snowflake tables.
3. How to query from AWS to Snowflake?
To query data from AWS to Snowflake, set up an external stage in Snowflake that points to your AWS S3 bucket, and then use SQL queries with the COPY INTO or EXTERNAL TABLE command to access the data.

Share it with your connections.
-
 Share To X
-
 Share To LinkedIn
-
 Share To Facebook
-
 Copy Link


