


 Quick Takeaway
For moving data from Azure SQL to Snowflake, you can either use Azure Blob Storage or a no-code platform like Hevo. Here’s a breakdown of both the methods:
- Using Azure Blob Storage involves exporting data to CSV, uploading it to Blob Storage, and using the COPY command in Snowflake. While the method is simple and cost-effective; it required more manual labour and is often error-prone.x
- Using Hevo automates the process of extraction, transformation, and loading (ETL) of data directly to Snowflake. This method is usually faster, real time and required no manual process.
Every organization can attribute its growth and success to data analysis. As volumes of data keep piling up daily, it is essential to capture and consolidate the data promptly for better analysis. Sometimes, it becomes necessary to migrate data from one database storage system to another to conduct in-depth analysis.
If you have large datasets stored in Azure SQL and wish to analyze your data comprehensively in a cloud data warehouse, Snowflake is a good option. This article will take you through two easy ways to migrate data from Azure SQL to Snowflake.
Table of Contents
A Brief Overview of Azure SQL
Azure SQL Database exists within the Microsoft Azure ecosystem as a fully managed platform as a service (PaaS) database engine. Operating on the latest stable version of the Microsoft SQL Server database engine, it provides you with a comprehensive set of features to store and analyze large datasets.
Azure SQL DB automates database management tasks like upgrades, patches, backups, and monitoring. You can utilize the platform’s advanced query processing functionalities and high-performance in-memory capabilities to streamline your data management needs. This feature allows you to turn your attention to other strategic tasks.
Check out our blogs on:
Tired of writing and maintaining complex ETL scripts to move data from Azure SQL to Snowflake? Hevo’s no-code platform automates the entire process, securely and at scale.
With Hevo:
✅ Connect Azure SQL and Snowflake in just a few clicks
✅ Enable near real-time replication with built-in CDC support
✅ Auto-handle schema mapping and data type conversions
Trusted by 2000+ data professionals at companies like Postman and Thoughtspot. Start your Azure SQL to Snowflake migration the easy way with Hevo today!
Get Started with Hevo for FreeSnowflake Overview
Snowflake is one of the leading data warehouse solutions; it leverages public cloud infrastructure across three platforms: Google Cloud Platform, Microsoft Azure, and AWS.
Known for its innovative architecture, Snowflake lets you scale resources according to your demands. The platform employs a dedicated SQL engine and uses a decoupled storage-compute model, where the storage layer is independent of the computational nodes. Through this model, you can store vast volumes of data in Snowflake, utilizing unparalleled elasticity and flexibility for structured and semi-structured data.
Methods to Load Data from Azure SQL to Snowflake
Let’s look into two easy methods that will help you move data from Azure SQL Server to Snowflake.
Method 1: Migrate Data from Azure SQL to Snowflake Using Hevo
Hevo is a real-time ELT data pipeline platform that provides you the flexibility to set up automated no-code data pipelines. You get integrations to over 150 data sources, allowing you to set up cost-effective data pipelines without writing a single line of code. Once you have configured your data source and destination on Hevo, you can transform and enrich your data to prepare it for in-depth analysis.
Benefits of Using Hevo
- Data Transformation: Hevo provides you with powerful Python-based as well as drag-and-drop transformations to clean, standardize, and prepare your data before moving it to your chosen destination.
- Incremental Data Load: The platform allows you to transfer modified data from the source to the destination in real time.
- Auto Schema Mapping: Hevo automatically detects the format of incoming data and replicates the same schema in your destination. Adopting schema mapping best practices for Azure SQL to Snowflake migration gives you more time to analyze the data during critical and time-sensitive assignments.
Steps to Set up a Data Pipeline in Hevo to Move Data from Azure SQL to Snowflake
Are you wondering, “How can I ETL my data from Azure SQL Database to Snowflake in Hevo?” Look into the detailed steps below.
1. Set Azure SQL as Your Source
Take a look at the four steps to set Azure SQL as the source of your data pipeline in Hevo.
Prerequisites
Before setting up Azure SQL as the source of your data pipeline, you must ensure that you meet the following prerequisites:
- The MS SQL Server version must be 2008 or higher.
- To create your data pipeline in Hevo, you must have the Team Administrator, Pipeline Administrator, or Team Collaborator role.
Step 1: Whitelist the Hevo IP Addresses for Your Region
Whitelisting Hevo’s IP addresses for your region enables the platform to connect with your Azure SQL database. Follow the steps below:
- Open your Azure MS SQL instance. Under the Resources tab, select the database you wish to synchronize with Hevo.
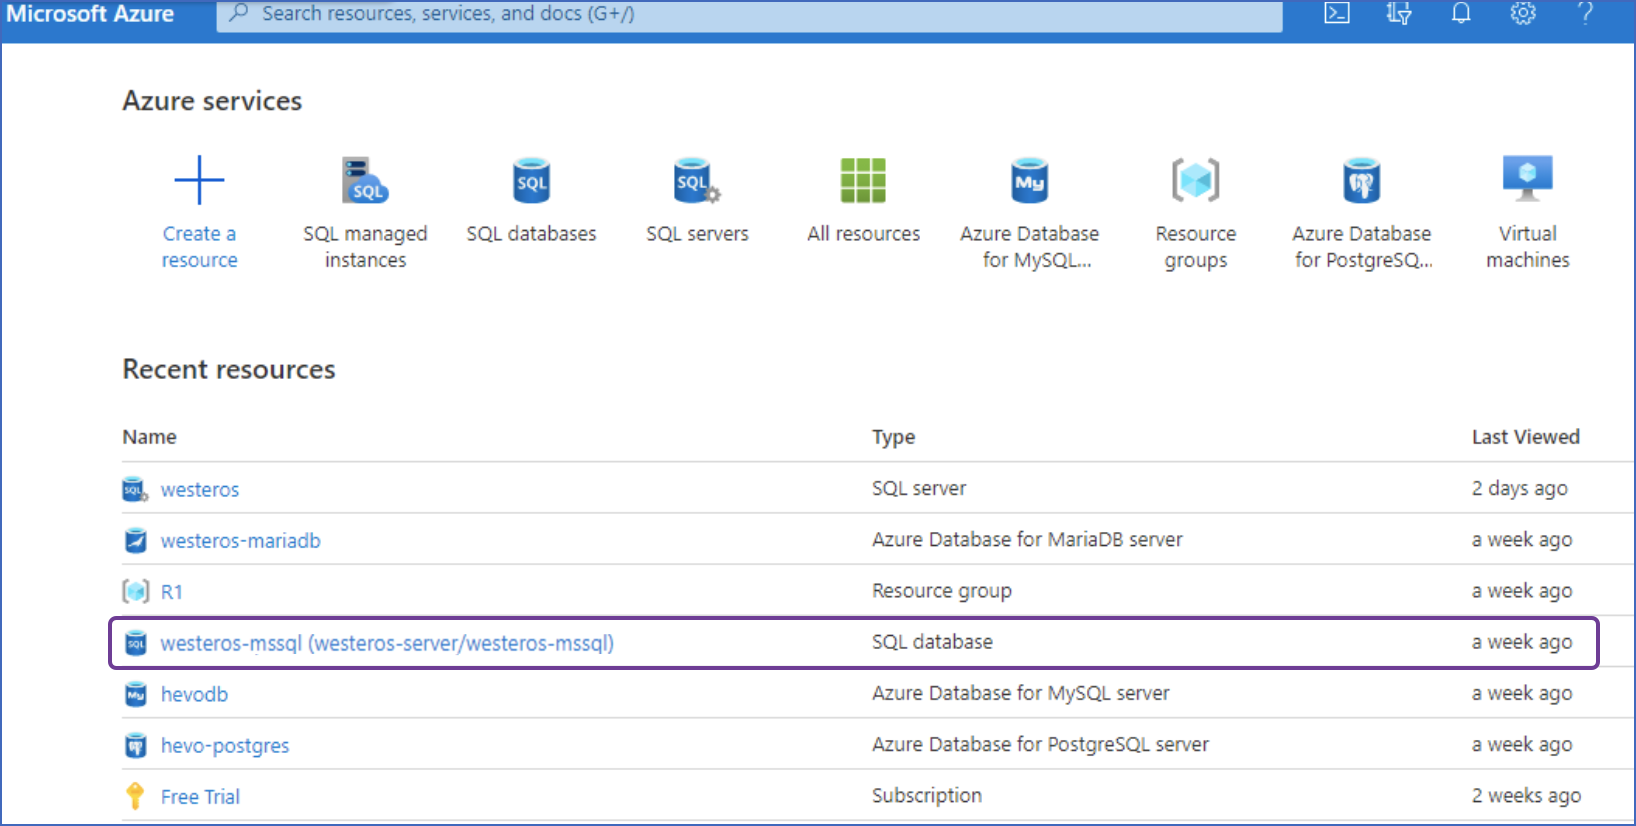
- Navigate to the right pane and select the Set server firewall tab to open Firewall settings.
- To create a firewall rule, you must specify a Rule name. You must also add the same Hevo IP addresses in the Start IP and End IP fields, depending on your region.
- Click on the Save button. Ensure you repeat this step when adding IP addresses for each applicable Hevo region.
Step 2: Enable Change Tracking Mechanisms
You must have the ALTER DATABASE privilege to operate the Change Tracking mechanism. Connect your Azure SQL Database to the client SQL Client tool and enter the commands to enable change tracking:
- At the database level:
ALTER DATABASE [<database>]
SET CHANGE_TRACKING = ON;
- For each table you wish to integrate:
ALTER TABLE [<schema>].[<table>]
ENABLE CHANGE_TRACKING;
Step 3: Create and Grant Privileges to a Database User
To create a database user, you must open your Azure MS SQL database in your client SQL Client tool. Enter the following command:
USE [<database>]; # <database> is the database name
CREATE USER hevo WITH PASSWORD = '<password>';
You must assign global privileges to the database user specified above in the Hevo Pipeline.
- To grant SELECT privilege at the table and schema level, use:
GRANT SELECT ON <schema_name>.<table_name> TO <username>;- To grant VIEW CHANGE TRACKING privilege, if you have set your Pipeline Mode to Change Tracking or Table and Query mode to Change Tracking:
GRANT VIEW CHANGE TRACKING ON <schema_name>.<table_name> TO <username>;Step 4: Configure Your Azure SQL Server Source Page
You must fill in all the mandatory fields in the Azure SQL Server Source page.
Add a unique name for your pipeline. For the Database Host field, remember to remove the http:// or https:// part if you have a URL-based hostname. For instance, if your hostname URL is https://mssql.database.windows.net, you should only enter mssql.database.windows.net in the field. It is important to note that the Database Port field, where your SQL Server checks for connections, has a default value 1433.
After choosing an option from the Select an Ingestion Mode menu, you must specify Object and Query Mode Settings to better configure your pipeline.
Towards the end, you will find the Connect Through SSH option. Enabling this option makes it easier for you to connect to Hevo via an SSH tunnel. This feature provides your database with an additional layer of security as you do not have to expose your SQL Server setup to the public.
Enabling the Include New Tables in the Pipeline option under Advanced Settings allows Hevo to automatically ingest data from the created tables after the Pipeline has been built. You can revisit and update this setting later.
Finally, click on TEST CONNECTION and then proceed to select TEST & CONTINUE.
2. Set Snowflake as Your Destination
Follow the three steps below to set Snowflake as the destination in your Hevo data pipeline.
Prerequisites
Before setting up Snowflake as the destination of your data pipeline, you must ensure that you meet the following prerequisites:
- You must have an active Snowflake account.
- To create a new role for Hevo, you must already have an ACCOUNTADMIN or SECURITYADMIN role in Snowflake. If you are looking to create a warehouse in Snowflake, you must already have an ACCOUNTADMIN or SYSADMIN role.
- You must assign USAGE permissions to the data warehouse and USAGE and CREATE SCHEMA permissions to databases to Hevo.
- You must assign Hevo the following permissions for all current and future schemas: USAGE, MONITOR, CREATE TABLE, CREATE EXTERNAL TABLE, and MODIFY.
- You must have the Team Collaborator or any other administrator role in Hevo, except Billing Administrator.
Step 1: Configure Your Snowflake Warehouse
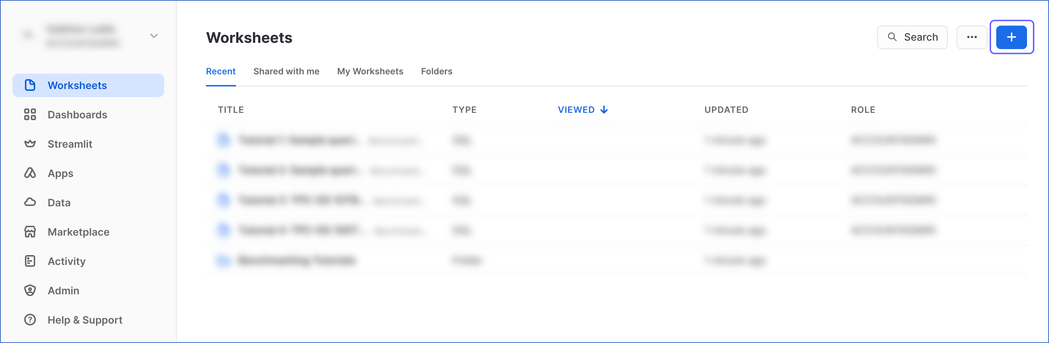
- Log in to your Snowflake account. Navigate to the top-right corner of your Worksheets tab and create a new worksheet by clicking the + icon.
- Hevo has a ready-to-use script that helps you configure the Snowflake warehouse as your data pipeline’s destination. You can directly paste the script below but remember to replace the sample values in lines 2-7 with your own values to create your warehouse.
-- create variables for user / password / role / warehouse / database (needs to be uppercase for objects)
set role_name = 'HEVO'; -- Replace "HEVO" with your role name
set user_name = 'HARRY_POTTER'; -- Replace "HARRY_POTTER" with your username
set user_password = 'Gryffindor'; -- Replace "Gryffindor" with the user password
set warehouse_name = 'HOGWARTS'; -- Replace "HOGWARTS" with the name of your warehouse
set database_name = 'RON'; -- Replace "RON" with the name of your database
set schemaName = 'DARK_ARTS'; -- Replace "DARK_ARTS" with the database schema name

set db_schema = concat($database_name, '.', $schemaName);

begin;

-- change role to securityadmin for user / role steps
use role securityadmin;

-- create role for HEVO
create
role if not exists identifier($role_name);
grant role identifier($role_name) to role SYSADMIN;

-- create a user for HEVO
create user if not exists identifier($user_name)
password = $user_password
default_role = $role_name
default_warehouse = $warehouse_name;

-- Grant access to the user
grant role identifier($role_name) to user identifier($user_name);

-- change role to sysadmin for warehouse / database steps
use role sysadmin;

-- create a warehouse for HEVO, if it does not exist
create
warehouse if not exists identifier($warehouse_name)
warehouse_size = xsmall
warehouse_type = standard
auto_suspend = 60
auto_resume = true
initially_suspended = true;

-- create database for HEVO
create database if not exists identifier($database_name);

-- grant HEVO role access to warehouse
grant USAGE
on warehouse identifier($warehouse_name)
to role identifier($role_name);

-- grant HEVO access to current schemas
use role accountadmin;
grant CREATE SCHEMA, MONITOR, USAGE, MODIFY
on database identifier($database_name)
to role identifier($role_name);

-- grant Hevo access to future schemas
use role accountadmin;
grant SELECT on future tables in database identifier($database_name) to role identifier($role_name);
grant MONITOR, USAGE, MODIFY on future schemas in database identifier($database_name) to role identifier($role_name);

use role accountadmin;
CREATE SCHEMA IF not exists identifier($db_schema);
GRANT USAGE, MONITOR, CREATE TABLE, CREATE EXTERNAL TABLE, MODIFY ON SCHEMA identifier($db_schema) TO ROLE identifier($role_name);

commit;
Add the values for role_name, user_name, warehouse_name, database_name, and schemaName in uppercase.
- Mac users can press CMD + A inside the worksheet area to select the entire script and then press CMD + return to run the script. Windows users can perform the same functions by pressing Ctrl + A and Ctrl + Enter, respectively.
- Once the successful script run is successful, use the credentials in lines 2-7 to establish a Snowflake warehouse-Hevo connection.
Step 2: Obtain Your Snowflake Account’s URL
- Log in to your Snowflake instance and click on the Admin tab.
- Click on the Accounts tab under Admin.
- To copy your account URL, keep your cursor on the Locator field and click on the link icon.
Step 3: Configure Snowflake as Your Data Pipeline’s Destination
- In the Hevo dashboard, click on the DESTINATIONS tab in the Navigation Bar.
- Click on +CREATE in the Destinations List View.
- Select Snowflake as your destination on the Add Destination page.
- A new page named Configure your Snowflake Warehouse will open. Ensure you fill out all the mandatory fields correctly.
You must enable both options under the Advanced Settings field. When you enable the first option, you append the __hevo_loaded_at column within the Destination table. The feature indicates the exact time when the changes in the dataset get loaded to Snowflake. The latter option, Create Transient Tables, can be understood as a fail-safe feature. With transient tables, Snowflake can recover data from a permanent table for up to seven days if you lose it.
At the end of the page, click on TEST CONNECTION, followed by SAVE & CONTINUE.
With these extremely simple and quick steps, you can create a data pipeline between Azure SQL and Snowflake using Hevo.
Method 2: Migrate Data from Azure SQL to Snowflake Using Azure Blob Storage
Snowflake currently supports incoming data from Azure Blob storage. So, if you have an Azure SQL Server database, you must first move it into Azure Blob storage. This internal migration can be achieved using Azure PowerShell or Azure Data Factory. Here, we will be using Azure Powershell to move Azure SQL data into Azure Blob Storage.
Azure PowerShell creates a data-factory pipeline that copies data from an SQL Server database to Azure Blob storage. You must also create and use a self-hosted integration runtime to move data between on-premises and cloud data stores.
Move Data from Azure SQL Server Database to Azure Blob Storage
The prerequisites for this method are:
- You must have an active Azure subscription.
- You must be assigned to an Owner or Contributor role or be an administrator in Azure to create data factory instances.
Step 1: Get the Name and Key of Your Azure Storage Account
- Sign in to the Azure portal. From the left pane, click on the More services tab.
- In the search bar, type the keyword Storage. You will see a few options related to storage come up. Choose Storage accounts.
- Select Access Keys in the storage account window and copy the values from the Storage account name and key1 boxes.
Step 2: Create a Blob Container in Your Azure Blob Storage
- In the storage account window, click the Overview tab and select Blobs.
- Select Containers from the Blob service window.
- A new window, New container, opens up. In the Name box, enter adftutorial and select OK.
Step 3: Log in to Azure PowerShell to Create a Data Factory
- Install and configure PowerShell. Once you log in, create an Azure resource group and define a variable and location for the data factory.
Step 4: Create a Self-Hosted Integration Runtime
The self-hosted integration runtime helps you copy and move datasets from the SQL Server database to Azure Blob Storage.
- Create a variable with a unique name for your integration runtime.
- Retrieve the authentication keys to register the self-hosted integration runtime with the data factory you created.
- Download the Azure Data Factory Integration Runtime and run the installation.
- Paste the authentication key in the Register Integration Runtime (Self-hosted) window and select Register.
- Select Finish at the end to connect your self-hosted integration runtime node with the data factory cloud service.
Step 5: Move Your Data into Azure Blob Storage
- Connect your SQL Server instance to the data factory service.
- Define the dataset in your SQL Server database instance as the source.
- Define the dataset from the Azure Storage linked service to be copied into Azure Blob Storage.
- Create a SQLServerToBlobPipeline with a copy activity that syncs your data from SQL Server to Azure Blob.
- Monitor the SQLServerToBlobPipeline in PowerShell.
- You can verify the output by checking the adftutorial container window and selecting Refresh in your Azure portal.
Step 6: Load Data Into Snowflake
Snowflake assumes that your data files are staged in an Azure container. You have to use the COPY INTO <table name> command to load the contents of the staged files directly into a Snowflake database table.
Limitations of Using Azure Blob Storage
- Data Size Limits: There are size limits for a single Azure Blob in Azure blob Storage. If your incoming data from Azure SQL exceeds that limit, you will have to process it in batches. Eventually, it will lead to delay in migrating the entire dataset in Snowflake.
- PowerShell Regions: While using Azure PowerShell to move data from Azure SQL to Azure Blob Storage, you must know that the PowerShell 7.2 runtime version is not supported in a few public regions. These include Central India, UAE Central, Israel Central, Italy North, Germany North and Gov clouds.
- Several Touchpoints: Since Snowflake can load data only from Azure Blob Storage, you will need to use Azure Data Factory or Azure Powershell. You must have an active Azure ecosystem account, specific roles and permissions to configure and move the data from Azure SQL. The process is also time-consuming and will require SQL coding expertise.
Use Cases of Migrating Data from Azure SQL DB to Snowflake
- With Snowflake, you can run queries and get insights from semi-structured data formats like JSON, XML, Avro, and Parquet. It contrasts with Azure SQL, where you can only find support for JSON files. You can process the other data formats in Azure Synapse Analytics.
- Snowflake offers separate pricing for its storage and compute layers. If you want to store large datasets without breaking the bank, Snowflake is a great choice.
- By implementing change data capture (CDC) for ongoing Azure SQL to Snowflake data synchronization, your datasets can stay up-to-date and ready for analysis at any time. Snowflake’s CDC feature tracks and ingests modifications made to the source dataset, allowing you access to an accurate data repository in near real-time.
- If you want to recover or restore data from an older version of your table, you can easily do so with Snowflake’s time travel feature. It isn’t easy to carry out the same task in Azure SQL DB, which only allows restoring a deleted database.
See how connecting Azure PostgreSQL to Snowflake can improve your data management. Explore our guide for straightforward instructions on the migration.

Learn More About:
- Azure Synapse vs Snowflake
- Azure Blob storage to Snowflake Integration
- Guide to Azure Data Factory Snowflake Integration
- Snowflake Snowpipe Azure integration
Final Takeaways
In this article, you learned two effective ways to migrate data from Azure SQL to Snowflake. The custom method has more steps, making it time-consuming and cumbersome to implement. With Hevo, you can set up a data pipeline between Azure SQL and Snowflake in less time and without any coding expertise. Ultimately, you must thoroughly assess your business requirements before deciding to migrate large datasets.
Find out how moving data from Azure MySQL to Snowflake can boost your data operations. Our resource provides simple steps for efficient data migration and integration.
Frequently Asked Questions (FAQs)
What ETL tools can I use to move and transform data from Azure SQL to Snowflake?
You can use Hevo to establish a data pipeline between Azure SQL and Snowflake. Hevo also allows you to conduct transformations on your dataset before moving it into Snowflake. Once your dataset is loaded in Snowflake, you can use the platform’s features to further transform your data.
How can I bring datasets from my on-premise Azure SQL Server Database into Snowflake?
You can move your on-premise data into Azure Blob Storage in the cloud, either through Azure Data Factory or Azure PowerShell. Once your data is in Azure Blob Storage, use Snowflake’s COPY INTO command to migrate the datasets. Alternatively, you can set up a data pipeline with Hevo to load the data swiftly into Snowflake.

Share it with your connections.
-
 Share To X
-
 Share To LinkedIn
-
 Share To Facebook
-
 Copy Link


