


Easily move your data from Confluent Cloud To Snowflake to enhance your analytics capabilities. With Hevo’s intuitive pipeline setup, data flows in real-time. Check out our 1-minute demo below to see the seamless integration in action!
Tired of juggling complex setups just to migrate Kafka data into Snowflake? You’re not alone. Moving real-time data efficiently from Confluent Cloud to Snowflake seamlessly can seem challenging, especially if you’re trying to avoid code-heavy processes or unreliable pipelines.
In this blog, I’ll walk you through two straightforward ways to connect Confluent Cloud to Snowflake: one with Hevo’s no-code solution and another using custom code for more control. Whether you’re short on time or need flexibility, you’ll find a method that works for your setup and helps you get your data where it needs to be fast.
Table of Contents
Why Connect Confluent Cloud to Snowflake?
- Customers can ingest real-time data with event streaming, transform it, process it, and analyze it in an intuitive data platform for the cloud with Confluent Cloud to Snowflake.
- To unleash developer productivity, operate effectively at scale, and satisfy all of your architectural requirements before going into production, Confluent offers a truly cloud-native experience. It does this by completing Kafka with a comprehensive set of enterprise-grade features. With the help of Confluent Cloud to Snowflake Cloud Data Platform, businesses of all sizes can now access the full potential of their data.
- By obtaining insights from all of their business users’ data, thousands of companies use Snowflake to advance their businesses beyond what was previously possible.
- Organizations are given a single, integrated platform by Snowflake that includes a data warehouse designed for the cloud, instant, secure, and governed access to their entire network of data, and a core architecture to enable a variety of data workloads, including a single platform for creating contemporary data applications.
- In addition to producing a modern and straightforward architecture, this integration of Confluent Cloud with Snowflake drastically lowers infrastructure management and cost.
Method 1: Using Hevo to Set Up Confluent Cloud to Snowflake
Step 1: Configure Confluent Cloud as your Source
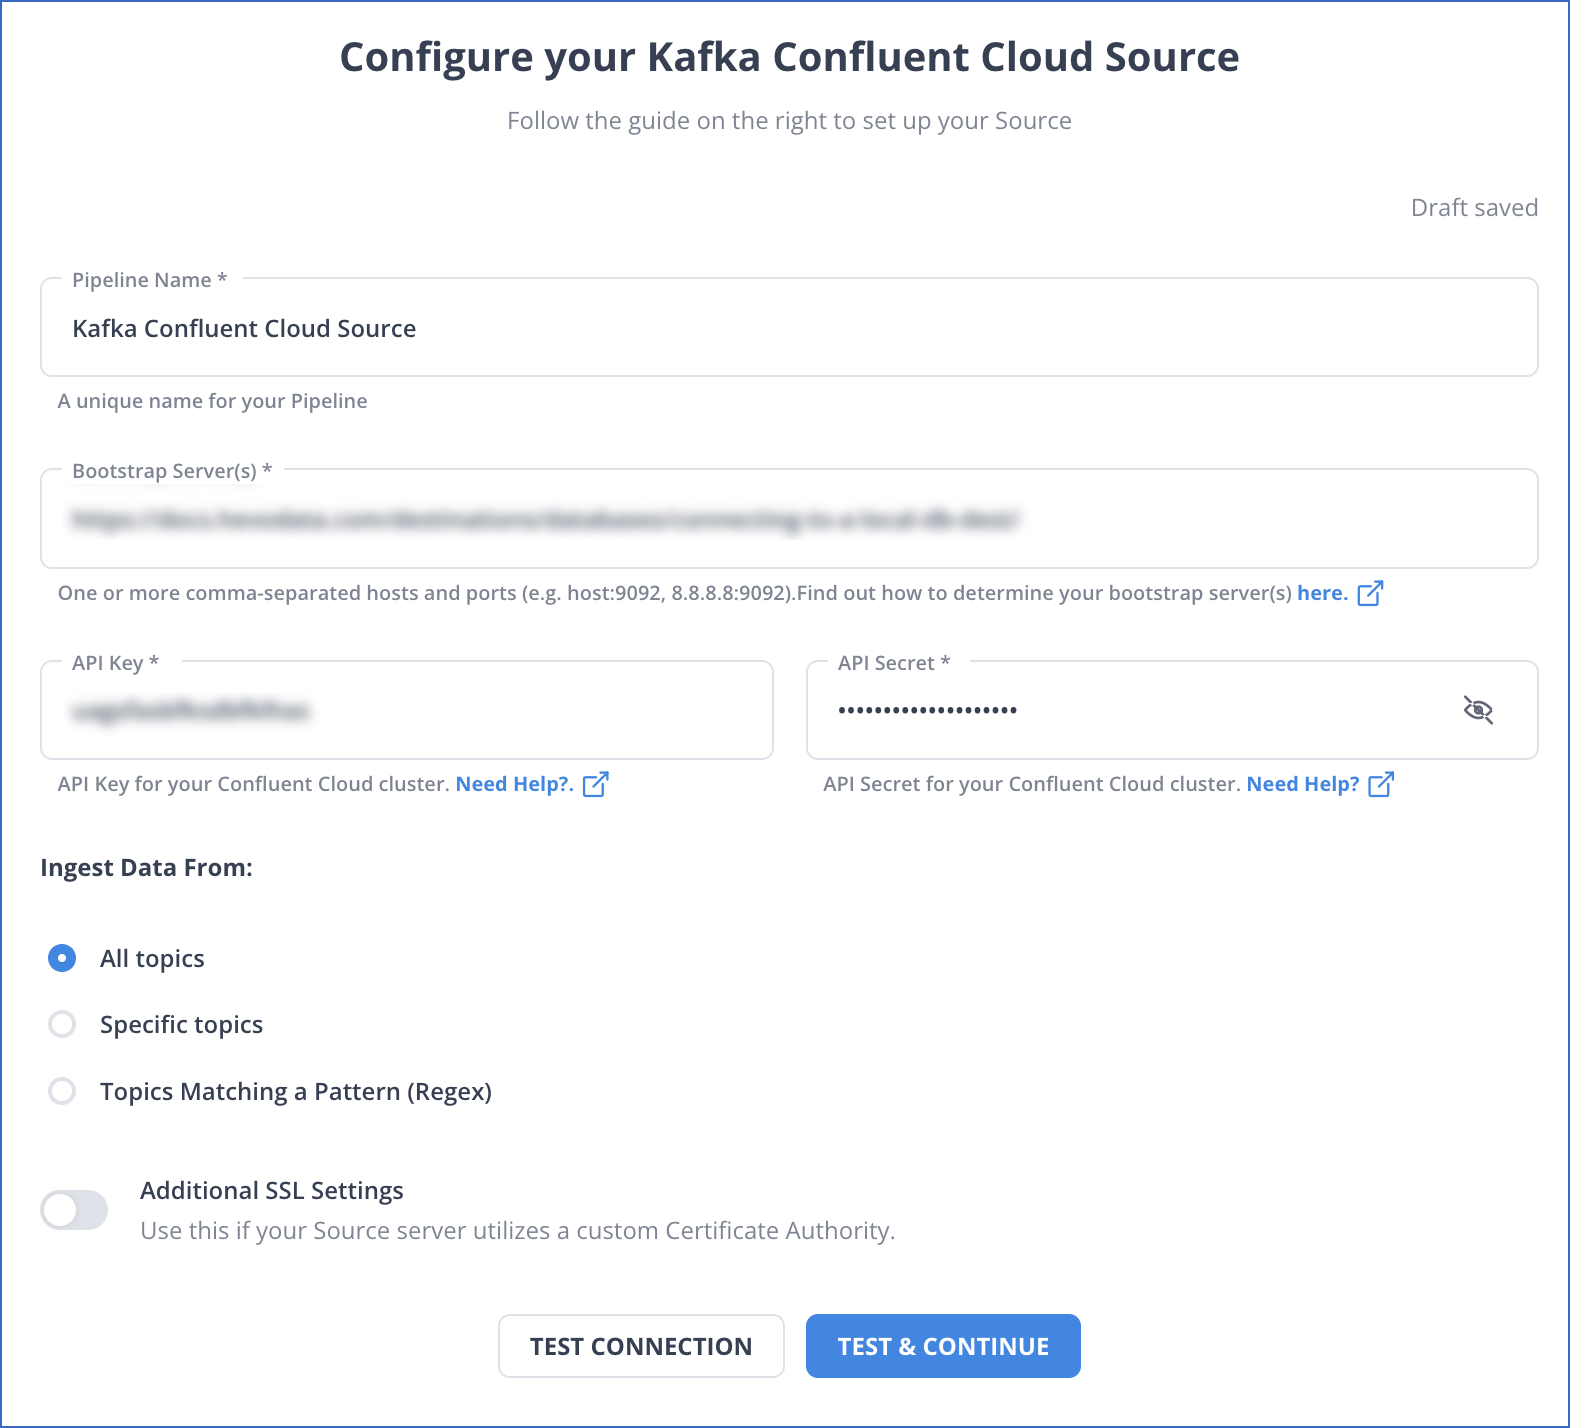
Step 2: Set up Snowflake as your destination in Hevo

Hevo will now move your data from Confluent Cloud to Snowflake in a consistent, secure, and reliable fashion.
Looking for the best ETL tools to connect your Snowflake account? Rest assured, Hevo’s no-code platform seamlessly integrates with Snowflake, streamlining your ETL process. Try Hevo and equip your team to:
- Integrate data from 150+ sources (60+ free sources).
- Get round-the-clock support, live monitoring, and instant notifications about your data transfers.
- Use a drag-and-drop transformation feature — a user-friendly way to perform simple data transformations.
Choose Hevo and see why Deliverr says- “The combination of Hevo and Snowflake has worked best for us. ”
Get started for Free with Hevo!Method 2: Using Custom Code to Move Data from Confluent Cloud to Snowflake
Prerequisites
- Kafka cluster credentials.
- Authorized access to a Confluent Cloud Cluster on Amazon Web Services, Microsoft Azure, or Google Cloud Platform.
- Installed Confluent CLI.
- Schema Registry should be enabled to use the schema registry-based format.
- The Snowflake account and key pair for connector authentication.
- The user created needs to be granted privileges in Snowflake to modify the database schema.
- Check the Networking and DNS Considerations for networking considerations.
Follow the steps below to connect Confluent Cloud to Snowflake.
Step 1: Generate the Snowflake Key Pair
Before the connector can connect Confluent Cloud to Snowflake, you must generate a key pair. Snowflake authentication needs 2048-RSA. Add the public key to the Snowflake user account and the private key to the connector configuration.

- Create the Key Pair
Complete the steps below to generate the key pair.
- Generate the private key using the command below.
openssl genrsa -out snowflake_key.pem 2048- Generate the public key.
openssl rsa -in snowflake_key.pem -pubout -out snowflake_key.pub- View the list of the generated Snowflake key files using the command below
ls -l snowflake_key*Output:
-rw-r--r--  1  1679 Jun  8 17:04 snowflake_key.pem
-rw-r--r-- 1 451 Jun 8 17:05 snowflake_key.pub- You can view the public key file by running the command below.
cat snowflake_key.pubOutput:
-----BEGIN PUBLIC KEY-----
MIIBIjANBgkqhkiG9w0BAQEFAAOCAQ8AMIIBCgKCAQEA2zIuUb62JmrUAMoME+SX
vsz9KUCp/cC+Y+kTGfYB3jRDQ06O0UT+yUKMO/KWuc0dUxZ8s9koW5l/n+TBfxIQ

... omitted

1tD+Ktd/CTXPoVEI2tgCC9Avf/6/9HU3IpV0gL8SZ8U0N5ot4Uw+CSYB3JjMagEG
bBWZ8Qc26pFk7Fd17+ykH6rEdLeQ9OElc0ZruVwSsa4AxaZOT+rqCCP7FQPzKTtA
JQIDAQAB
-----END PUBLIC KEY------ Copy the key and add it to the new user in the Snowflake account. Copy the part between –BEGIN PUBLIC KEY– and –END PUBLIC KEY– using the below command.
grep -v "BEGIN PUBLIC" snowflake_key.pub | grep -v "END PUBLIC"|tr -d '\r\n'- Create the User and Add the Public Key
Open your Snowflake project and follow the steps below to create a user account and a public key.
- Go to the Worksheets panel and then switch to the SECURITYADMIN role.
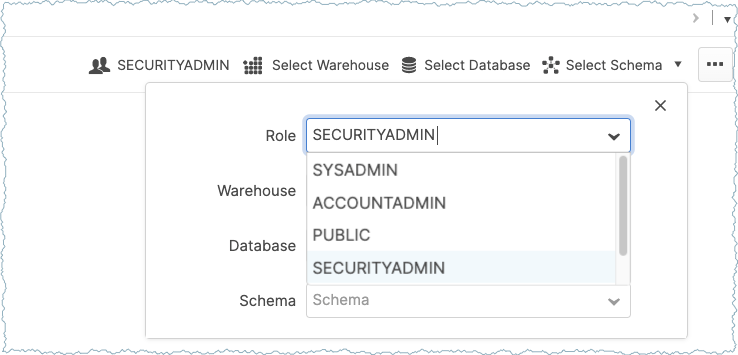
- Run the below query in Worksheets to create a user and add the public key copied earlier.
CREATE USER confluent RSA_PUBLIC_KEY='<public-key>';- Ensure to add the public key as a single line in the statement. The image below shows how the Snowflake Worksheets should look.

- Follow the steps below to set the correct privileges for the user you have added.
- For example, you can send Apache Kafka records to a PRODUCTION database using the schema PUBLIC. The code below shows the required queries for configuring the necessary user privileges.
// Use a role that can create and manage roles and privileges:
use role securityadmin;

// Create a Snowflake role with the privileges to work with the connector
create role kafka_connector_role;

// Grant privileges on the database:
grant usage on database PRODUCTION to role kafka_connector_role;

// Grant privileges on the schema:
grant usage on schema PRODUCTION.PUBLIC to role kafka_connector_role;
grant create table on schema PRODUCTION.PUBLIC to role kafka_connector_role;
grant create stage on schema PRODUCTION.PUBLIC to role kafka_connector_role;
grant create pipe on schema PRODUCTION.PUBLIC to role kafka_connector_role;

// Grant the custom role to an existing user:
grant role kafka_connector_role to user confluent;

// Make the new role the default role:
alter user confluent set default_role=kafka_connector_role;- Add the private key to your Snowflake configuration. Extract the key and move it to a safe place until you set up the connector.
- Get the list of generated Snowflake key files with the below command.
ls -l snowflake_key*

-rw-r--r--  1  1679 Jun  8 17:04 snowflake_key.pem
-rw-r--r-- 1 451 Jun 8 17:05 snowflake_key.pub- View the private key file using the command below.
cat snowflake_key.pemOutput:
-----BEGIN RSA PRIVATE KEY-----
MIIEpQIBAAKCAQEA2zIuUb62JmrUAMoME+SXvsz9KUCp/cC+Y+kTGfYB3jRDQ06O
0UT+yUKMO/KWuc0dUxZ8s9koW5l/n+TBfxIQx+24C2+l9t3TxxaLdf/YCgQwKNR9
dO9/c+SkX8NfcwUynGEo3wpmdb4hp0X9TfWKX9vG//zK2tndmMUrFY5OcGSSVJYJ
Wv3gk04sVxhINo5knpgZoUVztxcRLm/vNvIX1tD+Ktd/CTXPoVEI2tgCC9Avf/6/
9HU3IpV0gL8SZ8U0N5ot4Uw+CSYB3JjMagEGbBWZ8Qc26pFk7Fd17+ykH6rEdLeQ

... omitted

UfrYj7+p03yVflrsB+nyuPETnRJx41b01GrwJk+75v5EIg8U71PQDWfy1qOrUk/d
9u25iaVRzi6DFM0ppE76Lh72SKy+m0iEZIXWbV9q6vf46Oz1PrtffAzyi4pyJbe/
ypQ53f0CgYEA7rE6Dh0tG7EnYfFYrnHLXFC2aVtnkfCMIZX/VIZPX82VGB1mV43G
qTDQ/ax1tit6RHDBk7VU4Xn545Tgj1z6agYPvHtkhxYTq50xVBXr/xwlMnzUZ9s3
VjGpMYQANm2seleV6/si54mT4TkUyB7jMgWdFsewtwF60quvxmiA9RU=
-----END RSA PRIVATE KEY------ Copy the key and add it to the connector configuration. Copy only the part of the key between –BEGIN RSA PRIVATE KEY– and –END RSA PRIVATE KEY–.Use the below command to do it.
grep -v "BEGIN RSA PRIVATE KEY" snowflake_key.pem | grep -v "END RSA PRIVATE KEY"|tr -d '\r\n’Step 2: Using the Confluent Cloud Console
- Launch your Confluent Cloud Cluster by checking the Quick Start for Confluent Cloud for installation.
- In the left navigation menu, click on Data Integration and Connectors. If you already have connectors in your cluster, click on Add connector.
- Select your connector by clicking on the Snowflake Sink Connector Card.

- If you have populated Kafka topics, select the topics you want to connect from the topics list. Or create a new topic by clicking on the Add new topic.
- After the connector runs, verify that the messages are loaded into the Snowflake database table.
Step 3: Using the Confluent Command Line Interface
Follow the steps below to use the Snowflake Sink connector with Confluent Command Line Interface (CLI) to Confluent Cloud to Snowflake. It is assumed that you have installed Confluent CLI version 2.
- Enter the below command to list the available connectors.
confluent connect plugin list- Use the below command to specify the required connector configuration properties.
confluent connect plugin describe <connector-catalog-name>For example,
confluent connect plugin describe SnowflakeSinkOutput:
Following are the required configs:
connector.class: SnowflakeSink
name
kafka.auth.mode
kafka.api.key
kafka.api.secret
input.data.format
snowflake.url.name
snowflake.user.name
snowflake.private.key
snowflake.schema.name
tasks.max
topics- Create the JSON connector configuration file that contains configuration properties. The following example shows the required configuration properties.
{
  "connector.class": "SnowflakeSink",
  "name": "<connector-name>",
  "kafka.auth.mode": "KAFKA_API_KEY",
  "kafka.api.key": "<my-kafka-api-key>",
  "kafka.api.secret": "<my-kafka-api-secret>",
  "topics": "<topic1>, <topic2>",
  "input.data.format": "JSON",
  "snowflake.url.name": "https://wm83168.us-central1.gcp.snowflakecomputing.com:443",
  "snowflake.user.name": "<login-username>",
  "snowflake.private.key": "<private-key>",
  "snowflake.database.name": "<database-name>",
  "snowflake.schema.name": "<schema-name>",
  "tasks.max": "1"
}- Use the below command to load the configuration and start the connector.
confluent connect create --config <file-name>.jsonFor example,
confluent connect create --config snowflake-sink.jsonOutput:
Created connector confluent-snowflake lcc-ix4dl- Check the connector status using the command below.
confluent connect listOutput:
confluent iam service-account list

   Id     | Resource ID |       Name        |    Description
+---------+-------------+-------------------+-------------------
   123456 | sa-l1r23m   | sa-1              | Service account 1
789101 | sa-l4d56p | sa-2 | Service account 2- After executing the connector, check that the records are populated in your Snowflake database.
Conclusion
This article talks about connecting Confluent Cloud to Snowflake. Confluent Cloud assists businesses in streaming real-time data and uses the functionalities of Apache Kafka. Businesses can integrate the real-time data into a centralized repository like Snowflake for further analysis.
Hevo offers a No-code Data Pipeline that can automate your data transfer process, hence allowing you to focus on other aspects of your business like Analytics, Marketing, Customer Management, etc.
This platform allows you to transfer data from 150+ sources (including 40+ Free Sources), such as Confluent Cloud, and Cloud-based Data Warehouses like Snowflake, Google BigQuery, etc. It will provide you with a hassle-free experience and make your work life much easier.
Sign up for a 14-day free trial and simplify your data integration process. Check out the pricing details to understand which plan fulfills all your business needs.
Frequently Asked Questions
1. Can we connect Kafka to Snowflake?
Yes, Kafka can be connected to Snowflake using various methods to stream and process data.
2. Can Kafka for Snowflake subscribe to only one topic?
Kafka for Snowflake, specifically using tools like the Snowflake Kafka Connector, can indeed subscribe to multiple topics.
3. Which connection methods can be used to connect to Snowflake?
a) Snowflake Kafka Connector
b) StreamSets Data Collector
c) Apache NiFi

Share it with your connections.
-
 Share To X
-
 Share To LinkedIn
-
 Share To Facebook
-
 Copy Link


