Unlock the full potential of your Outbrain data by integrating it seamlessly with Snowflake. With Hevo’s automated pipeline, get data flowing effortlessly—watch our 1-minute demo below to see it in action!
Outbrain is the top native advertising platform in the world; it naturally improves and personalizes the reading experience.
Snowflake’s Data Cloud is built as Software-as-a-Service (SaaS) that is faster, easier to use, and more flexible than traditional options in data storage, processing, and analytical solutions.
This article discusses different methods for connecting Outbrain to Snowflake extensively and briefly describes Outbrain and Snowflake.
Table of Contents
What is Outbrain?
Outbrain is the leading discovery platform that connects interests with behaviors through data-driven native advertising. Publishers can monetize their content through ads in specific locations on their sites. At the same time, advertisers pay for placements to generate impressions, clicks, or video views, driving sales, brand awareness, and lead generation.
Key Features of Outbrain
- Video view and recommendation using Outbrain’s APIs.
- Conversion and testing capabilities with goal-specific campaigns.
- Outbrain VR rides on the best editorial judgment and the algorithm-driven recommendation of better content programming.
- Outbrain’s Amplify service drives the traffic to blogs, articles, and videos utilizing the pay-per-click platform.
- Discovery Modules give business insights into trending content custom-tailored to business needs.
What is Snowflake?

Snowflake is a fully managed Software-as-a-Service (SaaS) platform that integrates data warehouses, data lakes, data application development, and secure data sharing as one solution. Snowflake presents its own SQL query engine and cloud architecture. It combines shared-disk and shared-nothing architectures, centralizing all data in a repository for fast results.
Key Features of Snowflake
Here are some of the features of Snowflake:
- It allows data streams in real-time, thus enhancing analytics speed and quality.
- Embracing caching to provide improved query results without reprocessing unchanged data.
- It breaks data silos to give enterprise-wide insight and ensure better decision-making.
- Enhance analysis of customer behavior, data science innovation, and product offerings.
Why Integrate Outbrain to Snowflake?
The most challenging issue is that marketers relying on platforms like Outbrain risk wasting money on ineffective advertising, leading to low ROIs. Low-targeted audience targeting, which mainly results from disregarding what customers say, often results in ineffective ads.
Ads should be more targeted by showing them to users who may have been searching for products or adding items to their carts.
The data collection across the sources needs to be effective. Since this data cannot be natively pushed to Outbrain, adopting a data warehouse like Snowflake will support smoother data flow and improved ad performance.
Method 1: Using Hevo to Set Up Outbrain to Snowflake
Hevo is a fully managed ETL platform that completely automates the process of not only loading data from Outbrain but also enriching the data and transforming it into an analysis-ready form without having to write a single line of code.
Method 2: Using Custom Code to Move Data from Outbrain to Snowflake
This method of moving data from Outbrain to Snowflake. would be time-consuming and tedious to implement. Users will have to write custom codes to enable Outbrain to Snowflake migration.
Get Started with Hevo for FreeMethod 1: Using Hevo to Set Up Outbrain to Snowflake
Using Hevo, Outbrain to Snowflake Migration can be done in the following two steps:
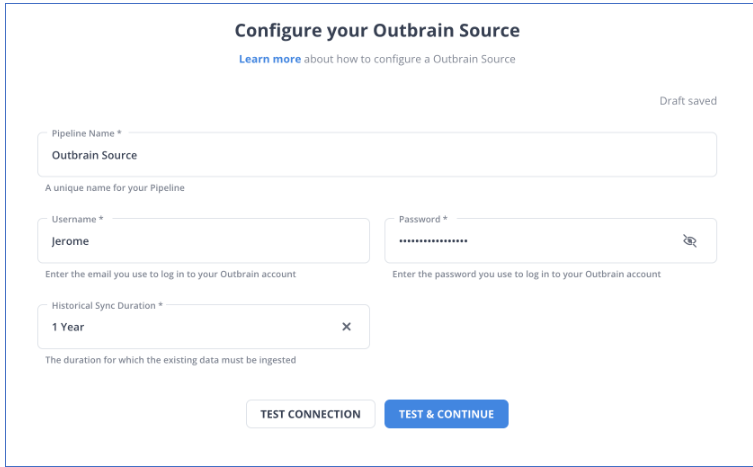
- Step 1: Configure Outbrain as the Source in your Pipeline by following the steps below:
- Step 1.1: Enter the information to configure your outbrain as a source according to the image below
- Step 1.2: Click on TEST & CONTINUE to configure your source successfully.

- Step 2: To set up Snowflake as a destination in Hevo, follow these steps:
- Step 2.1: Select Snowflake from the Add Destination page and set the parameters on Configure your Snowflake Destination page according to the image.
- Step 2.2: Click Test Connection to test connectivity with the Snowflake warehouse.
- Step 2.3: Once the test is successful, click SAVE DESTINATION.
Here are more reasons to try Hevo:
- Smooth Schema Management: Hevo automatically detects and maps the schema of incoming data in the desired Data Warehouse.
- Exceptional Data Transformations: Best-in-class & Native Support for Complex Data Transformation at fingertips.
- Quick Setup: Hevo, with its automated features and strong integration with 150+ Data Sources (including 60+ Free Sources), can be set up in minimal time.
- Built To Scale: As the number of sources and the volume of your data grows, Hevo scales horizontally, handling millions of records per minute with very little latency.
- Live Support: The Hevo team is available round the clock to extend exceptional support to its customers through chat, email, and support calls.
Method 2: Using Custom Code to Move Data from Outbrain to Snowflake
STEP 1: Outbrain to Redshift
- STEP 1.1: To integrate Outbrain to Redshift ingest first the data by Outbrain’s RESTful Amplify API; this ingestion returns JSON against marketers, campaigns, and performance.
- STEP 1.2: Defining tables in Redshift using the ‘
CREATE TABLE’ statement, one can insert the data with the ‘INSERT’ and ‘COPY’ statements. - STEP 1.3: Updates are followed by key fields to track progress and efficiently retrieve new data.
Also Read: Outbrain to Redshift Integration Simplified: 2 Easy Methods
STEP 2: Redshift to Snowflake
1. Database Objects Migration
Using schema and table structure as it is, keeping views same with no changes, create database objects in Snowflake.
2. Data Migration
- Create separate batches for each table (based on the filter options like transaction date or any other audit columns) and migrate historical data in these batches.
- To transfer incremental data, use Redshift’s “
Unload Command” to unload data from Redshift into S3 and Snowflake’s “Copy Command” to load the data from S3 into Snowflake tables. - Another strategy involves using any data replication tool compatible with Snowflake to load raw data from the source system into Snowflake. On top of this raw data, ETL/ELT pipelines can fill the platform’s facts, dimensions, and metrics tables.
NOTE: The appropriate SQL syntax and constructs must be adjusted when transferring data from Redshift to Snowflake.
Redshift V/S Snowflake
| Features | Redshift | Snowflake |
| SQL Constructs | DISTKEY, SORTKEY, ENCODE | Not present |
| Current timestamp function | GETDATE() | CURRENT_TIMESTAMP() |
| Semi-structured data | Can’t store directly | VARIANT datatype |
| JSON Handling | Copies only top-level JSON. Nested ones are treated as strings. | Better at handling complex data. |
Pro Tips:
- The last crucial step is validating data in Snowflake that is identical to data in Redshift.
- A custom Python script has been created to automate this time-consuming process. It connects the source and destination and performs crucial checks such as record counts, data type comparisons, metrics comparison in Fact Tables, database object counts, duplicate checks, etc.
- A daily CRON job can be scheduled or automated to execute this solution.
Conclusion
This article explains how to connect Outbrain to Snowflake using various methods. It also gives an overview of Snowflake and Outbrain.
Hevo offers a No-code Data Pipeline that can automate your data transfer process, hence allowing you to focus on other aspects of your business like Analytics, Marketing, Customer Management, etc.
This platform allows you to transfer data from 150+ sources (including 40+ Free Sources) such as Outbrain and Cloud-based Data Warehouses like Snowflake, Google BigQuery, etc. It will provide you with a hassle-free experience and make your work life much easier.
Want to take Hevo for a spin?
Get a 14-day free trial now and experience the feature-rich Hevo suite firsthand. You can also have a look at the unbeatable pricing that will help you choose the right plan for your business needs.
FAQs
1. How do I migrate a database to a Snowflake?
To migrate a database to Snowflake, You can use tools like Hevo Data for automated ETL processes, Snowflake’s data loading features (COPY command, Snowpipe), or third-party migration solutions.
2. Why move from SQL Server to Snowflake?
Moving from SQL Server to Snowflake allows for automatic scaling, cost-efficient storage, and the processing of real-time data without any hassle of manually managed infrastructure.
3. How to bulk load data into Snowflake?
Snowflake bulk data loading is possible through the process of staging the data in an external storage like S3, Azure Blob, or GCS. Then, using the COPY INTO command, transfer data into Snowflake tables. However, it can be automated and even made easy with tools such as Hevo Data.


