


Do you want to transfer your Amplitude data to Amazon Redshift? Are you finding it challenging to integrate Amplitude to Redshift? If yes, then you have landed at the right place! This article aims at providing you with a step-by-step guide to help you integrate Amplitude with Amazon Redshift for a fruitful analysis of your product development strategies, customer interaction & behaviour, product performance & adoption and much more!
Upon a complete walkthrough of the content, you will be able to load data from Amplitude projects to your Amazon Redshift tables with ease. It will help you draw crucial insights about your product’s performance and customers. You will be able to provide an enhanced personalised experience to your customers, target them better, & carry out analytics on your customers’ entire journey across numerous channels, experiments to build products with features that resonate with your customers. It will help you generate more engagement, build positive customer relationships and convert more prospects to loyal customers.
Table of Contents
Introduction to Amplitude

Amplitude is a robust product analytics platform that allows businesses to draw crucial insights about their customers’ interactions and experience of working with their products. With Amplitude in place, businesses and marketers can get a holistic 360-degree view of their customer’s journey from the very start by keeping track of crucial metrics such as engagement, retention, conversions, product interaction, MRR, CAC, etc.
Amplitude helps businesses build and refine their product development strategies by identifying functionalities that resonate with their customers, keeps them engaged and motivated to use & invest in their platform. It houses intuitive functionalities such as cross-platform tracking, enterprise-level security, behaviour analytics, A/B testing, dashboarding, and a lot more, allowing companies to optimise their products, personalise customer experiences that drive engagement and customer loyalty.
Looking for the best ETL tools to connect your data sources? Rest assured, Hevo’s no-code platform helps streamline your ETL process. Try Hevo and equip your team to:
- Integrate data from 150+ sources(60+ free sources).
- Simplify data mapping with an intuitive, user-friendly interface.
- Instantly load and sync your transformed data into your desired destination.
Try Hevo and discover how companies like EdApp have chosen Hevo over tools like Stitch to “build faster and more granular in-app reporting for their customers.”
Get Started with Hevo for FreeKey Features of Amplitude:
- Dashboarding & Reporting: Amplitude houses a diverse set of in-built dashboard templates, visualisation functionalities such as charts, graphs, etc. and hence allows teams to build impeccably informative & unique business reports and dashboards.
- A/B Testing: It allows a business to carry out multiple A/B tests for their products, websites and other offerings, helping them draw crucial insights about the features that resonate with their customers.
- Customers’ Journey: It allows businesses to replicate customers’ journey with their products through various channels and lets them analyse & draw key patterns about user behaviour, likes, dislikes, issues, churn points, etc.
- Real-time Analytics: Amplitude allows companies to start tracking the performance of the new product features, immediately after they are available to the customers.
For further information on Amplitude, you can check the official website here.
Introduction to Amazon Redshift
Amazon Redshift is a fully-managed petabyte-scale cloud-based data warehouse, designed to store large-scale data sets and perform insightful analysis on them in real-time.
It is highly column-oriented & designed to connect with SQL-based clients and business intelligence tools, making data available to users in real-time. Supporting PostgreSQL 8, Redshift delivers exceptional performance and efficient querying. Each Amazon Redshift data warehouse contains a collection of computing resources (nodes) organized in a cluster, each having an engine of its own and a database to it.
For further information on Amazon Redshift, you can check the official website here.
Prerequisites
- Working knowledge of Amplitude.
- Working knowledge of Amazon S3.
- Working knowledge of Amazon Redshift.
- A general idea about using the Amazon Redshift Copy Command.
Methods to connect Amplitude to Redshift
There are multiple ways in which you can transfer data from Amplitude to Redshift:
- Method 1: Best Way to Connect Amplitude to Redshift: Using Hevo Data
- Method 2: Using Amazon S3 Buckets to Transfer Data from Amplitude to Redshift
Method 1: Best Way to Connect Amplitude to Redshift: Using Hevo Data
Hevo Data focuses on two simple steps to get you started:
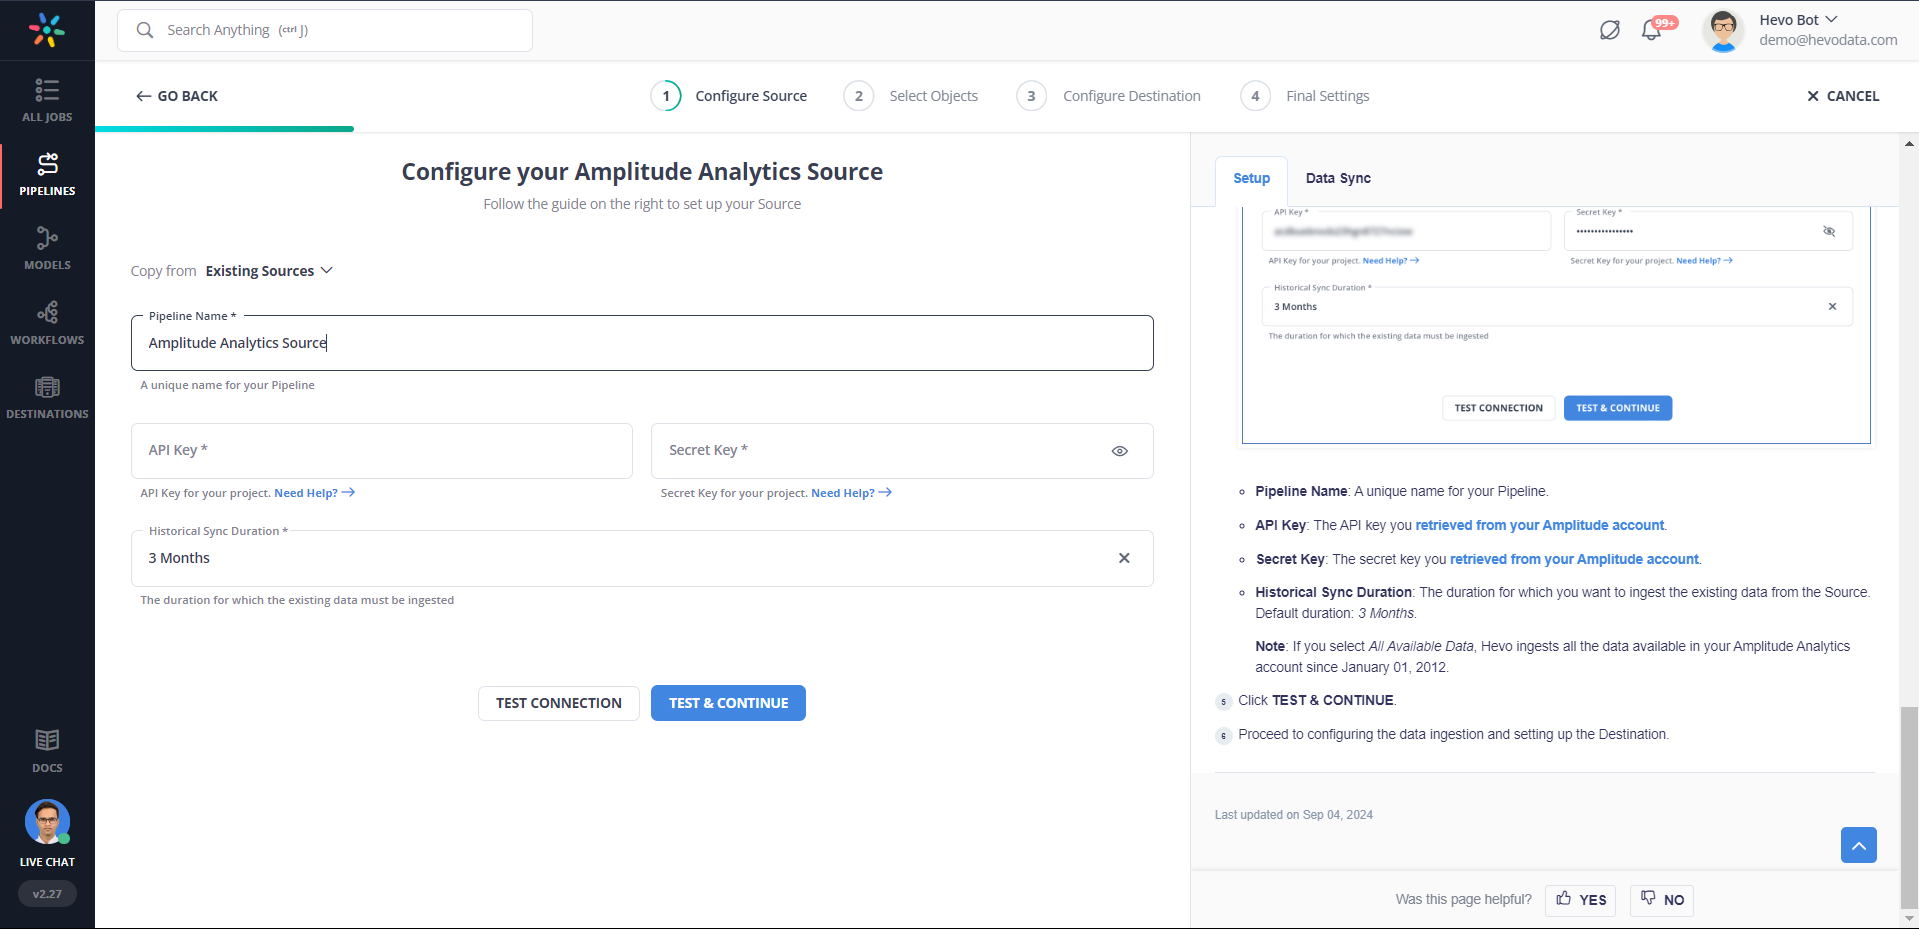
- Configure Source: Connect Hevo Data with Amplitude by providing the API and Secret key for your Amplitude project, along with a unique name for your pipeline. You will also need to enter the date, starting from where you want to export the data.
- Integrate Data: Load data from Amplitude to Redshift by providing your Amazon Redshift database credentials. Enter a name for your database, the host, and port number for your Amazon Redshift database, and connect in a matter of minutes.

Check out what makes Hevo amazing:
- Secure: Hevo has a fault-tolerant architecture that ensures that the data is handled in a secure, consistent manner with zero data loss.
- Schema Management: Hevo takes away the tedious task of schema management & automatically detects schema of incoming data and maps it to the destination schema.
- Minimal Learning: Hevo, with its simple and interactive UI, is extremely simple for new customers to work on and perform operations.
- Hevo Is Built To Scale: As the number of sources and the volume of your data grows, Hevo scales horizontally, handling millions of records per minute with very little latency.
- Incremental Data Load: Hevo allows the transfer of data that has been modified in real-time. This ensures efficient utilization of bandwidth on both ends.
- Live Support: The Hevo team is available round the clock to extend exceptional support to its customers through chat, email, and support calls.
- Live Monitoring: Hevo allows you to monitor the data flow and check where your data is at a particular point in time.
Simplify your data analysis with Hevo today! Sign up here for a 14-day free trial!
Method 2: Using Amazon S3 Buckets to Transfer Data from Amplitude to Redshift
Amplitude’s in-built Amazon S3 connector allows users to extract data about their Amplitude Project/s and load into an Amazon S3 bucket of their choice either by setting up an automatic data extract that fetches hourly or by setting up a manual data extract to load historical data from Amplitude. Using Redshift’s copy command, you can then load your Amplitude data from an S3 bucket to Amazon Redshift.
This method can be implemented using the following steps:
- Step 1: Signing in to Amplitude
- Step 2: Selecting the Amazon S3 Destination Connector
- Step 3: Setting up Automatic Data Exports in Amplitude for Amazon S3
- Step 4: Setting up Manual Data Exports in Amplitude for Amazon S3 (Optional)
- Step 5: Configuring the IAM Role for your Redshift Instance
- Step 6: Using the Copy Command to Load Data from S3 to Redshift
Step 1: Signing in to Amplitude
To start exporting your data from Amplitude, you first need to login to your Amplitude Analytics dashboard. To do this, go to the official website of Amplitude and log in using your credentials such as your organisation URL, username and password.

Once you’ve logged in, the Amplitude Analytics dashboard will now open up on your screen as follows:

Step 2: Selecting the Amazon S3 Destination Connector
With your Amplitude Analytics dashboard now open, you need to make use of the in-built Amazon S3 connector to establish a connection between Amplitude & your Amazon S3 bucket/s to start exporting your data.
To set up the connection, click on the “Sources and Destinations” option found in the bottom corner of the panel on the left.

The “Sources & Destinations” menu window will now open up on your screen, where you’ll be able to see a list of various source and destination connectors that Amplitude supports. You now need to click on the destinations window. In case you’re not able to see the destinations tab, go to the manage data option, select your desired project that you want to export and then click on the data destinations option.

Once you’ve selected the destinations tab, click on the add destination button found in the top right corner of your screen:

You can now either use the search box to locate the Amazon S3 connector or select it from the list of various Amplitude’s destination connectors available on your screen.

This is how you can locate and select the Amazon S3 connector to set up the Amplitude to Redshift connection via Amazon S3.
Step 3: Setting up Automatic Data Exports in Amplitude for Amazon S3
Once you’ve selected the desired Amazon S3 connector, you can now start configuring the export properties to set up automatic export in Amplitude for your Amazon S3 Bucket.
To do this, you will first have to choose the type of data export you want to carry out. You can either choose to set up an hourly export to start exporting Amplitude events from today onwards or export events from multiple Amplitude Ids in a merged fashion (This might not be available yet) to your Amazon S3 bucket.

With your data export type now set up, you now need to configure the bucket policy for your Amazon S3 bucket. To do this, go to the official website of AWS Console and log in with your credentials such as username and password.

Once you’ve logged in, select your desired Amazon S3 bucket and click on the permissions tab. You can now click on the “Bucket Policy” option and use the policy editor to create/modify the policy for your Amazon S3 bucket and then save it.

In case you don’t have a bucket set up in your Amazon S3 instance, you can click here to check out amazon’s official documentation that will help you set up your Amazon S3 bucket with ease. Ensure that you name your bucket as follows:
amplitude_export-organisationIdFor example, if your organization Id is 3786, you can name your bucket as follows:
amplitude_export-3786With your bucket policy now set up in the AWS Console, go back to your Amplitude instance and provide the name of your Amazon S3 bucket, along with information about its region and click on create.

To complete the setup process, click on the verify bucket access tab and allow Amplitude to test the connection between your Amazon S3 bucket and Amplitude instance.

Once your connection is verified, Amplitude will automatically start exporting data immediately from your Amplitude project/s to your Amazon S3 bucket/s. It will also carry out automatic exports every hour.
This is how you can set up automatic hourly data export for Amazon S3 to load data from Amplitude to Redshift via Amazon S3.


Step 4: Setting up Manual Data Exports in Amplitude for Amazon S3 (Optional)
In case you don’t want to fetch any historical data from Amplitude and are comfortable with the automatic export functionality, then can click here to skip this step and directly jump to the next one.
Amplitude also allows you to load historical data from Amplitude to your Amazon S3 bucket by specifying the desired range of UTC-based dates. You can then click on the “Start Export” option.

With your automatic & manual exports now set up, you can use your Amplitude dashboard to monitor their status as follows:

In case you want to disable automatic exports, you can click on the manage option found in the top right corner of your screen. The export settings window will now open up on your screen, where you can toggle off the automatic exports and then save your changes to bring them into effect.

This is how you can set up manual data export for Amazon S3 to load historical data from Amplitude to Redshift via Amazon S3.
Are you tired of following a tedious setup process? Click here to check out the method of using Hevo Data that will let you integrate Amplitude to Redshift in an automated and hassle-free manner!
Step 5: Configuring the IAM Role for your Redshift Instance
With your Amplitude data now available in your Amazon S3 buckets, you now need to set up an IAM role for your Amazon Redshift cluster, that will communicate with your Amazon S3 bucket. To do this, go to the official website of AWS IAM Console and log in with your credentials such as username and password.
Once you’ve logged in, click on the roles option found in the panel on the left and select the create role option. The create a role page will now open up on your screen, where you need to choose the AWS service option.

Select the use case for which you’re going to create the IAM role. Search for Redshift and select the “Redshift-Customisable” use case.

The “permissions policy” page will now open up on your screen where you need to choose the “AmazonS3FullAccess” for your new IAM role.

Once you’ve selected it, click on next. You now need to provide a name & description for your IAM role and then click on the create role button.

With your IAM role now set up, you will have to associate it with your Amazon Redshift cluster. To do this, go to the AWS Redshift services page, select the clusters option found in the panel on the left and click on the name of your active cluster.

Click on the properties tab for your Amazon Redshift cluster and use the attached IAM roles option to associate your Amazon Redshift cluster with the new IAM role.

The manage IAM roles window will now open up on your screen where you need to select your role from the drop-down list and then click on the add button.

You can now verify that your IAM role now associates with your Amazon Redshift cluster, by checking out its permissions, indicating that it can communicate with your Amazon S3 bucket.

Ensure that you copy and safely keep the Amazon Resource Number(ARN) for your cluster permissions as you’ll need this to authorise your copy command.
This is how you can configure the IAM role for your Amazon Redshift cluster.

Step 6: Using the Copy Command to Load Data from S3 to Redshift
With your IAM role now set up and associated with your Amazon Redshift cluster, you can use the Amazon Redshift copy command to transfer data from your Amazon S3 bucket into your desired Amazon Redshift table. In case you don’t have a table set up in your Amazon Redshift instance, you can click here to check out our detailed blog on Amazon Redshift create table command, that will help you set up your Redshift table with ease.
You can use the Amazon Redshift copy command using the following syntax:
copy <table_name> from 's3://<bucket_name>/<object_prefix>'
authorisation;
In case you want to load data from multiple files, you can make use of the JSON-based manifest file parameter in your copy command. The manifest files store the list of all the files you want to import. You can modify the copy command as follows:
copy <table_name> from 's3://<bucket_name>/<manifest_file>'
authorisation
manifest;
For example, if you want to import data from the orders.json file in your Amazon S3 bucket into your Amazon Redshift orders table, you can use the following command:
copy orders
from 's3://amplitude_export-3786/orders.json.'
credentials
'aws_iam_role=arn:aws:iam::xxxx:role/S3_Access_Role_For_Redshift'
region 'eu-west-3'
json 'auto';- Orders: It represents the table you’ll be importing data into from S3.
- amplitude_export-3786: It represents your Amazon S3 bucket storing the Amplitude data.
- Credentials: Here, you’re providing the IAM role ARN number, copied from the cluster permissions in the last step.
- Region: It represents the region in which your S3 bucket is present.
- JSON Auto: This parameter instructs Redshift to automatically determine the table column names from your Raw JSON file.
Once you’ve executed the copy command, you can now use a simple SQL select statement to determine whether the data import process took place properly or not. To do this, you can use the following command:
select * from orders;You will now be able to see that the orders table contains data and returns rows as follows:

This is how you can load data from Amplitude to Redshift by using Amazon S3 buckets to transfer your Amplitude project data.
Limitations of using Amazon S3 & Copy Command to transfer data
- This method requires you to set up and configure Amazon S3 buckets, IAM roles, permission policies, etc., which requires you to have a deep understanding of the Amazon Web Services environment. Setting these up can be a challenging task, especially for a beginner.
- Using the Amazon Redshift copy command to load data can result in duplicate rows as Amazon Redshift doesn’t apply constraints, and hence, you will have to use a staging table to avoid such errors.
- Amplitude’s S3 connector supports ingesting historical data only through the manual export set up.
- You must ensure that the type conversions done by the Amazon Redshift copy command are correct as it could lead to wrong/corrupt data imports.
Conclusion
This article teaches you how to connect Amplitude to Redshift with ease. It provides in-depth knowledge about the concepts behind every step to help you understand and implement them efficiently. These methods, however, can be challenging especially for a beginner & this is where Hevo saves the day.
visit our website to explore hevoHevo Data, a No-code Data Pipeline, helps you transfer data from a free source like Amplitude or any other paid source of your choice in a fully automated and secure manner without having to write the code repeatedly. Hevo, with its strong integration with free sources like Amplitude and other 100+ sources & BI tools, allows you to not only export & load data but also transform & enrich your data & make it analysis-ready in a jiff.
Frequently Asked Questions
1. How do I export amplitude to Redshift?
-Use Amplitude’s Redshift export feature within the Amplitude interface.
-Configure AWS Redshift settings in Amplitude, including your Redshift cluster, database, and credentials.
-Schedule or manually export the data from Amplitude to Redshift.
2. How do I connect to a Redshift database?
-Use a SQL client like SQL Workbench or DBeaver.
-Enter the Redshift cluster endpoint, port, database name, username, and password.
-Connect via JDBC/ODBC drivers or directly through an application like pgAdmin.
3. How do I connect amplitude to Google Analytics?
Amplitude does not natively connect to Google Analytics, but you can:
-Use a third-party ETL tool like Fivetran or Segment to sync data between Amplitude and Google Analytics.
-Export raw data from Amplitude, process it, and then upload it to Google Analytics.

Share it with your connections.
-
 Share To X
-
 Share To LinkedIn
-
 Share To Facebook
-
 Copy Link


