


Do you want to visualize your MySQL data in Tableau? Are you looking for a simple fix? If yes, you’ve landed on the right page! This article provides you with a step-by-step solution to help you connect MySQL to Tableau in a matter of minutes.
This article aims at answering all your queries about connecting MySQL to Tableau. Follow our easy guide to master the skill of connecting MySQL to Tableau using various methods.
Table of Contents
Introduction to MySQL

MySQL is an open-source database management system that is distributed, supported and developed by Oracle Incorporation (INC). MySQL is a relational database which stores the data in the form of tables and views. It supports various database objects such as tables, stored procedures, functions, triggers, views, indexes, and even cursors.
MySQL database server runs comfortably on any laptop or desktop even with various web applications or servers installed on the system. MySQL database server is designed to support large databases which may contain data of many organizations. MySQL database servers support a wide range of functions and multiple web API’s.
It performs exceptionally well & securely accesses various databases on the internet. It ensures connectivity with servers and devices at all times.
Introduction to Tableau

Tableau is a powerful business intelligence tool used to turn raw data into an understandable format. It is a tool popularly used to visualize data and can be understood even by a non-technical user.
It creates visualizations with the help of dashboards and worksheets, this helps users perform real-time analysis in a very fast and secure manner. It doesn’t require any programming skill or technical background to operate it.
Prerequisites
- Working knowledge of MySQL.
- MySQL clusters and database.
- Working knowledge of Tableau.
- Tableau installed at the host workstation.
Methods to connect MySQL to Tableau
There are many ways in which you can connect MySQL to Tableau:
- Method 1: Using Tableau’s MySQL connector
- Method 2: Using ODBC to connect MySQL to Tableau
- Method 3: Using Hevo, A No-Code Data Integration Platform
- Method 4: Exporting MySQL data as CSV


Method 1: Using Tableau’s MySQL connector
Tableau’s in-built MySQL connector conveniently connects MySQL to Tableau. You can easily set up a data source and use Tableau to visualize your data to perform a fruitful analysis for your business.
This method requires you to install the MySQL ODBC driver. The ODBC driver allows tableau to interact with data stored in your MySQL database and hence perform analysis easily. The MySQL driver comes installed by default with Tableau v9.3 and above. Users supporting any previous versions of their system can download the driver from the official MySQL site here.
Follow the below mentioned steps to connect MySQL to Tableau:
- Step 1: Configuring Tableau
- Step 2: Configuring Data Source
- Step 3: Performing Analysis Using Tableau
Step 1: Configuring Tableau
Launch Tableau on your workstation and select MySQL from the connect column on the left. This will open a dialogue box where you need to provide the connection details for MySQL.
To connect with tableau, you will need to provide information about the server which hosts your database. If you want to connect to a contained database, you can also specify the name of the database.

Click on Sign in to establish a connection. This will enable a connection without SSL. To establish an SSL enabled connection, click the Require SSL checkbox before you sign in.
If you want to run a specific SQL command every-time a new connection is established, you can use the Initial SQL option. This will open a dialogue box, where you can specify your desired SQL query.

Step 2: Configuring Data Source
The data source page loads up after configuring the Tableau connector and successfully signing in.
Select the data source name option and give a unique name to the database you are using. It’s considered a good practice to have a unique name as it makes it much easier for users to identify the database from which data is being fetched.
To select the desired schema, you can use the schema drop-down list from the column on the left. You can also perform a text-based search to find the desired option. Now similarly find and select the desired table and drag it onto the canvas.
This is how you can connect MySQL with Tableau. Now click on the sheets tab to begin the analysis.
Custom SQL features can be used to focus on specific SQL statements, rather than querying the entire database. Click on the Custom SQL option from the panel on the left. A new dialogue box will now open up, where you can provide the query you want to execute.
Step 3: Performing Analysis Using Tableau
To visualize the data, click on the data option from the desktop menu bar and then select a table from the list of data sources (usually found at the bottom of the pop-up).
Here we are selecting a table called clientid to visualize the data. Now from the menu bar, select dashboard and create a new dashboard. This will generate a simple bar graph for your data.
This is a simple example of how you can visualize data using Tableau. There are many ways in which you can experiment with data using Tableau’s interactive UI and easily manage your business requirements.
This is how you can connect and visualize data from MySQL in Tableau.
Limitations of this method:
- MySQL often faces a connection issue with systems that have the firewall on. This prevents connecting with the default port. Understanding the differences between hardware vs software firewall implementations can help database administrators configure the appropriate security measures while still allowing necessary connections for business intelligence tools.
- Sometimes MySQL databases are configured to establish connections only with some specified IPs.
- This method requires installing the MySQL ODBC driver beforehand, which requires you to make multiple configuration settings.
- It is a must for all computers to be able to run the Tableau servers in case of a distributed installation.
Method 2: Using ODBC to connect MySQL to Tableau
ODBC drivers can also be used to connect MySQL to Tableau. The ODBC driver can add a data source such as MySQL and then connect with Tableau.
This can be implemented using the following steps:
Step 1: Installing MySQL ODBC Driver and DSN Setup
Download the latest version of ODBC driver for MySQL on your system from the official MySQL site.
Once the ODBC driver is installed on your system, launch it to start the DSN set up process. Choose the correct 64 or 32-bit version and select the System DSN tab.
Click on the add button and select the MySQL ODBC driver. You can either select the MySQL ODBC 8.0 ANSI driver or the MySQL ODBC 8.0 UNICODE driver.
The ANSI driver delivers the best performance but has a limited character set. For the entire character set, use the UNICODE option.
The MySQL DSN setup box will now appear, where you need to fill in details regarding the connection settings and authentication:
Fill the necessary fields as follows:
- Data Source: Give the name of the data source you want to connect to.
- TCP/IP Server: Give the network name or IP address of the MySQL server.
- Port: MySQL uses the port 3306 by default, however, you can fill in the correct port number as per your MySQL cluster.
- Database: Give the name of your database.
- User: Enter the username in the correct format to connect with the MySQL database.
- Passwords: Enter your password here.
To test the connection, click on the test button. If the connection is successful, a new dialogue box will open up.
Step 2: Connecting to Tableau
Launch Tableau on your workstation and select other databases (ODBC) from the connect column on the left. This will open a dialogue box where you need to provide the connection details.
In the ODBC dialogue box, select the MySQL DSN from a drop-down list and click on ok.

Select the data source name option and give a unique name to the database you are using. It’s considered a good practice to have a unique name as it makes it much easier for users to identify the database from which data is being fetched.
To select the desired schema, you can use the schema drop-down list from the column on the left. You can also perform a text-based search to find the desired option. Now similarly find and select the desired table and drag it onto the canvas.
This is how you can use ODBC to connect MySQL to Tableau to run the powerful analysis.
Some limitations of this method:
- This method sometimes requires using third-party tools, which essentially is an extra tool that needs to be maintained.
- There is always confusion about choosing the right driver. The ANSI delivers in terms of performance however lacks the entire character set whereas the UNICODE driver contains the entire set but suffers on the performance end.
- The ODBC driver needs to be compiled with the debug mode enabled.


Method 3: Using Hevo, to Connect to MySQL as a Source
Say goodbye to the tedious challenges of unifying your marketing data! Use Hevo Data to connect MySQL to Tableau. Hevo, a No-Code Data Integration Platform, to connect MySQL with various marketing applications to bring in integrated data in a matter of minutes and visualize it in Tableau. It is the ideal solution for creating a single source of truth for marketing. Hevo is fully managed and completely automates the process of not only bringing in your data from multiple sources but also transforming it into a cleaned and analysis-ready form without having to write a single line of code. Its fault-tolerant architecture ensures that the data is handled in a secure, consistent manner with zero data loss.
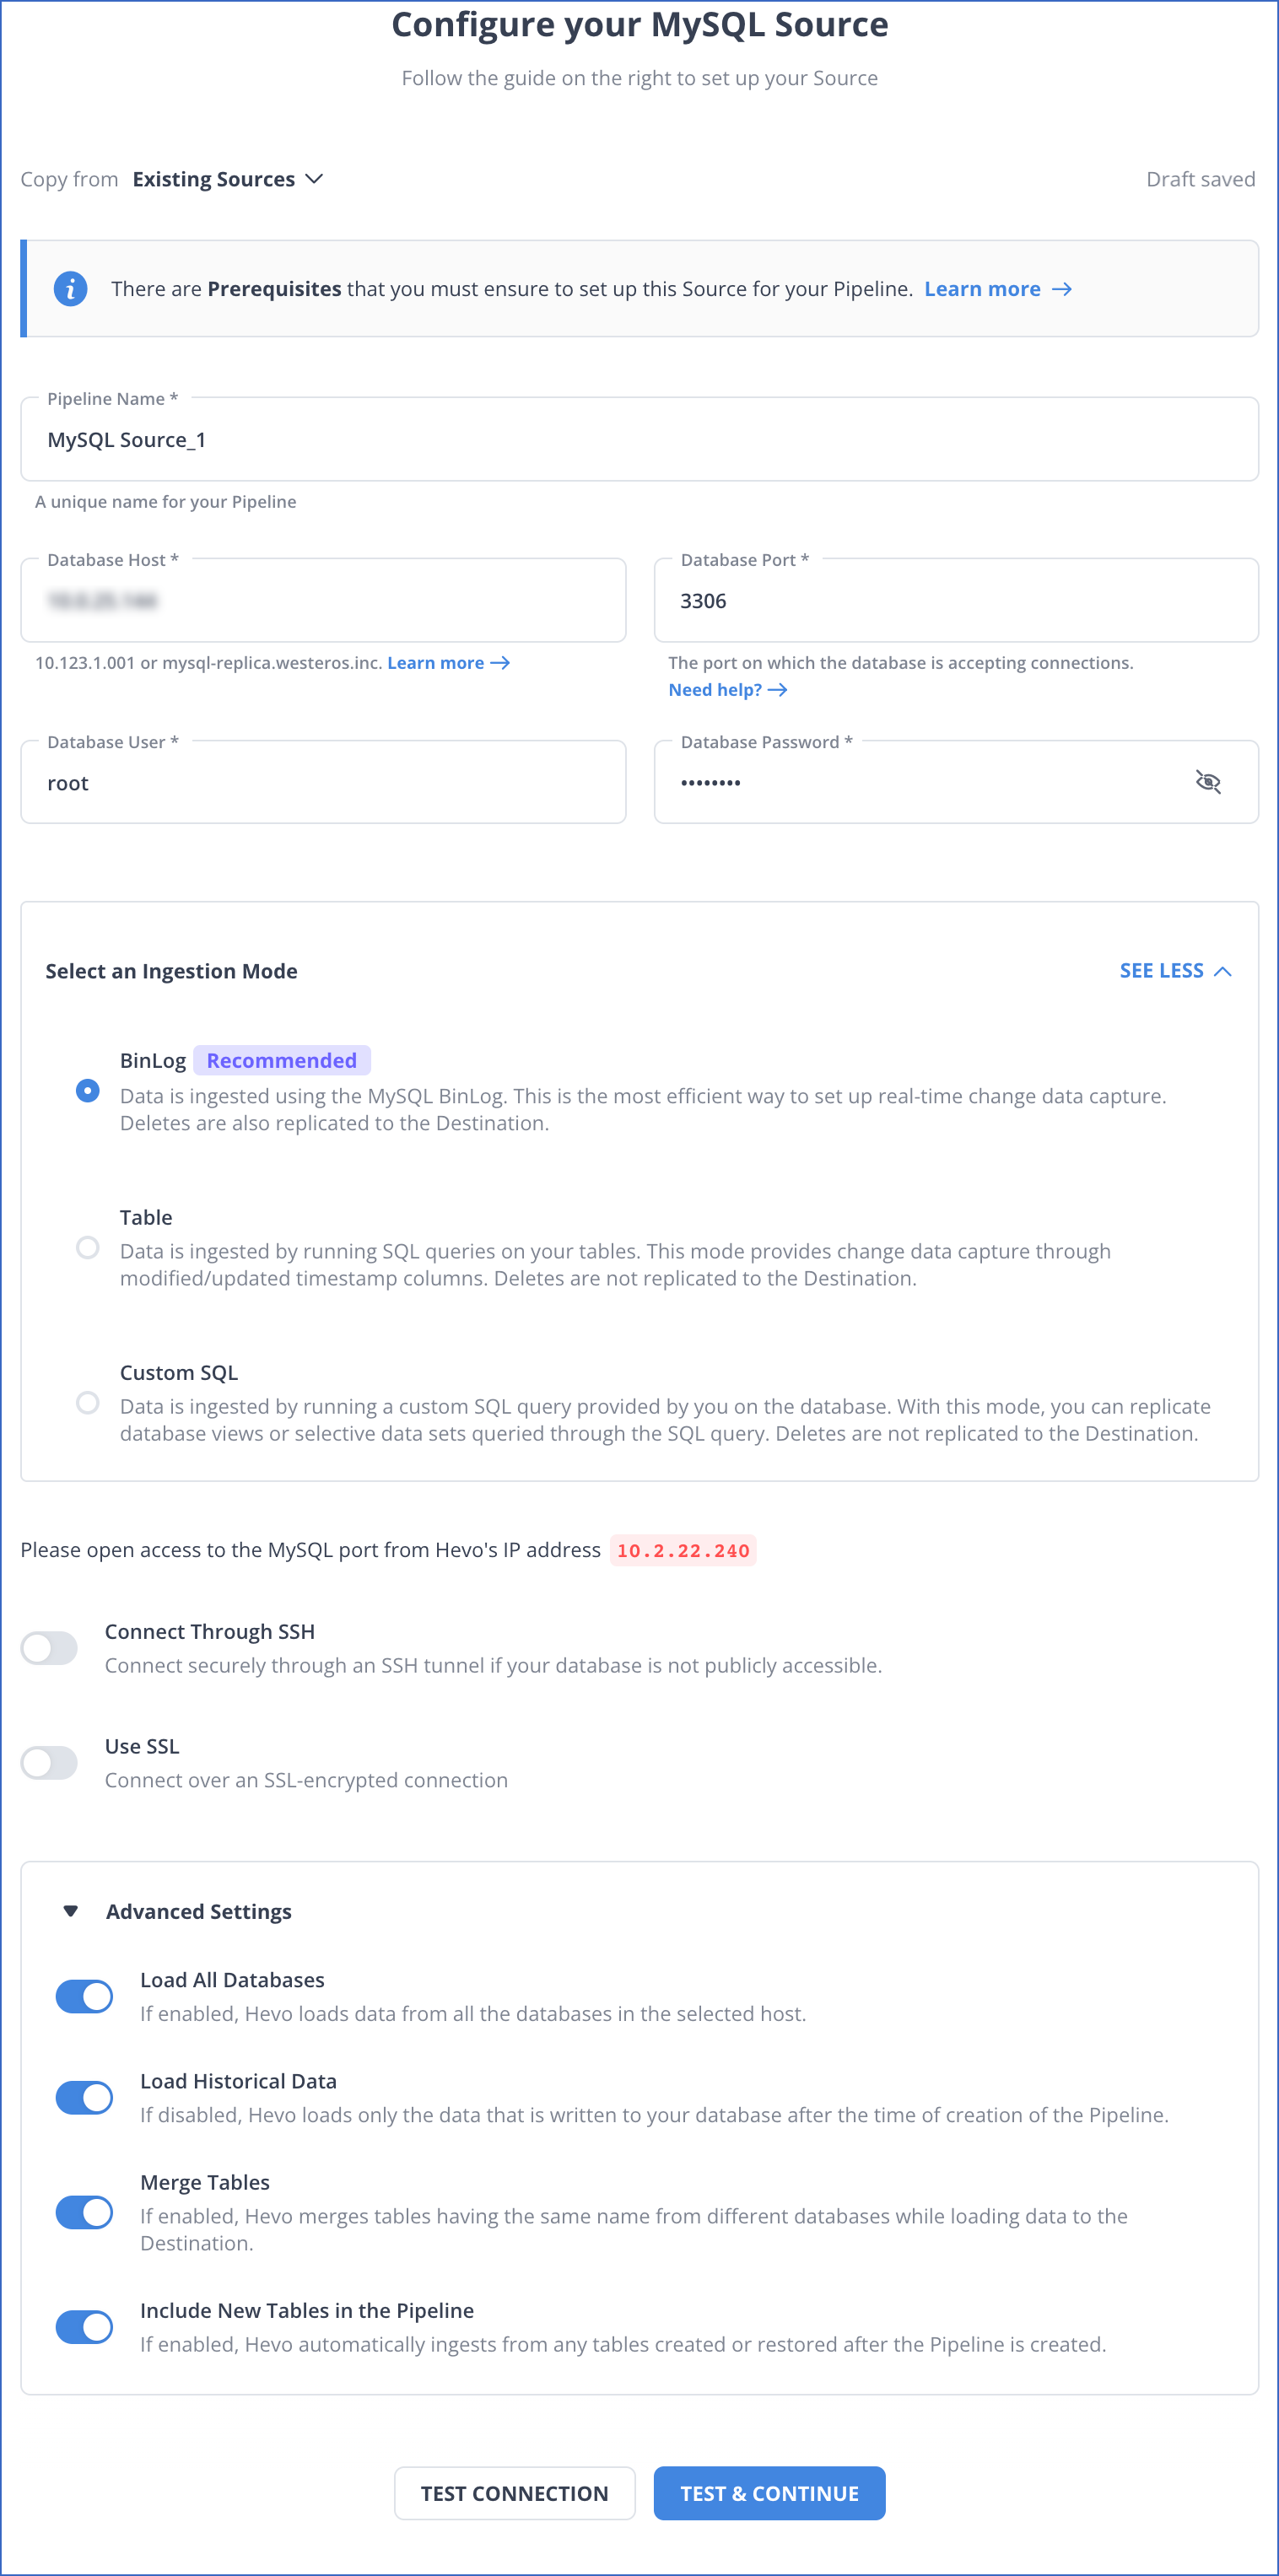
Step 1: Configure your Source
- Click PIPELINES in the Navigation Bar.
- Click + CREATE PIPELINE in the Pipelines List View.
- In the Select Source Type page, select MySQL.
- In the Configure your MySQL Source page, specify the following:
Method 4: Exporting MySQL data as CSV
One unique way to connect MySQL to Tableau is to export data from MySQL in CSV format and then use the Tableau text connector to analyze the data.
This can be done using 2 simple steps:
Step 1: Export data as CSV using MySQL workbench
Launch MySQL workbench on your system and open the desired project. MySQL allows exporting data in the desired format using the table data export wizard.
Select the table you want to export using the navigator option and right-click on it. Select the table data export wizard option from the list of available options to begin the process.
A new dialogue box will now open up, representing the table and the columns that you want to export.
You can either select columns manually or use the select all option to choose all columns of the desired table. Click on next to start the process.
A new dialogue box will now open up, where you select the desired path & the data type you want to export in.
Tick the checkbox to export the files on your system. You can also monitor the export process from the dialogue box.
This is how you can export data from MySQL on your system.
Step 2: Using Tableau’s Text connector
Open the Text connector in Tableau and select the exported data file from your system. Click on the info button, this will open up a new dialogue box as follows:
Now fill the necessary fields as follows:
- Field Separator: Select the character that is used to separate columns in the CSV file.
- Text Qualifier: Specify the text qualifier that is being used in the file.
- Locale: Choose the language that is used to parse the file. Tableau uses these to separate the numbers.
- Does the file include field names in the first row: Specify whether the selected text file contains column names in the first row or not.
Limitations of this method:
- There are chances of the tables getting corrupted while exporting data using the MySQL workbench.
- It is slightly complicated and often makes performing simple tasks difficult.
- It doesn’t support all databases.
You can also learn more about:
Conclusion
In conclusion, integrating MySQL with Tableau empowers businesses to make data-driven decisions by visualizing real-time data from their databases. By following the steps outlined in this guide, users can seamlessly connect, analyze, and present data in a user-friendly interface. Whether for complex reporting or day-to-day analysis, this connection ensures efficient and insightful business intelligence workflows, helping organizations unlock the full potential of their data.
FAQ on MySQL to Tableau
Can you connect MySQL to Tableau?
Yes, you can connect MySQL to Tableau. Tableau provides a native connector for MySQL, allowing you to import data from your MySQL database into Tableau for analysis and visualization. You just need the MySQL server details, including the hostname, port, database name, and credentials, to establish the connection.
Can you connect SQL database to Tableau?
Yes, Tableau can connect to various SQL databases, including MySQL, Microsoft SQL Server, PostgreSQL, and others. Tableau supports native connectors for many SQL-based databases, making it easy to bring data into Tableau for visualization and reporting.
How to import SQL to Tableau?
To import SQL data into Tableau:
1. Open Tableau and select Connect from the Data tab.
2. Choose the appropriate database (e.g., MySQL, SQL Server).
3. Enter the necessary server details (hostname, database, credentials).
4. Once connected, you can either drag-and-drop tables or write custom SQL queries to import the specific data you need.
5. After importing, the data will be available for building visualizations and reports.
Want to take Hevo for a spin? sign up here for a 14-day free trial!
Tell us about your experience of connecting MySQL to Tableau in the comments section below.

Share it with your connections.
-
 Share To X
-
 Share To LinkedIn
-
 Share To Facebook
-
 Copy Link


