


On a late Friday evening, just when you’re about to call your day at the office, you have received an email stating a priority task. The director of the support team has requested you to help him build an ETL pipeline for moving data from Dixa to BigQuery.
What would you do? You know that you can’t delay it as the support team is revisiting and analyzing the efficiency of different communication channels.
Don’t worry; you’re in the right place. This article will give you the methods for building an ETL pipeline for replicating data from Dixa to BigQuery. Enough talk! Let’s get to it.
Table of Contents
How to Replicate Data From Dixa to BigQuery?
Dixa, being a conversational customer service platform, helps enable real-time dialogs between business and their clients over email, social media, voice calls, and messaging. It collects data about customers, audiences, events, campaigns, etc.
To integrate Dixa to BigQuery, you can either:
- Use CSV files or
- A no-code automated solution.
We’ll cover replication via CSV files next.
Replicate Data from Dixa to BigQuery Using Export APIs
Let’s dive into the process of replicating this data from Dixa to BigQuery in CSV format:
Step 1: Export Data from Dixa
Here’s what you can export from your Dixa account:
- Audiences
- Reports
- Templates
- Campaigns
- Content studio files
- Events
And here’s what you can’t export from your account:
- Deleted audiences
- Billing receipts
- Third-party information
- Website, landing page, and ad content
Let’s dive into the steps for exporting data from Dixa using Export APIs.
- Log in to your Dixa account.
- Go to the side navigation bar and click on the “Settings” option. Scroll down to the Manage section and select the “Integrations” option.
- The “Integrations” page appears on the screen. Now, select the “API Tokens” card. And click on the “Configure API tokens” button.
- API Tokens page appears on the screen. Now, click the “Add API Token” button.
- Now, give a name to the API token. Then, select “Dixa API” as the API version. Finally, click the “Add API Token” button.
- The API token will get generated. To copy the token, click on the “Copy Token” button.
- Now, you can paste the token wherever you need the authentication, i.e., the API reference section of Dixa or in your dedicated tool such as Postman, Terminal, etc. You can use the authentication token in one of these two ways:
- Now, write the GET API requests for the objects from which you want to retrieve data.
To customize the data Dixa returns, you can even add a couple of alternative filters.
The following is an example of a well-formed REST URL in Dixa:
<strong>https://exports.dixa.io/v1/conversation_export?closed_after=2019-08-24&closed_before=2019-08-24&created_after=2019-08-24&created_before=2019-08-24&csids=0&last_message_created_after=2019-08-24&last_message_created_before=2019-08-24&updated_after=2019-08-24&updated_before=2019-08-24</strong>The above URL is composed of the following parts:
- Base URL: https://exports.dixa.io/
- Resource Path: v1/conversation_export
- Query parameter: closed_after=2019-08-24&closed_before=2019-08-24&created_after=2019-08-24&created_before=2019-08-24&csids=0&last_message_created_after=2019-08-24&last_message_created_before=2019-08-24&updated_after=2019-08-24&updated_before=2019-08-24
In this same format, you can write the REST URL to fetch data from Conversations or Messages object.
Query Parameters that can be used when making a GET request to return a list of conversations:
- closed_after: Filter for conversations closed after this date.
- closed_before: Filter for conversations closed before this date.
- created_after: Filter for conversations created after this date.
- created_before: Filter for conversations created before this date.
- csids: Filter for this list of conversation IDs, comma separated.
- last_message_created_after: Filter for conversations where the last message was created after this date.
- last_message_created_before: Filter for conversations where the last message was created before this date.
- updated_after: Filter for conversations updated after this date.
- updated_before: Filter for conversations updated before this date.
Query Parameters that can be used when making a GET request to return a list of messages:
- Created_after: Filter for conversations created after this date.
- Created_before: Filter for conversations created before this date.
A sample GET request for getting a list of conversations written in curl looks like this:
curl -i -X GET \
  'https://exports.dixa.io/v1/message_export?created_after=2019-08-24&created_before=2019-08-24' \
  -H 'Authorization: YOUR_API_KEY_HERE'
Sample response of the above GET request looks like this:
[
  {
    "id": "497f6eca-6276-4993-bfeb-53cbbbba6f08",
    "csid": 0,
    "created_at": 0,
    "initial_channel": "widgetchat",
    "author_name": "string",
    "author_email": "string",
    "direction": "inbound",
    "text": "string",
    "from_phone_number": "string",
    "to_phone_number": "string",
    "duration": 0,
    "recording_url": "string",
    "voicemail_url": "string",
    "to": "string",
    "from": "string",
    "cc": [
      "string"
    ],
    "bcc": [
      "string"
    ],
    "attached_files": [
      "string"
    ],
    "is_automated_message": true,
    "chat_input_question": "How can we help?",
    "chat_input_answer": "None of the above",
    "chat_menu_text": "Please input your order number."
  }
]
Now, you can store the API response JSON file in your local system.
Looking for a quick way to integrate Dixa with BigQuery? Look no further! Hevo is a no-code data pipeline platform that simplifies the process, allowing you to replicate your data in just 2 easy steps. With Hevo, not only will your data be seamlessly transferred, but it will also be enriched and ready for analysis.
Check out why Hevo is the best:
- Minimal Learning: Hevo’s simple and interactive UI makes it extremely simple for new customers to work on and perform operations.
- Schema Management: Hevo takes away the tedious task of schema management & automatically detects the schema of incoming data and maps it to the destination schema.
- Faster Insight Generation: Hevo offers near real-time data replication, so you have access to real-time insight generation and faster decision-making.
- Live Support: The Hevo team is available 24/7 to extend exceptional support to its customers through chat, E-Mail, and support calls.
- Secure: Hevo has a fault-tolerant architecture that ensures that the data is handled in a secure, consistent manner with zero data loss.
- Transparent Pricing: Hevo offers transparent pricing with no hidden fees, allowing you to budget effectively while scaling your data integration needs.
Try Hevo today and experience seamless data migration and transformation.
Get Started with Hevo for FreeStep 2: Loading Data into BigQuery
If your file size is less than 10 MB, you can directly load JSON files from your local system to BigQuery.
Otherwise, you need to first upload your files to Google Cloud Storage bucket. From there, you can then upload your data into your BigQuery account.
For that, you can carry out the following steps:
- Go to your Cloud Storage Browser page and navigate to the bucket where you want to upload your JSON files. Click on the “Upload Files” button, select the files & click on the OK button.
- Now, navigate to your BigQuery page in the Google Cloud Console. In the Explorer pane on the left, expand it and click on the dataset in which you want to upload your JSON files to connect Dixa to BigQuery.
- Click on the “+ Create Table” button in the Dataset info section. In the source section, select Upload from the drop-down menu for loading your files from your local system, or choose Google Cloud Storage for files more than 10 MB that are uploaded in GCS buckets.
- Select the file format as JSON and specify the required details in the Destinations section.
- You can define the schema by yourself, or you can enable auto-detection of the schema. You can also provide the required details in the Advanced options section.
- Then, select the “Create Table” button.
You can also refer to the following documentation for any in-depth information on loading JSON data into Google BigQuery.
This 3-step approach is beneficial for replicating data from Dixa to BigQuery in the following scenarios:
- Low-frequency Data Replication: This method is appropriate when your product and marketing teams need the Dixa data only once in an extended period, i.e., monthly, quarterly, yearly, or just once.
- Dedicated Personnel: If your organization has dedicated people who have to select categories manually, customize templates, then download and upload CSV files, then accomplishing this task is not much of a headache.
- Low Volume Data: It can be a tedious task to repeatedly select different categories, select templates or customize them, and download & upload CSV files. Moreover, merging these CSV files from multiple departments is time-consuming if you are trying to measure the business’s overall performance. Hence, this method is optimal for replicating only a few files.
When the frequency of replicating data from Dixa increases, this process becomes highly monotonous. It adds to your misery when you have to transform the raw data every single time. With the increase in data sources, you would have to spend a significant portion of your engineering bandwidth creating new data connectors. Just imagine — building custom connectors for each source, transforming & processing the data, tracking the data flow individually, and fixing issues. Doesn’t it sound exhausting?
Instead, you should be focusing on more productive tasks. Being relegated to the role of a ‘Big Data Plumber‘ that spends their time mostly repairing and creating the data pipeline might not be the best use of your time.
To start reclaiming your valuable time, you can…
Replicate Data from Dixa to BigQuery Using an Automated ETL Tool
Going all the way to write custom scripts for every new data connector request is not the most efficient and economical solution. Frequent breakages, pipeline errors, and lack of data flow monitoring make scaling such a system a nightmare.
You can streamline the Dixa to BigQuery integration process by opting for an automated tool. Here are the benefits of leveraging an automated no-code tool:
- It allows you to focus on core engineering objectives while your business teams can jump on to reporting without any delays or data dependency on you.
- Your sales & support teams can effortlessly enrich, filter, aggregate, and segment raw Dixa data with just a few clicks.
- The beginner-friendly UI saves the engineering team hours of productive time lost due to tedious data preparation tasks.
- Without coding knowledge, your analysts can seamlessly create thorough reports for various business verticals to drive better decisions.
- Your business teams get to work with near-real-time data with no compromise on the accuracy & consistency of the analysis.
- You get all your analytics-ready data in one place. With this, you can quickly measure your business performance and deep dive into your Dixa data to explore new market opportunities.
For instance, here’s how Hevo Data, a cloud-based ETL tool, makes Dixa to BigQuery data replication ridiculously easy:
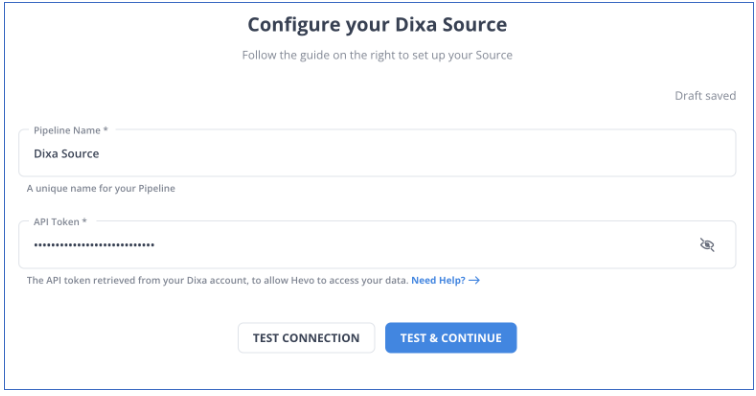
Step 1: Configure Dixa as a Source
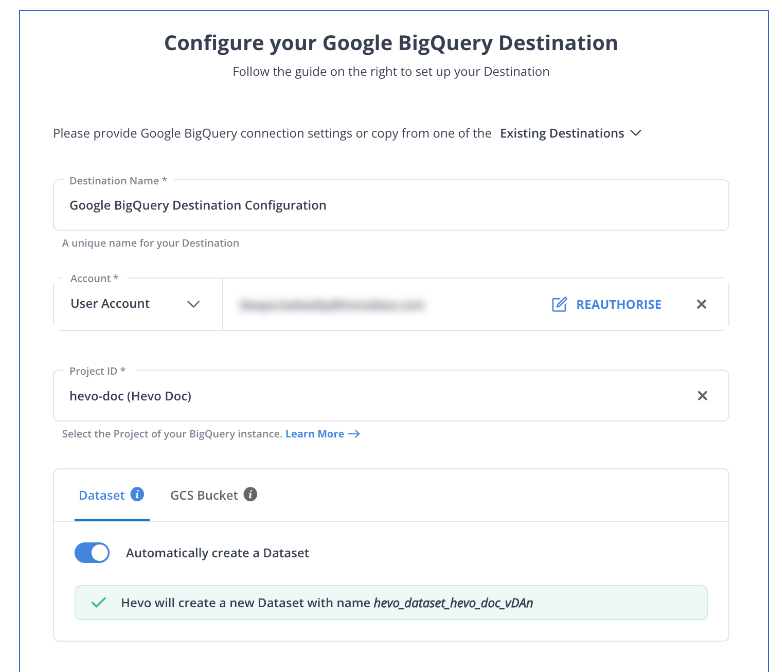
Step 2: Configure BigQuery as a Destination
All Done to Setup Your ETL Pipeline
After implementing the 2 simple steps, Hevo Data will take care of building the pipeline for replicating data from Dixa to BigQuery based on the inputs given by you while configuring the source and the destination.
The pipeline will automatically replicate new and updated data from Dixa to BigQuery every 1 hr (by default). However, you can also adjust the data replication frequency as per your requirements.
Data Pipeline Frequency
| Default Pipeline Frequency | Minimum Pipeline Frequency | Maximum Pipeline Frequency | Custom Frequency Range (Hrs) |
| 1 Hr | 1 Hr | 24 Hrs | 1-24 |
For in-depth knowledge of how a pipeline is built & managed in Hevo Data, you can also visit the official documentation for Dixa as a source and BigQuery as a destination.
You don’t need to worry about security and data loss. Hevo’s fault-tolerant architecture will stand as a solution to numerous problems. It will enrich your data and transform it into an analysis-ready form without having to write a single line of code.

What Can You Achieve by Replicating Your Data from Dixa to BigQuery?
By replicating data from Dixa to BigQuery you can help your data analysts get critical business insights for the following instances. Does your use case make the list?
- What percentage of customers’ queries from a region are through email?
- Which customer acquisition channel has the maximum number of tickets raised?
- What percentage of agents respond to customers’ tickets acquired through the communication channel?
- Customers acquired from which channel have the maximum satisfaction ratings?
Summing It Up
Collecting an API key, sending a GET request through REST APIs, downloading, transforming uploading the JSON data would be the smoothest process when your marketing team requires data from Dixa only once in a while. But what if the support team requests data of multiple objects with numerous filters in the Dixa data every once in a while? Going through this process over and again can be monotonous and would eat up a major portion of your engineering bandwidth. The situation worsens when these requests are for replicating data from multiple sources.
So, would you carry on with this method of manually writing GET API requests every time you get a request from the support team? You can stop spending so much time being a ‘Big Data Plumber’ by using a custom ETL solution instead.
A custom ETL solution becomes necessary for real-time data demands such as monitoring email campaign performance or viewing the sales funnel. By selecting Hevo Data’s 150+ plug-and-play integrations, you can free your engineering bandwidth from these repetitive and resource-intensive tasks. Sign up for Hevo’s 14-day free trial and experience seamless data migration.
Share it with your connections.
-
 Share To LinkedIn
-
 Share To Facebook
-
 Share To X
-
 Copy Link


