As a data engineer, you hold all the cards to make data easily accessible to your business teams. Your sales and support team just requested a Dixa to Snowflake connection on priority. We know you don’t wanna keep your data scientists and business analysts waiting to get critical business insights. If this is a one-time thing, exporting data with the help of CSV files is helpful. Or, hunt for a no-code tool that fully automates & manages data integration for you while you focus on your core objectives.
Well, look no further. With this article, get a step-by-step guide to connecting Dixa to Snowflake effectively and quickly, delivering data to your sales and support teams.
Table of Contents
How to Connect Dixa to Snowflake?
To replicate Dixa to Snowflake, you can either use CSV files or a no-code automated solution. We’ll cover replication via CSV files next.
Export Dixa to Snowflake using CSV Files
In this method, you will learn how to replicate Dixa to Snowflake using CSV Files.
Dixa to CSV
You want to export your data from Dixa. In such a scenario,
- Step 1: Navigate to Analytics > Export.
- Step 2: You need to select the email where you want to receive your CSV data. You can also select the period for which you want to retrieve data. Please remember that all the data can be exported, but the exporting is limited to three months for each export.
- Step 3: Now click on Export My Data. Your data will be sent to you in your mailbox within a few minutes.
CSV to Snowflake
- Step 1: Apply the USE statement to choose the database you established before.
Syntax:
Use database [database-name];- Step 2: CREATE a File Format.
Syntax:
CREATE [ OR REPLACE ] FILE FORMAT [ IF NOT EXISTS ]
                      TYPE = { CSV | JSON | AVRO | ORC | PARQUET | XML } [ formatTypeOptions ]
                      [ COMMENT = '' ]
This creates a named file format for a set of staged data that can be accessed or loaded into Snowflake tables.
- Step 3: Using the CREATE statement, create a table in Snowflake.
Syntax:
CREATE [ OR REPLACE ] TABLE [ ( [ ] , [ ] , ... ) ] ;This either replaces an existing table or creates a new one in the current/specified schema.
- Step 4: Now load the CSV data file from your local system to the staging of the Snowflake using the PUT command.
Syntax:
put file://D:\dezyre_emp.csv @DEMO_DB.PUBLIC.%dezyre_employees;
- Step 5: Now COPY the data into a target table.
Example:
copy into dezyre_employees
  from @%dezyre_employees
  file_format = (format_name = 'my_csv_format' , error_on_column_count_mismatch=false)
  pattern = '.*dezyre_emp.csv.gz'
  on_error = 'skip_file';
Now, you can check if your data loaded into the target table correctly by running a select query.
Example:
select * from dezyre_employees;This process will successfully load your desired CSV datasets into Snowflake.
Using CSV files and SQL queries is a great way to replicate data from Dixa to Snowflake. It is ideal in the following situations:
- One-Time Data Replication: When your business teams require these Dixa files quarterly, annually, or for a single occasion, manual effort and time are justified.
- No Transformation of Data Required: This strategy offers limited data transformation options. Therefore, it is ideal if the data in your spreadsheets is accurate, standardized, and presented in a suitable format for analysis.
- Lesser Number of Files: Downloading and composing SQL queries to upload multiple CSV files is time-consuming. It can be particularly time-consuming if you need to generate a 360-degree view of the business and merge spreadsheets containing data from multiple departments across the organization.
You face a challenge when your business teams require fresh data from multiple reports every few hours. For them to make sense of this data in various formats, it must be cleaned and standardized. This requires you to devote substantial engineering bandwidth to creating new data connectors. To ensure a replication with zero data loss, you must monitor any changes to these connectors and fix data pipelines on an ad hoc basis. These additional tasks consume forty to fifty percent of the time you could have spent on your primary engineering objectives.
How about you focus on more productive tasks than repeatedly writing custom ETL scripts, downloading, cleaning, and uploading CSV files? This sounds good, right?
In that case, you can…
Looking for a quick way to integrate Dixa with Snowflake? Look no further! Hevo is a no-code data pipeline platform that simplifies the process, allowing you to replicate your data in just 2 easy steps. With Hevo, not only will your data be seamlessly transferred, but it will also be enriched and ready for analysis.
Check out why Hevo should be your go-to choice:
- Minimal Learning: Hevo’s simple and interactive UI makes it extremely simple for new customers to work on and perform operations.
- Schema Management: Hevo takes away the tedious task of schema management & automatically detects the schema of incoming data and maps it to the destination schema.
- Faster Insight Generation: Hevo offers near real-time data replication, so you have access to real-time insight generation and faster decision-making.
- Live Support: The Hevo team is available 24/7 to extend exceptional support to its customers through chat, E-Mail, and support calls.
- Secure: Hevo has a fault-tolerant architecture that ensures that the data is handled in a secure, consistent manner with zero data loss.
- Transparent Pricing: Hevo offers transparent pricing with no hidden fees, allowing you to budget effectively while scaling your data integration needs.
Try Hevo today and experience seamless data migration and transformation.
Get Started with Hevo for FreeAutomate the Data Replication process using a No-Code Tool
Going all the way to use CSV files for every new data connector request is not the most efficient and economical solution. Frequent breakages, pipeline errors, and lack of data flow monitoring make scaling such a system a nightmare.
You can streamline the Dixa to Snowflake data replication process by opting for an automated tool. To name a few benefits, you can check out the following:
- It allows you to focus on core engineering objectives. At the same time, your business teams can jump on to reporting without any delays or data dependency on you.
- Your marketers can effortlessly enrich, filter, aggregate, and segment raw Dixa data with just a few clicks.
- The beginner-friendly UI saves the engineering team hours of productive time lost due to tedious data preparation tasks.
- Without coding knowledge, your analysts can seamlessly aggregate campaign data from multiple sources for faster analysis.
- Your business teams get to work with near real-time data with no compromise on the accuracy & consistency of the analysis.
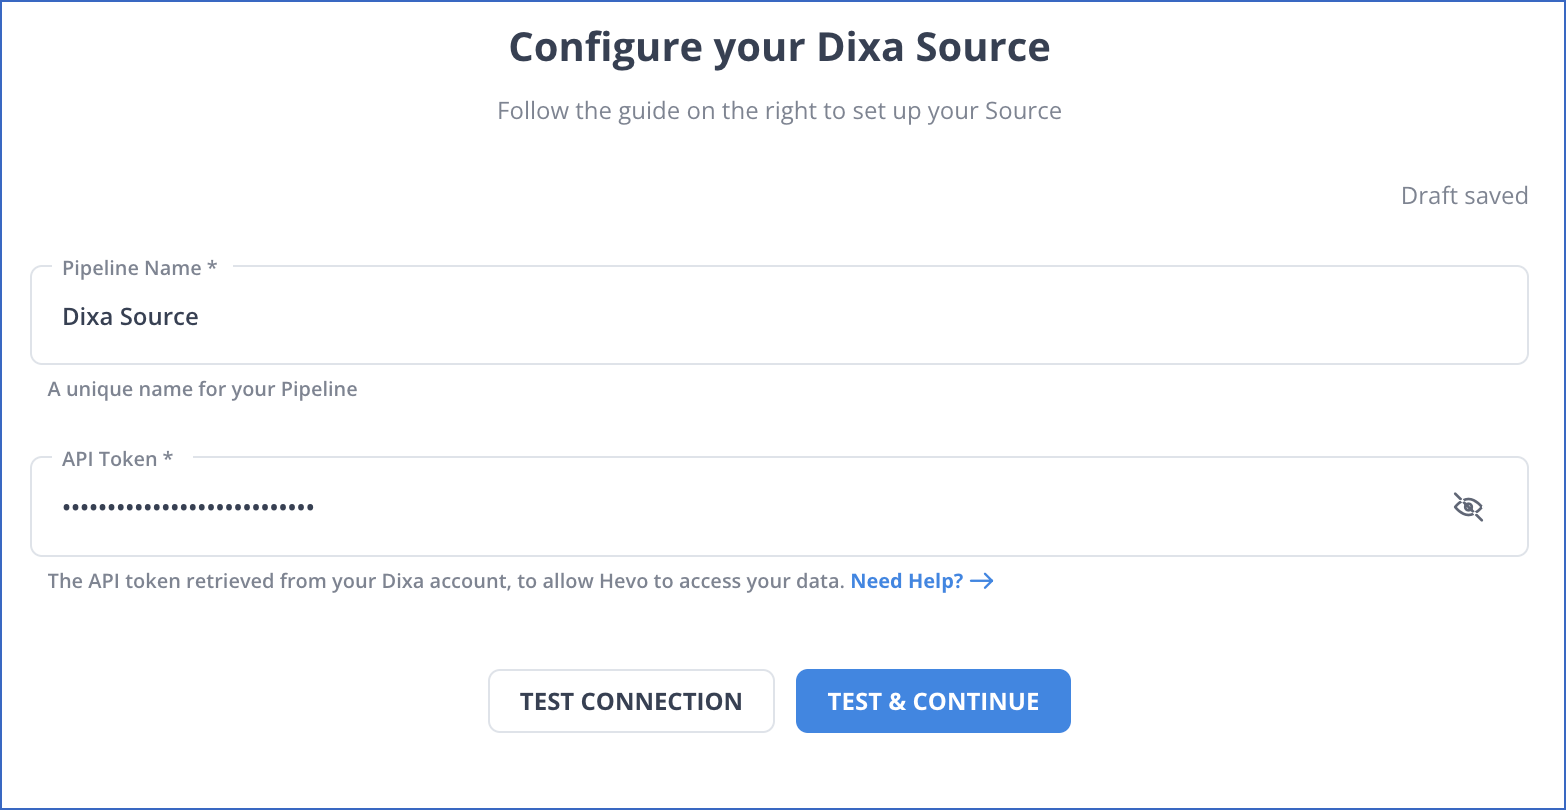
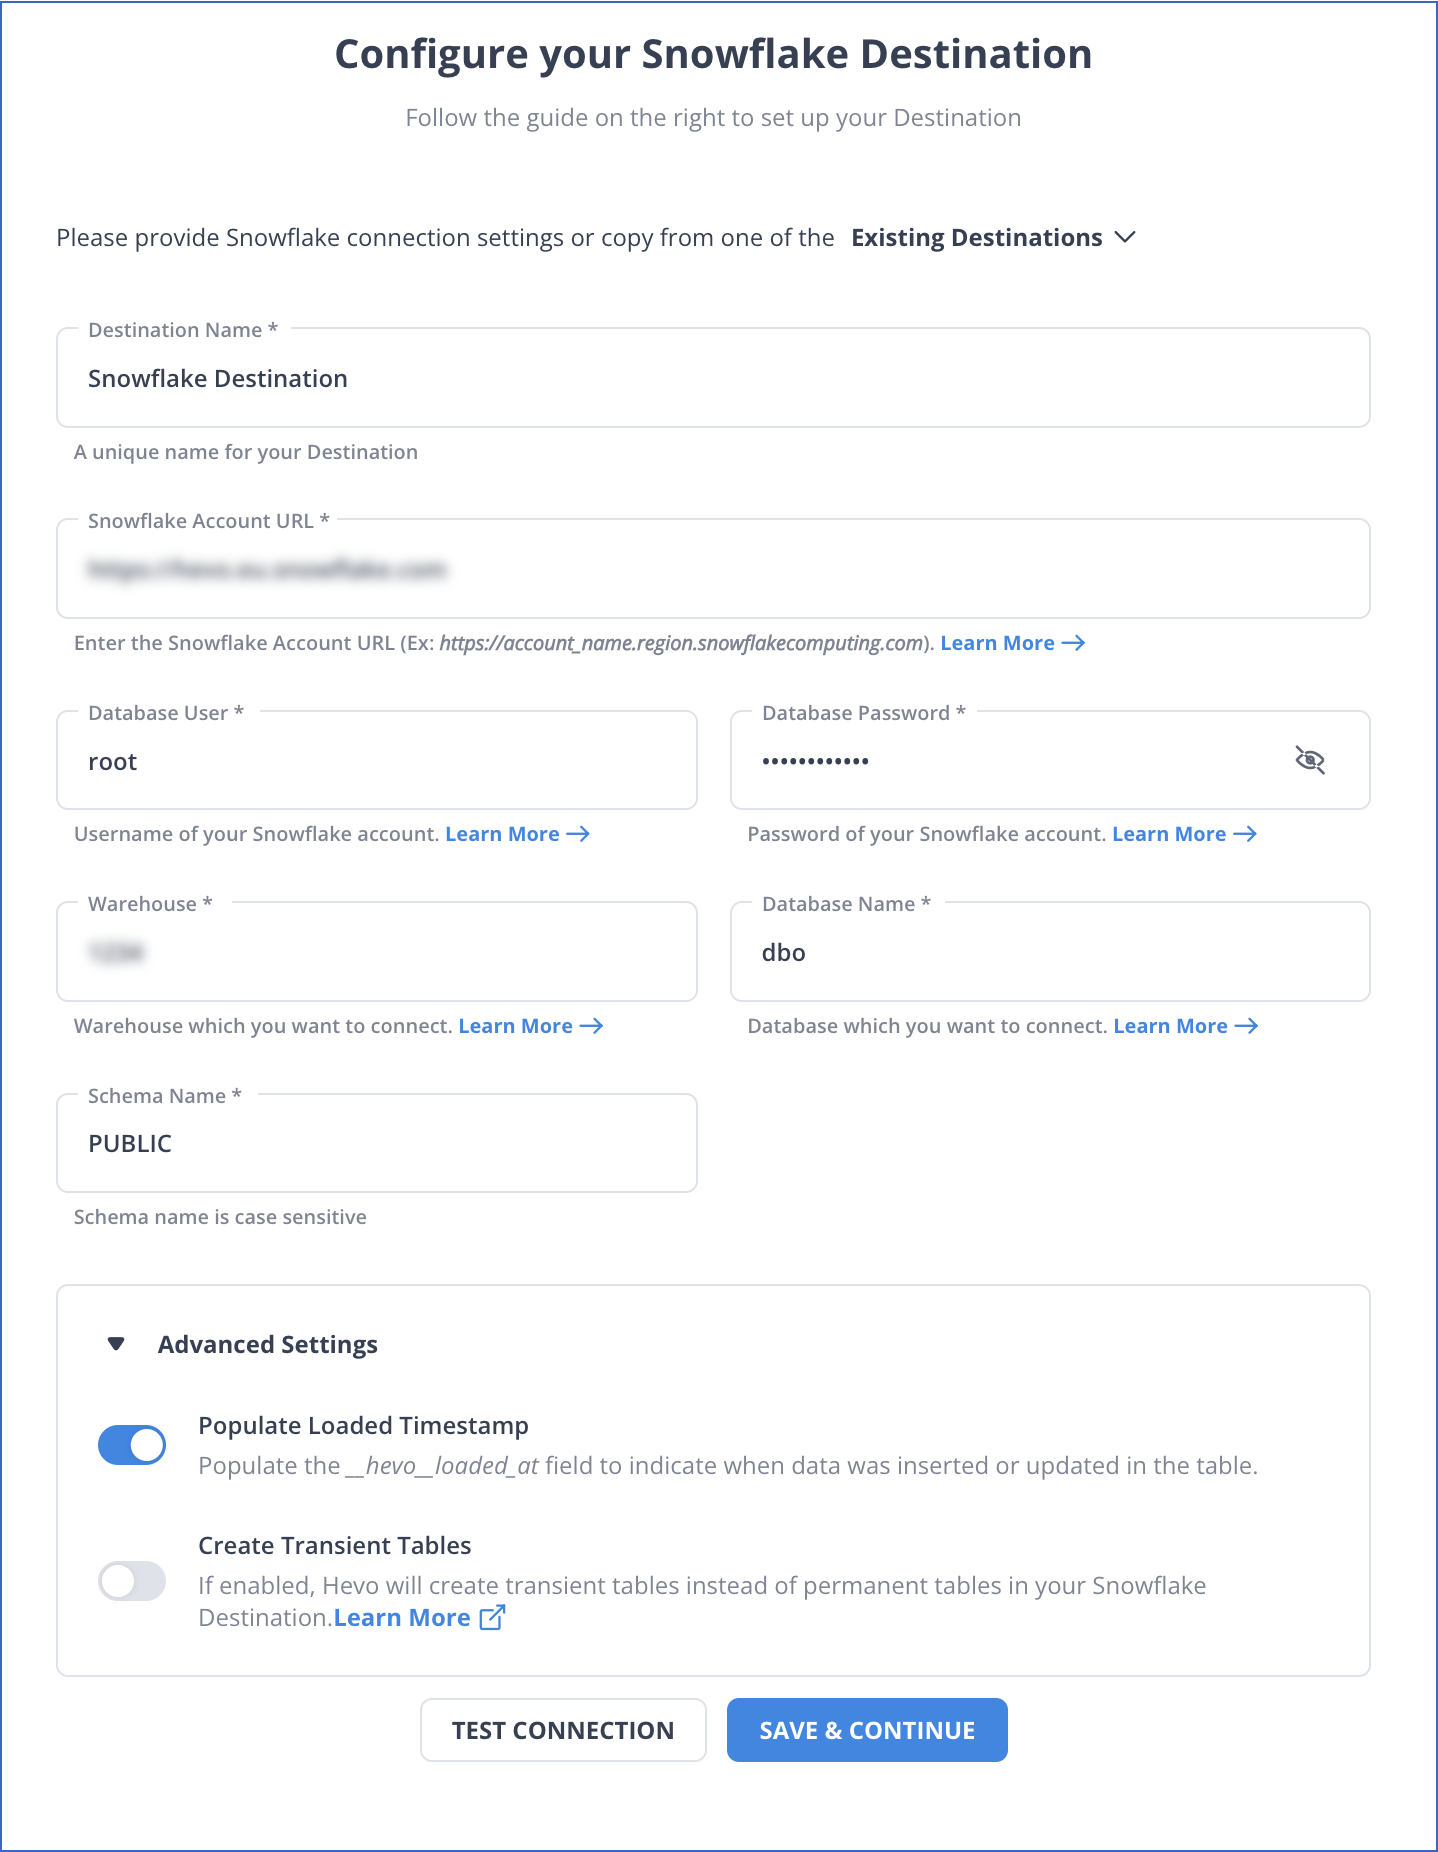
As a hands-on example, you can check out how Hevo, a cloud-based no-code ETL/ELT Tool, makes the Dixa to Snowflake integration effortless in just 2 simple steps:
Step 1: Configure Dixa as a Source

Step 2: Configure Snowflake as a Destination

That’s it, literally! You have connected Dixa to Snowflake in just 2 steps. These were just the inputs required from your end. Now, everything will be taken care of by Hevo. It will automatically replicate new and updated data from Dixa to Snowflake.
You can also visit the official documentation of Hevo for Dixa as a source and Snowflake as a destination to have in-depth knowledge about the process.
In a matter of minutes, you can complete this no-code & automated approach of connecting Dixa to Snowflake using Hevo and start analyzing your data.
Hevo’s fault-tolerant architecture ensures that the data is handled securely and consistently with zero data loss. It also enriches the data and transforms it into an analysis-ready form without writing a single line of code.
What can you hope to achieve by replicating data from Dixa to Snowflake?
- You can centralize the data for your project. Using data from your company, you can create a single customer view to analyze your projects and team performance.
- Get more detailed customer insights. Combine all data from all channels to comprehend the customer journey and produce insights that may be used at various points in the sales funnel.
- You can also boost client satisfaction. Analyze customer interaction through email, chat, phone, and other channels. Identify drivers to improve customer pleasure by combining this data with consumer touchpoints from other channels.
Key Takeaways
These data requests from your marketing and product teams can be effectively fulfilled by replicating data from Dixa to Snowflake. If data replication must occur every few hours, you will have to switch to a custom data pipeline. This is crucial for marketers, as they require continuous updates on the ROI of their marketing campaigns and channels. Instead of spending months developing and maintaining such data integrations, you can enjoy a smooth ride with Hevo’s 150+ plug-and-play integrations (including 40+ free sources such as Dixa).
Snowflake’s “serverless” architecture prioritizes scalability and query speed and enables you to scale and conduct ad hoc analyses much more quickly than with cloud-based server structures. The cherry on top is that Hevo will make it simpler by making the data replication process very fast! Sign up for Hevo’s 14-day free trial and experience seamless data migration.
FAQs
What is Dixa?
Dixa is a customer service platform that enhances engagement across multiple channels, including voice, email, chat, and social media. It provides a unified interface for support teams, focusing on personalized experiences, improved response times, and analytics to optimize customer service operations.
How to load data to snowflake from csv?
To load data into Snowflake from a CSV file, upload the CSV to a Snowflake stage. Then, create a corresponding table and use the `COPY INTO` command to transfer the data from the staged CSV file into the table efficiently.


