


Unlock the full potential of your Jira data by integrating it seamlessly with PostgreSQL. With Hevo’s automated pipeline, get data flowing effortlessly—watch our 1-minute demo below to see it in action!
Jira Software is primarily used for Project Management, Bug Tracking, and Issue Tracking. A Jira dashboard consists of various useful features and functions which simplify the process of handling issues. With Jira, you can organize, plan, track, and manage all your Agile software development projects in a single place. Trusted by over 36,000 websites worldwide, Jira is used to offer better prioritization, visibility, and increased productivity for project managers and teams.
PostgreSQL is an Object-Relational Database Management System that focuses on SQL compliance and extensibility. This Open-Source Relational Database supports both JSON & SQL querying and serves as the primary data source for numerous mobile, web, geospatial, and analytics applications.
In this article, you will see how you can connect Jira to PostgreSQL in a few simple steps.
Table of Contents
Introduction to Jira

- Jira is a very widely used issue tracking, bug tracking, project, and team management tool. Jira is used by software and business teams to track and report the progress of a project. It was developed by Atlassian Corporation.
- The tool aims to improve the visibility, predictability, and resource allocation of a project.
- Jira Service Management, Jira Software, and Jira Work Management come with built-in project templates for various use cases.
- Since these products can seamlessly integrate for a diverse set of business use cases, teams across organizations can collaborate to improve their efficiency.
Introduction to PostgreSQL

- Among open-source databases, PostgreSQL is considered to be one of the most advanced. It uses standard SQL to query relational data and for non-relational data, it uses JSON. It supports advanced data types, complex queries, and client-server network architecture.
- PostgreSQL is widely known for its Open-Source platform that supports all features of RDBMS. It also provides an array of features on top of RDBMS features like indexes, stored procedures, views, triggers, and atomicity features to name a few.
- This ensures the maintenance of ACID principles while doing away with the need to read locks.
Why connect Jira to PostgreSQL?
Establishing Jira to PostgreSQL provides a lot of functionalities, making it essential to connect these two technologies:
- A user can have access to all the data in the PostgreSQL database if all the data from the PostgreSQL be brought to one database.
- One can directly run all the SQL functionalities on the data and extract information in any desired manner.
- Once data is in Jira , it becomes easy to integrate with all other data visualization tools like Tableau or Power BI
Pre-requisites
Here we assume that you are connecting to a PostgreSQL server that is installed on your Jira server host system locally.
If you are trying to connect Jira to a remote PostgreSQL server, then you first need to configure your postgreql.conf and pg_hba.conf files to accept remote TCP connections from Jira’s IP address.
After modifying the two files, restart PostgreSQL.
Methods to Connect Jira to PostgreSQL Database
Here are the methods you can use to connect Jira to PostgreSQL in a seamless fashion:
- Method 1: Using Hevo to Connect Jira to PostgreSQL
- Method 2: Using Jira to Connect Jira to PostgreSQL
Method 1: Using Hevo to Connect Jira to PostgreSQL

Hevo Data, an Automated No-code Data Pipeline helps you directly transfer data from JIRA to PostgreSQL within minutes in a completely hassle-free & automated manner. Hevo allows you to maintain a replica of your Jira Data in PostgreSQL and provides automatic incremental updates without your intervention.
Hevo takes care of all your data preprocessing to connect Jira to PostgreSQL and lets you focus on key business activities and draw a much more powerful insight on how to generate more leads, retain customers, and take your business to new heights of profitability. It provides a consistent & reliable solution to manage data in real-time and always have analysis-ready data in your desired destination.
These are the steps involved in connecting Jira to PostgreSQL using Hevo:
- Step 1: Connect Hevo to Jira by providing the Pipeline Name, API Key, User Email ID, and website name.

- Step 2: Connect Jira to PostgreSQL by providing the Destination Name, Database Host, Database Port, Database User, Database Password, Database Name, and Database Schema.

As can be seen, you are simply required to enter the corresponding credentials to implement this fully automated data pipeline without using any code.
Check out what makes Hevo amazing:
- Secure: Hevo has a fault-tolerant architecture that ensures that the data is handled in a secure, consistent manner with zero data loss.
- Auto Schema Mapping: Hevo takes away the tedious task of schema management & automatically detects the schema of incoming data from Jira files and maps it to the destination schema.
- Quick Setup: Hevo with its automated features, can be set up in minimal time. Moreover, with its simple and interactive UI, it is extremely easy for new customers to work on and perform operations.
- Transformations: Hevo provides preload transformations through Python code. It also allows you to run transformation code for each event in the Data Pipelines you set up. Hevo also offers drag and drop transformations like Date and Control Functions, JSON, and Event Manipulation to name a few. These can be configured and tested before putting them to use for aggregation.
- Hevo Is Built To Scale: As the number of sources and the volume of your data grows, Hevo scales horizontally, handling millions of records per minute with very little latency.
- Incremental Data Load: Hevo allows the transfer of data that has been modified in real-time. This ensures efficient utilization of bandwidth on both ends.
- Live Support: The Hevo team is available round the clock to extend exceptional support to its customers through chat, email, and support calls.
With continuous real-time data movement, Hevo helps you combine your data from JIRA along with your other data sources and seamlessly load it into PostgreSQL with a no-code, easy to setup interface. Try our 14-day full access free trial!
Connect JIRA to PostgreSQL for FreeMethod 2: Using Jira to Connect Jira to PostgreSQL
Here are the steps you can implement to leverage Jira to establish a connection from Jira to PostgreSQL:
- Step 1: Create a Database User
- Step 2: Create a Database
- Step 3: Grant Privileges to the User
- Step 4: Configure the Jira Server
Step 1: Create a Database User
Create a database user that Jira will use to connect to PostgreSQL. For eg: ‘user_jira’.
Step 2: Create a Database
Create a database where Jira can store issues with Unicode collation. For eg: ‘database_jira’.
You can create a database using the following command:
CREATE DATABASE database_jira WITH ENCODING 'UNICODE' LC_COLLATE 'C' LC_CTYPE 'C' TEMPLATE template0;You can also use the command line:
$ createdb -E UNICODE -l C -T template0 database_jiraStep 3: Grant Privileges to the User
This will allow the user to connect to PostgreSQL, create tables, and write to them.
GRANT ALL PRIVILEGES ON DATABASE <Database Name> TO <Role Name>Step 4: Configure the Jira Server
There are two methods that you can use to configure the Jira server to connect it to PostgreSQL.
Case 1: Using the Jira Setup Wizard
- In the first case, when you are accessing Jira for the first time after installation, you will see ‘Configure Language and Database’ on the screen.
- Set Database Connection to My own database and Database Type to PostgreSQL.
- Fill out the fields, test your connection, and save as shown below.
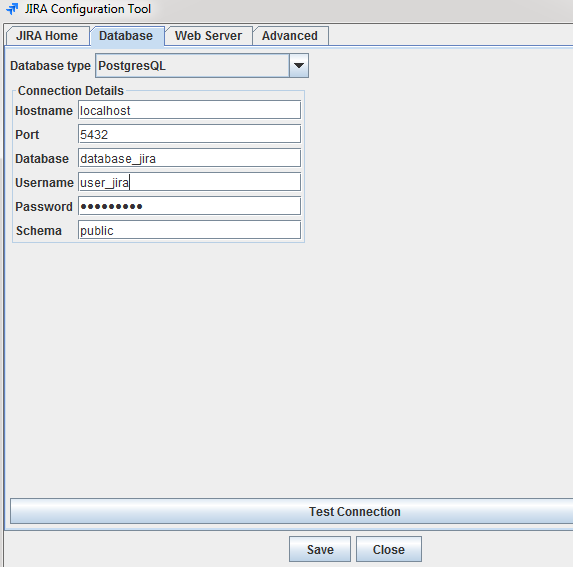
Here is a short description of the Database Connection Fields:
- Hostname: Here you enter the name/ IP address of the machine where the PostgreSQL server is installed.
- Port: Here you can just use the default port.
- Database: We created a PostgreSQL database above with the name ‘database_jira’ in Step 2. This is the database where Jira will save data.
- Username: We created a user called ‘user_jira’ in Step 1. This is the user for Jira to connect to the database server.
- Password: This is the user’s password for authentication.
- Schema: This is the schema that the database uses. The default schema is ‘public’. Schema names should be in lower-case only.
Case 2: Using the Jira Configuration File
- In the second case, if you already have a Jira instance, open a command prompt, move to the ‘bin’ folder in the Jira installation folder and run config.bat. (This is for Windows. For Linux/Unix, execute config.sh file).
C:UsersMasterAtlassianJIRAbin>config.bat- Look for the Database tab. Navigate to it, set PostgreSQL as the Database type.
- Fill out the fields, test your connection, and save as shown below.

- Finally, restart Jira.
That is it. You have successfully connected Jira to PostgreSQL!
All the changes are saved to your dbconfig.xml file in the Jira home folder. All the details of database connections are defined in this file. After you connect to the database, your dbconfig.xml file will look like this:
<?xml version="1.0" encoding="UTF-8"?>

<jira-database-config>
  <name>defaultDS</name>
  <delegator-name>default</delegator-name>
  <database-type>postgres72</database-type>
  <schema-name>public</schema-name>
  <jdbc-datasource>
    <url>jdbc:postgresql://localhost:5432/database_jira</url>
    <driver-class>org.postgresql.Driver</driver-class>
	<username>user_jira</username>
	<password>******</password>
    <pool-min-size>20</pool-min-size>
    <pool-max-size>20</pool-max-size>
    <pool-max-wait>30000</pool-max-wait>
    <validation-query>select 1</validation-query>
    <min-evictable-idle-time-millis>4000</min-evictable-idle-time-millis>
	<time-between-eviction-runs-millis>5000</time-between-eviction-runs-millis>
    <pool-max-idle>20</pool-max-idle>
    <pool-remove-abandoned>true</pool-remove-abandoned>
    <pool-remove-abandoned-timeout>300</pool-remove-abandoned-timeout>
	<pool-test-on-borrow>false</pool-test-on-borrow>
    <pool-test-while-idle>true</pool-test-while-idle>
  </jdbc-datasource>
</jira-database-config>
Limitations of Using Jira to Connect Jira to PostgreSQL
The above method of using Jira to set up the Jira to PostgreSQL connection contains the following limitations:
- It will require a lot of time and resources on your part. Moreover, the process of creating data replications manually is error-prone.
- Your data in Jira will change at periodic intervals and you will need to manually update that data in your PostgreSQL every time there is a new update.
- You will have to manually debug any type of error in your data transfer process. Furthermore, a custom-coded data solution will require regular maintenance and updates.
Conclusion
- The article introduced you to Jira and PostgreSQL and provided 2 methods to connect Jira to PostgreSQL.
- The manual method needs you to be proficient with databases to perform data transformations. In the event of changes in the API of Jira, you might end up with data loss and it requires expertise and constant monitoring.
- Also, the data you get won’t be real-time and you need to write extra code to get data real-time.
- All of this will affect your project’s deadline and create a lot of unnecessary distractions from your core business.
Share with us in the comments what you think about connecting Jira to PostgreSQL!

Share it with your connections.
-
 Share To X
-
 Share To LinkedIn
-
 Share To Facebook
-
 Copy Link


