


Data is your business’s lifeblood. Analyzing business data can help you gain insights to generate reports and create a strategic business plan. If you have large datasets in JSON format, consider migrating them to SQL Server.
SQL Server enhances data analysis through its orderly storage structure. You can optimize data querying by accessing JSON data stored in tables, rows, and columns. This article will discuss JSON SQL Server migration methods for quickly moving your data.
Let’s look at some methods to load JSON file to SQL Server.
Table of Contents
Overview of JSON
JSON is a formatted data text used to interchange information between varied web applications, servers, or different software. It is easy to read, lightweight, and language-independent. Many programming languages have built-in tools for serializing and deserializing the JSON data, making it easy for developers to format and modify the data.
Overview of SQL Server
SQL Server is a database that supports various data types. It allows users to store their data in tables, which is helpful during data querying and manipulation. The database also supports machine learning models and algorithms, which are helpful for predictive analysis. SQL Server database smoothly integrates with Microsoft products to enhance the scalability of your data.
Methods to Migrate Data from JSON to SQL Server
JSON documents sometimes consist of sub-elements or hierarchical data that you can’t easily map into the SQL database. Let’s learn how to load JSON file in SQL Server using different methods.
Method 1: JSON SQL Server Data Migration With Hevo
Step 1: Configure REST API to Set JSON as Your Source
To load JSON file to SQL Server using Hevo, you must select a parsing strategy in the last step of creating a pipeline so that the JSON data is easily readable. For advanced setups, explore SQL Server REST API integration techniques.
Prerequisites
- The location or the REST API endpoint should be available to load the data.
- To authenticate your REST API source, you must provide credentials, including your username, password, and API key.
- You should have a basic knowledge of JSONPATH and JSONPATH expressions.
- You should have a Team Administrator, Pipeline Administrator, or Team Collaborator role in Hevo.
Select REST API as Your Source Type
- Click on PIPELINE in the Navigation Bar.
- Select +CREATE from the Pipeline View List.
- On the Select Source Type page, choose REST API as your source.

To learn more about configuring the source, learn from our documentation page.
Specific the following on the Configure REST API source page-
- Specify the name of your pipeline within 255 characters.
- Set up your source as REST API.
- Specify the data root or path from where you want to replicate the data.
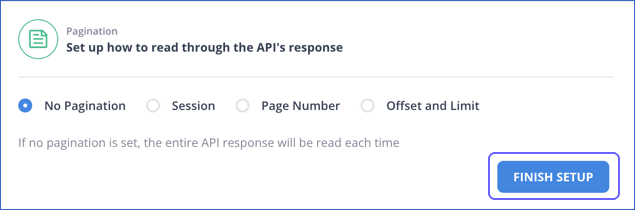
- Select a Pagination Method.
- Click on FINISH SETUP.
Step 2: Construct a Connection for Your REST API Source Endpoint
To set up a connection to your REST API endpoint, you must specify the following:
- Method: There are two methods for requesting data:
- Get Method (Default): This is an HTTP method for requesting data from your API endpoint.
- Post Method: This HTTP method sends data to your REST API source. You must specify the Request Body, including the data sent to your endpoint. The data needs to be present in valid JSON or form data.
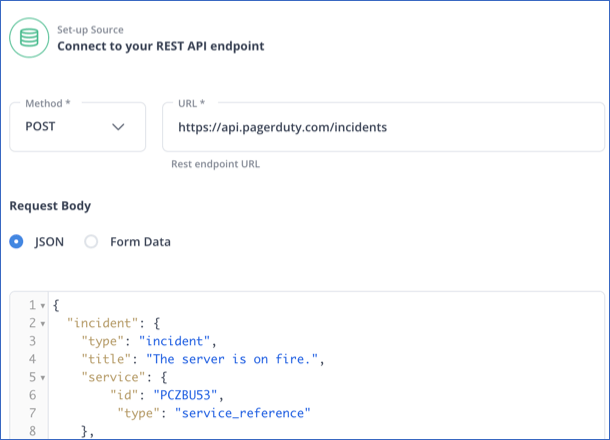
- Specify the URL of your REST API source.
- Specify the authentication method. To learn how to select the authentication method that suits your needs, read the Hevo documentation to specify the type of authentication method.
Set up a Data Replication Path and Select Pagination
- Specify the Data Root
To specify the data replication path, you must select the data root of the JSON PATH expression for the API response element. Hevo suggests a root for the data based on the URL you entered. You can provide a data root or choose from the suggested roots.
If you enter a data root, check its validity through CHECK PARSED RESPONSE. Then, read the Hevo documentation and specify the root of the data to determine which is best.
- Select Pagination
Pagination allows you to read your data in smaller parts. To see what you expect, you must check the API response for all Pagination methods except for No Pagination. To set up pagination, correct the pagination method for your data source. Read Set up pagination.
You can refer to the Hevo documentation to learn more about configuring REST API as the source.
Step 3: Select the SQL Server as Your Destination
Prerequisites
- Your SQL Server should be running.
- Your host SQL Server’s DNS or IP address should be available.
- You must grant the critical privileges to your database user.
- You should have an assigned administrator role, such as a Team Collaborator.
You must implement a few optional steps before making SQL Server your destination in the data pipeline.
- Set up your SQL Server Instance.
- Allow access to your SQL Server Instance.
- Create a database for your SQL Server Instance.
You can refer to the Hevo documentation to know more about setting SQL Server as the destination of your data pipeline.
Create a Database User for Your SQL Server
- Create a login user.
- Login to your SQL Server instance as a master user through an SQL client tool.
- Enter the following query to access the particular database where you want to add your user-
USE <database_name>
GO
- Enter the following command to generate a login user-
CREATE LOGIN [<login_name>] WITH PASSWORD=N'<strong_password>', DEFAULT_DATABASE=[<database_name>]
GO
Enter the following command to connect the database to your login user-
CREATE USER [<username>] FOR LOGIN [<login_name>]
GO
Create a Database User for Your SQL Server
- Log in as a login user to your SQL Server instance using the SQL client tool.
- Execute the following command to access the database that you created for your login user-
USE <database_name>
GO
Execute the following command to grant privileges-
GRANT ALTER, SELECT, INSERT, UPDATE ON SCHEMA::<schema_name> TO <username>
GO
GRANT CREATE TABLE, INSERT, SELECT, UPDATE ON DATABASE::<database_name> to <username>
GO
Configure your SQL Server Connection Settings
- Click on the DESTINATION tab from the Navigation bar.
- Click on +CREATE on the Destination List View.
- On the Add Destination Page, select SQL Server as your destination.
- Specify the required fields on the configuration settings page
- Click on TEST CONNECTION. This is enabled after you specify all the mandatory fields.
- Click on SAVE & CONTINUE.
Read more, If you want to know how to configure destination when you export data from SQL Server to JSON file.
Method 2: JSON to SQL Server Data Integration Using OPENROWSET (Bulk)
This method will tell you how to insert JSON data in table in SQL Server.
Prerequisites
- You should know about NVACHAR data type.
- Must have a basic understanding of JSON and SQL Server.
- Must be familiar with JSON data, JSON String, JSON Object, and JSON arrays.
- You should be familiar with built-in JSON functions and operators such as ISJSON(), JSON_VALUE(), and JSON_QUERY().
Functionality of OPENROWSET (Bulk) Function
- You can use the OPENROWSET (Bulk) function to read the data from a file.
- The Bulk function returns data as a JSON table in SQL Server, with a single column containing all the data in the file.
- OPENROWSET (Bulk) can return the entire content of a file in the form of text value.
- The syntax will read content from a file and return the value in BulkColumn.
<code>SELECT * FROM OPENROWSET (BULK 'file_path', SINGLE_CLOB) as correlation_nameStep 1: Inserting a Query to read JSON Data
The first step involves reading the JSON file from your file system using the OPENROWSET (Bulk) function. This function loads the content of the JSON file as text into SQL Server.
SELECT * FROM OPENROWSET (BULK 'E:\file1.json', SINGLE_CLOB) AS import;This Query can be explained as below:
E:\file1.json: This is the location on your computer where the JSON file is stored. It’s the file that contains the data you want to bring into SQL Server.
SINGLE_CLOB: This tells SQL Server to treat the entire contents of the JSON file as a single large block of text, allowing it to be read and processed as one unit.
import: This is just a label we give to the result. It’s like a temporary name for the data being brought in from the JSON file, so we can refer to it in the query.
Step 2: Convert JSON Data to a Table
To convert JSON data into a table, you need to:
- Declare a variable for passing the JSON data.
- Store the data you imported into BulkColumn in the variable you created.
- Use OPENJSON() to convert JSON table to SQL Server table.
- Use the WITH clause along with the function to define the data parameters.
Here’s the query for the same:
Declare @JSON varchar(max)
SELECT @JSON=BulkColumn
FROM OPENROWSET (BULK 'E:\file1.json', SINGLE_CLOB) import
SELECT * FROM OPENJSON (@JSON)
WITH  (
   [Firstname] varchar(20),
   [Lastname] varchar(20),
   [Gender] varchar(20),
   [AGE] int );
Limitations of JSON SQL Server Migration Using OPENROWSET() Function
- Parsing nested JSON arrays using the OPENJSON() function can be time-consuming.
- OPENJSON() supports only limited data types, such as numbers, strings, and booleans. Data types like dates or objects require technical expertise or manual intervention.
- The functionality of an OPENROWSET (Bulk) function depends on the version of SQL Server and impacts operations such as data import/export, data mapping, etc.
JSON SQL Server Use Cases
- When you save JSON to SQL Server, it facilitates better data storage, data querying, and scalability.
- JSON data files consist of data from different sources, such as APIs and web applications. Inserting JSON table into SQL Server lets you centralize your data, improving its overall performance.

Final Word
JSON SQL Server data integration helps you centralize your source data and perform analysis correctly. Through Hevo’s zero-code data transformation pipeline, you can generate profound insights for your business faster.
Want to take Hevo for a spin? Try Hevo’s 14-day free trial and experience the feature-rich Hevo suite first hand. You can also have a look at the unbeatable Hevo pricing that will help you choose the right plan for your business needs.
Learn More About how to load data from JSON to Redshift.
FAQs (Frequently Asked Questions)
1. Can you use SQL queries to manipulate JSON data?
Many databases today, such as MySQL, SQL Server, and PostgreSQL, have built-in support for JSON data. You can store your JSON data in your favored database and use SQL queries to analyze and manipulate data in your JSON file.
2. Can we store JSON in SQL Server?
Yes, you can store JSON in SQL Server. It is typically stored in columns with the NVARCHAR data type, and you can use JSON functions to parse and query the data.
3. Is there a JSON data type in SQL Server?
No, SQL Server does not have a dedicated JSON data type. Instead, JSON is stored as NVARCHAR, and SQL Server provides functions to work with JSON data.

Share it with your connections.
-
 Share To X
-
 Share To LinkedIn
-
 Share To Facebook
-
 Copy Link


