


Unlock the full potential of your Klaviyo data by integrating it seamlessly with Redshift. With Hevo’s automated pipeline, get data flowing effortlessly—watch our 1-minute demo below to see it in action!
Are you looking to move your data from Klaviyo to Redshift in a few minutes? This article explains two easy steps to transfer data from Klaviyo to Amazon Redshift. With Hevo, make this process effortless – no coding required!
Table of Contents
What is Klaviyo?

Klaviyo is the best solution for seamlessly integrating with Shopify-powered online stores. It offers email automation and customer database management features that help you retain and engage lost customers. The platform is simple to use and ideal for agencies.
Klaviyo has robust tools, including site tracking, segmentation, 360-degree customer profiles, drag-and-drop email designs, custom activity fields, 1-click integrations, and ROI-based reporting.
What is Redshift?

AWS Redshift is an Amazon Web Services data warehouse service. It’s commonly used for large-scale data storage and analysis and large database migrations.
Amazon Redshift provides lightning-fast performance and scalable data processing solutions.Redshift also offers a number of data analytics tools, as well as compliance features, and artificial intelligence and machine learning applications.
When integrated, moving data from Klaviyo to Redshift could solve some of the biggest data problems for businesses.
Hevo Data offers a No-Code Data Pipeline that can automate your data transfer process, hence allowing you to focus on other aspects of your business like Analytics, Customer Management, etc.
Start a free trial and:
- Enjoy Fully Automated Pipelines
- Benefit from Real-Time Data Transfer
- Get Live Support with 24/5 chat from actual engineers, not bots!
Take Hevo’s 14-day free trial to experience a better way to manage your data pipelines. Discover why top companies like Postman choose Hevo to build their data pipelines.
Get Started with Hevo for FreeSetting up Klaviyo to Redshift Integration
- Method 1: Using Hevo Data to Integrate Klaviyo to Redshift [No Code Solution]
- Method 2: Using Custom Code to Move Data from Klaviyo to Redshift
Method 1: Using Hevo Data to Integrate Klaviyo to Redshift [No-Code Solution]
Step 1: Configure Klaviyo

- Configure Klaviyo as the Source in your Pipeline by following the steps below:
- Step 1.1: In the Asset Palette, select PIPELINES.
- Step 1.2: In the Pipelines List View, click + CREATE.
- Step 1.3: Select Klaviyo on the Select Source Type page.
- Step 1.4: Set the following in the Configure your Klaviyo Source page:
- Pipeline Name: Give your Pipeline a unique name.
- Private API Key: Your Klaviyo account’s private API key.
- Historical Sync Duration: The time it takes to ingest historical data.
- Step 1.5: TEST & CONTINUE is the button to click.
Step 2: Configure Redshift
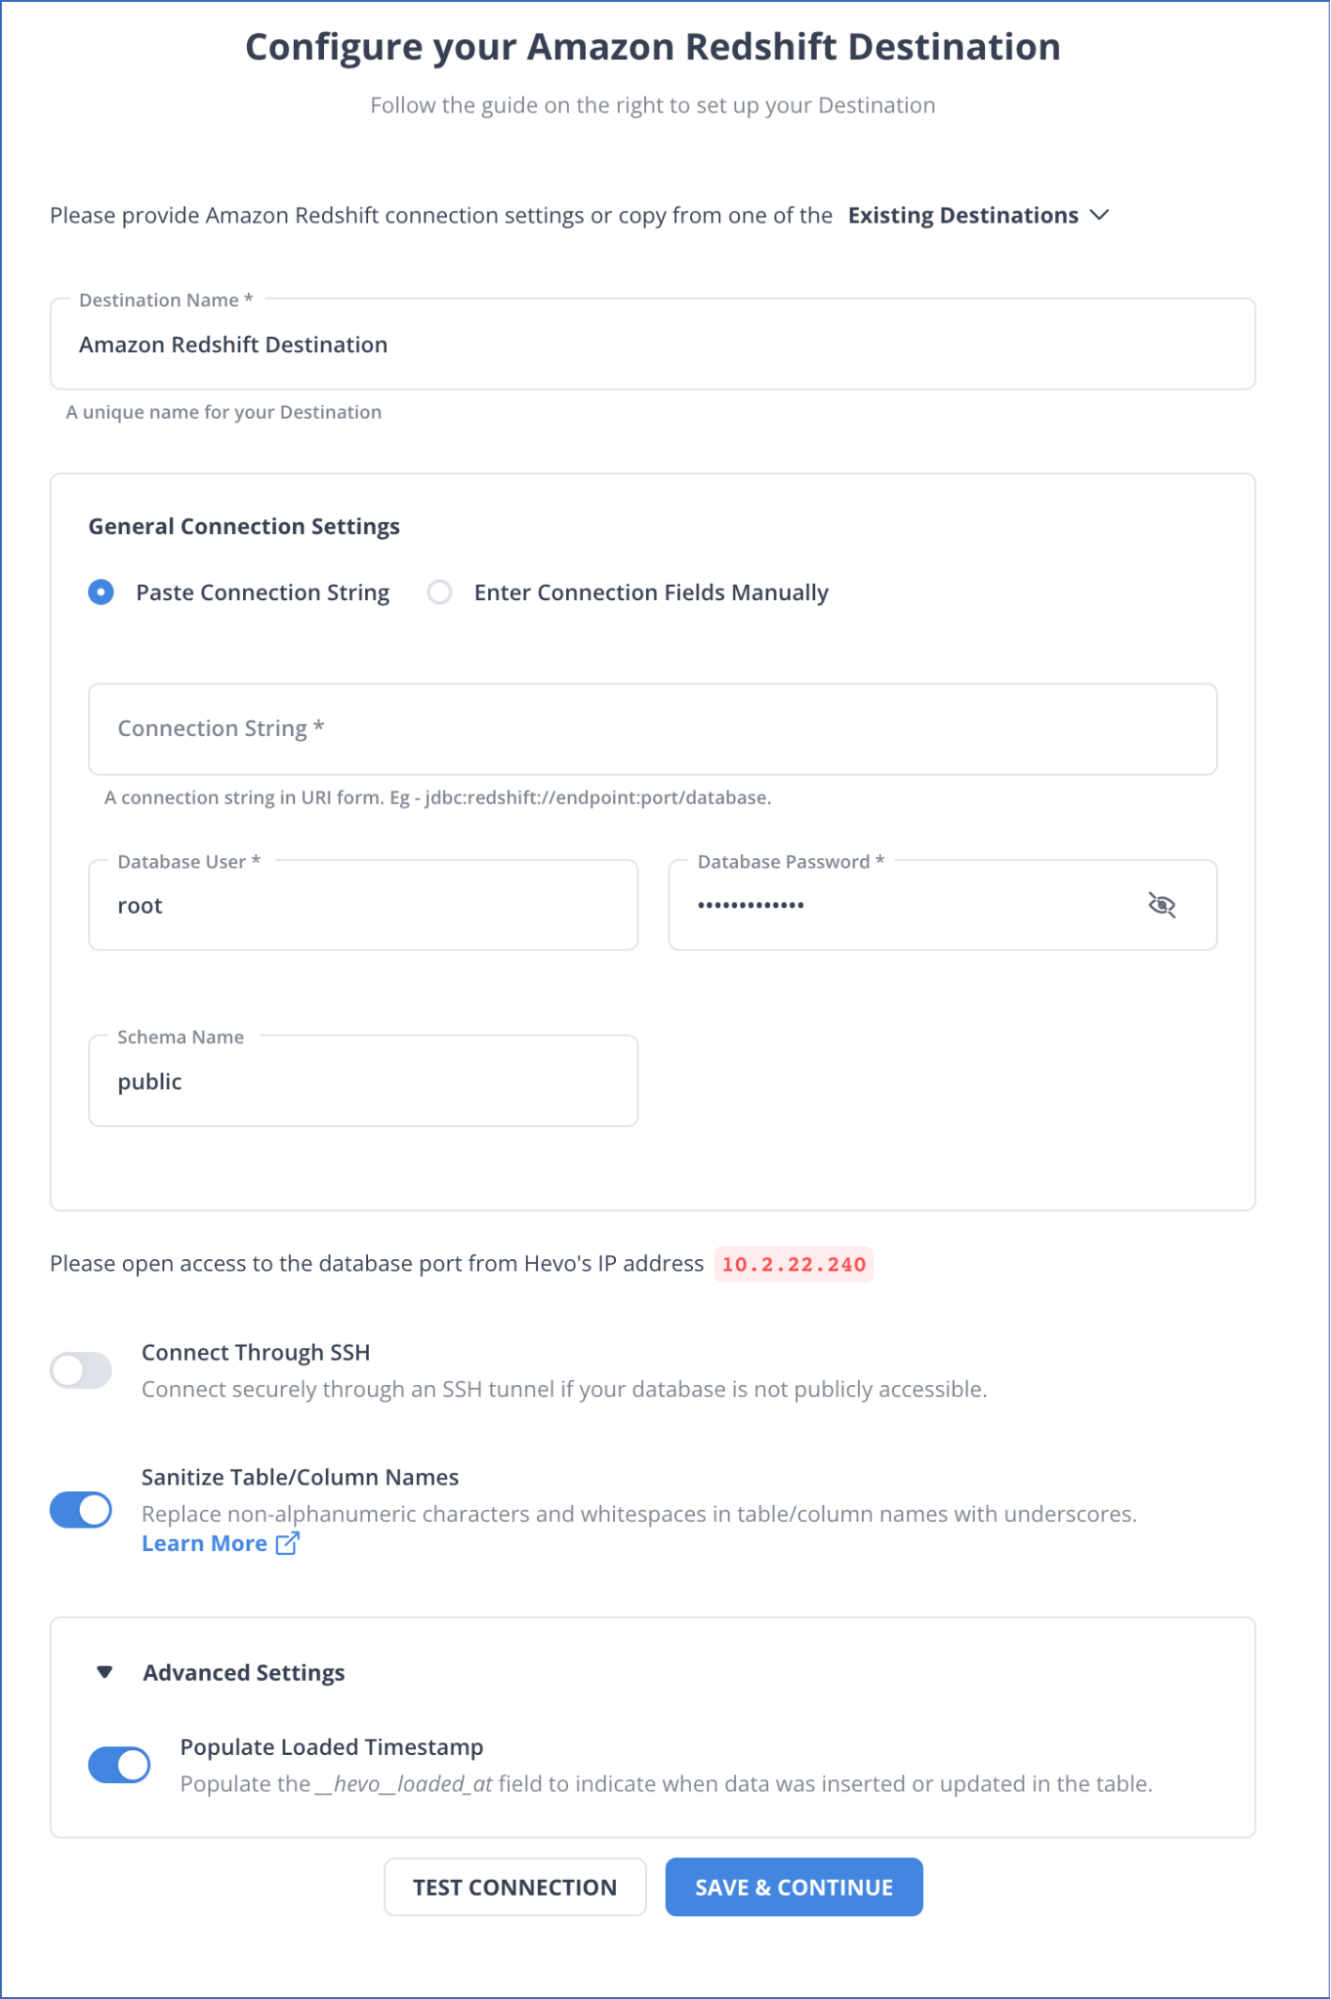
- To set up Amazon Redshift as a destination in Hevo, follow these steps:
- Step 2.1: In the Asset Palette, select DESTINATIONS.
- Step 2.2: In the Destinations List View, click + CREATE.
- Step 2.3: Select Amazon Redshift from the Add Destination page.
- Step 2.4: Set the following parameters on the Configure your Amazon Redshift Destination page:
- Destination Name: A unique name for your Destination.
- Database Cluster Identifier: Amazon Redshift host’s IP address or DNS.
- Database Port: The port on which your Amazon Redshift server listens for connections. Default value: 5439
- Database User: A user with a non-administrative role in the Redshift database.
- Database Password: The password of the user.
- Database Name: The name of the Destination database where data will be loaded.
- Database Schema: The name of the Destination database schema. Default value: public.
- Step 2.5: Click Test Connection to test connectivity with the Amazon Redshift warehouse.
- Step 2.6: Once the test is successful, click SAVE DESTINATION.
Why you should Integrate Automatically using Hevo?
- Smooth Schema Management: Hevo takes away the tedious task of schema management & automatically detects the schema of incoming data and maps it to your schema in the desired Data Warehouse.
- Exceptional Data Transformations: Best-in-class & Native Support for Complex Data Transformation at fingertips. Code & No-code Flexibility is designed for everyone.
- Quick Setup: Hevo with its automated features, can be set up in minimal time. Moreover, with its simple and interactive UI, it is extremely easy for new customers to work on and perform operations.
- Built To Scale: As the number of sources and the volume of your data grows, Hevo scales horizontally, handling millions of records per minute with very little latency.
- Live Support: The Hevo team is available round the clock to extend exceptional support to its customers through chat, email, and support calls.

Method 2: Using Custom Code to Move Data from Klaviyo to Redshift
This method explains how to get data from Klaviyo and migrate Klaviyo to Redshift.
Step 1: Getting Data from Klaviyo
- Developers can access data on metrics, profiles, lists, campaigns, and templates using Klaviyo’s REST APIs. You can refine the information returned by using two to seven optional parameters in each of these APIs. A simple call to the Klaviyo Metrics API to retrieve data, for example, would look like this:
GET https://a.klaviyo.com/api/v1/metrics- As a response, the GET request returns a JSON object containing all of the fields from the specified dataset. For any given record, all fields might not be available. The JSON may appear as follows:
{
  "end": 1,
  "object": "$list",
  "page_size": 50,
  "start": 0,
  "total": 2,
  "data": [
    {
      "updated": "2017-11-03 17:28:09",
      "name": "Active on Site",
      "created": "2017-11-03 17:28:09",
      "object": "metric",
      "id": "3vtCwa",
      "integration": {
        "category": "API",
        "object": "integration",
        "id": "4qYGmQ",
        "name": "API"
      }
    },
    {
      "updated": "2017-11-03 20:54:40",
      "name": "Added integration",
      "created": "2017-11-03 20:54:40",
      "object": "metric",
      "id": "8qYK7L",
      "integration": {
        "category": "API",
        "object": "integration",
        "id": "4qYGmQ",
        "name": "API"
      }
    ]
  }
Step 2: Loading Data into Redshift
You can use Redshift’s CREATE TABLE statement to define a table that will receive all of the data once you’ve identified the columns you want to insert.
Create Table Command
The creation of tables in Redshift is similar to how you create tables in other databases. Table constraints, column constraints, and attributes, such as column attributes and table attributes, are all defined in the create table syntax.
Syntax
CREATE [ [LOCAL ] { TEMPORARY | TEMP } ] TABLE
[ IF NOT EXISTS ] table_name
( { column_name data_type [column_attributes] [ column_constraints ]
  | table_constraints
  | LIKE parent_table [ { INCLUDING | EXCLUDING } DEFAULTS ] }
  [, ... ]  )
[ BACKUP { YES | NO } ]
[table_attribute]

where column_attributes are:
  [ DEFAULT default_expr ]
  [ IDENTITY ( seed, step ) ]
  [ GENERATED BY DEFAULT AS IDENTITY ( seed, step ) ]
  [ ENCODE encoding ]
  [ DISTKEY ]
  [ SORTKEY ]
  [ COLLATE CASE_SENSITIVE | COLLATE CASE_INSENSITIVE  ]

and column_constraints are:
  [ { NOT NULL | NULL } ]
  [ { UNIQUE  |  PRIMARY KEY } ]
  [ REFERENCES reftable [ ( refcolumn ) ] ]

and table_constraints  are:
  [ UNIQUE ( column_name [, ... ] ) ]
  [ PRIMARY KEY ( column_name [, ... ] )  ]
  [ FOREIGN KEY (column_name [, ... ] ) REFERENCES reftable [ ( refcolumn ) ]


and table_attributes are:
  [ DISTSTYLE { AUTO | EVEN | KEY | ALL } ]
  [ DISTKEY ( column_name ) ]
  [ [COMPOUND | INTERLEAVED ] SORTKEY ( column_name [,...]) |  [ SORTKEY AUTO ] ]
  [ ENCODE AUTO ]
Export Table
After you’ve created a table, you might want to migrate your data to Redshift by using INSERT statements to add data row by row. Redshift isn’t designed to insert data one row at a time. If you have a large amount of data to insert, save it to Amazon S3 and then load it into Redshift with the COPY command.
Insert Command
A query can be used instead of the ‘values’ in the Redshift INSERT statement. If the query’s results are compatible with the table column structure, Redshift will execute the query and insert all of the query’s resultant rows.
Syntax
INSERT INTO table_name [ ( column [, ...] ) ]
{DEFAULT VALUES |
VALUES ( { expression | DEFAULT } [, ...] )
[, ( { expression | DEFAULT } [, ...] )
[, ...] ] |
query }
Copy Command
A COPY operation can be performed with as few as three parameters: a Table Name, a Data Source, and Data Access Authorization.
Amazon Redshift extends the COPY command’s functionality to allow you to load data in a variety of formats from multiple data sources, control data access, manage data transformations and manage the load operation.
Syntax
COPY table-name
[ column-list ]
FROM data_source
authorization
[ [ FORMAT ] [ AS ] data_format ]
[ parameter [ argument ] [, ... ] ]
Common Challenges Faced
- It’s not a good idea to duplicate all of your data every time your records are updated. This would be painfully slow and resource-intensive.
- Instead, identify key fields that your script can use to bookmark its progress through the data and return to as it searches for updated data. It’s best to use auto-incrementing fields like updated at or created at for this.
- Once you’ve added this functionality, you can set up your script as a
<strong>Cron job</strong>or a continuous loop to get new data as it appears in Klaviyo. - As with any code, you must maintain it once you’ve written it. You may need to change the script if Klaviyo changes its API or if the API sends a field with a datatype your code doesn’t recognize. You must undoubtedly do so if your users require slightly different information.
Key Takeaways
- This article talks about the distinct ways for setting up Klaviyo to Redshift integration. It also gives an overview of Klaviyo and Redshift.
- Depending on the particular use case and data requirement, you may choose to replicate data from Klaviyo to Redshift using one of the approaches detailed in this article.
- You may build a custom code-based data pipeline to transfer data from Klaviyo to Redshift data warehouse.
- The better alternative is to use an automated ETL tool like Hevo to move data for analysis quickly.
Hevo allows you to transfer data from 150+ sources (including 40+ Free Sources) such as Klaviyo and Cloud-based Data Warehouses like Snowflake, Google BigQuery, Amazon Redshift, etc. It will provide you with a hassle-free experience and make your work life much easier.
Want to take Hevo for a spin?
Sign up for a 14-day free trial and experience the feature-rich Hevo suite first hand.
Let us know your experience of connecting Klaviyo to Redshift in the comment section below. You can also have a look at the unbeatable pricing that will help you choose the right plan for your business needs.
FAQs
1. How do I transfer data to Redshift?
Create a manifest file containing the data. Use Amazon’s COPY command to load data from sources like S3, DynamoDB, or a local system. You can also use data integration tools like Hevo to automate the process.
2. How do I connect to Redshift database?
To connect to a Redshift database, set up Amazon Redshift using your AWS account. You can also find its connection details and use a SQL client or tool like psql or SQL Workbench/J, and provide the required details. Alternatively, you can use data integration tools like Hevo for a no-code connection.
3. How do I import data from CSV to Redshift?
To import data from a CSV to Redshift, upload the CSV file to an Amazon S3 bucket. You can then use the COPY command in Redshift to load the data into your table by specifying the S3 path and file format.

Share it with your connections.
-
 Share To X
-
 Share To LinkedIn
-
 Share To Facebook
-
 Copy Link


